jump start VOLVO XC90 TWIN ENGINE 2019 Owners Manual
[x] Cancel search | Manufacturer: VOLVO, Model Year: 2019, Model line: XC90 TWIN ENGINE, Model: VOLVO XC90 TWIN ENGINE 2019Pages: 697, PDF Size: 10.33 MB
Page 12 of 697
10
STARTING AND DRIVING
Starting the vehicle434
Switching off the vehicle436
Ignition modes437
Selecting ignition mode438
Brake functions438
Brakes439
Brake Assist System441
Braking on wet roads441
Braking on salted roads441
Maintenance of the brake system442
Parking brake442
Activating and deactivating the park-ing brake443
Settings for automatically activatingthe parking brake444
Parking on a hill444
Parking brake malfunction445
Auto-hold brakes446
Activating and deactivating Auto-hold at a standstill446
Hill Start Assist447
Braking assist after a collision447
Transmission448
Gear selector positions for automatictransmissions449
Using the steering wheel paddles* toshift451
Shiftlock452
The kickdown function452
All Wheel Drive (AWD)452
Drive systems453
Starting and stopping the combus-tion engine in Twin Engine vehicles454
Drive modes454
Changing drive mode459
Energy distribution in hybrid modeusing map data*460
Leveling control* and suspension461
Leveling control settings*464
Low Speed Control464
Activating and deactivating LowSpeed Control using the function button465
Hill Descent Control466
Activating and deactivating HillDescent Control using the functionbutton
467
Economical driving467
Using the electric motor only469
Factors affecting electric motor range469
"Hold" and "Charge" functions471
Preparing for a long trip472
Winter driving472
Driving through standing water473
Opening/closing the fuel filler door474
Refueling475
Fuel476
Octane rating477
Emission controls479
Overheating of engine and transmission479
Battery drain480
Jump starting using another battery481
Detachable towbar*482
Driving with a trailer483
Trailer Stability Assist*485
Checking trailer lights486
Towing using a towline487
Attaching and removing the towing eyelet488
Recovery489
HomeLink®*489
Programming HomeLink®*490
Using HomeLink®*491
Type approval for HomeLink®*492
Compass*493
Activating and deactivating the compass*493
Calibrating the compass*493
Page 438 of 697
||STARTING AND DRIVING
436
CAUTION
When starting in cold weather, the auto-
matic transmission may shift up at slightly
higher engine speeds than normal until
the automatic transmission fluid reaches
normal operating temperature.
Do not race a cold engine immediately
after starting. This could prevent fluids
from properly lubricating vital compo-
nents in the engine before it has reached
the proper operating temperature.
The engine should be idling when the
gear selector is moved. Never accelerate
until the gear is fully engaged. Accelerat-
ing rapidly before a gear is properly
engaged could lead to harder wear of
components.
To help prevent the transmission oil from
overheating, select P or N when idling at
a standstill for prolonged periods of time.
Related information
Switching off the vehicle (p. 436)
Ignition modes (p. 437)
Adjusting the steering wheel (p. 201)
Jump starting using another battery (p. 481)
Selecting ignition mode (p. 438) Switching off the vehicle
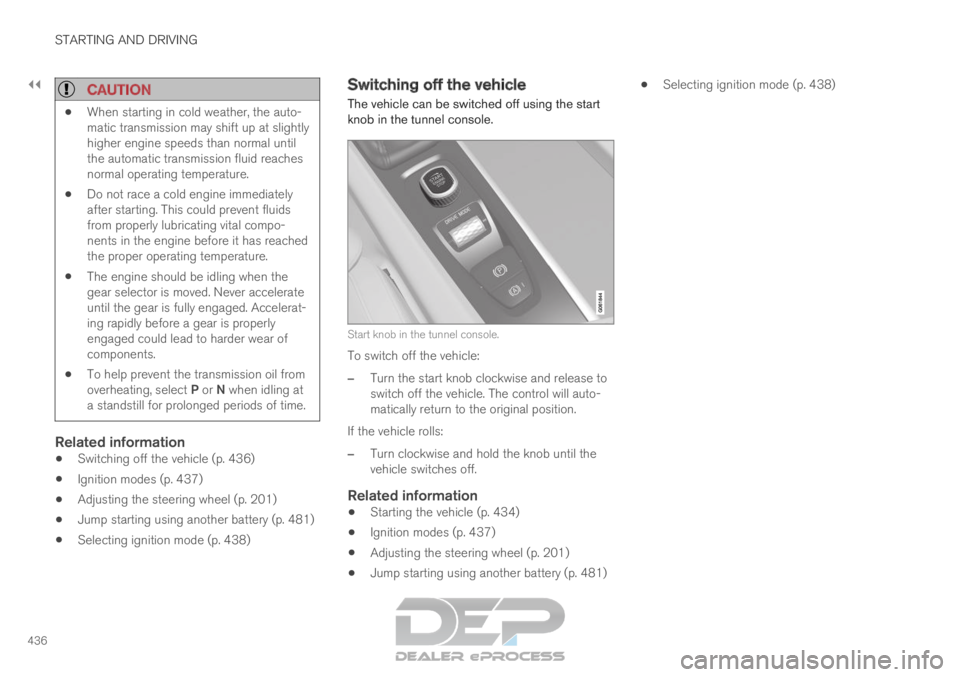
The vehicle can be switched off using the start
knob in the tunnel console.
Start knob in the tunnel console.
To switch off the vehicle:
– Turn the start knob clockwise and release to
switch off the vehicle. The control will auto-
matically return to the original position.
If the vehicle rolls:
– Turn clockwise and hold the knob until the
vehicle switches off.
Related information
Starting the vehicle (p. 434)
Ignition modes (p. 437)
Adjusting the steering wheel (p. 201)
Jump starting using another battery (p. 481)
Selecting ignition mode (p. 438)
Page 439 of 697
STARTING AND DRIVING
* Option/accessory.437
Ignition modes
The vehicle's ignition can be put in various
modes (levels) to make different functions availa-
ble.
To enable the use of a limited number of func-
tions when the engine is not running, the ignition
can be put in one of three different levels: 0, I
and II. These levels are referred to as "ignition
modes" in the Owner's Manual.
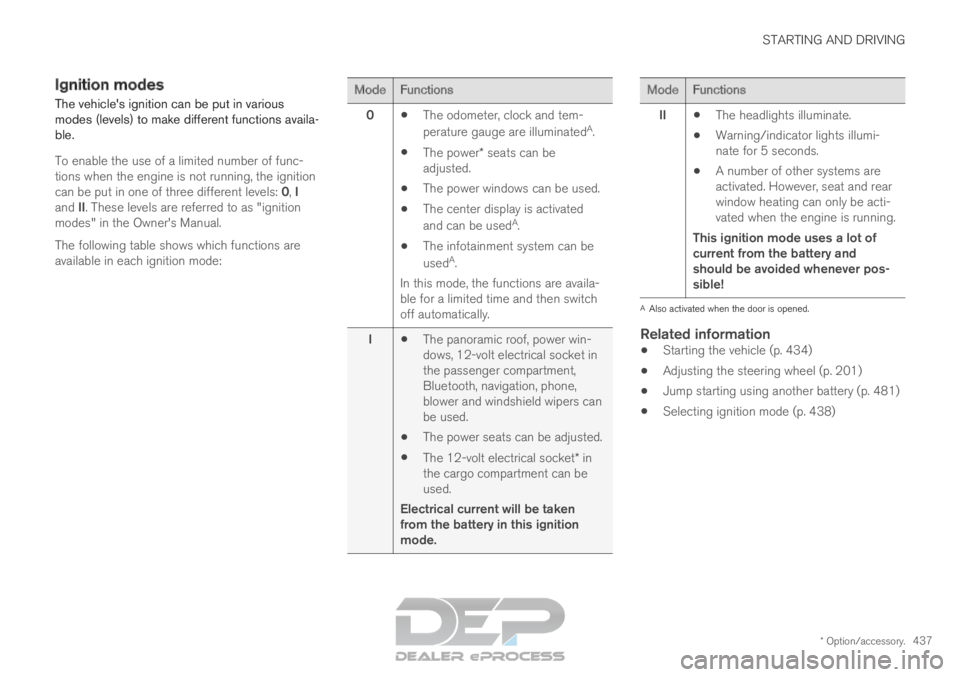
The following table shows which functions are
available in each ignition mode: Mode
Functions
0 The odometer, clock and tem-
perature gauge are illuminated A
.
The power* seats can be
adjusted.
The power windows can be used.
The center display is activated
and can be used A
.
The infotainment system can be
used A
.
In this mode, the functions are availa-
ble for a limited time and then switch
off automatically.
I The panoramic roof, power win-
dows, 12-volt electrical socket in
the passenger compartment,
Bluetooth, navigation, phone,
blower and windshield wipers can
be used.
The power seats can be adjusted.
The 12-volt electrical socket* in
the cargo compartment can be
used.
Electrical current will be taken
from the battery in this ignition
mode. Mode
Functions
II The headlights illuminate.
Warning/indicator lights illumi-
nate for 5 seconds.
A number of other systems are
activated. However, seat and rear
window heating can only be acti-
vated when the engine is running.
This ignition mode uses a lot of
current from the battery and
should be avoided whenever pos-
sible! A
Also activated when the door is opened.
Related information
Starting the vehicle (p. 434)
Adjusting the steering wheel (p. 201)
Jump starting using another battery (p. 481)
Selecting ignition mode (p. 438)
Page 440 of 697
STARTING AND DRIVING
438Selecting ignition mode
The vehicle's ignition can be put in various
modes (levels) to make different functions availa-
ble.
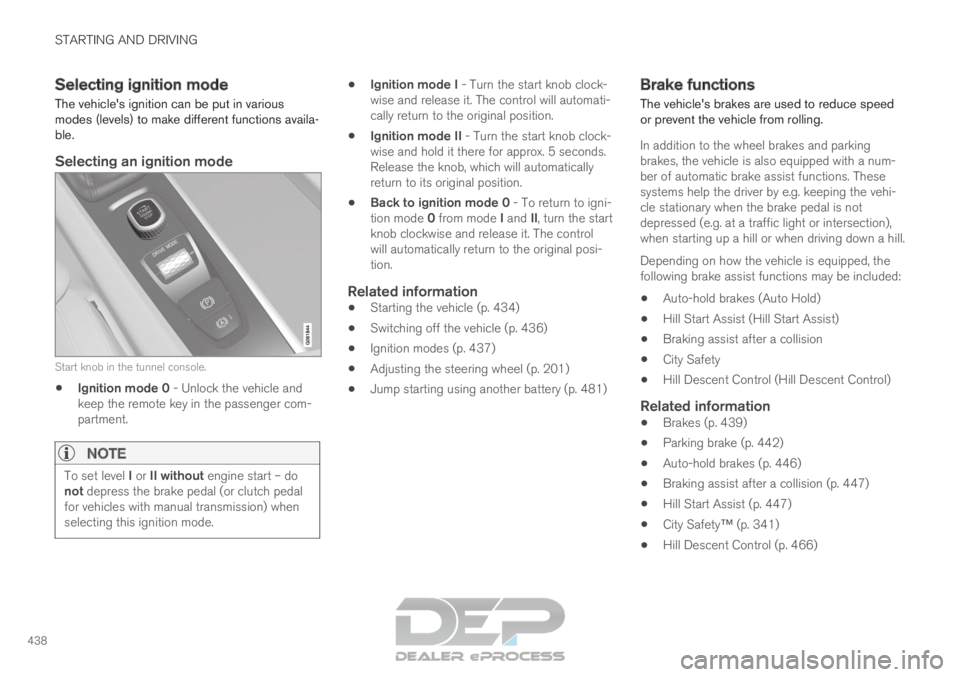
Selecting an ignition mode Start knob in the tunnel console.
Ignition mode 0 - Unlock the vehicle and
keep the remote key in the passenger com-
partment.
NOTE To set level I or II without engine start – do
not depress the brake pedal (or clutch pedal
for vehicles with manual transmission) when
selecting this ignition mode.
Ignition mode I - Turn the start knob clock-
wise and release it. The control will automati-
cally return to the original position.
Ignition mode II - Turn the start knob clock-
wise and hold it there for approx. 5 seconds.
Release the knob, which will automatically
return to its original position.
Back to ignition mode 0 - To return to igni-
tion mode 0 from mode I and II, turn the start
knob clockwise and release it. The control
will automatically return to the original posi-
tion.
Related information
Starting the vehicle (p. 434)
Switching off the vehicle (p. 436)
Ignition modes (p. 437)
Adjusting the steering wheel (p. 201)
Jump starting using another battery (p. 481) Brake functions
The vehicle's brakes are used to reduce speed
or prevent the vehicle from rolling.
In addition to the wheel brakes and parking
brakes, the vehicle is also equipped with a num-
ber of automatic brake assist functions. These
systems help the driver by e.g. keeping the vehi-
cle stationary when the brake pedal is not
depressed (e.g. at a traffic light or intersection),
when starting up a hill or when driving down a hill.
Depending on how the vehicle is equipped, the
following brake assist functions may be included:
Auto-hold brakes (Auto Hold)
Hill Start Assist (Hill Start Assist)
Braking assist after a collision
City Safety
Hill Descent Control (Hill Descent Control)
Related information
Brakes (p. 439)
Parking brake (p. 442)
Auto-hold brakes (p. 446)
Braking assist after a collision (p. 447)
Hill Start Assist (p. 447)
City Safety™ (p. 341)
Hill Descent Control (p. 466)
Page 483 of 697
STARTING AND DRIVING
}}
481
Jump starting using another battery
If the start battery is discharged, current from
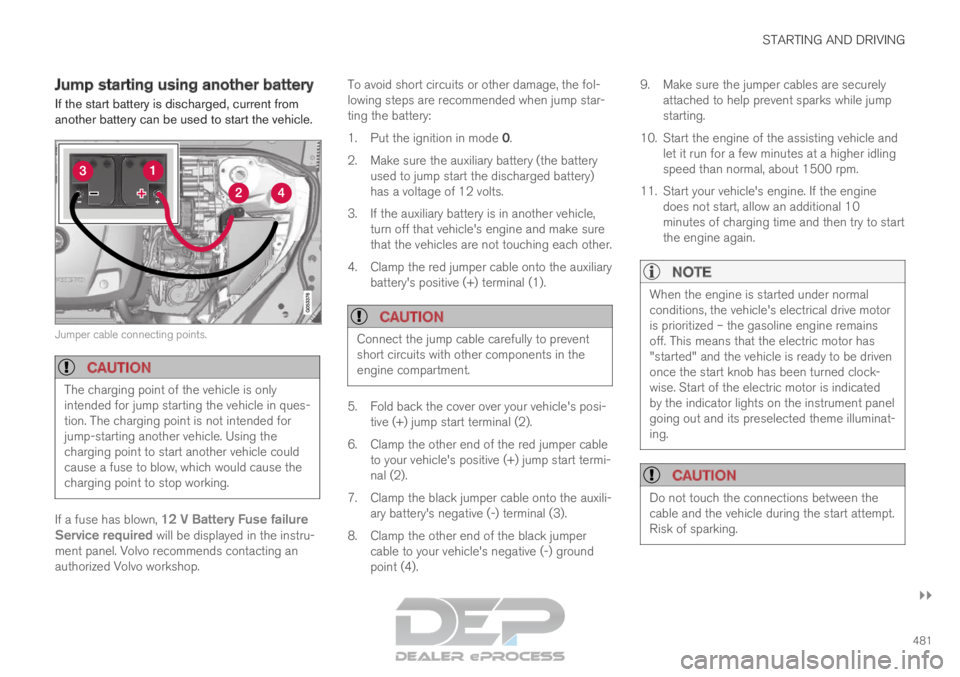
another battery can be used to start the vehicle. Jumper cable connecting points.
CAUTION
The charging point of the vehicle is only
intended for jump starting the vehicle in ques-
tion. The charging point is not intended for
jump-starting another vehicle. Using the
charging point to start another vehicle could
cause a fuse to blow, which would cause the
charging point to stop working.
If a fuse has blown, 12 V Battery Fuse failure
Service required will be displayed in the instru-
ment panel. Volvo recommends contacting an
authorized Volvo workshop. To avoid short circuits or other damage, the fol-
lowing steps are recommended when jump star-
ting the battery:
1.
Put the ignition in mode 0.
2.
Make sure the auxiliary battery (the battery
used to jump start the discharged battery)
has a voltage of 12 volts.
3. If the auxiliary battery is in another vehicle, turn off that vehicle's engine and make sure
that the vehicles are not touching each other.
4. Clamp the red jumper cable onto the auxiliary battery's positive (+) terminal (1).
CAUTION Connect the jump cable carefully to prevent
short circuits with other components in the
engine compartment.
5. Fold back the cover over your vehicle's posi-
tive (+) jump start terminal (2).
6.
Clamp the other end of the red jumper cable
to your vehicle's positive (+) jump start termi-
nal (2).
7. Clamp the black jumper cable onto the auxili- ary battery's negative (-) terminal (3).
8. Clamp the other end of the black jumper cable to your vehicle's negative (-) ground
point (4). 9. Make sure the jumper cables are securely
attached to help prevent sparks while jump
starting.
10. Start the engine of the assisting vehicle and let it run for a few minutes at a higher idling
speed than normal, about 1500 rpm.
11. Start your vehicle's engine. If the engine does not start, allow an additional 10
minutes of charging time and then try to start
the engine again.
NOTE When the engine is started under normal
conditions, the vehicle's electrical drive motor
is prioritized – the gasoline engine remains
off. This means that the electric motor has
"started" and the vehicle is ready to be driven
once the start knob has been turned clock-
wise. Start of the electric motor is indicated
by the indicator lights on the instrument panel
going out and its preselected theme illuminat-
ing.
CAUTION
Do not touch the connections between the
cable and the vehicle during the start attempt.
Risk of sparking.
Page 484 of 697
||STARTING AND DRIVING
* Option/accessory.
482 12. Remove the jumper cables in the reverse
order ‒ first the black cables and then the
red cables.
Make sure that none of the clamps of the
black jumper cables come into contact with
either vehicle's positive (+) jump start termi-
nals or either of the red jumper cable's con-
nected clamps.
WARNING PROPOSITION 65 WARNING! Battery posts,
terminals, and related accessories contain
lead and lead compounds, chemicals known
to the state of California to cause cancer and
reproductive harm. Wash hands after han-
dling.
WARNING
Batteries generate hydrogen gas, which
is flammable and explosive.
Do not connect the jumper cable to any
part of the fuel system or to any moving
parts. Avoid touching hot manifolds.
Battery fluid contains sulfuric acid. Do not
allow battery fluid to contact eyes, skin,
fabrics or painted surfaces.
If contact occurs, flush the affected area
immediately with water. Obtain medical
help immediately if eyes are affected.
Never expose the battery to open flame
or electric spark. Do not smoke near the
battery. Failure to follow the instructions
for jump starting can lead to injury.
NOTE The vehicle cannot be started if the hybrid
battery is discharged.
Related information
Starting the vehicle (p. 434)
Ignition modes (p. 437)
Adjusting the steering wheel (p. 201)
Selecting ignition mode (p. 438) Detachable towbar*
Volvo recommends the use of Volvo towbars
that are specially designed for the vehicle.
NOTE The optional detachable trailer hitch may not
be available in all markets or on all models.
Consult your Volvo retailer.
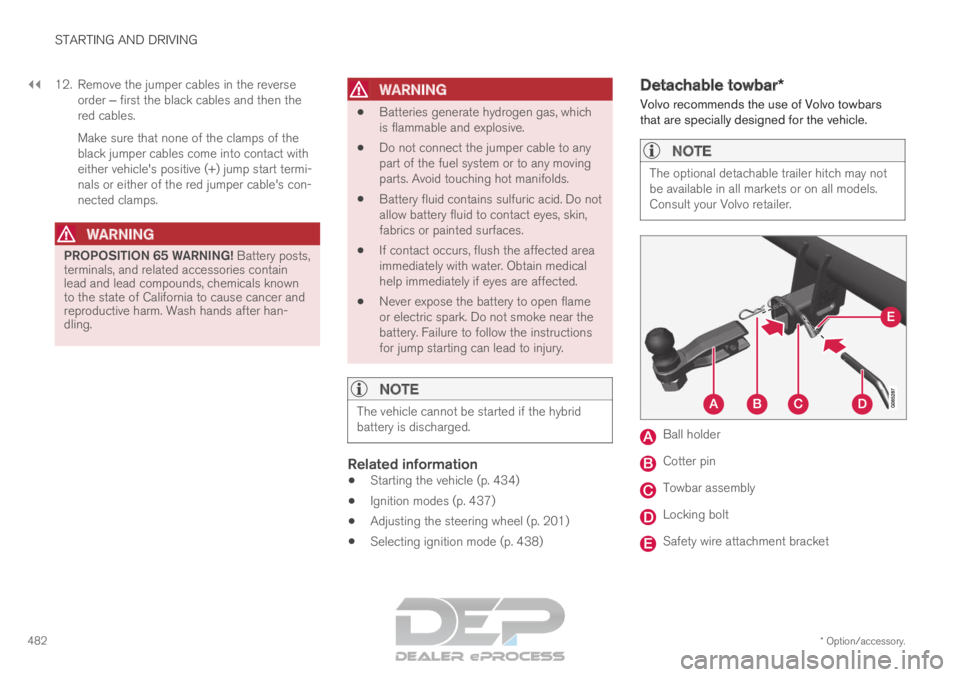
Ball holder
Cotter pin
Towbar assembly
Locking bolt
Safety wire attachment bracket
Page 489 of 697
STARTING AND DRIVING
487
Disabling the automatic check
The automatic light check can be disabled in the
center display.
1.Tap Settings in the Top view.
2.
Tap My Car Lights and Lighting
.
3. Deselect Automatic Trailer Lamp Check.
Manual check
If the automatic check has been disabled, the
check can be started manually.
1.
Tap Settings in the Top view.
2.
Tap My Car Lights and Lighting
.
3. Select Manual Trailer Lamp Check.
>
The light check will begin. Get out of the
vehicle to perform the check.
Related information
Driving with a trailer (p. 483) Towing using a towline
This section refers to one vehicle being towed
behind another using a towline.
Twin Engine vehicles may not be towed behind
another vehicle due to the risk of damage to the
electric motor. The vehicle must be lifted onto a
tow truck and transported with all four wheels on
the bed or lifting platform of the truck (no wheels
may touch the road).
Towing another vehicleTowing another vehicle requires a lot of power -
use the AWD drive mode. This helps charge the
hybrid battery and improve the vehicle's driving
and roadholding characteristics.
Before towing another vehicle, check applicable
speed limit regulations.
Jump startingDo not tow the vehicle to start the engine. Use an
auxiliary battery if the start battery's charge level
is so low that the engine cannot be started.
CAUTION Attempts to tow-start the vehicle could cause
damage to the electrical drive motor and
three-way catalytic converter.
Related information
Attaching and removing the towing eyelet
(p. 488)
Hazard warning flashers (p. 161)
Recovery (p. 489)
Jump starting using another battery (p. 481)
Selecting ignition mode (p. 438)
Page 629 of 697

MAINTENANCE AND SERVICE
}}
627
Start battery
The vehicle has a single-pole electrical system
that uses the chassis and engine mount as con-
ductors.
The start battery is used to start the electrical
system and power electrical equipment in the
vehicle. The hybrid battery is used to start the
combustion engine.
The start battery should only be replaced by a
workshop 15
.
The start battery is a 12 V AGM (Absorbed Glass
Mat) battery, dimensioned for regenerative charg-
ing and to support the function of the vehicle's
various systems.
The service life and performance of the start bat-
tery are affected by factors such as driving style,
driving conditions, climate, battery discharges,
number of starts, etc.
Never disconnect the start battery while the
engine is running.
Make sure the cables to the start battery are
correctly connected and the clamps are
securely tightened.
WARNING
Batteries generate hydrogen gas, which
is flammable and explosive.
Do not connect the jumper cable to any
part of the fuel system or to any moving
parts. Avoid touching hot manifolds.
Battery fluid contains sulfuric acid. Do not
allow battery fluid to contact eyes, skin,
fabrics or painted surfaces.
If contact occurs, flush the affected area
immediately with water. Obtain medical
help immediately if eyes are affected.
Never expose the battery to open flame
or electric spark. Do not smoke near the
battery. Failure to follow the instructions
for jump starting can lead to injury.
Connection points
WARNING PROPOSITION 65 WARNING
Battery posts, terminals, and related accesso-
ries contain lead and lead compounds, chemi-
cals known to the state of California to cause
cancer and reproductive harm. Wash hands
after handling.Use the vehicle's connection points in the engine
compartment to connect an external start battery
or battery charger.
The battery terminals on the car's start battery in
the luggage/cargo area must not be used.
Positive connection point
Negative connection point
CAUTION
It is not possible to charge another vehicle's
battery by means of current through the
charging points. Using the charging points to
charge another vehicle's battery could cause
a fuse to blow, which would cause the charg-
ing points to stop working.
15
An authorized Volvo workshop is recommended.
Page 632 of 697

||MAINTENANCE AND SERVICE
630
CAUTION
If replacing the battery, make sure you
replace it with a battery of the same size, cold
start capacity and type as the original battery
(see the decal on the battery).
Related information
Battery symbols (p. 632)
Hybrid battery (p. 631)
Jump starting using another battery (p. 481)
Page 680 of 697
INDEX
678B Backrest
front seat, adjusting
184, 185, 188,
189, 190, 191
rear seat, adjusting 197, 198
rear seat, folding 193, 198, 199
Battery Hybrid 631
jump-start 481
Maintenance 627
start 627
symbols on the battery 632
warning symbols 632
BLIS 355, 356, 357, 358
Blower adjusting 226
air distribution 210
air vents 211
Bluetooth connect 524
connecting vehicle to Internet 543
phone 532
settings 541
Book service and repair 615
Booster cushions 71
Brake assist after collision 447 Brake fluid
grade
673
Brake functions 438
Brake light 160
Brake position 449
Brakes 439
anti-lock brakes, ABS 439
automatic when stationary 446
Brake Assist System, BAS 441
brake lights 160
brake system 438
emergency brake lights 160
handbrake 442
Maintenance 442
on salted roads 441
on wet roads 441
brake system fluid 673
C Camera sensor
351
Camera unit
337, 341
Capacity weight 588, 669
Cargo compartment 598
attachment points 601
cargo net 606 electrical outlet
594, 596
Lighting
163
Cargo compartment cover 601, 602
cargo net 606
Cargo net 606
Car wash 650, 651, 653, 654, 655, 656
Catalytic converter 479
recovery 487
CD player 522
Cell phone, see Phone 533
Center console 593
Center display change appearance 131
cleaning 645
climate controls 215
Function view 122
keyboard 126
messages 140, 141
operation 112, 115, 119, 124
overview 109
settings 132, 133
switch off and change volume 131
symbols in status bar 124
views 115
Central locking 262
Change of owner 134
Changing a wheel 574