sensor VOLVO XC90 TWIN ENGINE HYBRID 2017 User Guide
[x] Cancel search | Manufacturer: VOLVO, Model Year: 2017, Model line: XC90 TWIN ENGINE HYBRID, Model: VOLVO XC90 TWIN ENGINE HYBRID 2017Pages: 584, PDF Size: 14.2 MB
Page 77 of 584
SAFETY
}}
75
seated occupant and determine if the passeng-er's side front airbag should be enabled (mayinflate) or disabled (will not inflate).
The OWS will disable (will not inflate) the pas-senger's side front airbag when:
•the front passenger's seat is unoccupied, orhas small/medium objects in the front seat,
•the system determines that an infant is pres-ent in a rear-facing infant seat that is instal-led according to the manufacturer's instruc-tions,
•the system determines that a small child ispresent in a forward-facing child restraintthat is installed according to the manufactur-er's instructions,
•the system determines that a small child ispresent in a booster seat,
•a front passenger takes his/her weight off ofthe seat for a period of time,
•a child or a small person occupies the frontpassenger's seat.
The OWS uses a PASSENGER AIRBAG OFFindicator lamp which will illuminate and stay on toremind you that the passenger's side front airbagis disabled. The PASSENGER AIRBAG OFF indi-cator lamp is located in the overhead console,near the base of the rearview mirror.
NOTE
When the ignition is switched on, the OWSindicator light will illuminate for several sec-onds while the system performs a self-diag-nostic test.
However, if a fault is detected in the system:
•The OWS indicator light will stay on
•The SRS warning light will come on and stayon and a text message will be displayed.
WARNING
If a fault in the system is detected and indi-cated as described, be aware that the pas-senger's side front airbag will not deploy inthe event of a collision. In this case, the SRSsystem and Occupant Weight Sensor shouldbe inspected by a trained and qualified Volvoservice technician as soon as possible.
WARNING
•Never try to open, remove, or repair anycomponents in the OWS system. Thiscould result in system malfunction. Main-tenance or repairs should only be carriedout by an a trained and qualified Volvoservice technician.
•The front passenger's seat should not bemodified in any way. This could reducepressure on the seat cushion, whichmight interfere with the OWS system'sfunction.
Passenger'sseat occu-pancy status
OWS indi-cator lightstatus
Passenger'sside front air-bag status
Seat unoccu-piedOWS indi-cator lightlights up.
Passenger'sside front air-bag disabled
Seat occu-pied by lowweight occu-
pant/objectA
OWS indi-cator lightlights up
Passenger'sside front air-bag disabled
Seat occu-pied by heavyoccupant/object
OWS indi-cator light isnot lit
Passenger'sside front air-bag enabled
AVolvo recommends that children always be properly restrainedin appropriate child restraints in the rear seats. Do not assumethat the passenger's side front airbag is disabled unless the
Page 78 of 584
||
SAFETY
76
PASSENGER AIRBAG OFF indicator lamp is lit. Make sure thechild restraint is properly installed. If there is any doubt as to thestatus of the passenger's side front airbag, move the childrestraint to the rear seat.
The OWS is designed to enable (may inflate) thepassenger's side front airbag in the event of acollision anytime the system senses that a per-son of adult size is sitting properly in the frontpassenger's seat. The PASSENGER AIRBAGOFF indicator lamp will be off and remain off.
If a person of adult size is sitting in the front pas-senger's seat, but the PASSENGER AIRBAGOFF indicator lamp is on, it is possible that theperson isn't sitting properly in the seat. If thishappens:
•Turn the vehicle off and ask the person toplace the seatback in an upright position.
•Have the person sit upright in the seat, cen-tered on the seat cushion, with the person'slegs comfortably extended.
•Restart the vehicle and have the personremain in this position for about two minutes.This will allow the system to detect that per-son and enable the passenger's frontal air-bag.
•If the PASSENGER AIRBAG OFF indicatorlamp remains on even after this, the personshould be advised to ride in the rear seat.
This condition reflects limitations of the OWSclassification capability. It does not indicate OWSmalfunction.
Modifications
If you are considering modifying your vehicle inany way to accommodate a disability, for exampleby altering or adapting the driver's or front pas-senger's seat(s) and/or airbag systems, pleasecontact Volvo at:
In the USA
Volvo Car USA, LLC
Customer Care Center
1 Volvo Drive
P.O. Box 914
Rockleigh, New Jersey 07647
1-800-458-1552
In Canada
Volvo Cars of Canada Corp.
National Customer Service
9130 Leslie Street, Suite 101
Richmond Hill, Ontario L4B 0B9
1-800-663-8255
WARNING
•No objects that add to the total weight onthe seat should be placed on the frontpassenger's seat. If a child is seated inthe front passenger's seat with any addi-tional weight, this extra weight couldcause the OWS system to enable the air-bag, which might cause it to deploy in theevent of a collision, thereby injuring thechild.
•The seat belt should never be wrappedaround an object on the front passeng-er's seat. This could interfere with theOWS system's function.
•The front passenger's seat belt shouldnever be used in a way that exerts morepressure on the passenger than normal.This could increase the pressure exertedon the weight sensor by a child, andcould result in the airbag being enabled,which might cause it to deploy in theevent of a collision, thereby injuring thechild.
Page 80 of 584
||
SAFETY
78
Components in the SIPS airbag system
This SIPS airbag system consists of a gas gener-ator, the side airbag modules built into the out-board sides of both front seat backrests, andelectronic sensors/wiring.
WARNING
•The SIPS airbag system is a supplementto the structural Side Impact ProtectionSystem and the three-point seat belt sys-tem. It is not designed to deploy duringcollisions from the front or rear of thevehicle or in rollover situations.
•The use of seat covers on the front seatsmay impede SIPS airbag deployment.
•No objects, accessory equipment or stick-ers may be placed on, attached to orinstalled near the SIPS airbag system orin the area affected by SIPS airbagdeployment.
•Never try to open or repair any compo-nents of the SIPS airbag system. Thisshould be done only by a trained andqualified Volvo service technician.
•In order for the SIPS airbag to provide itsbest protection, both front seat occupantsshould sit in an upright position with theseat belt properly fastened.
•Failure to follow these instructions canresult in injury to the occupants of thevehicle in the event of an accident.
Related information
•Airbag system (p. 71)
•Seat belts (p. 66)
Inflatable curtains
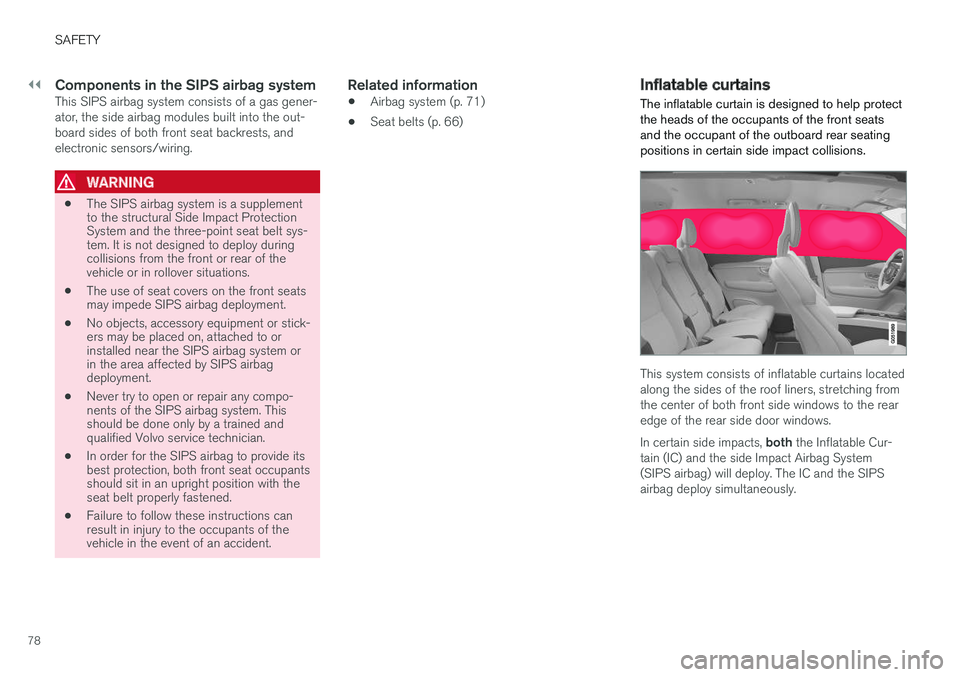
The inflatable curtain is designed to help protectthe heads of the occupants of the front seatsand the occupant of the outboard rear seatingpositions in certain side impact collisions.
This system consists of inflatable curtains locatedalong the sides of the roof liners, stretching fromthe center of both front side windows to the rearedge of the rear side door windows.
In certain side impacts, both the Inflatable Cur-tain (IC) and the side Impact Airbag System(SIPS airbag) will deploy. The IC and the SIPSairbag deploy simultaneously.
Page 81 of 584
SAFETY
79
WARNING
•Never try to open or repair any compo-nents of the IC system. This should bedone only by a trained and qualified Volvoservice technician.
•Never hang heavy items from the ceilinghandles. This could impede deploymentof the Inflatable Curtain.
•The cargo area and rear seat should notbe loaded to a level higher than 4 in.(10 cm) below the upper edge of the rearside windows. Objects placed higher thanthis level could impede the function ofthe Inflatable Curtain.
•In order for the IC to provide its best pro-tection, both front seat occupants andboth outboard rear seat occupants shouldsit in an upright position with the seat beltproperly fastened; adults using the seatbelt and children using the proper childrestraint system.
Related information
•Airbag system (p. 71)
•Side impact airbags (p. 77)
•Child safety (p. 81)
•Seat belts (p. 66)
Safety mode
As a safety precaution after a collision, the func-tionality of some of the vehicle's systems may bereduced.
If the vehicle has been involved in a collision, thetext Safety mode may appear in the informationdisplay.
NOTE
This text can only be shown if the display isundamaged and the vehicle's electrical sys-tem is intact.
Safety mode is a feature that is triggered if oneor more of the safety systems such as the front/side airbags inflatable curtain, etc., or one ormore of the seat belt pretensioners has deployed.The collision may have damaged an importantfunction in the vehicle, such as the fuel lines,sensors for one of the safety systems, the brakesystem, etc.
WARNING
•Never attempt to repair the vehicle your-self or to reset the electrical system afterthe vehicle has displayed Safety mode.This could result in injury or improper sys-tem function.
•Restoring the vehicle to normal operatingstatus should only be done by a trainedand qualified Volvo service technician.
•After Safety mode has been displayed, ifyou detect the odor of fuel vapor, or seeany signs of fuel leakage, do not attemptto start the vehicle. Leave the vehicleimmediately.
Related information
•Starting or moving a vehicle in safety mode(p. 80)
•General safety information (p. 62)
Page 85 of 584
SAFETY
}}
83
Child restraints
Suitable child restraints should always be usedwhen children travel in the vehicle.
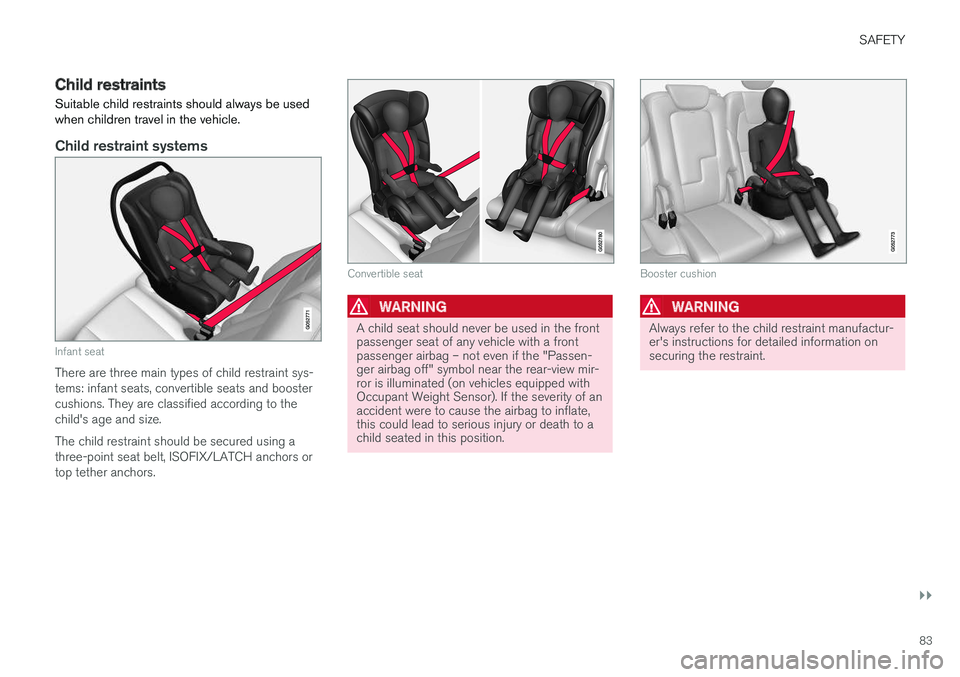
Child restraint systems
Infant seat
There are three main types of child restraint sys-tems: infant seats, convertible seats and boostercushions. They are classified according to thechild's age and size.
The child restraint should be secured using athree-point seat belt, ISOFIX/LATCH anchors ortop tether anchors.
Convertible seat
WARNING
A child seat should never be used in the frontpassenger seat of any vehicle with a frontpassenger airbag – not even if the "Passen-ger airbag off" symbol near the rear-view mir-ror is illuminated (on vehicles equipped withOccupant Weight Sensor). If the severity of anaccident were to cause the airbag to inflate,this could lead to serious injury or death to achild seated in this position.
Booster cushion
WARNING
Always refer to the child restraint manufactur-er's instructions for detailed information onsecuring the restraint.
Page 87 of 584
SAFETY
}}
85
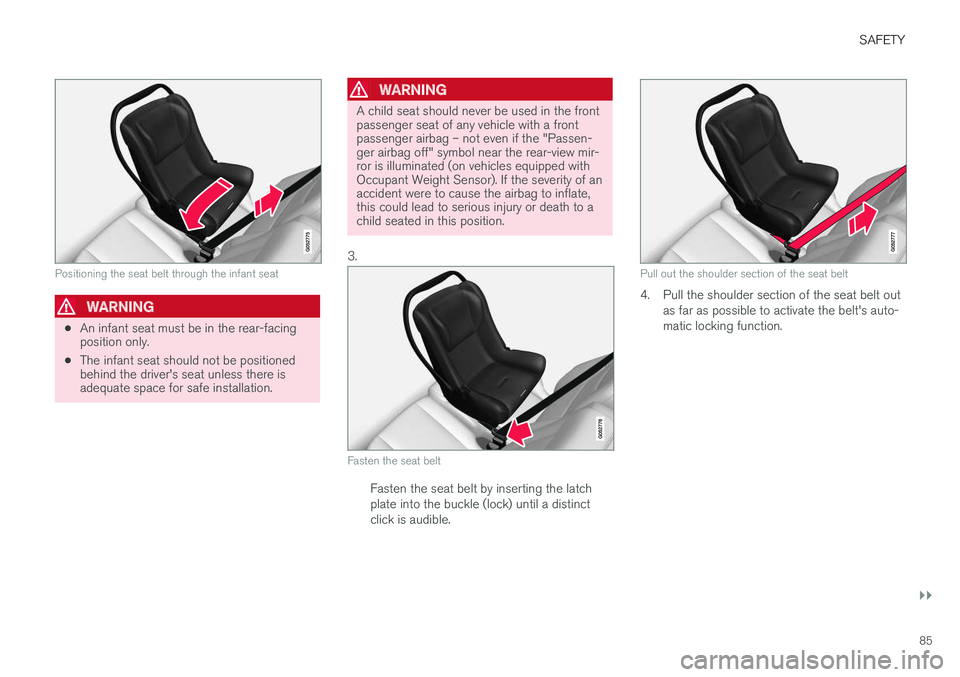
Positioning the seat belt through the infant seat
WARNING
•An infant seat must be in the rear-facingposition only.
•The infant seat should not be positionedbehind the driver's seat unless there isadequate space for safe installation.
WARNING
A child seat should never be used in the frontpassenger seat of any vehicle with a frontpassenger airbag – not even if the "Passen-ger airbag off" symbol near the rear-view mir-ror is illuminated (on vehicles equipped withOccupant Weight Sensor). If the severity of anaccident were to cause the airbag to inflate,this could lead to serious injury or death to achild seated in this position.
3.
Fasten the seat belt
Fasten the seat belt by inserting the latchplate into the buckle (lock) until a distinctclick is audible.
Pull out the shoulder section of the seat belt
4. Pull the shoulder section of the seat belt outas far as possible to activate the belt's auto-matic locking function.
Page 93 of 584
SAFETY
}}
91
WARNING
•Be sure to fasten the attachment cor-rectly to the anchor (see the illustration).If the attachment is not correctly fas-tened, the child restraint may not beproperly secured in the event of a colli-sion.
•The ISOFIX/LATCH lower child restraintanchors are only intended for use withchild seats positioned in the outboardseating positions. These anchors are notcertified for use with any child restraintthat is positioned in the center seatingposition. When securing a child restraintin the center seating position, use onlythe vehicle's center seat belt.
Related information
•Top tether anchors (p. 92)
Lower child seat attachment points1
The vehicle is equipped with lower attachmentpoints for child seats in the second row of seats.
The lower attachment points are intended for usewith rear-facing child restraints.
Always follow the child restraint manufacturer'sinstallation instructions when attaching a childrestraint to these attachment points.
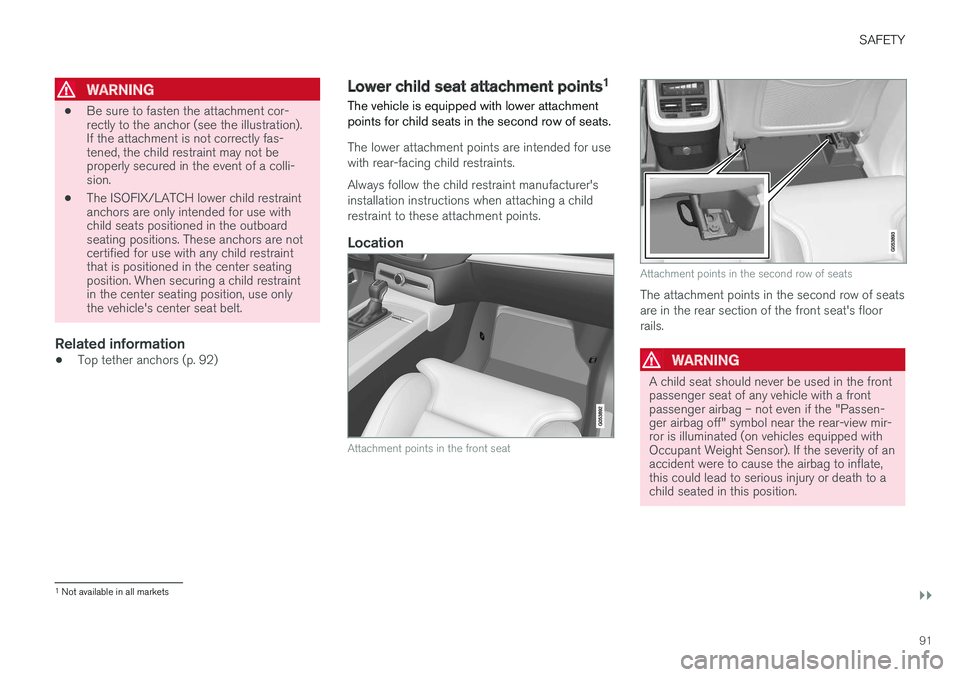
Location
Attachment points in the front seat
Attachment points in the second row of seats
The attachment points in the second row of seatsare in the rear section of the front seat's floorrails.
WARNING
A child seat should never be used in the frontpassenger seat of any vehicle with a frontpassenger airbag – not even if the "Passen-ger airbag off" symbol near the rear-view mir-ror is illuminated (on vehicles equipped withOccupant Weight Sensor). If the severity of anaccident were to cause the airbag to inflate,this could lead to serious injury or death to achild seated in this position.
1Not available in all markets
Page 94 of 584
||
SAFETY
92
Related information
•Child restraints (p. 83)
•ISOFIX/LATCH lower anchors (p. 90)
•Occupant weight sensor (p. 74)
Top tether anchors
Your Volvo is equipped with child restraint toptether anchorages for all three seating positionsin the rear seat. They are located on the rearside of the backrests.
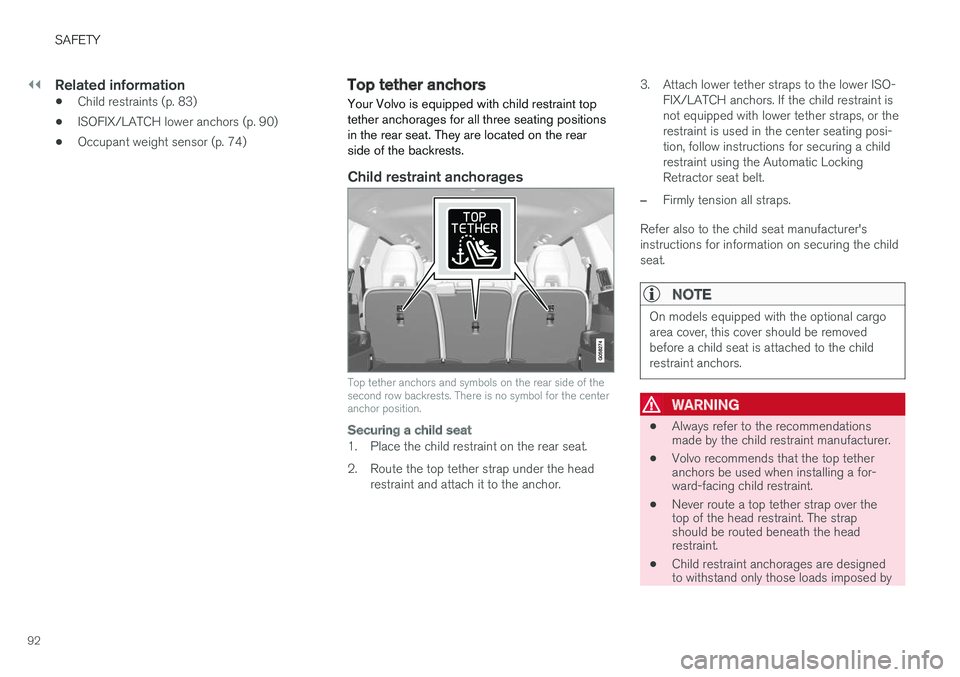
Child restraint anchorages
Top tether anchors and symbols on the rear side of thesecond row backrests. There is no symbol for the centeranchor position.
Securing a child seat
1. Place the child restraint on the rear seat.
2. Route the top tether strap under the headrestraint and attach it to the anchor.
3. Attach lower tether straps to the lower ISO-FIX/LATCH anchors. If the child restraint isnot equipped with lower tether straps, or therestraint is used in the center seating posi-tion, follow instructions for securing a childrestraint using the Automatic LockingRetractor seat belt.
–Firmly tension all straps.
Refer also to the child seat manufacturer'sinstructions for information on securing the childseat.
NOTE
On models equipped with the optional cargoarea cover, this cover should be removedbefore a child seat is attached to the childrestraint anchors.
WARNING
•Always refer to the recommendationsmade by the child restraint manufacturer.
•Volvo recommends that the top tetheranchors be used when installing a for-ward-facing child restraint.
•Never route a top tether strap over thetop of the head restraint. The strapshould be routed beneath the headrestraint.
•Child restraint anchorages are designedto withstand only those loads imposed by
Page 102 of 584
INSTRUMENTS AND CONTROLS
* Option/accessory, for more information, see Introduction.100
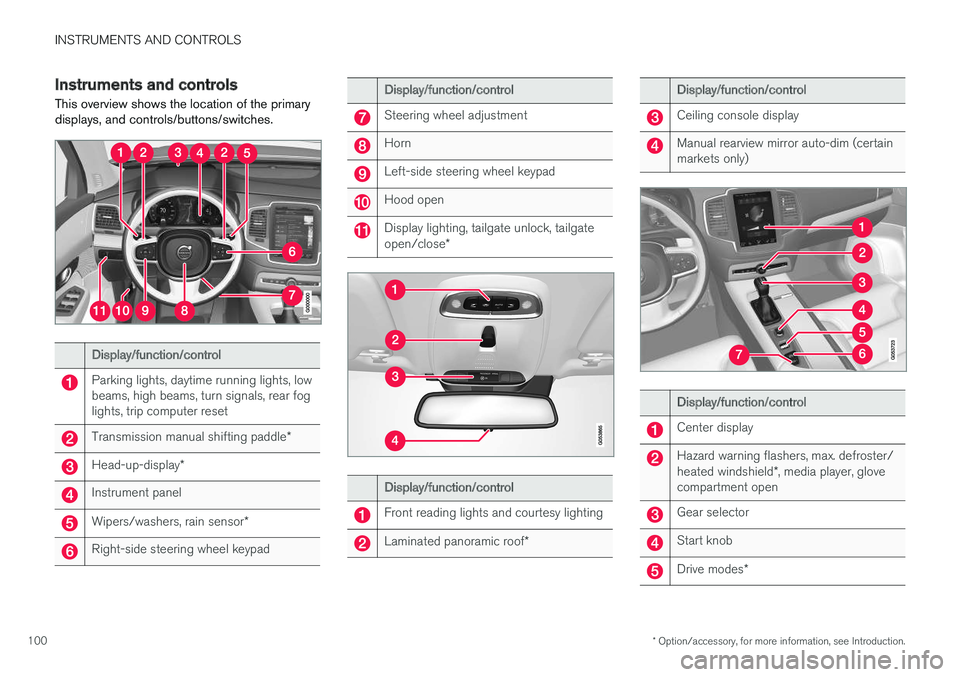
Instruments and controls
This overview shows the location of the primarydisplays, and controls/buttons/switches.
Display/function/control
Parking lights, daytime running lights, lowbeams, high beams, turn signals, rear foglights, trip computer reset
Transmission manual shifting paddle*
Head-up-display*
Instrument panel
Wipers/washers, rain sensor*
Right-side steering wheel keypad
Display/function/control
Steering wheel adjustment
Horn
Left-side steering wheel keypad
Hood open
Display lighting, tailgate unlock, tailgateopen/close*
Display/function/control
Front reading lights and courtesy lighting
Laminated panoramic roof*
Display/function/control
Ceiling console display
Manual rearview mirror auto-dim (certainmarkets only)
Display/function/control
Center display
Hazard warning flashers, max. defroster/heated windshield*, media player, glovecompartment open
Gear selector
Start knob
Drive modes*
Page 116 of 584
||
INSTRUMENTS AND CONTROLS
114
been running, the power windows can be oper-ated for several minutes after the ignition hasbeen switched off, or until a door has beenopened.
NOTE
•Movement of the windows will stop if theyare obstructed in any way. If this happenstwice in succession, the automatic func-tion will not work for several minutes andthe window can be closed by holding thebutton up.
•To reduce buffeting wind noise if the rearwindows are opened, also open the frontwindows slightly.
Manual up/down
–Move one of the controls up/down slightly.
>The power windows move up/down aslong as the control is held in position.
Auto up/down
–Move one of the controls up/down as far aspossible and release it.
>The window will open or close completely.
Resetting
If the battery has been disconnected, the autoopen function must be reset so that it will workproperly
1. Gently raise the front section of the button toclose the window and hold it for one second.
2. Release the button briefly.
3. Raise the front section of the button againfor one second.
Related information
•Child safety locks (p. 257)
Rearview mirror
The interior rearview mirror has an auto-dimfunction that helps reduce glare from followingvehicle's headlights.
Auto-dim function
The auto-dim function is controlled by two sen-sors: one pointing forward (located on the for-ward-facing side of the mirror, which monitors theamount of ambient light) and one pointing rear-ward (located on the side of the mirror facing thedriver at the upper edge, which senses thestrength of following vehicles' headlights), andwork together to help eliminate glare.
NOTE
Obstructing the forward sensor with e.g.,parking stickers, transponders, etc., or the rearsensor by loading the cargo area or the rearseat in such a way that light is prevented fromreaching the sensor will reduce the auto-dimfunction in the interior rearview mirror andoptional auto-dim function in the door mirrors.
The auto-dim function is always active while thevehicle is being driven except when the reversegear has been selected. The level of sensitivityfor this function can be set to three levels, whichaffect the rearview mirror and door mirrors.