YAMAHA AEROX50 2003 Service Manual
Manufacturer: YAMAHA, Model Year: 2003, Model line: AEROX50, Model: YAMAHA AEROX50 2003Pages: 84, PDF Size: 0.96 MB
Page 41 of 84
OPERATION AND IMPORTANT RIDING POINTS
5
EAU00461
Parking
When parking, stop the engine, and
then remove the key from the main
switch.
EW000058
•Since the engine and exhaust
system can become very hot,
park in a place where
pedestrians or children are not
likely to touch them.
•Do not park on a slope or on
soft ground, otherwise the
scooter may overturn.
EC000062
Never park in an area where there
are fire hazards such as grass or
other flammable materials.
WARNING
CAUTION:
5-5
Page 42 of 84
EAU00462
PERIODIC MAINTENANCE AND MINOR REPAIR
Periodic maintenance and lubrication chart ............ 6-2
Removing and installing cowling and panel ............ 6-5
Cowling A ................................................................ 6-5
Panel A .................................................................... 6-5
Checking the spark plug ......................................... 6-6
Final transmission oil .............................................. 6-7
Coolant .................................................................... 6-8
Cleaning the air filter element ................................. 6-9
Adjusting the carburetor ........................................ 6-10
Adjusting the throttle cable free play ..................... 6-11
Tires ...................................................................... 6-11
Wheels .................................................................. 6-13
Adjusting the front and rear brake lever
free play ................................................................ 6-13
Checking the front and rear brake pads ................ 6-14
Checking the brake fluid level ............................... 6-14
6 Changing the brake fluid ....................................... 6-15
Adjusting the autolube pump ................................ 6-15
Checking and lubricating the cables ..................... 6-16
Lubricating the front and rear brakes levers .......... 6-16
Checking and lubricating the centerstand ............. 6-16
Checking the front fork .......................................... 6-17
Checking the steering ........................................... 6-17
Checking the wheel bearings ................................ 6-18
Battery ................................................................... 6-18
Replacing the fuse ................................................ 6-20
Replacing a headlight bulb .................................... 6-20
Replacing tail/brake light bulb ............................... 6-21
Replacing a turn signal light bulb .......................... 6-22
Troubleshooting ..................................................... 6-22
Troubleshooting chart ............................................ 6-23
Engine overheating ............................................... 6-24
Page 43 of 84
PERIODIC MAINTENANCE AND MINOR REPAIR
6
EAU03453
Safety is an obligation of the owner.
Periodic inspection, adjustment and
lubrication will keep your vehicle in the
safest and most efficient condition pos-
sible. The most important points of
scooter inspection, adjustment, and
lubrication are explained on the
following pages.
EW000060
If you are not familiar with scooter
maintenance work, have a Yamaha
dealer do it for you.
EAU00466
EW000061
This scooter is designed for use on
paved roads only. If this scooter is
operated in abnormally dusty,
muddy or wet conditions, the air filter
element should be cleaned or
replaced more frequently, otherwise
rapid engine wear may result.
Consult a Yamaha dealer for proper
maintenance intervals.WARNING
WARNING
6-1
Page 44 of 84
PERIODIC MAINTENANCE AND MINOR REPAIR
6
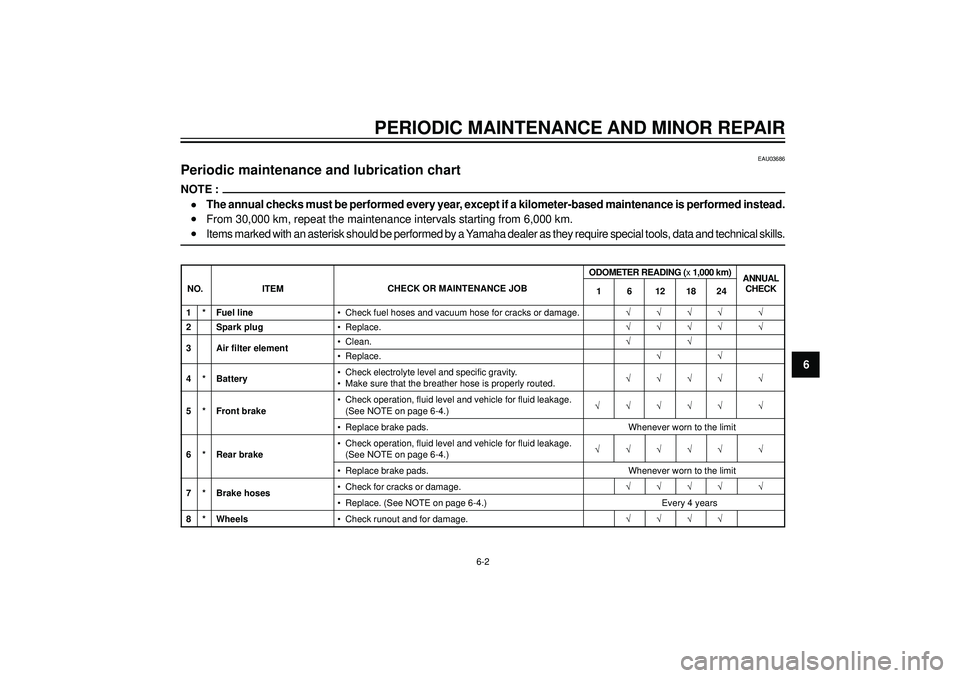
1 * Fuel line• Check fuel hoses and vacuum hose for cracks or damage.√√√√ √
2 Spark plug• Replace.√√√√ √
3 Air filter element• Clean.√√• Replace.√√
4 * Battery• Check electrolyte level and specific gravity.
√√√√ √
• Make sure that the breather hose is properly routed.
• Check operation, fluid level and vehicle for fluid leakage.
√√√√√ √
5 * Front brake(See NOTE on page 6-4.)
• Replace brake pads. Whenever worn to the limit
• Check operation, fluid level and vehicle for fluid leakage.
√√√√√ √
6 * Rear brake(See NOTE on page 6-4.)
• Replace brake pads. Whenever worn to the limit
7 * Brake hoses• Check for cracks or damage.√√√√ √• Replace. (See NOTE on page 6-4.) Every 4 years
8 * Wheels• Check runout and for damage.√√√√
EAU03686
Periodic maintenance and lubrication chart
NOTE :
•The annual checks must be performed every year, except if a kilometer-based maintenance is performed instead.
•From 30,000 km, repeat the maintenance intervals starting from 6,000 km.
•Items marked with an asterisk should be performed by a Yamaha dealer as they require special tools, data and technical skills.
ODOMETER READING (x 1,000 km)
NO. ITEMCHECK OR MAINTENANCE JOB
1
ANNUAL
CHECK
6121824
6-2
Page 45 of 84

PERIODIC MAINTENANCE AND MINOR REPAIR
6
• Check tread depth and for damage.
9 * Tires• Replace if necessary.
√√√√ √
• Check air pressure.
• Correct if necessary.
10 * Wheel bearings• Check bearing for looseness or damage.√√√√
11 * Steering bearings• Check bearing play and steering for roughness.√√√√√• Lubricate with lithium-soap-based grease. Every 24,000 km
12 * Chassis fasteners• Make sure that all nuts, bolts and screws are
√√√√ √
properly tightened.
13 Centerstand• Check operation.
√√√√ √
• Lubricate.
14 * Front fork• Check operation and for oil leakage.√√√√
15 * Shock absorber assembly• Check operation and shock absorber for oil leakage.√√√√
16 * Carburetor• Check starter (chocke) operation.
√√√√√ √
• Adjust engine idling speed.
17 * Autolube pump• Check operation.
√√√√
• Bleed if necessary.
18 Final transmission oil• Check vehicle for oil leakage.√√ √• Change.√√√
19 * V-belt• Replace. Every 10,000 km
20 * Front and rear brake
• Check operation.√√√√√ √
switches
ODOMETER READING (x 1,000 km)
NO. ITEMCHECK OR MAINTENANCE JOB
1
ANNUAL
CHECK
6121824
6-3
Page 46 of 84
PERIODIC MAINTENANCE AND MINOR REPAIR
6
EAU03541*
NOTE :
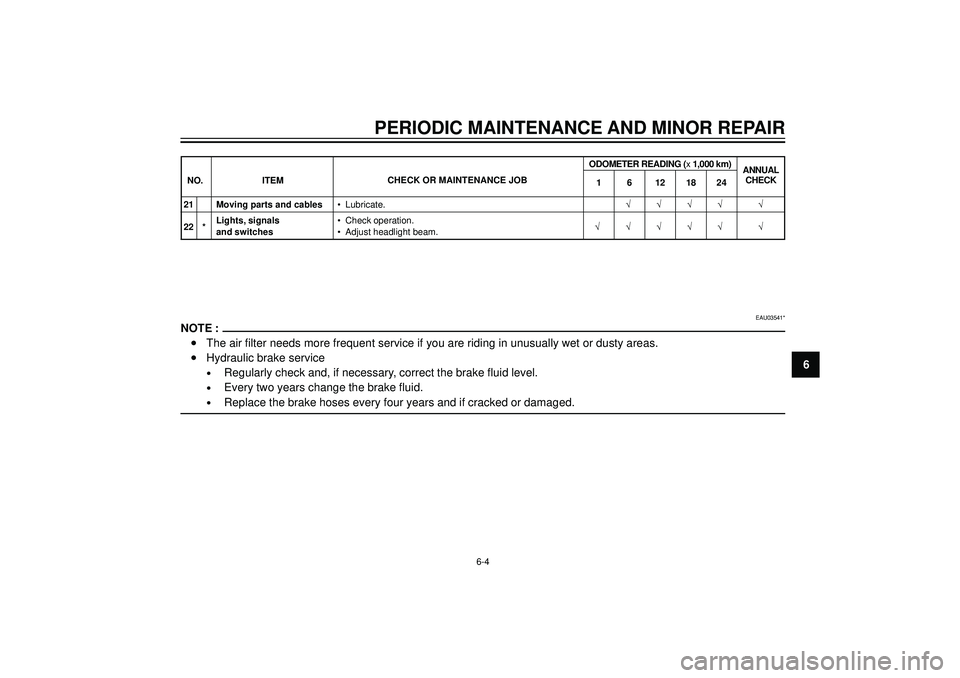
•The air filter needs more frequent service if you are riding in unusually wet or dusty areas.
•Hydraulic brake service
•Regularly check and, if necessary, correct the brake fluid level.
•Every two years change the brake fluid.
•Replace the brake hoses every four years and if cracked or damaged.
21 Moving parts and cables• Lubricate.√√√√ √
22 *Lights, signals• Check operation.
√√√√√ √
and switches• Adjust headlight beam.
ODOMETER READING (x 1,000 km)
NO. ITEMCHECK OR MAINTENANCE JOB
1
ANNUAL
CHECK
6121824
6-4
Page 47 of 84
PERIODIC MAINTENANCE AND MINOR REPAIR
6
EAU03810
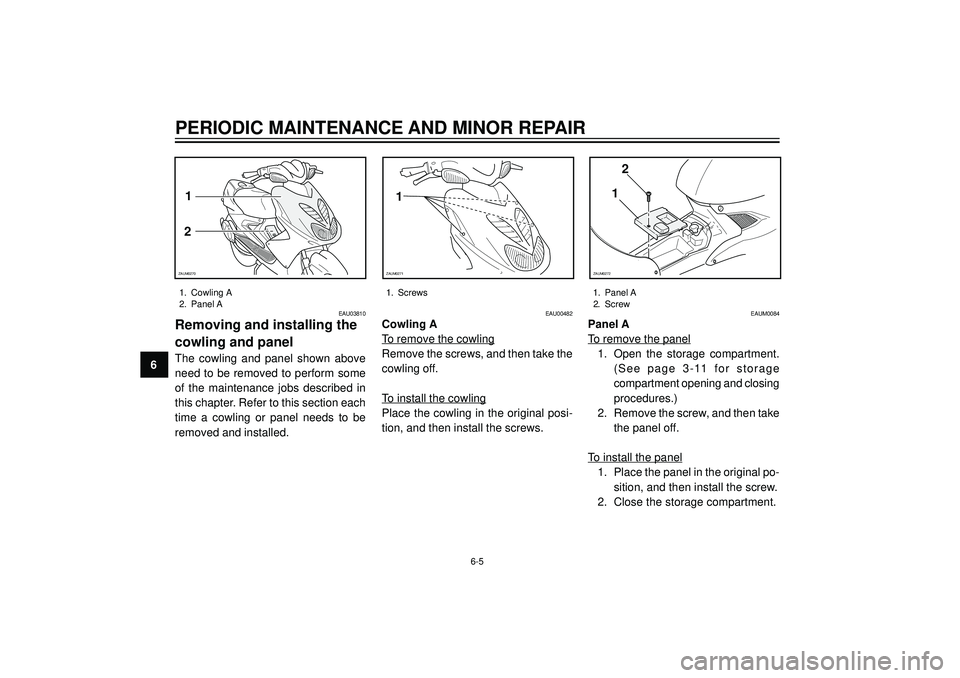
Removing and installing the
cowling and panel
The cowling and panel shown above
need to be removed to perform some
of the maintenance jobs described in
this chapter. Refer to this section each
time a cowling or panel needs to be
removed and installed.
1
2
ZAUM0270
1. Cowling A
2. Panel A
EAU00482
Cowling A
To remove the cowling
Remove the screws, and then take the
cowling off.
To install the cowling
Place the cowling in the original posi-
tion, and then install the screws.
1
ZAUM0271
1. Screws
2
1
ZAUM0272
1. Panel A
2. Screw
6-5
EAUM0084
Panel A
To remove the panel
1. Open the storage compartment.
(See page 3-11 for storage
compartment opening and closing
procedures.)
2. Remove the screw, and then take
the panel off.
To install the panel
1. Place the panel in the original po-
sition, and then install the screw.
2. Close the storage compartment.
Page 48 of 84
PERIODIC MAINTENANCE AND MINOR REPAIR
6
EAU01651
Checking the spark plug
The spark plug is an important engine
component, which should be checked
periodically, preferably by a Yamaha
dealer. Since heat and deposits will
cause any spark plug to slowly erode,
it should be removed and checked in
accordance with the periodic mainte-
nance and lubrication chart. In addition,
the condition of the spark plug can
reveal the condition of the engine.
The porcelain insulator around the
center electrode of the spark plug
should be a medium-to-light tan (the
ideal color when the scooter is ridden
normally). If the spark plug shows a
distinctly different color, the engine
could be defective. Do not attempt to
diagnose such problems yourself.
Instead, have a Yamaha dealer check
the scooter.
If the spark plug shows signs of
electrode erosion and excessive carbon
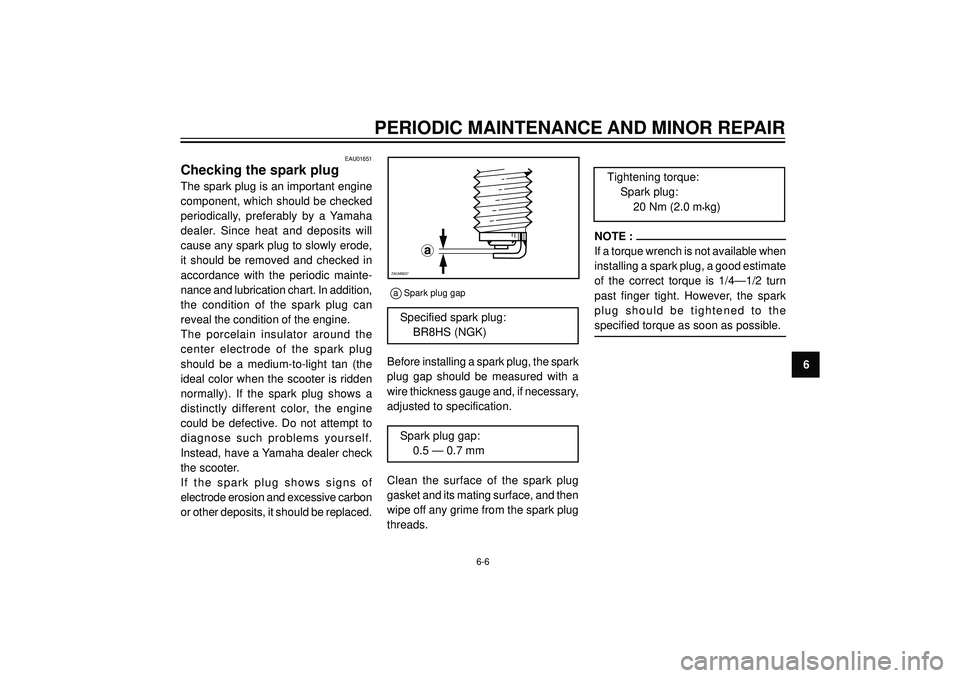
or other deposits, it should be replaced.Specified spark plug:
BR8HS (NGK)
Before installing a spark plug, the spark
plug gap should be measured with a
wire thickness gauge and, if necessary,
adjusted to specification.
Spark plug gap:
0.5 — 0.7 mm
Clean the surface of the spark plug
gasket and its mating surface, and then
wipe off any grime from the spark plug
threads.
a
ZAUM0037
a Spark plug gap
Tightening torque:
Spark plug:
20 Nm (2.0 m
•kg)
NOTE :
If a torque wrench is not available when
installing a spark plug, a good estimate
of the correct torque is 1/4—1/2 turn
past finger tight. However, the spark
plug should be tightened to the
specified torque as soon as possible.
6-6
Page 49 of 84
PERIODIC MAINTENANCE AND MINOR REPAIR
6
EWA00062
•Make sure that no foreign
material enters the final trans-
mission case.
•Make sure that no oil gets on
the tire or wheel.
7. Check the final transmission case
for oil leakage. If oil is leaking,
check for the cause.
WARNING
EAU04228
Final transmission oil
The final transmission case must be
checked for oil leakage before each
ride. If any leakage is found, have a
Yamaha dealer check and repair the
scooter. In addition, the final transmis-
sion oil must be changed as follows at
the intervals specified in the periodic
maintenance and lubrication chart.
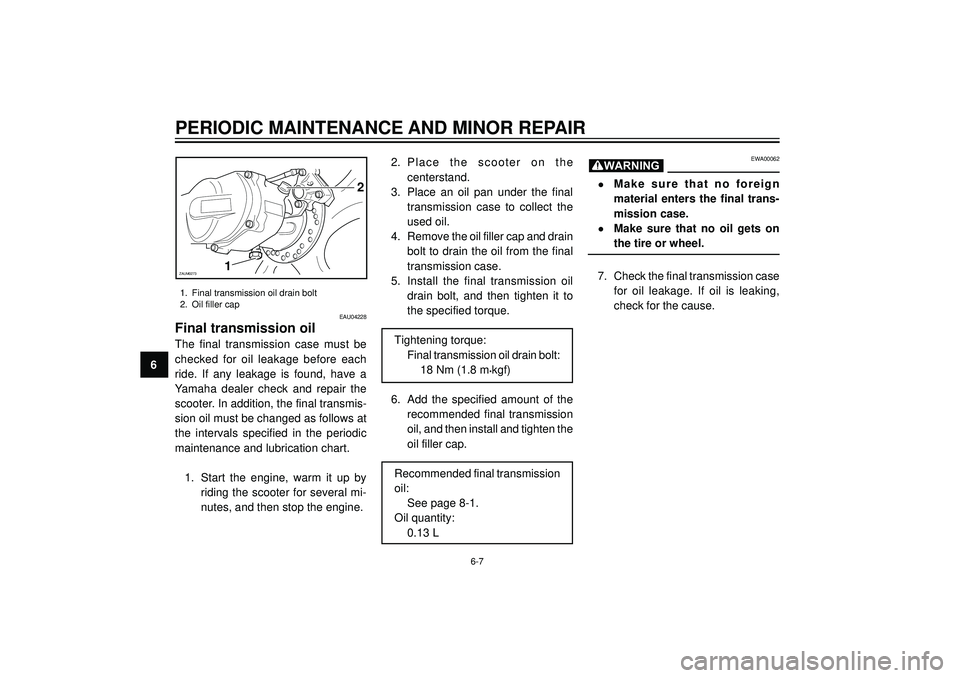
1. Start the engine, warm it up by
riding the scooter for several mi-
nutes, and then stop the engine.2. Place the scooter on the
centerstand.
3. Place an oil pan under the final
transmission case to collect the
used oil.
4. Remove the oil filler cap and drain
bolt to drain the oil from the final
transmission case.
5. Install the final transmission oil
drain bolt, and then tighten it to
the specified torque.
Tightening torque:
Final transmission oil drain bolt:
18 Nm (1.8 m
•kgf)
6. Add the specified amount of the
recommended final transmission
oil, and then install and tighten the
oil filler cap.
Recommended final transmission
oil:
See page 8-1.
Oil quantity:
0.13 L
12ZAUM0273
1. Final transmission oil drain bolt
2. Oil filler cap
6-7
Page 50 of 84
PERIODIC MAINTENANCE AND MINOR REPAIR
6
EC000080
•If coolant is not available, use
distilled water or soft tap water
instead. Do not use hard water
or salt water since it is harmful
to the engine.
•If water has been used instead
of coolant, replace it with
coolant as soon as possible,
otherwise the engine may not
be sufficiently cooled and the
cooling system will not be
protected against frost and cor-
rosion.
•If water has been added to the
coolant, have a Yamaha dealer
check the antifreeze content of
the coolant as soon as possi-
ble, otherwise the effectiveness
of the coolant will be reduced.
EW000067
Never attempt to remove the radiator
cap when the engine is hot.
CAUTION:
WARNING
EAU01808*
Coolant
To check the coolant level
1. Place the scooter on a level sur-
face and hold it in an upright po-
sition.
NOTE :
•The coolant level must be
checked on a cold engine since
the level varies with engine
temperature.
•Make sure that the scooter is
positioned straight up when
checking the coolant level. A slight
tilt to the side can result in a false
reading.
2. Remove cowling A. (See page
6-5 for cowling removal and ins-
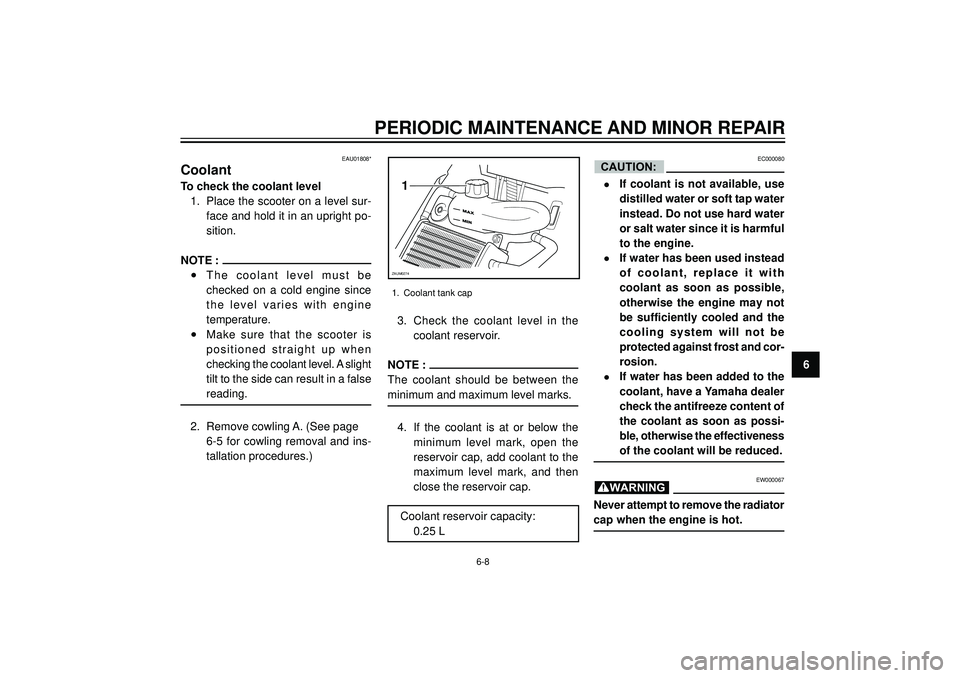
tallation procedures.)3. Check the coolant level in the
coolant reservoir.
NOTE :
The coolant should be between the
minimum and maximum level marks.
4. If the coolant is at or below the
minimum level mark, open the
reservoir cap, add coolant to the
maximum level mark, and then
close the reservoir cap.
Coolant reservoir capacity:
0.25 L
�
1
ZAUM0274
1. Coolant tank cap
6-8