YAMAHA AEROX50 2004 Manual PDF
Manufacturer: YAMAHA, Model Year: 2004, Model line: AEROX50, Model: YAMAHA AEROX50 2004Pages: 84, PDF Size: 0.96 MB
Page 71 of 84
SCOOTER CARE AND STORAGE
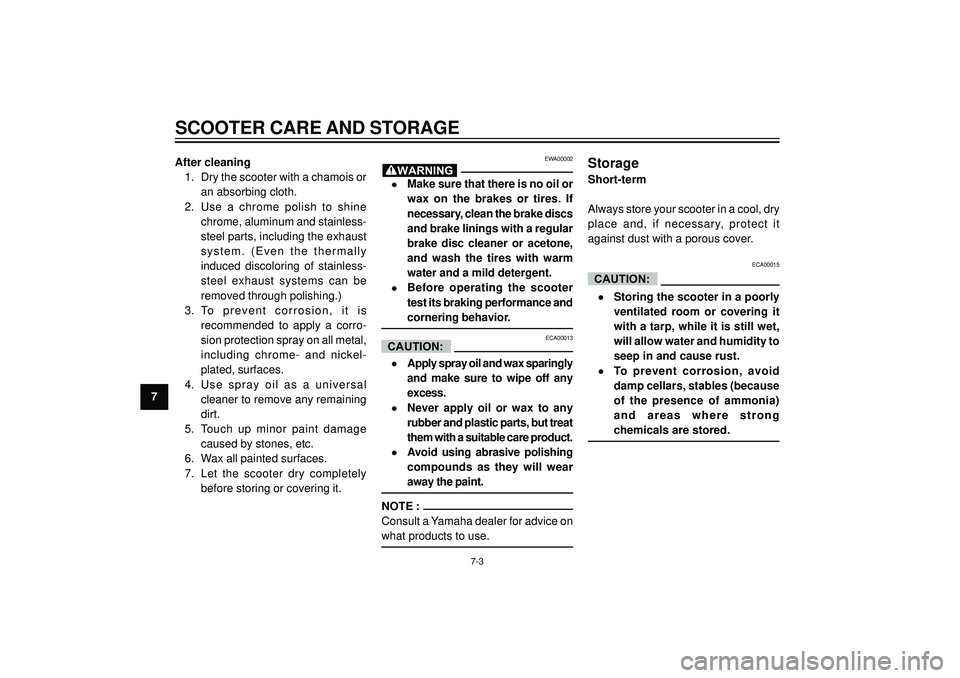
7After cleaning
1. Dry the scooter with a chamois or
an absorbing cloth.
2. Use a chrome polish to shine
chrome, aluminum and stainless-
steel parts, including the exhaust
system. (Even the thermally
induced discoloring of stainless-
steel exhaust systems can be
removed through polishing.)
3. To prevent corrosion, it is
recommended to apply a corro-
sion protection spray on all metal,
including chrome- and nickel-
plated, surfaces.
4. Use spray oil as a universal
cleaner to remove any remaining
dirt.
5. Touch up minor paint damage
caused by stones, etc.
6. Wax all painted surfaces.
7. Let the scooter dry completely
before storing or covering it.
EWA00002
•Make sure that there is no oil or
wax on the brakes or tires. If
necessary, clean the brake discs
and brake linings with a regular
brake disc cleaner or acetone,
and wash the tires with warm
water and a mild detergent.
•Before operating the scooter
test its braking performance and
cornering behavior.
ECA00013
•Apply spray oil and wax sparingly
and make sure to wipe off any
excess.
•Never apply oil or wax to any
rubber and plastic parts, but treat
them with a suitable care product.
•Avoid using abrasive polishing
compounds as they will wear
away the paint.
NOTE :
Consult a Yamaha dealer for advice on
what products to use.
Storage
Short-term
Always store your scooter in a cool, dry
place and, if necessary, protect it
against dust with a porous cover.
ECA00015
•Storing the scooter in a poorly
ventilated room or covering it
with a tarp, while it is still wet,
will allow water and humidity to
seep in and cause rust.
•To prevent corrosion, avoid
damp cellars, stables (because
of the presence of ammonia)
and areas where strong
chemicals are stored.
WARNING
CAUTION:
CAUTION:
7-3
Page 72 of 84
SCOOTER CARE AND STORAGE
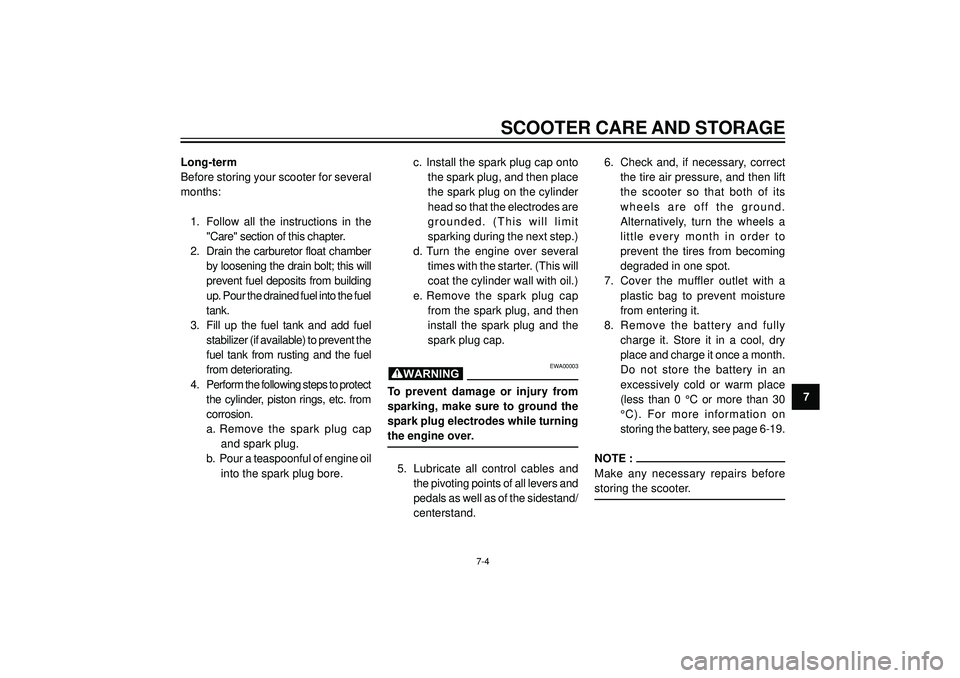
7 Long-term
Before storing your scooter for several
months:
1. Follow all the instructions in the
"Care" section of this chapter.
2. Drain the carburetor float chamber
by loosening the drain bolt; this will
prevent fuel deposits from building
up. Pour the drained fuel into the fuel
tank.
3. Fill up the fuel tank and add fuel
stabilizer (if available) to prevent the
fuel tank from rusting and the fuel
from deteriorating.
4. Perform the following steps to protect
the cylinder, piston rings, etc. from
corrosion.
a. Remove the spark plug cap
and spark plug.
b. Pour a teaspoonful of engine oil
into the spark plug bore.c. Install the spark plug cap onto
the spark plug, and then place
the spark plug on the cylinder
head so that the electrodes are
grounded. (This will limit
sparking during the next step.)
d. Turn the engine over several
times with the starter. (This will
coat the cylinder wall with oil.)
e. Remove the spark plug cap
from the spark plug, and then
install the spark plug and the
spark plug cap.
EWA00003
To prevent damage or injury from
sparking, make sure to ground the
spark plug electrodes while turning
the engine over.
5. Lubricate all control cables and
the pivoting points of all levers and
pedals as well as of the sidestand/
centerstand.6. Check and, if necessary, correct
the tire air pressure, and then lift
the scooter so that both of its
wheels are off the ground.
Alternatively, turn the wheels a
little every month in order to
prevent the tires from becoming
degraded in one spot.
7. Cover the muffler outlet with a
plastic bag to prevent moisture
from entering it.
8. Remove the battery and fully
charge it. Store it in a cool, dry
place and charge it once a month.
Do not store the battery in an
excessively cold or warm place
(less than 0 °C or more than 30
°C). For more information on
storing the battery, see page 6-19.
NOTE :
Make any necessary repairs before
storing the scooter.
WARNING
7-4
Page 73 of 84

Page 74 of 84
EAU01038
SPECIFICATIONS
Specifications ...................................................................................... 8-1
Conversion table ................................................................................. 8-4
8
Page 75 of 84
SPECIFICATIONS
8
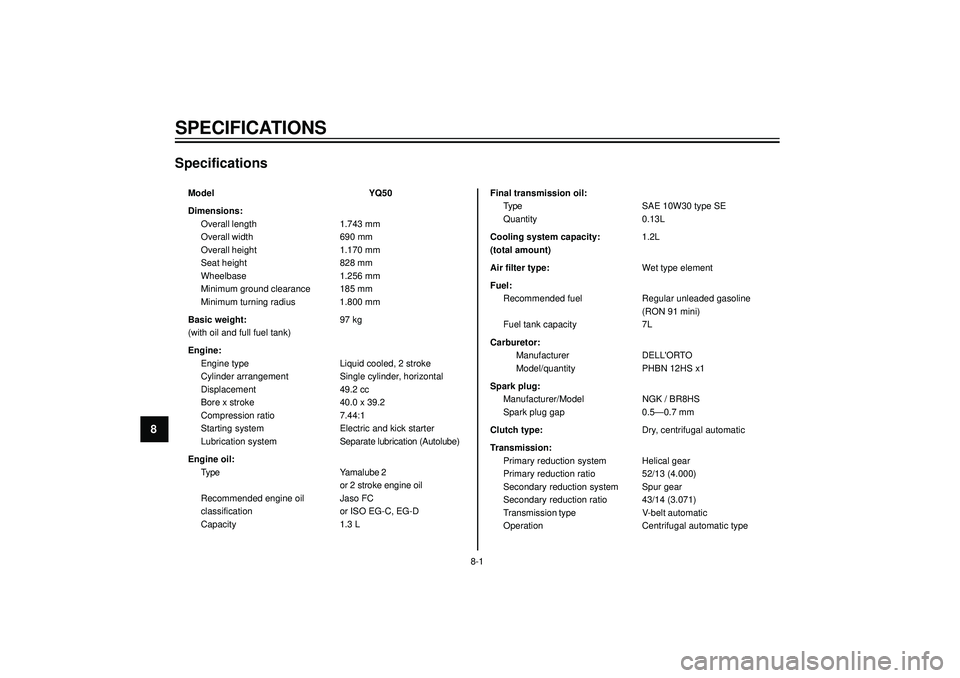
Specifications
Model YQ50
Dimensions:
Overall length 1.743 mm
Overall width 690 mm
Overall height 1.170 mm
Seat height 828 mm
Wheelbase 1.256 mm
Minimum ground clearance 185 mm
Minimum turning radius 1.800 mm
Basic weight:97 kg
(with oil and full fuel tank)
Engine:
Engine type Liquid cooled, 2 stroke
Cylinder arrangement Single cylinder, horizontal
Displacement 49.2 cc
Bore x stroke 40.0 x 39.2
Compression ratio 7.44:1
Starting system Electric and kick starter
Lubrication systemSeparate lubrication (Autolube)
Engine oil:
Type Yamalube 2
or 2 stroke engine oil
Recommended engine oil Jaso FC
classification or ISO EG-C, EG-D
Capacity 1.3 LFinal transmission oil:
Type SAE 10W30 type SE
Quantity 0.13L
Cooling system capacity:1.2L
(total amount)
Air filter type:Wet type element
Fuel:
Recommended fuel Regular unleaded gasoline
(RON 91 mini)
Fuel tank capacity 7L
Carburetor:
Manufacturer DELL'ORTO
Model/quantity PHBN 12HS x1
Spark plug:
Manufacturer/Model NGK / BR8HS
Spark plug gap 0.5—0.7 mm
Clutch type:Dry, centrifugal automatic
Transmission:
Primary reduction system Helical gear
Primary reduction ratio 52/13 (4.000)
Secondary reduction system Spur gear
Secondary reduction ratio 43/14 (3.071)
Transmission type V-belt automatic
Operation Centrifugal automatic type
8-1
Page 76 of 84
SPECIFICATIONS
8
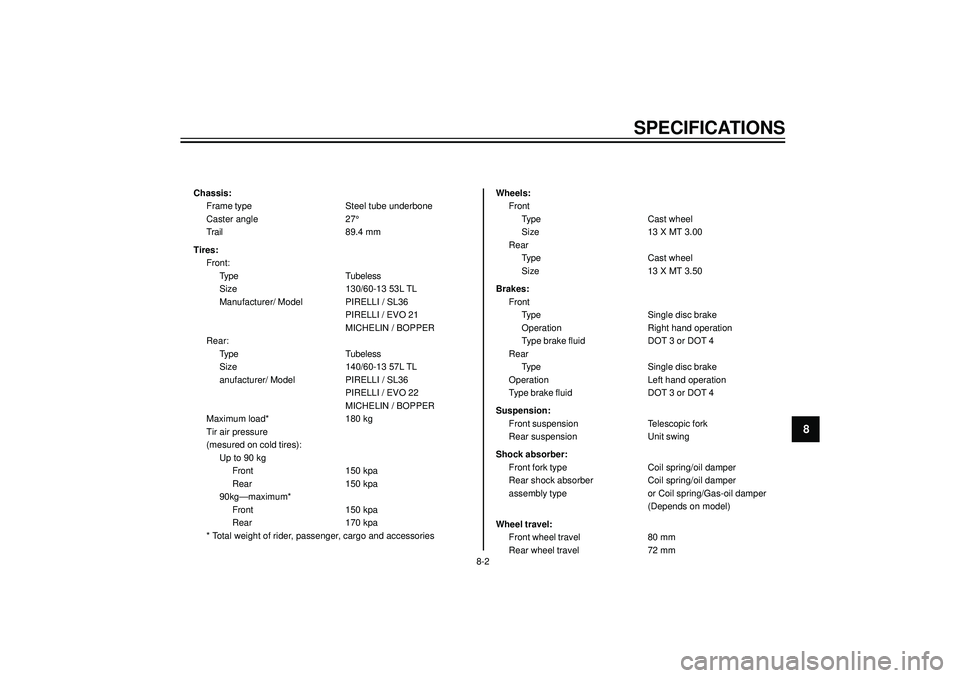
Chassis:
Frame type Steel tube underbone
Caster angle 27°
Trail 89.4 mm
Tires:
Front:
Type Tubeless
Size 130/60-13 53L TL
Manufacturer/ Model PIRELLI / SL36
PIRELLI / EVO 21
MICHELIN / BOPPER
Rear:
Type Tubeless
Size 140/60-13 57L TL
anufacturer/ Model PIRELLI / SL36
PIRELLI / EVO 22
MICHELIN / BOPPER
Maximum load* 180 kg
Tir air pressure
(mesured on cold tires):
Up to 90 kg
Front150 kpa
Rear 150 kpa
90kg—maximum*
Front150 kpa
Rear 170 kpa
* Total weight of rider, passenger, cargo and accessoriesWheels:
Front
Type Cast wheel
Size 13 X MT 3.00
Rear
Type Cast wheel
Size 13 X MT 3.50
Brakes:
Front
Type Single disc brake
Operation Right hand operation
Type brake fluid DOT 3 or DOT 4
Rear
Type Single disc brake
Operation Left hand operation
Type brake fluid DOT 3 or DOT 4
Suspension:
Front suspension Telescopic fork
Rear suspension Unit swing
Shock absorber:
Front fork type Coil spring/oil damper
Rear shock absorber Coil spring/oil damper
assembly type or Coil spring/Gas-oil damper
(Depends on model)
Wheel travel:
Front wheel travel 80 mm
Rear wheel travel 72 mm
8-2
Page 77 of 84
SPECIFICATIONS
8
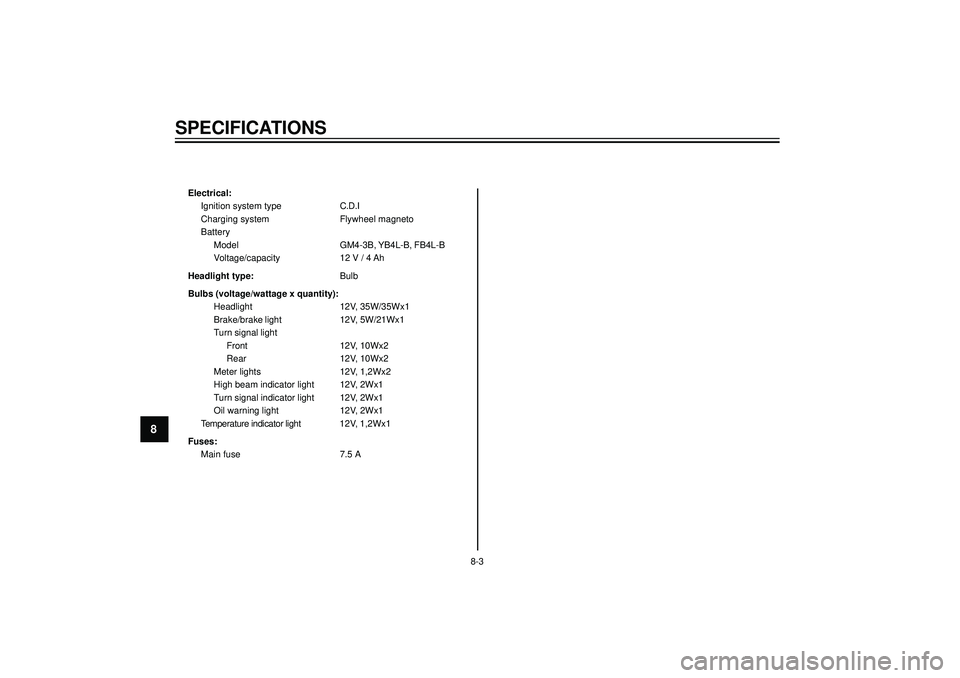
Electrical:
Ignition system type C.D.I
Charging system Flywheel magneto
Battery
Model GM4-3B, YB4L-B, FB4L-B
Voltage/capacity 12 V / 4 Ah
Headlight type:Bulb
Bulbs (voltage/wattage x quantity):
Headlight 12V, 35W/35Wx1
Brake/brake light 12V, 5W/21Wx1
Turn signal light
Front 12V, 10Wx2
Rear 12V, 10Wx2
Meter lights 12V, 1,2Wx2
High beam indicator light 12V, 2Wx1
Turn signal indicator light 12V, 2Wx1
Oil warning light 12V, 2Wx1
Temperature indicator light 12V, 1,2Wx1
Fuses:
Main fuse 7.5 A
8-3
Page 78 of 84
SPECIFICATIONS
8
EAU04513
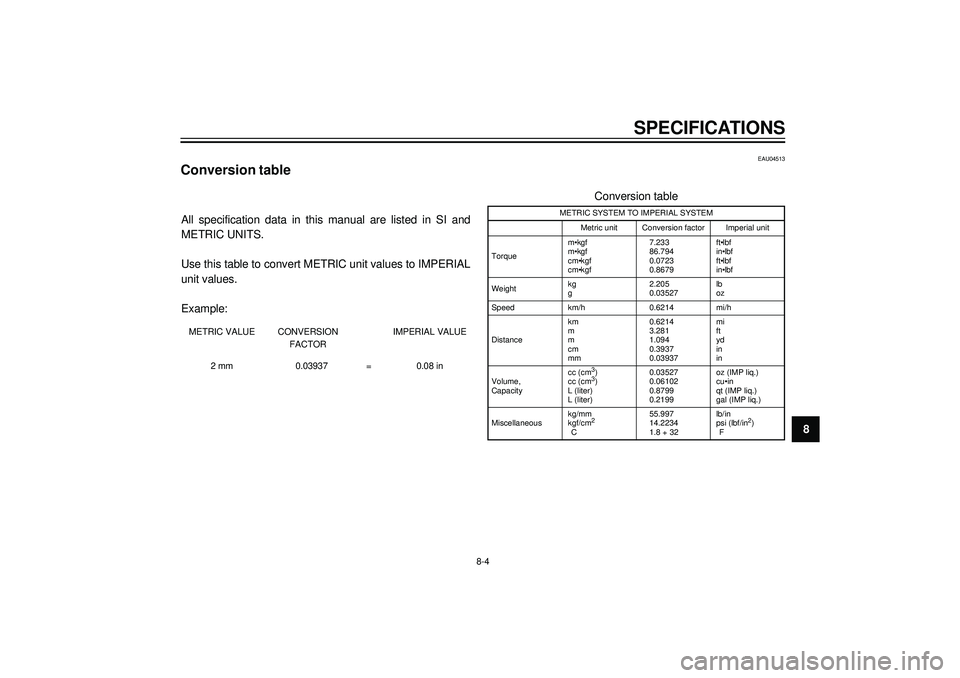
Conversion table
All specification data in this manual are listed in SI and
METRIC UNITS.
Use this table to convert METRIC unit values to IMPERIAL
unit values.
Example:
METRIC VALUE CONVERSION
FACTORIMPERIAL VALUE
2 mm 0.03937 = 0.08 in
Conversion table
METRIC SYSTEM TO IMPERIAL SYSTEM
Metric unit Conversion factor Imperial unit
Torquem•kgf
m•kgf
cm•kgf
cm•kgf
7.233 86.794 0.0723 0.8679ft•lbf
in•lbf
ft•lbf
in•lbf
Weightkg
g
2.205 0.03527lb
oz
Speed km/h
0.6214 mi/h
Distancekm
m
m
cm
mm
0.6214 3.281 1.094 0.3937 0.03937mi
ft
yd
in
in
Volume,
Capacitycc (cm3)
cc (cm3)
L (liter)
L (liter) 0.03527 0.06102 0.8799 0.2199oz (IMP liq.)
cu•in
qt (IMP liq.)
gal (IMP liq.)
Miscellaneouskg/mm
kgf/cm
2
C
55.997 14.2234 1.8 + 32 lb/in
psi (lbf/in
2)
F
8-4
Page 79 of 84

Page 80 of 84
9
EAU01039
CONSUMER INFORMATION
Identification numbers ......................................................................... 9-1
Key identification number .................................................................... 9-1
Vehicle identification number .............................................................. 9-1
Model label .......................................................................................... 9-2