tire pressure YAMAHA BANSHEE 350 2006 Notices Demploi (in French)
[x] Cancel search | Manufacturer: YAMAHA, Model Year: 2006, Model line: BANSHEE 350, Model: YAMAHA BANSHEE 350 2006Pages: 400, PDF Size: 3.59 MB
Page 13 of 400
Tires ...................................................5-23
How to measure tire pressure ............5-27
Tire wear limit .....................................5-29
Fittings and fasteners .........................5-31
Lights ..................................................5-31
Switches .............................................5-31
OPERATION ............................................6-1
Starting a cold engine...........................6-3
Starting a warm engine ........................6-9
Warming up ..........................................6-9
Shifting ...............................................6-11
To start out and accelerate .................6-15
To decelerate .....................................6-19
Engine break-in ..................................6-21
Parking ...............................................6-25
Parking on a slope ..............................6-27
Accessories and loading ....................6-29
6
Riding Your ATV ......................................7-1
Getting to know your ATV ....................7-3
Ride with care and good
judgement ...........................................7-5
Be careful where you ride ...................7-27
Turning your ATV ...............................7-41
Climbing uphill ....................................7-45
Riding downhill ...................................7-57
Crossing a slope .................................7-61
Crossing through shallow water .........7-65
Riding over rough terrain ....................7-69
Sliding and skidding ...........................7-71
What to do if ... ..................................7-75
What to do ... .....................................7-75
PERIODIC MAINTENANCE AND
ADJUSTMENT .........................................8-1
Owner’s manual and tool kit .................8-3
Periodic maintenance/Lubrication ........8-7
Transmission oil .................................8-17
8
7
Page 26 of 400
1-3
q
w
q
GB
D
E
FI
NL
P
S Set with tires cold.
Bei kalten Reifen.
Ajuste con los
neumáticos en frío.
Pneus à froid.Impostare a pneumatici
freddi.
Wanneer de banden
koud zijn.
Regular com pneus
frios.
Ställ in med kalla däck. 30 kPa
0.30 kgf/cm
2
4.4 psi30 kPa
0.30 kgf/cm
2
4.4 psi
5FK-21696-M0
YAMAHA MOTOR CO., LTD.
SHIZUOKA JAPAN
p4GB-2155A-00
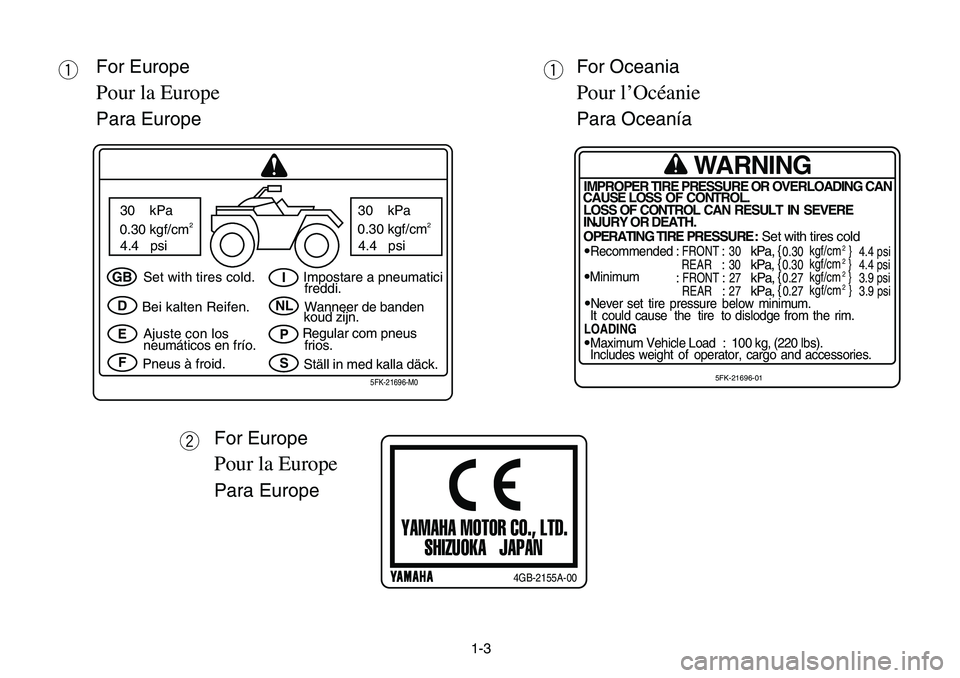
qWARNING
IMPROPER TIRE PRESSURE OR OVERLOADING CAN
CAUSE LOSS OF CONTROL.
LOSS OF CONTROL CAN RESULT IN SEVERE
INJURY OR DEATH.
OPERATINGTIRE PRESSURE : Set with tires cold
9
Recommended : FRONT : 30 kPa,{0.30kgf/cm2}
4.4 psi
REAR:30 kPa,{0.30kgf/cm2}
4.4 psi9Minimum:FRONT : 27 kPa,{0.27kgf/cm2}
3.9 psi
REAR:27 kPa,{0.27kgf/cm2}
3.9 psi9Never set tire pressure below minimum.
It could cause the tire to dislodge from the rim.
LOADING9Maximum Vehicle Load:
100 kg,(220 lbs).
Includes weight of operator, cargo and accessories.
5FK-21696-01
qFor Europe
Pour la Europe
Para EuropeFor Oceania
Pour l’Océanie
Para Oceanía
For Europe
Pour la Europe
Para Europe
Page 42 of 400
2-13
8Never attempt to operate over large obstacles,
such as large rocks or fallen trees. Always fol-
low proper procedures when operating over
obstacles as described in this manual.
8Always be careful when skidding or sliding.
Learn to safely control skidding or sliding by
practicing at low speeds and on level, smooth
terrain. On extremely slippery surfaces, such
as ice, go slowly and be very cautious in order
to reduce the chance of skidding or sliding out
of control.
8Never operate an ATV in fast flowing water or
in water deeper than that recommended in
this manual. Remember that wet brakes may
have reduced stopping ability. Test your
brakes after leaving water. If necessary, apply
them several times to let friction dry out the
linings.
8Always use the size and type of tires specified
in this manual.
8Always maintain proper tire pressure as
described in this manual.
Page 96 of 400
5-1
EBU00113
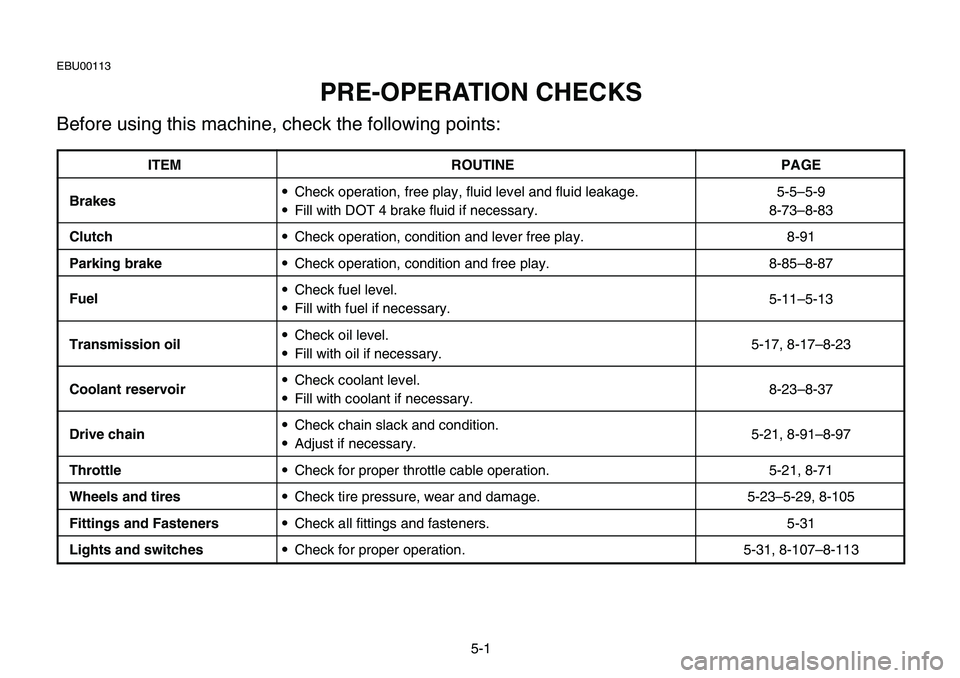
PRE-OPERATION CHECKS
Before using this machine, check the following points:
ITEM ROUTINE PAGE
Brakes9Check operation, free play, fluid level and fluid leakage. 5-5–5-9
9Fill with DOT 4 brake fluid if necessary. 8-73–8-83
Clutch9Check operation, condition and lever free play. 8-91
Parking brake9Check operation, condition and free play. 8-85–8-87
Fuel9Check fuel level.
9Fill with fuel if necessary.5-11–5-13
Transmission oil9Check oil level.
9Fill with oil if necessary.5-17, 8-17–8-23
Coolant reservoir 9Check coolant level.
9Fill with coolant if necessary.8-23–8-37
Drive chain9Check chain slack and condition.
9Adjust if necessary.5-21, 8-91–8-97
Throttle9Check for proper throttle cable operation. 5-21, 8-71
Wheels and tires9Check tire pressure, wear and damage. 5-23–5-29, 8-105
Fittings and Fasteners9Check all fittings and fasteners. 5-31
Lights and switches9Check for proper operation. 5-31, 8-107–8-113
Page 118 of 400
5-23
EBU00158
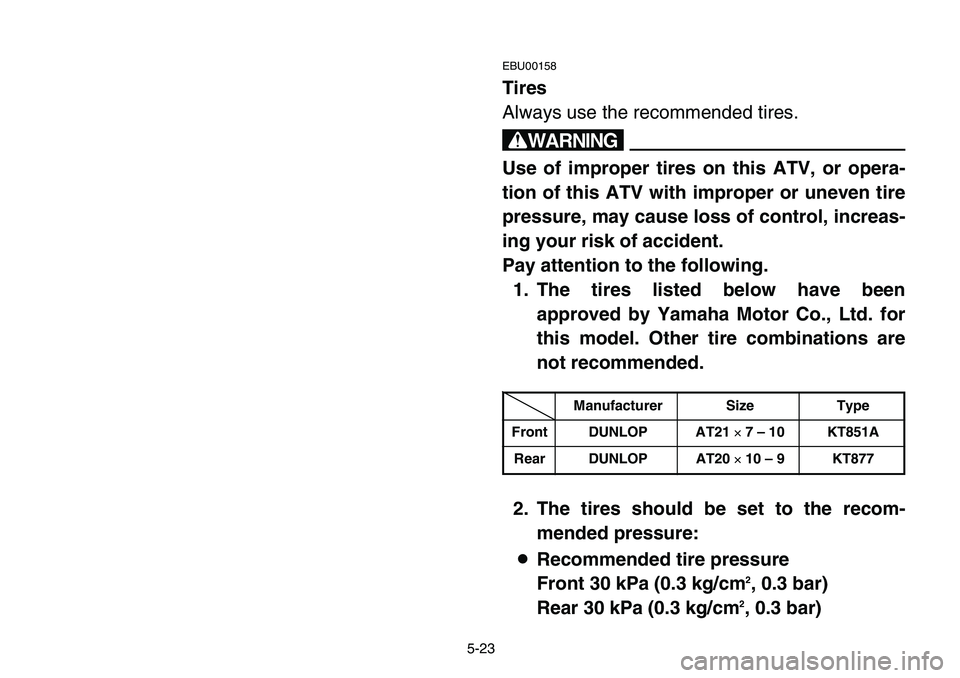
Tires
Always use the recommended tires.
w
Use of improper tires on this ATV, or opera-
tion of this ATV with improper or uneven tire
pressure, may cause loss of control, increas-
ing your risk of accident.
Pay attention to the following.
1. The tires listed below have been
approved by Yamaha Motor Co., Ltd. for
this model. Other tire combinations are
not recommended.
2. The tires should be set to the recom-
mended pressure:
8Recommended tire pressure
Front 30 kPa (0.3 kg/cm
2, 0.3 bar)
Rear 30 kPa (0.3 kg/cm
2, 0.3 bar)
Manufacturer Size Type
Front DUNLOP AT21 ×7 – 10 KT851A
Rear DUNLOP AT20 ×10 – 9 KT877
Page 120 of 400
5-25
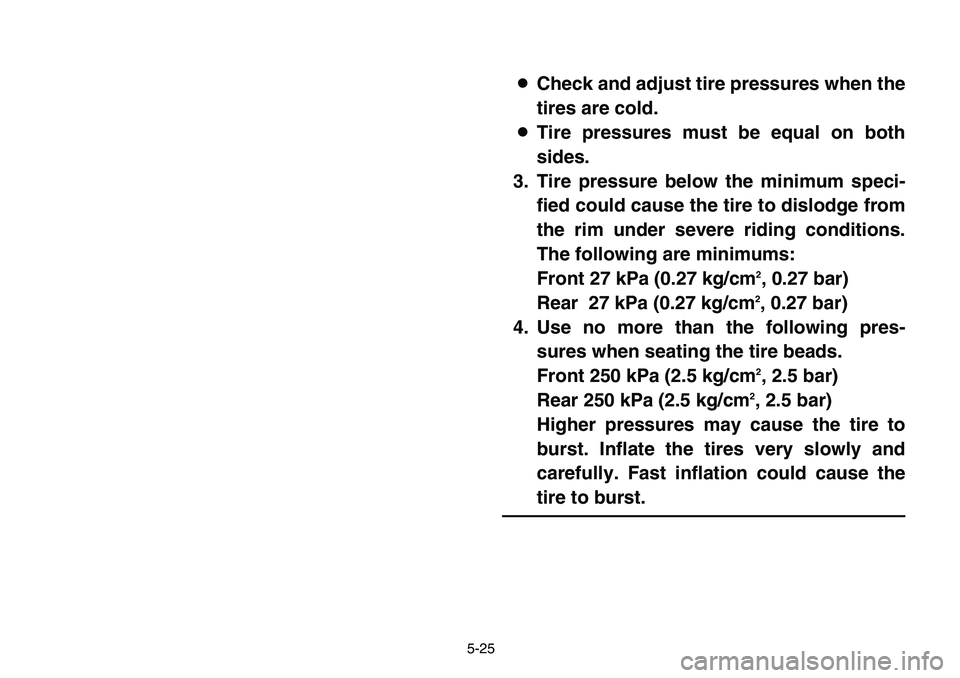
8Check and adjust tire pressures when the
tires are cold.
8Tire pressures must be equal on both
sides.
3. Tire pressure below the minimum speci-
fied could cause the tire to dislodge from
the rim under severe riding conditions.
The following are minimums:
Front 27 kPa (0.27 kg/cm
2, 0.27 bar)
Rear 27 kPa (0.27 kg/cm
2, 0.27 bar)
4. Use no more than the following pres-
sures when seating the tire beads.
Front 250 kPa (2.5 kg/cm
2, 2.5 bar)
Rear 250 kPa (2.5 kg/cm
2, 2.5 bar)
Higher pressures may cause the tire to
burst. Inflate the tires very slowly and
carefully. Fast inflation could cause the
tire to burst.
Page 122 of 400
5-27
EBU14450
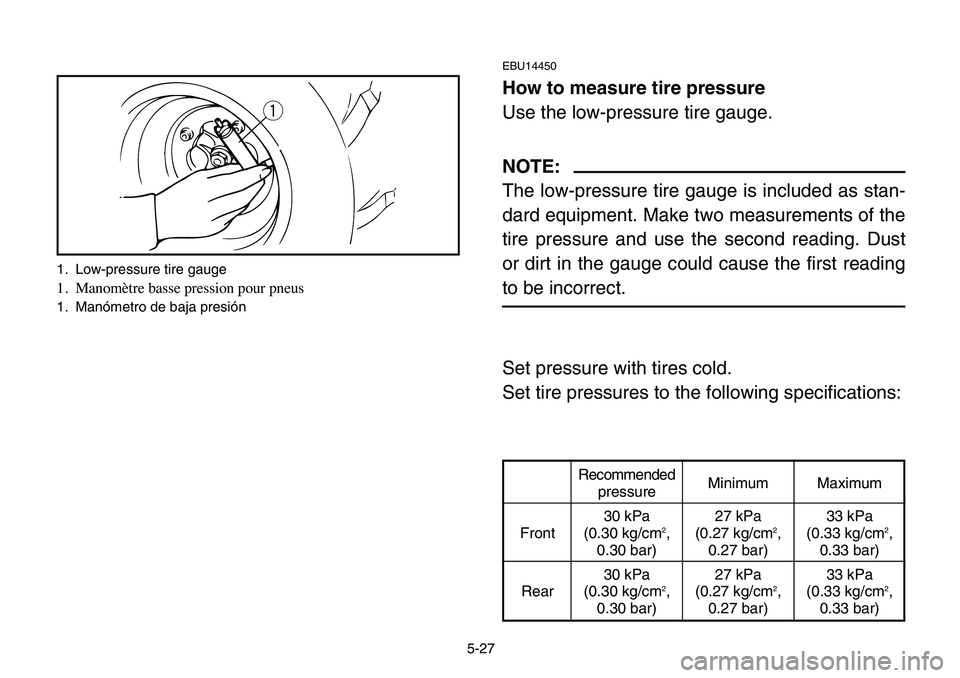
How to measure tire pressure
Use the low-pressure tire gauge.
NOTE:
The low-pressure tire gauge is included as stan-
dard equipment. Make two measurements of the
tire pressure and use the second reading. Dust
or dirt in the gauge could cause the first reading
to be incorrect.
Set pressure with tires cold.
Set tire pressures to the following specifications:
q
1. Low-pressure tire gauge
1. Manomètre basse pression pour pneus
1. Manómetro de baja presión
Recommended
pressure
30 kPa
(0.30 kg/cm
2,
0.30 bar)
30 kPa
(0.30 kg/cm
2,
0.30 bar)Minimum
27 kPa
(0.27 kg/cm
2,
0.27 bar)
27 kPa
(0.27 kg/cm
2,
0.27 bar)Maximum
33 kPa
(0.33 kg/cm
2,
0.33 bar)
33 kPa
(0.33 kg/cm
2,
0.33 bar) Front
Rear
Page 180 of 400
7-15
w
Always use the size and type tires specified
in the Owner’s Manual for this vehicle on
pages 5-23–5-25. Always maintain proper tire
pressure as described in the Owner’s Manual
on page 5-27. Use of improper tires on this
ATV, or operation of this ATV with improper
or uneven tire pressure, may cause loss of
control, increasing your risk of an accident.
Do not operate at speeds too fast for your
skills or the conditions.
w
Always go at a speed that is proper for the
terrain, visibility and operating conditions,
and your experience. Operating this ATV at
speeds too fast for your skills or the condi-
tions increases your chances of losing con-
trol of the ATV, which can result in an acci-
dent.
Page 248 of 400
8-3
EBU12220
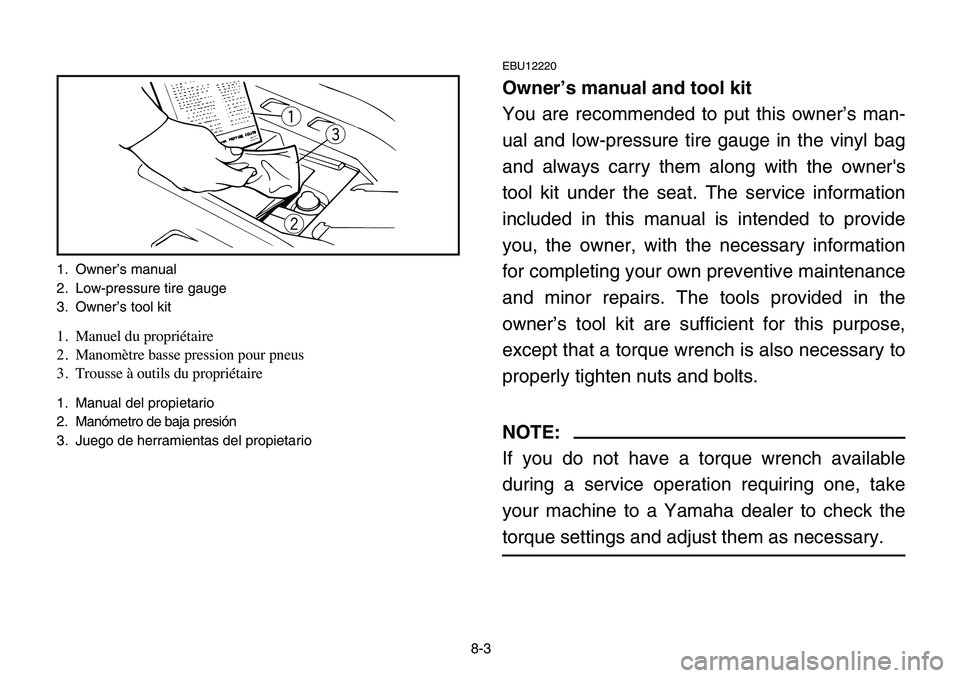
Owner’s manual and tool kit
You are recommended to put this owner’s man-
ual and low-pressure tire gauge in the vinyl bag
and always carry them along with the owner's
tool kit under the seat. The service information
included in this manual is intended to provide
you, the owner, with the necessary information
for completing your own preventive maintenance
and minor repairs. The tools provided in the
owner’s tool kit are sufficient for this purpose,
except that a torque wrench is also necessary to
properly tighten nuts and bolts.
NOTE:
If you do not have a torque wrench available
during a service operation requiring one, take
your machine to a Yamaha dealer to check the
torque settings and adjust them as necessary.
q
we
1. Owner
Page 253 of 400
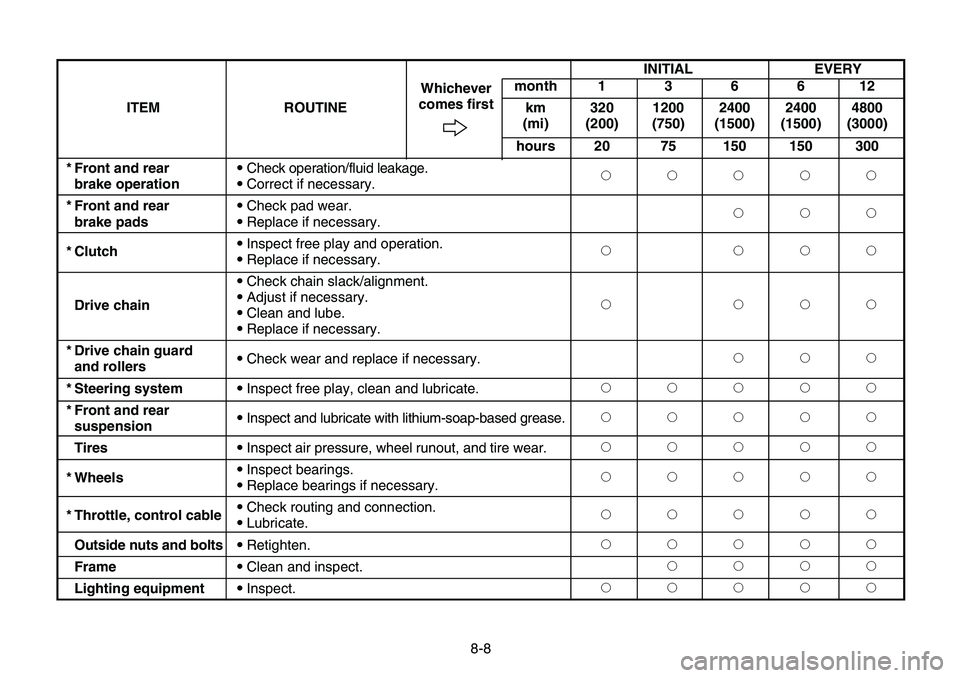
8-8INITIAL EVERY
month 1 3 6 6 12
ITEM ROUTINEWhichever
km 320 1200 2400 2400 4800 comes first
(mi) (200) (750) (1500) (1500) (3000)
hours 20 75 150 150 300
* Front and rear9Check operation/fluid leakage.
22222
brake operation9Correct if necessary.
* Front and rear9Check pad wear.
222
brake pads9Replace if necessary.
* Clutch9Inspect free play and operation.
2222
9Replace if necessary.
9Check chain slack/alignment.
Drive chain9Adjust if necessary.
2222
9Clean and lube.
9Replace if necessary.
* Drive chain guard
9Check wear and replace if necessary.222
and rollers
* Steering system9Inspect free play, clean and lubricate.22222
* Front and rear
9Inspect and lubricate with lithium-soap-based grease.22222
suspension
Tires9Inspect air pressure, wheel runout, and tire wear.22222
* Wheels9Inspect bearings.
22222
9Replace bearings if necessary.
* Throttle, control cable9Check routing and connection.
22222
9Lubricate.
Outside nuts and bolts9Retighten.22222
Frame9Clean and inspect.2222
Lighting equipment9Inspect.22222