YAMAHA BANSHEE 350 2011 Owners Manual
BANSHEE 350 2011
YAMAHA
YAMAHA
https://www.carmanualsonline.info/img/51/49356/w960_49356-0.png
YAMAHA BANSHEE 350 2011 Owners Manual
Trending: parking brake, headlights, ground clearance, wheel alignment, tire type, dimensions, oil change
Page 101 of 148

8-23
1
2
3
4
5
6
78
9
10
11
4. Make sure the gasket is properly positioned,
then insert the tailpipe into the muffler and
align the screw holes.
5. Install the screws and tighten them to the
specified torque.
WARNING
EWB02340
Do not start the engine when cleaning the
spark arrester, otherwise it could cause injury
to the eyes, burns, carbon monoxide poison-
ing, possibly leading to death, and start a fire.
Always let the exhaust system cool prior to
touching exhaust components.
EBU23994
Changing the carburetor settings
In extremely cold weather, it is necessary to
change the carburetor settings to maintain opti-
mum engine performance and to prevent engine
damage.WARNING
EWB01990
�
Improperly servicing or adjusting the carbu-
retors could cause them to malfunction with
the possibility of an accident, or the carbure-
tors could leak fuel, which would be a fire
hazard.
�
Carburetor adjustments should only be per-
formed by a Yamaha dealer. Do not attempt
to perform these procedures unless you
have mechanical knowledge and the neces-
1. Screw
2. Tailpipe
3. Spark arrester
4. Gasket
Tightening torque:
Screw:
7 Nm (0.7 m·kgf, 5.1 ft·lbf)
2
3
41
1
Page 102 of 148
8-24
1
2
3
4
5
6
78
9
10
11
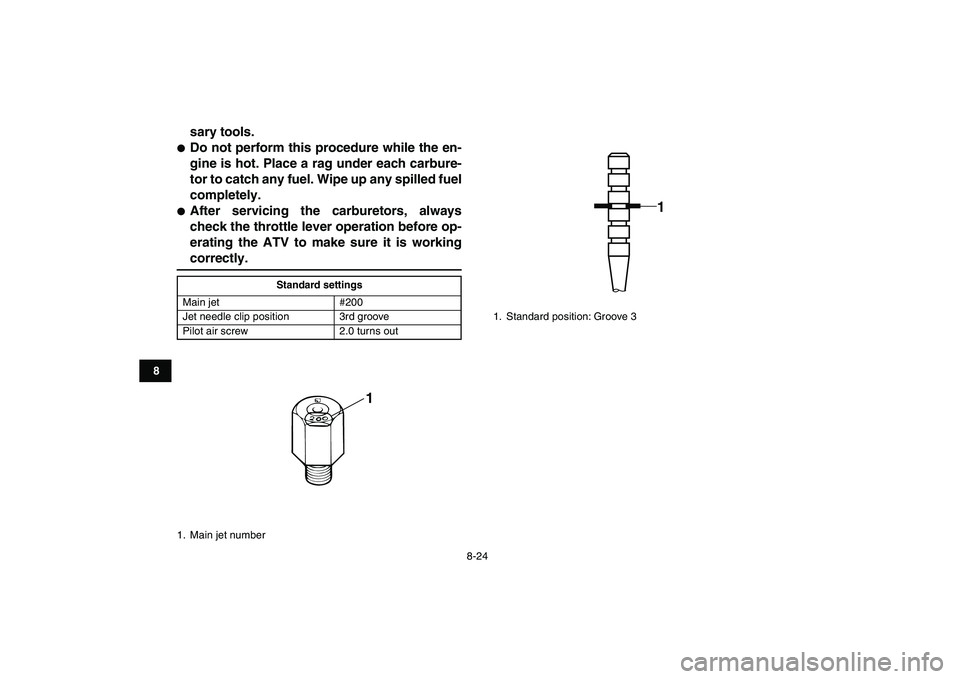
sary tools.
�
Do not perform this procedure while the en-
gine is hot. Place a rag under each carbure-
tor to catch any fuel. Wipe up any spilled fuel
completely.
�
After servicing the carburetors, always
check the throttle lever operation before op-
erating the ATV to make sure it is working
correctly.
Standard settings
Main jet #200
Jet needle clip position 3rd groove
Pilot air screw 2.0 turns out
1. Main jet number
1
1. Standard position: Groove 3
1
Page 103 of 148
8-25
1
2
3
4
5
6
78
9
10
11
Carburetor setting chart
Changing the settings of the carburetors
To change the settings of the carburetors, you
need to disassemble and remove them. Follow the
procedures for both carburetors.
Disassembling and removing the carburetors
1. Turn the fuel cock to the “OFF” position.
2. Turn out the carburetor drain screw to drain
the fuel.
3. Remove the seat.
4. Remove the radiator cover and side cover by
removing the screws.
5. Remove the fuel hose from the fuel cock.
TemperatureAltitude
0
–1500 m (5000 ft) Above 1500 m (5000 ft)
Main jet Jet needle Pilot air screw Main jet Jet needle Pilot air screw
Above 0 °C (32 °F) #200 3rd groove 2.0 turns out #190 3rd groove 2 1/2 turns out
from +5 °C (41 °F) to
–15 °C (5 °F)#220 3rd groove 1 1/2 turns out #200 3rd groove 2.0 turns out
from –10 °C (14 °F) to
–30 °C (–22 °F)#240 4th groove 1 1/2 turns out #220 3rd groove 1 1/2 turns out
1. Radiator cover
2. Side cover
3. Screw
1
2 3 3
3
3
Page 104 of 148
8-26
1
2
3
4
5
6
78
9
10
11
6. Remove the fuel tank by removing the bolts.
7. Remove the air filter case cover by unhooking
the holders.
1. Fuel hose
1
1. Fuel tank
2. Bolt
1
2
22
2
Page 105 of 148
8-27
1
2
3
4
5
6
78
9
10
11
8. Remove the mixing chamber cap securing
plate by removing the screw.9. Loosen the carburetor joint screws.
1. Air filter case cover
2. Air filter case cover holder
1 2 2
1. Mixing chamber cap securing plate
2. Screw
21
Page 106 of 148
8-28
1
2
3
4
5
6
78
9
10
11
10. Remove the mixing chamber cap.
11. Remove the throttle cable from the throttle
valve, and then remove the throttle cable hold-
er by removing the screws.
1. Joint screw
1
11
1
1. Throttle cable
2. Throttle valve
3. Throttle cable holder
4. Screw
1
2
3 4
Page 107 of 148
8-29
1
2
3
4
5
6
78
9
10
11
12. Remove the carburetor, and then remove the
float chamber by removing the screws.
13. Remove the float and needle valve.
1. Float chamber
2. Screw
1
2 2
2
2
Page 108 of 148

8-30
1
2
3
4
5
6
78
9
10
11
14. Change the main jet and the jet needle clip po-
sition.
TIP
�
Optional main jets can be obtained at a Yamaha
dealer.
�
After the jet needle clip position is changed, the
throttle cables may need to be adjusted.
Assembling and installing the carburetors
Assemble and install both carburetors by the fol-lowing steps.
1. Install the needle valve and float.
2. Install the float chamber by installing the
screws.
3. Install the carburetor and tighten the joint
screws.
4. Assemble the throttle valve.
5. Install the mixing chamber cap, and then tight-
en it securely to the specified torque.
6. Install the mixing chamber cap securing plate
by installing the screw.
NOTICE:
Be sure to
match one of the projections on the carbu-
retor cap with one of the slots on the se-
curing plate. If the securing plate does not
match a projection, tighten the carburetor
cap until they align. Do not loosen the car-
buretor cap.
[ECB00502]
1. Float
2. Needle valve
3. Main jet
1
2 3
Tightening torque:
Mixing chamber cap:
4 Nm (0.40 m·kgf, 2.9 ft·lbf)
Page 109 of 148
8-31
1
2
3
4
5
6
78
9
10
11
7. Tighten the mixing chamber cap securing
plate screw to the specified torque.
8. Tighten the carburetor joint screws.
Adjusting the throttle cables
1. Move the throttle lever a few times.
2. Push the throttle lever forward until it stops
and hold it in this position.
3. Check through each carburetor window to see
if the punch mark on the throttle valve is at the
specified position.
4. If not, loosen the locknut and turn the adjust-
ing nut until the specified position is obtained.
1. Mixing chamber cap securing plate
2. Projection
3. Slot
4. Screw
Tightening torque:
Mixing chamber cap securing plate screw:
3.5 Nm (0.35 m·kgf, 2.5 ft·lbf)
12
3
4
1. Punch mark
2. Specified position: 0–1mm
1
2
Page 110 of 148

8-32
1
2
3
4
5
6
78
9
10
11
5. Move the throttle lever a few times and re-
check the position.
6. Install the fuel tank, side cover, radiator cover
and air filter case cover.
7. Connect the fuel hose to the fuel cock.
8. Install the seat.
EBU24020
Adjusting the engine idling speed
The engine idling speed must be checked and, if
necessary, adjusted as follows at the intervals
specified in the periodic maintenance and lubrica-tion chart.
TIP
�
A diagnostic tachometer is needed to make this
adjustment.
�
The carburetor synchronization and the throttle
cable free play must be checked, and adjusted if
necessary, before adjusting the engine idling
speed.
1. Start the engine and warm it up.
TIP
The engine is warm when it quickly responds to the
throttle.
2. Attach the tachometer to the spark plug lead.
3. Turn in both pilot air screws until they lightly
seat.
4. Turn out both pilot air screws to specification.
(See the “Changing the carburetor settings”
section on the page 8-23.)
1. Adjusting nut
2. Locknut
1
2
Trending: fuel pressure, service interval, stop start, check engine light, ECU, spark plugs replace, low beam