turn YAMAHA BLASTER 200 2002 Owner's Guide
[x] Cancel search | Manufacturer: YAMAHA, Model Year: 2002, Model line: BLASTER 200, Model: YAMAHA BLASTER 200 2002Pages: 368, PDF Size: 4.89 MB
Page 221 of 368

7-55
If your ATV has stalled or stopped and you
believe you can continue up the hill, restart care-
fully to make sure you do not lift the front wheels
which could cause you to lose control. If you are
unable to continue up the hill, dismount the ATV
on the uphill side. Physically turn the ATV
around and then descend the hill.
If you start to roll backwards, DO NOT use the
rear brake to stop or try to put the ATV in gear.
The ATV could easily tip over backwards.
Instead, dismount the ATV immediately on the
uphill side.
5KJ-62 (7 shou) 4/23/01 3:06 PM Page 56
Page 223 of 368

7-57
w
Use proper gear and maintain steady speed
when climbing a hill.
If you lose all forward speed:
8Keep weight uphill.
8Apply the brakes.
8Lock parking brake, after you are stopped.
If you begin rolling backwards:
8Keep weight uphill.
8Never apply the rear brake while rolling
backwards. Apply the front brake.
When fully stopped, apply rear brake as
well, and then lock parking brake.
Dismount on uphill side or to a side if point-
ed straight uphill. Turn the ATV around and
remount, following the procedure described
in the Owner’s Manual.
5KJ-62 (7 shou) 4/23/01 3:06 PM Page 58
Page 229 of 368

7-63
CROSSING A SLOPE
Traversing a sloping surface on your ATV
requires you to properly position your weight to
maintain proper balance. Be sure that you have
learned the basic riding skills on flat ground
before attempting to cross a sloping surface.
Avoid slopes with slippery surfaces or rough ter-
rain that may upset your balance.
As you travel across a slope, lean your body in
the uphill direction. It may be necessary to cor-
rect the steering when riding on loose surfaces
by pointing the front wheels slightly uphill. When
riding on slopes be sure not to make sharp turns
either up or down hill.
5KJ-62 (7 shou) 4/23/01 3:06 PM Page 64
Page 231 of 368

7-65
If your ATV does begin to tip over, gradually
steer in the downhill direction if there are no
obstacles in your path. As you regain proper bal-
ance, gradually steer again in the direction you
wish to travel.
w
Never attempt to turn the ATV around on any
hill until you have mastered the turning tech-
nique as described in the Owner’s Manual on
level ground. Be very careful when turning
on any hill. Avoid crossing the side of a
steep hill if possible.
When crossing the side of a hill:
8Always follow proper procedures as
described in the Owner’s Manual.
8Avoid hills with excessively slippery or
loose surfaces.
8Shift your weight to the uphill side of the
ATV.
OK
5KJ-62 (7 shou) 4/23/01 3:06 PM Page 66
Page 243 of 368

7-77
WHAT TO DO IF ...
This section is designed to be a reference guide
only. Be sure to read each section on riding
techniques completely.
WHAT TO DO ...
8If your ATV doesn’t turn when you want it to:
Bring the ATV to a stop and practice the turn-
ing maneuvers again. Be sure you are putting
your weight on the footboard to the outside of
the turn. Position your weight over the front
wheels for better control. (See pages 7-43 ~
7-47.)
8If your ATV begins to tip while turning:
Lean more into the turn to regain balance. If
necessary, gradually let off the throttle and/or
steer to the outside of the turn. (See pages
7-43 ~ 7-47.)
5KJ-62 (7 shou) 4/23/01 3:06 PM Page 78
Page 245 of 368

7-79
8If your ATV starts to slide sideways:
Steer in the direction of the slide if you have
the room.
Applying the brakes or accelerating is not rec-
ommended until you have corrected the slide.
(See pages 7-73 ~ 7-75.)
8If your ATV can’t make it up a hill you are try-
ing to climb:
Turn the ATV around if you still have forward
speed. If not, stop, dismount on the uphill side
of the ATV and physically turn the ATV
around. If the ATV starts to slip backwards
DO NOT USE THE REAR BRAKE - the ATV
may tip over on top of you. Dismount the ATV
on the uphill side. (See pages 7-47 ~ 7-57.)
5KJ-62 (7 shou) 4/23/01 3:06 PM Page 80
Page 249 of 368
8-1
EBU00516
PERIODIC
MAINTENANCE AND
ADJUSTMENT
Periodic inspection, adjustment and lubrication
will keep your machine in the safest and most
efficient condition possible. Safety is an obliga-
tion of the machine owner. The most important
points of machine inspection, adjustment and
lubrication are explained on the following pages.
w
Never service an engine while it is running.
Moving parts can catch clothing or parts of
the body, causing injury. Electrical compo-
nents can cause shocks or can start fires.
Turn off the engine when performing mainte-
nance unless otherwise specified. Have a
Yamaha dealer perform service if you are not
familiar with machine service.
5KJ-62 (8 shou) 4/23/01 3:08 PM Page 2
Page 283 of 368
8-35
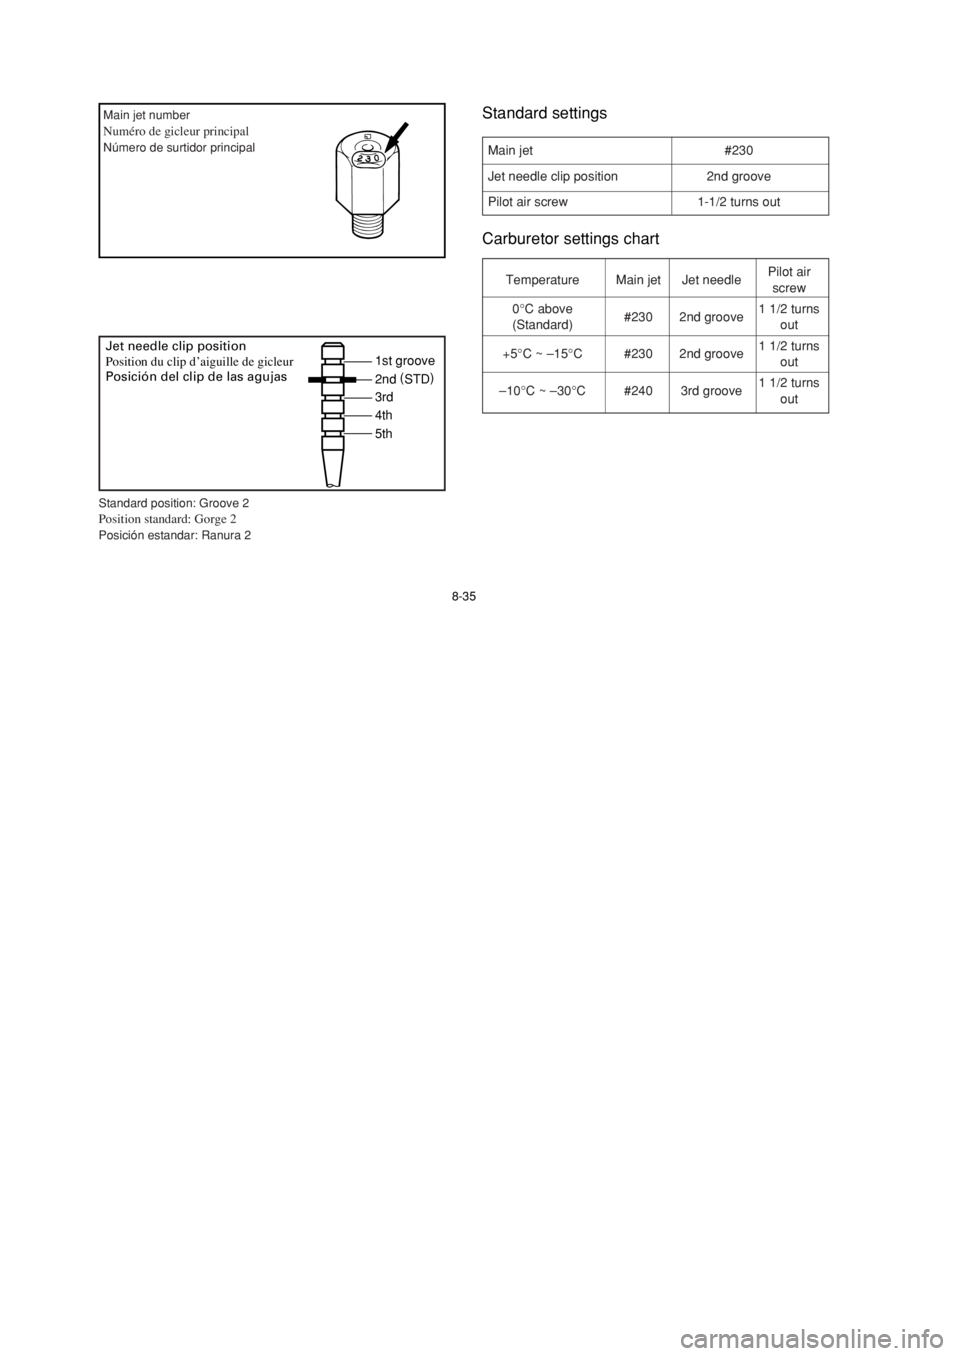
Standard settings
Carburetor settings chart
1st groove
2nd (
STD)
3rd
4th
5th Jet needle clip position
Position du clip d’aiguille de gicleur
Posición del clip de las agujas
Main jet #230
Jet needle clip position 2nd groove
Pilot air screw 1-1/2 turns out
Temperature Main jet Jet needlePilot air
screw
0°C above
#230 2nd groove1 1/2 turns
(Standard) out
+5°C ~ –15°C #230 2nd groove1 1/2 turns
out
–10°C ~ –30°C #240 3rd groove1 1/2 turns
out
Main jet number
Numéro de gicleur principalNúmero de surtidor principal
Standard position: Groove 2
Position standard: Gorge 2Posición estandar: Ranura 2
5KJ-62 (8 shou) 4/23/01 3:08 PM Page 36
Page 285 of 368
8-37
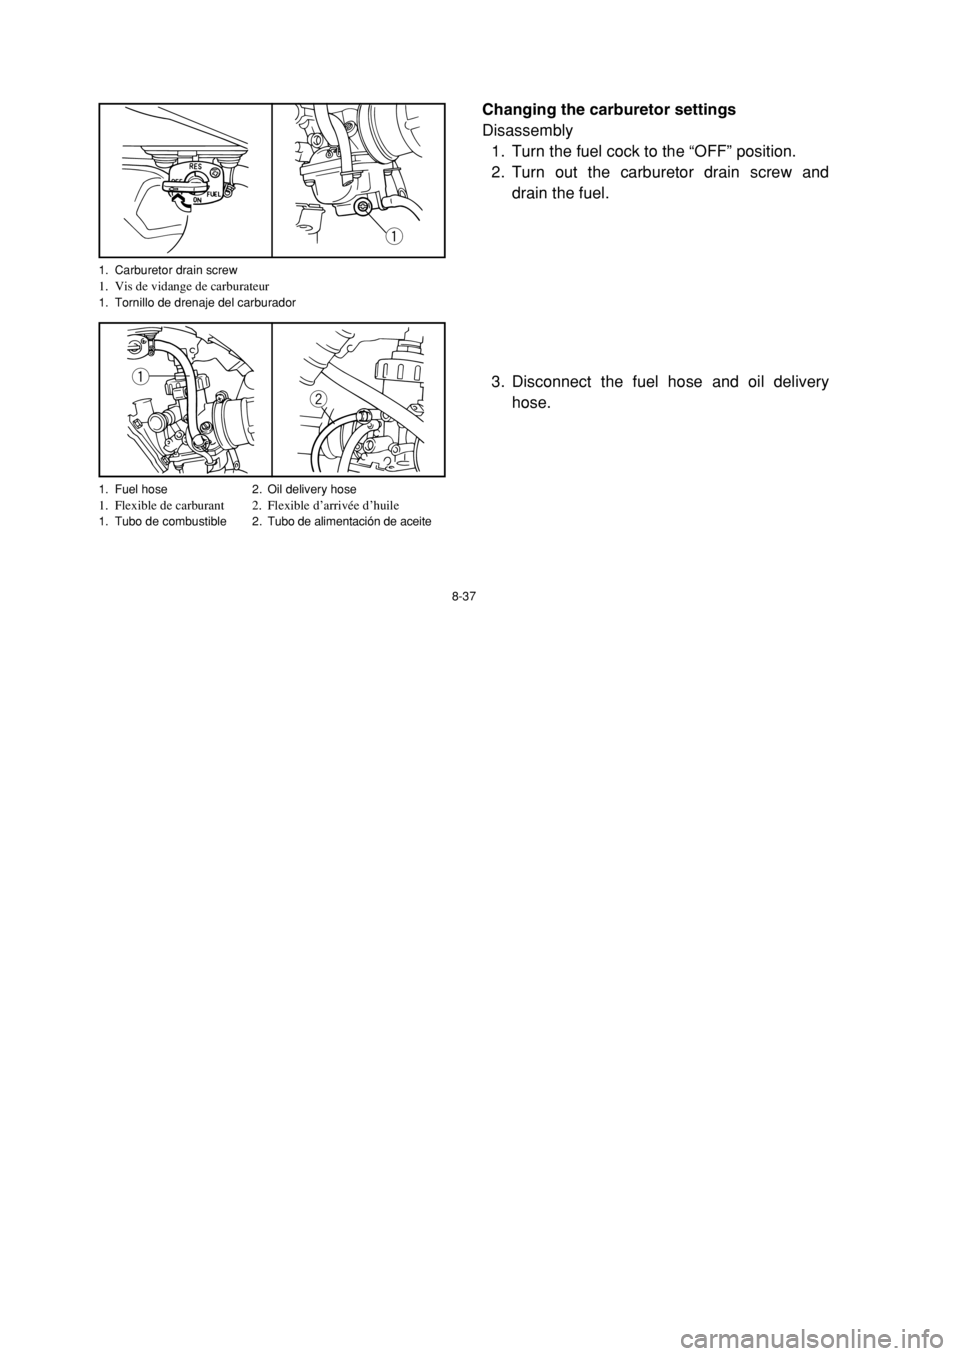
Changing the carburetor settings
Disassembly
1. Turn the fuel cock to the “OFF” position.
2. Turn out the carburetor drain screw and
drain the fuel.
3. Disconnect the fuel hose and oil delivery
hose.
q
q
w
1. Carburetor drain screw1. Vis de vidange de carburateur1. Tornillo de drenaje del carburador
1. Fuel hose 2. Oil delivery hose
1. Flexible de carburant 2. Flexible d’arrivée d’huile1. Tubo de combustible 2.Tubo de alimentación de aceite
5KJ-62 (8 shou) 4/23/01 3:08 PM Page 38
Page 293 of 368

8-45
EBU00301
Idle speed adjustment
NOTE:
A diagnostic tachometer must be used for this
procedure.
1. Start the engine and warm it up for a few
minutes at approximately 1,000 to 2,000
r/min. Occasionally rev the engine to 4,000
to 5,000 r/min. The engine is warm when it
quickly responds to the throttle.
2. Connect the tachometer and set the idle to
the specified idling speed by adjusting the
throttle stop screw. Turn the screw in to
increase engine speed, and out to decrease
engine speed.
q
1. Throttle stop screw1. Vis de butée de papillon1. Tornillo tope del acelerador
Specified idle speed:
1,450 ~1,550 r/min
5KJ-62 (8 shou) 4/23/01 3:08 PM Page 46