turn YAMAHA BLASTER 200 2002 Service Manual
[x] Cancel search | Manufacturer: YAMAHA, Model Year: 2002, Model line: BLASTER 200, Model: YAMAHA BLASTER 200 2002Pages: 368, PDF Size: 4.89 MB
Page 295 of 368
8-47
EBU00307
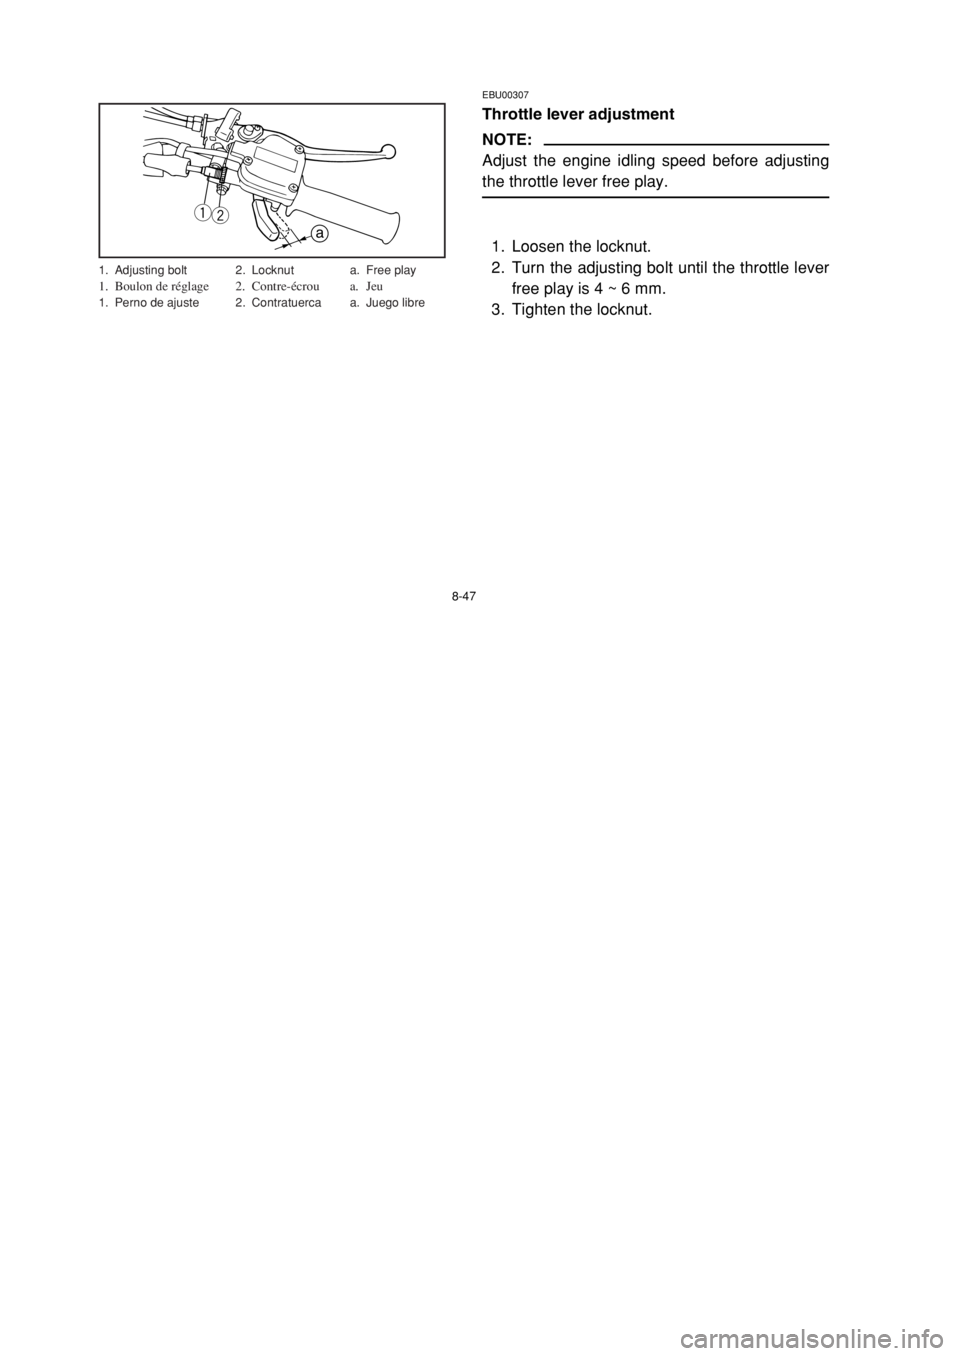
Throttle lever adjustment
NOTE:
Adjust the engine idling speed before adjusting
the throttle lever free play.
1. Loosen the locknut.
2. Turn the adjusting bolt until the throttle lever
free play is 4 ~ 6 mm.
3. Tighten the locknut.
q
w
a
1. Adjusting bolt 2. Locknut a. Free play1. Boulon de réglage 2. Contre-écrou a. Jeu1. Perno de ajuste 2. Contratuerca a. Juego libre
5KJ-62 (8 shou) 4/23/01 3:08 PM Page 48
Page 299 of 368
qw
a
a’
a = a’
1. Equalizer 2. Cable joint1.Égaliseur 2. Raccord de câble1. Ecualizador 2. Conexión del cable
8-51
EBU00524
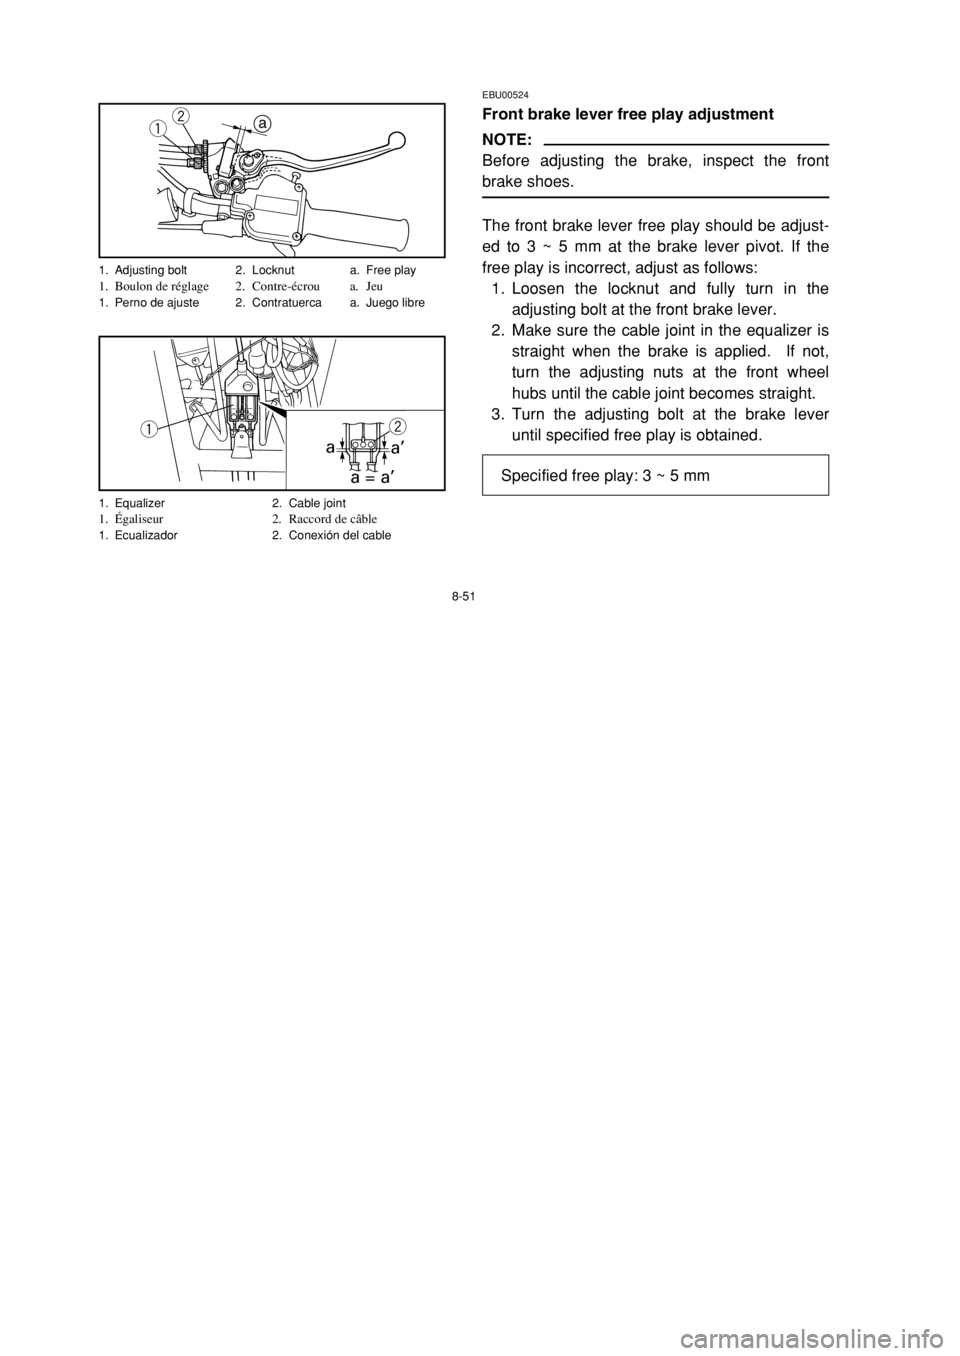
Front brake lever free play adjustment
NOTE:
Before adjusting the brake, inspect the front
brake shoes.
The front brake lever free play should be adjust-
ed to 3 ~ 5 mm at the brake lever pivot. If the
free play is incorrect, adjust as follows:
1. Loosen the locknut and fully turn in the
adjusting bolt at the front brake lever.
2. Make sure the cable joint in the equalizer is
straight when the brake is applied. If not,
turn the adjusting nuts at the front wheel
hubs until the cable joint becomes straight.
3. Turn the adjusting bolt at the brake lever
until specified free play is obtained.
wqa
1. Adjusting bolt 2. Locknut a. Free play1. Boulon de réglage 2. Contre-écrou a. Jeu1. Perno de ajuste 2. Contratuerca a. Juego libre
Specified free play: 3 ~ 5 mm
5KJ-62 (8 shou) 4/23/01 3:08 PM Page 52
Page 303 of 368
8-55
EBU00595
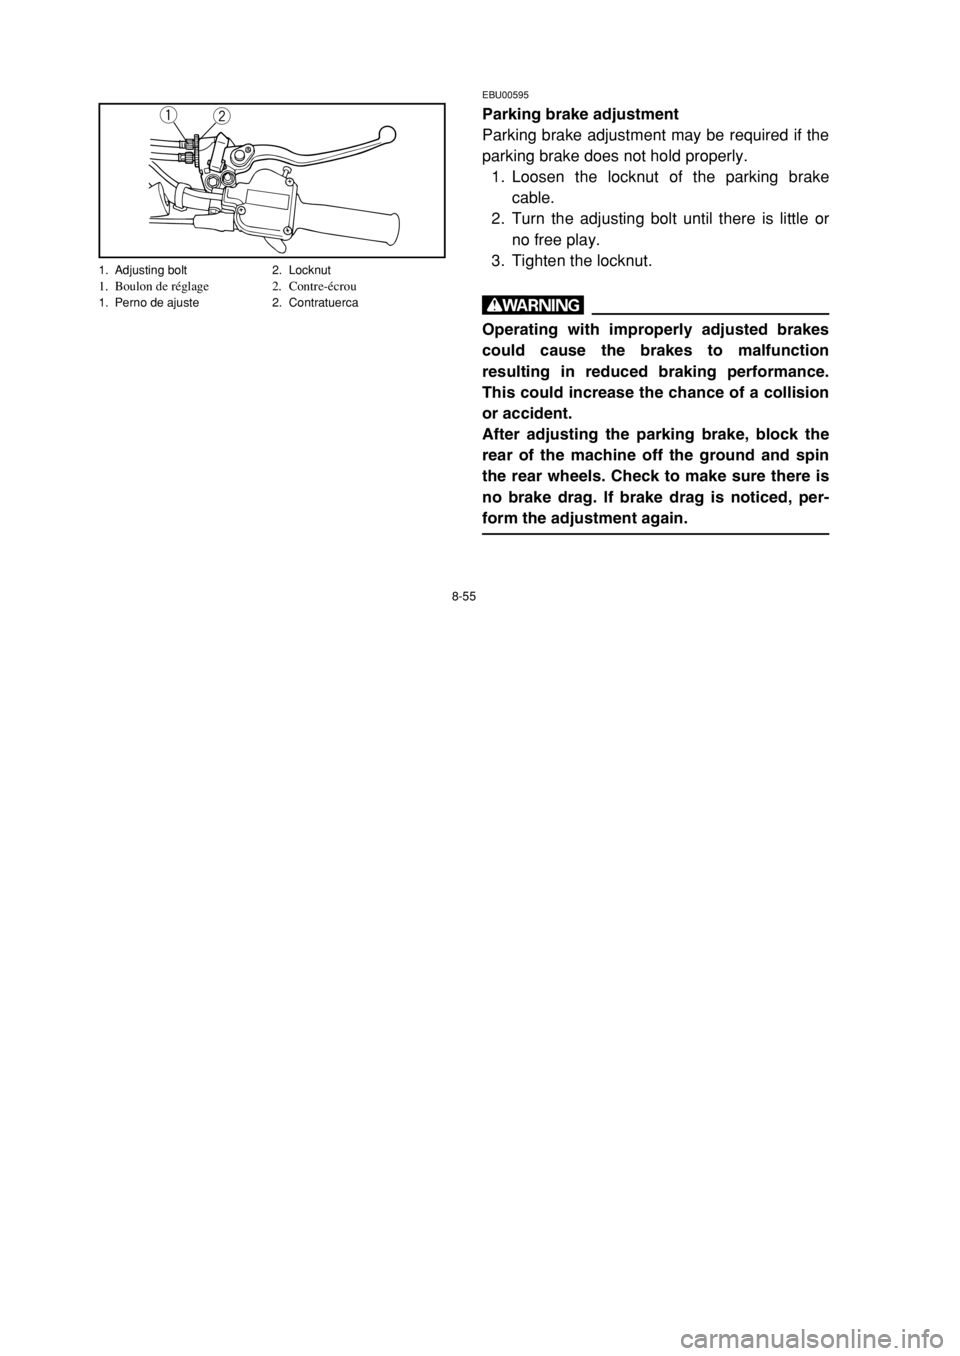
Parking brake adjustment
Parking brake adjustment may be required if the
parking brake does not hold properly.
1. Loosen the locknut of the parking brake
cable.
2. Turn the adjusting bolt until there is little or
no free play.
3. Tighten the locknut.
w
Operating with improperly adjusted brakes
could cause the brakes to malfunction
resulting in reduced braking performance.
This could increase the chance of a collision
or accident.
After adjusting the parking brake, block the
rear of the machine off the ground and spin
the rear wheels. Check to make sure there is
no brake drag. If brake drag is noticed, per-
form the adjustment again.
wq
1. Adjusting bolt 2. Locknut1. Boulon de réglage 2. Contre-écrou1. Perno de ajuste 2. Contratuerca
5KJ-62 (8 shou) 4/23/01 3:08 PM Page 56
Page 305 of 368

8-57
EBU00833
Adjusting the rear brake light switch
The rear brake light switch, which is activated by
the brake pedal and brake lever, is properly
adjusted when the brake light comes on just
before braking takes effect. If necessary, adjust
the brake light switch as follows.
Turn the adjusting nut while holding the rear
brake light switch in place. To make the brake
light come on earlier, turn the adjusting nut in
direction a. To make the brake light come on
later, turn the adjusting nut in direction b.
ba
q
w
1. Rear brake light switch1. Contacteur de feu stop sur frein arrière1. Interruptor de la luz de freno trasero
2. Adjusting nut
2.Écrou de réglage2. Tuerca de ajuste
5KJ-62 (8 shou) 4/23/01 3:08 PM Page 58
Page 307 of 368
8-59
EBU00539
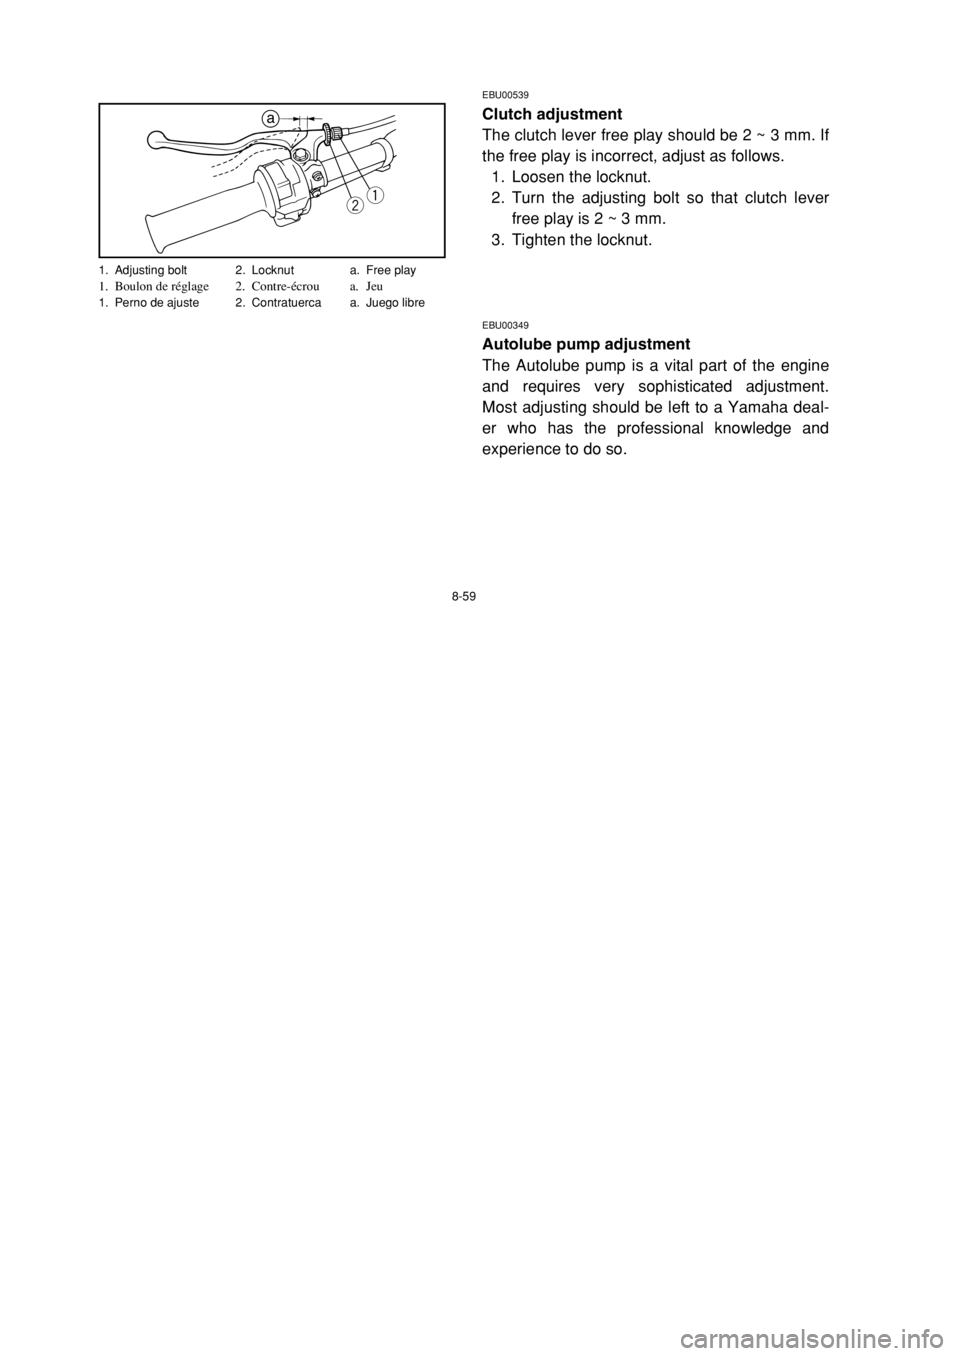
Clutch adjustment
The clutch lever free play should be 2 ~ 3 mm. If
the free play is incorrect, adjust as follows.
1. Loosen the locknut.
2. Turn the adjusting bolt so that clutch lever
free play is 2 ~ 3 mm.
3. Tighten the locknut.
EBU00349
Autolube pump adjustment
The Autolube pump is a vital part of the engine
and requires very sophisticated adjustment.
Most adjusting should be left to a Yamaha deal-
er who has the professional knowledge and
experience to do so.
qw
a
1. Adjusting bolt 2. Locknut a. Free play1. Boulon de réglage 2. Contre-écrou a. Jeu1. Perno de ajuste 2. Contratuerca a. Juego libre
5KJ-62 (8 shou) 4/23/01 3:08 PM Page 60
Page 311 of 368

8-63
EBU00351
Drive chain slack adjustment
1. Loosen the rear wheel hub bolts.
2. Loosen the adjuster locknuts on each side.
To tighten the chain, turn the chain adjuster
clockwise. To loosen the chain, turn the
adjuster counterclockwise and push the
wheel forward. Turn each adjuster exactly
the same amount to maintain correct axle
alignment.
There are marks on each side of the
swingarm and on each chain adjuster. Use
them to check for proper alignment.
3. After adjusting, be sure to tighten the lock-
nuts and the wheel hub bolts.
q
w
e
q
wqw
1. Upper bolt (×2) 2. Lower bolt (×2)1. Boulon supérieur (×2) 2. Boulon inférieur (×2)1. Tornillo superior (×2) 2. Tornillo inferior (×2)
1. Locknut (×2) 2. Adjuster (×2)
3. Alignment marks
1. Contre-écrou (×2) 2. Dispositif de réglage (×2)
3. Repères d’alignement
1. Contratuerca (×2) 2. Tornillo de ajuste (×2)
3. Marcas de alineación
Upper wheel hub bolt:
50 Nm (5.0 m0kg)
Lower wheel hub bolt:
50 Nm (5.0 m0kg)
5KJ-62 (8 shou) 4/23/01 3:08 PM Page 64
Page 325 of 368

8-77
2. Remove the bulb holder cover, turn the bulb
holder counterclockwise and remove the
defective bulb.
w
The headlight bulb is hot when it is on and
immediately after it is turned off. Wait for the
bulb to cool before touching or removing it.
You can be burned, or a fire could start if the
bulb touches something flammable.
3. Put a new bulb into position and secure it in
place with the bulb holder.
4. Install the bulb holder cover.
cC
Make sure the bulb holder cover is securely
fitted over the bulb holder and seated
against the reflector.
5. Install the headlight unit assembly.
Adjust the headlight beam if necessary.
5KJ-62 (8 shou) 4/23/01 3:08 PM Page 78
Page 329 of 368

8-81
EBU00861
Tail/brake light bulb replacement
1. Remove the bulb holder (together with the
bulb) by turning it counterclockwise.
2. Remove the defective bulb from the bulb
holder by pushing it inward and turning it
counterclockwise.
3. Install a new bulb in the bulb holder by
pushing it inward and turning it clockwise.
4. Install the bulb holder (together with the
bulb).
q
q
w
1. Bulb holder1. Fixation d’ampoule1. Portabombillas
1. Bulb holder 2. Bulb
1. Fixation d’ampoule 2. Ampoule
1. Portabombillas 2. Bombilla
5KJ-62 (8 shou) 4/23/01 3:08 PM Page 82
Page 335 of 368
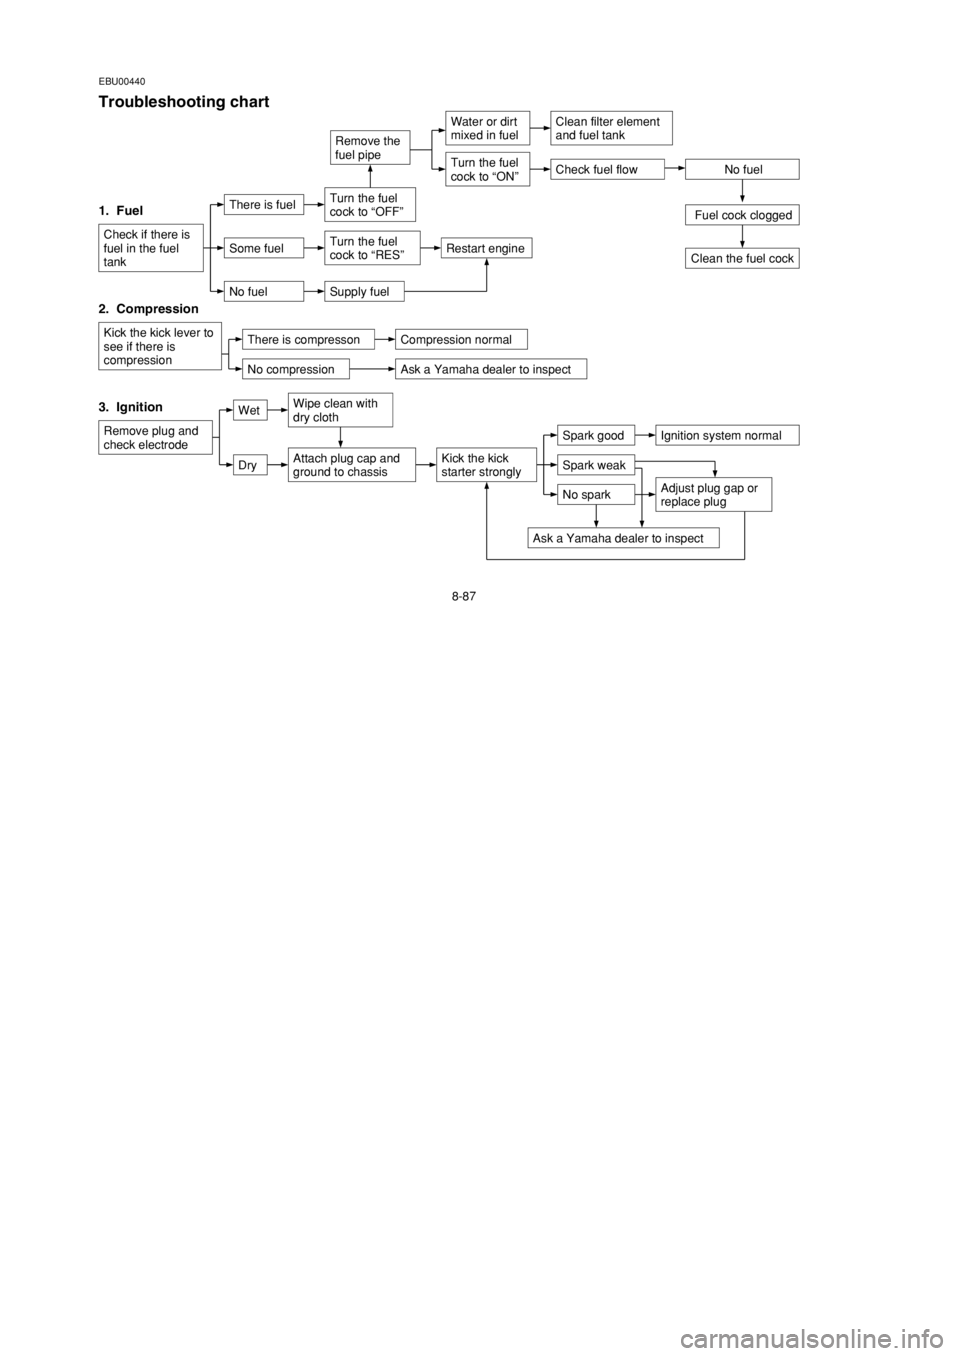
8-87
EBU00440
Troubleshooting chart
Check fuel flow
1. Fuel
Check if there is
fuel in the fuel
tank
2. Compression
Kick the kick lever to
see if there is
compression
3. Ignition
Remove plug and
check electrode
WetWipe clean with
dry cloth
DryAttach plug cap and
ground to chassisKick the kick
starter stronglySpark weak
Spark goodIgnition system normal
No spark
Ask a Yamaha dealer to inspect
Adjust plug gap or
replace plug
There is compressonCompression normal
Ask a Yamaha dealer to inspectNo compression
There is fuelTurn the fuel
cock to “OFF”
Remove the
fuel pipe
Water or dirt
mixed in fuel
No fuel
Fuel cock clogged
Some fuelTurn the fuel
cock to “RES”Restart engine
No fuelSupply fuel
Clean filter element
and fuel tank
Turn the fuel
cock to “ON”
Clean the fuel cock
5KJ-62 (8 shou) 4/23/01 3:08 PM Page 88
Page 345 of 368

9-7
EBU00528
B. STORAGE
Long term storage (60 days or more) of your
machine will require some preventive proce-
dures to guard against deterioration. After thor-
oughly cleaning the machine, prepare for stor-
age as follows:
1. Fill the fuel tank with fresh fuel and add fuel
stabilizer (if available).
NOTE:
Use of fuel stabilizer eliminates the need to
drain the fuel system. Consult a Yamaha dealer
if the fuel system is to be drained instead.
2. Remove the spark plug, pour about one
tablespoon of SAE 10W30 or 20W40 motor
oil in the spark plug hole and reinstall the
spark plug. Ground the spark plug wire and
turn the engine over several times to coat
the cylinder wall with oil.
3. Clean the drive chain thoroughly and lubri-
cate it. (See page 8-65.)
5KJ-62 (9 shou ~) 4/23/01 3:09 PM Page 8