YAMAHA EC-03 2012 Workshop Manual
Manufacturer: YAMAHA, Model Year: 2012, Model line: EC-03, Model: YAMAHA EC-03 2012Pages: 78, PDF Size: 2.19 MB
Page 51 of 78
PERIODIC MAINTENANCE AND ADJUSTMENT
8-2
2
3
4
5
6
789
EAU50610
TIP
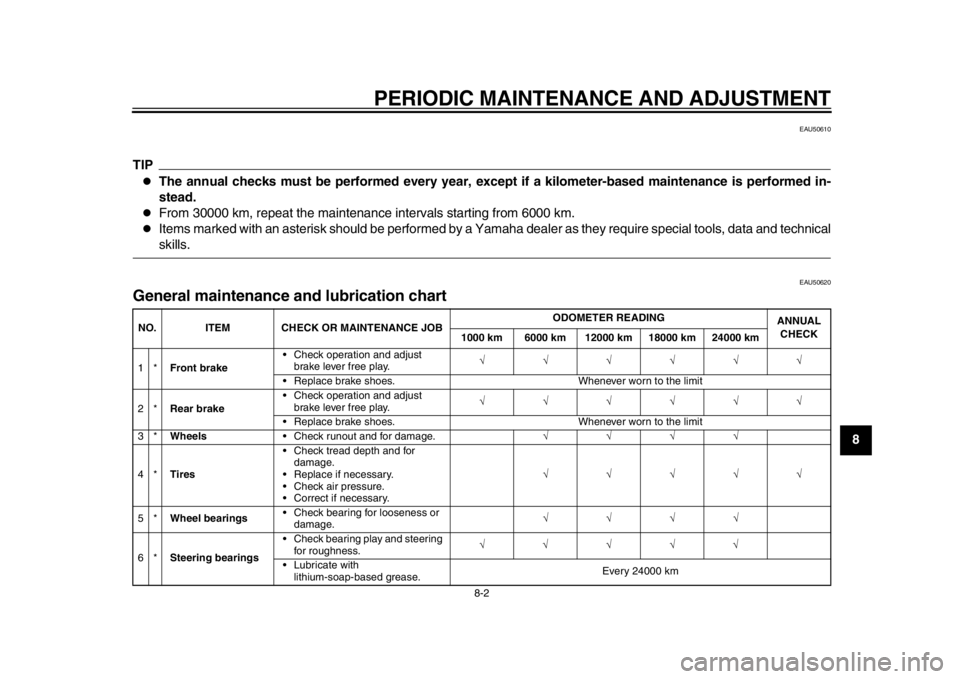
The annual checks must be performed every year, except if a kilometer-based maintenance is performed in-
stead.
From 30000 km, repeat the maintenance intervals starting from 6000 km.
Items marked with an asterisk should be performed by a Yamaha dealer as they require special tools, data and technicalskills.
EAU50620
General maintenance and lubrication chart NO. ITEM CHECK OR MAINTENANCE JOB ODOMETER READING
ANNUAL
CHECK
1000 km 6000 km 12000 km 18000 km 24000 km
1* Front brake Check operation and adjust
brake lever free play.
Replace brake shoes. Whenever worn to the limit
2* Rear brake Check operation and adjust
brake lever free play.
Replace brake shoes. Whenever worn to the limit
3* Wheels Check runout and for damage.
4* Tires Check tread depth and for
damage.
Replace if necessary.
Check air pressure.
Correct if necessary.
5* Wheel bearings Check bearing for looseness or
damage.
6* Steering bearings Check bearing play and steering
for roughness.
Lubricate with lithium-soap-based grease. Every 24000 km
1CB-9-EA.book 2 ページ 2012年4月11日 水曜日 午前9時34分
Page 52 of 78

PERIODIC MAINTENANCE AND ADJUSTMENT
8-3
1
2
3
4
5
6
78
9
7*Chassis fasteners Make sure that all nuts, bolts
and screws are properly
tightened.
8 Front brake lever
pivot shaft Lubricate with
lithium-soap-based grease.
9 Rear brake lever
pivot shaft Lubricate with
lithium-soap-based grease.
10 Centerstand Check operation.
Lubricate.
11 * Front fork Check operation and for oil
leakage.
12 * Shock absorber
assembly Check operation and shock
absorber for oil leakage.
13 * Front and rear
brake switches Check operation.
14 Moving parts and
cables Lubricate.
15 * Accelerator grip Check operation.
Correct if necessary.
16 * Lights, signals and
switches Check operation.
Adjust headlight beam.
17 * Motor noise Check for irregular noise coming
from the motor.
Correct if necessary.
18 * Charging cord and
plug Check condition and for
damage.
Replace if necessary.
NO. ITEM CHECK OR MAINTENANCE JOB
ODOMETER READING
ANNUAL
CHECK
1000 km 6000 km 12000 km 18000 km 24000 km
1CB-9-EA.book 3 ページ 2012年4月11日 水曜日 午前9時34分
Page 53 of 78
PERIODIC MAINTENANCE AND ADJUSTMENT
8-4
2
3
4
5
6
789
EAU50143
Checking for irregular motor
sounds Check the motor for irregular sounds.TIPThe motor cannot be revved beyond a
certain motor speed by turning the ac-
celerator grip when the vehicle is on thecenterstand.
EAU50155
Checking the accelerator grip Before checking the accelerator grip,
check the following points.
Make sure that the key is in the
“OFF” position. Turn the accelera-
tor grip slowly and check that it
moves smoothly, and returns
smoothly when released.
Check for any signs of deteriora-
tion or damage around the accel-
erator grip. Also check the
accelerator grip holder mounting
bolts for tightness.
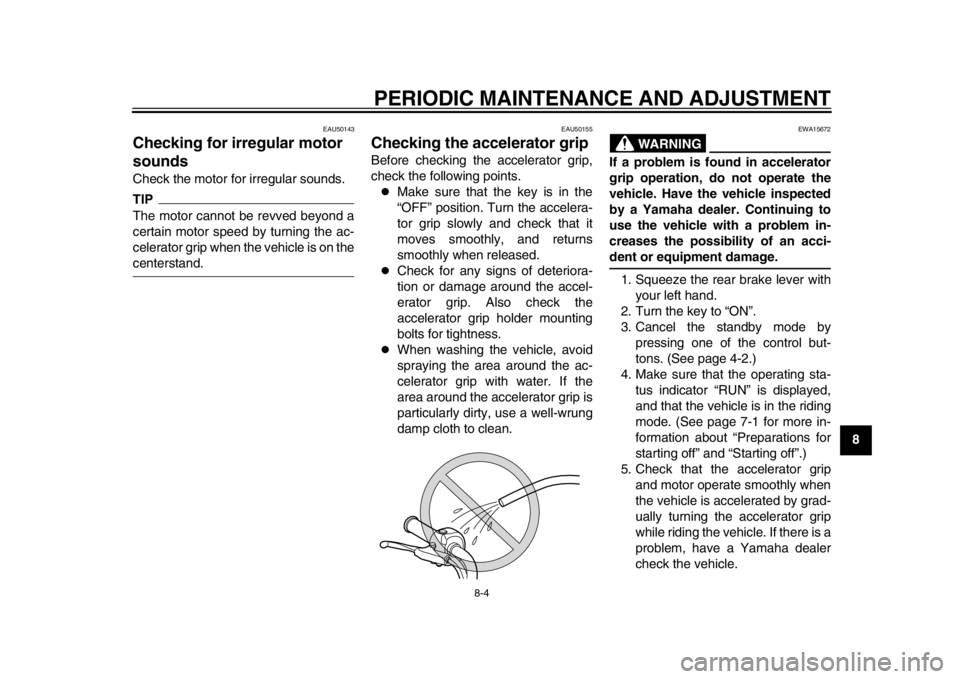
When washing the vehicle, avoid
spraying the area around the ac-
celerator grip with water. If the
area around the accelerator grip is
particularly dirty, use a well-wrung
damp cloth to clean.
WARNING
EWA15672
If a problem is found in accelerator
grip operation, do not operate the
vehicle. Have the vehicle inspected
by a Yamaha dealer. Continuing to
use the vehicle with a problem in-
creases the possibility of an acci-dent or equipment damage.1. Squeeze the rear brake lever with your left hand.
2. Turn the key to “ON”.
3. Cancel the standby mode by pressing one of the control but-
tons. (See page 4-2.)
4. Make sure that the operating sta- tus indicator “RUN” is displayed,
and that the vehicle is in the riding
mode. (See page 7-1 for more in-
formation about “Preparations for
starting off” and “Starting off”.)
5. Check that the accelerator grip and motor operate smoothly when
the vehicle is accelerated by grad-
ually turning the accelerator grip
while riding the vehicle. If there is a
problem, have a Yamaha dealer
check the vehicle.
1CB-9-EA.book 4 ページ 2012年4月11日 水曜日 午前9時34分
Page 54 of 78
PERIODIC MAINTENANCE AND ADJUSTMENT
8-5
1
2
3
4
5
6
78
9
EAU50674
Tires Tires are the only contact between the
vehicle and the road. Safety in all con-
ditions of riding depends on a relatively
small area of road contact. Therefore, it
is essential to maintain the tires in good
condition at all times and replace them
at the appropriate time with the speci-
fied tires.
Tire air pressure
The tire air pressure should be checked
and, if necessary, adjusted before each
ride.
WARNING
EWA10511
Never overload your vehicle. Opera-
tion of an overloaded vehicle couldcause an accident.Tire inspection
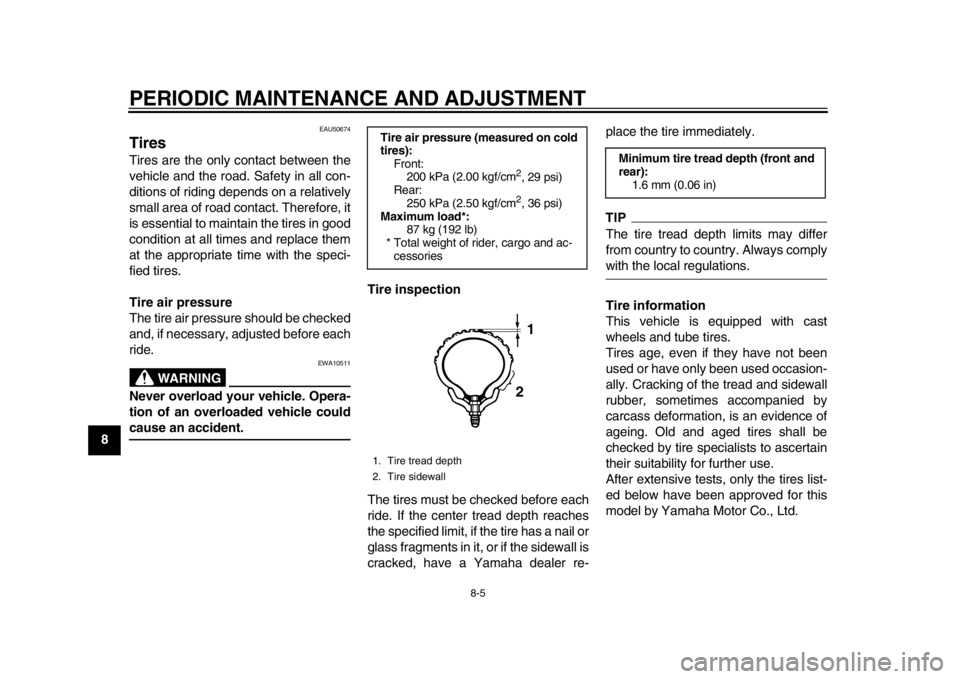
The tires must be checked before each
ride. If the center tread depth reaches
the specified limit, if the tire has a nail or
glass fragments in it, or if the sidewall is
cracked, have a Yamaha dealer re-place the tire immediately.
TIPThe tire tread depth limits may differ
from country to country. Always complywith the local regulations.
Tire information
This vehicle is equipped with cast
wheels and tube tires.
Tires age, even if they have not been
used or have only been used occasion-
ally. Cracking of the tread and sidewall
rubber, sometimes accompanied by
carcass deformation, is an evidence of
ageing. Old and aged tires shall be
checked by tire specialists to ascertain
their suitability for further use.
After extensive tests, only the tires list-
ed below have been approved for this
model by Yamaha Motor Co., Ltd.
Tire air pressure (measured on cold
tires):
Front:200 kPa (2.00 kgf/cm
2, 29 psi)
Rear: 250 kPa (2.50 kgf/cm2, 36 psi)
Maximum load*:
87 kg (192 lb)
* Total weight of rider, cargo and ac- cessories
1. Tire tread depth
2. Tire sidewall
12
Minimum tire tread depth (front and
rear): 1.6 mm (0.06 in)
1CB-9-EA.book 5 ページ 2012年4月11日 水曜日 午前9時34分
Page 55 of 78
PERIODIC MAINTENANCE AND ADJUSTMENT
8-6
2
3
4
5
6
789
WARNING
EWA10471
Have a Yamaha dealer replace
excessively worn tires. Besides
being illegal, operating the vehi-
cle with excessively worn tires
decreases riding stability and
can lead to loss of control.
The replacement of all wheel
and brake-related parts, includ-
ing the tires, should be left to a
Yamaha dealer, who has the
necessary professional knowl-
edge and experience to do so.
Ride at moderate speeds after
changing a tire since the tire
surface must first be “broken
in” for it to develop its optimalcharacteristics.
EAU22003
Cast wheels
WARNING
EWA10610
The wheels on this model are not de-
signed for use with tubeless tires.
Do not attempt to use tubeless tireson this model.
To maximize the performance, durabil-
ity, and safe operation of your vehicle,
note the following points regarding the
specified wheels.
The wheel rims should be checked
for cracks, bends, warpage or oth-
er damage before each ride. If any
damage is found, have a Yamaha
dealer replace the wheel. Do not
attempt even the smallest repair to
the wheel. A deformed or cracked
wheel must be replaced.
The wheel should be balanced
whenever either the tire or wheel
has been changed or replaced. An
unbalanced wheel can result in
poor performance, adverse han-
dling characteristics, and a short-
ened tire life.
EAU22152
Adjusting the front and rear
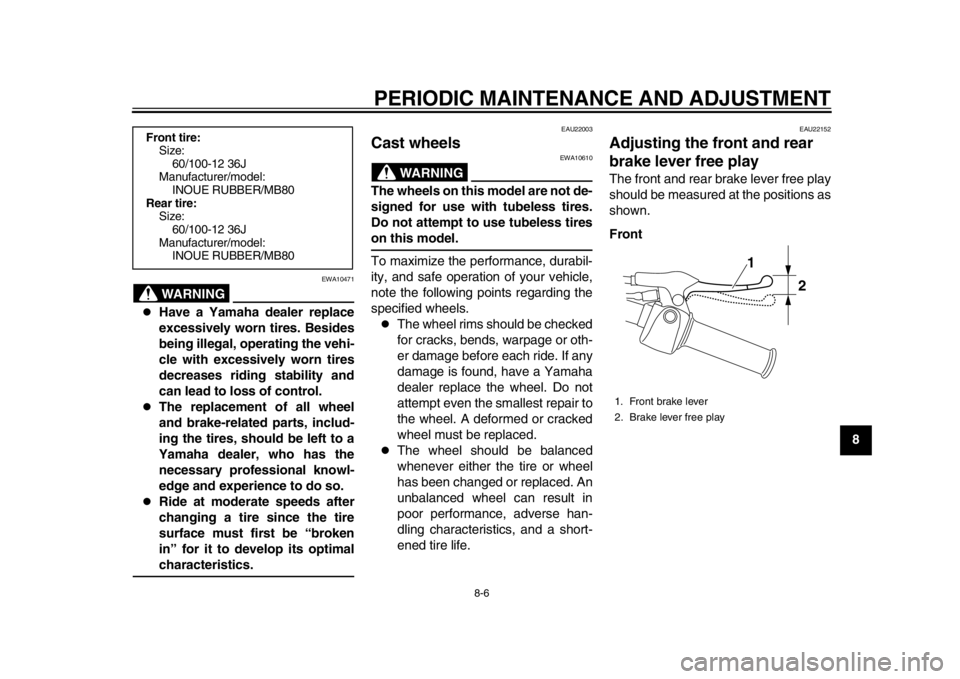
brake lever free play The front and rear brake lever free play
should be measured at the positions as
shown.
Front
Front tire:Size: 60/100-12 36J
Manufacturer/model:
INOUE RUBBER/MB80
Rear tire: Size:
60/100-12 36J
Manufacturer/model: INOUE RUBBER/MB80
1. Front brake lever
2. Brake lever free play
1
2
1CB-9-EA.book 6 ページ 2012年4月11日 水曜日 午前9時34分
Page 56 of 78
PERIODIC MAINTENANCE AND ADJUSTMENT
8-7
1
2
3
4
5
6
78
9Rear
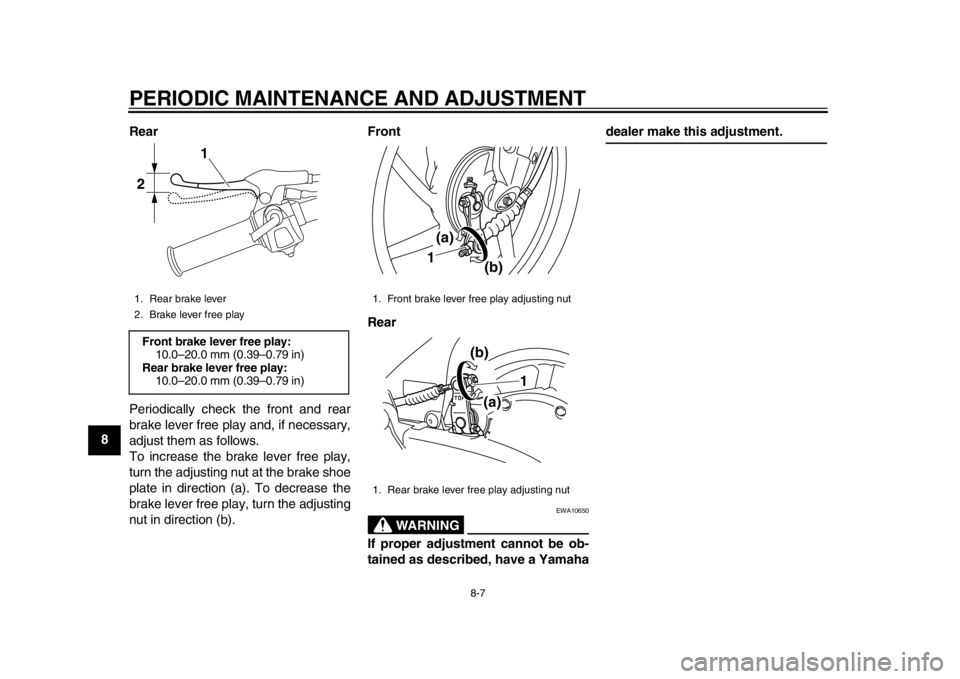
Periodically check the front and rear
brake lever free play and, if necessary,
adjust them as follows.
To increase the brake lever free play,
turn the adjusting nut at the brake shoe
plate in direction (a). To decrease the
brake lever free play, turn the adjusting
nut in direction (b). Front
Rear
WARNING
EWA10650
If proper adjustment cannot be ob-
tained as described, have a Yamaha
dealer make this adjustment.
1. Rear brake lever
2. Brake lever free playFront brake lever free play:
10.0–20.0 mm (0.39–0.79 in)
Rear brake lever free play: 10.0–20.0 mm (0.39–0.79 in)
1
2
1. Front brake lever free play adjusting nut
1. Rear brake lever free play adjusting nut
(a)
(b)
1
1
(a)
(b)
1CB-9-EA.book 7 ページ 2012年4月11日 水曜日 午前9時34分
Page 57 of 78
PERIODIC MAINTENANCE AND ADJUSTMENT
8-8
2
3
4
5
6
789
EAU22361
Checking the front and rear
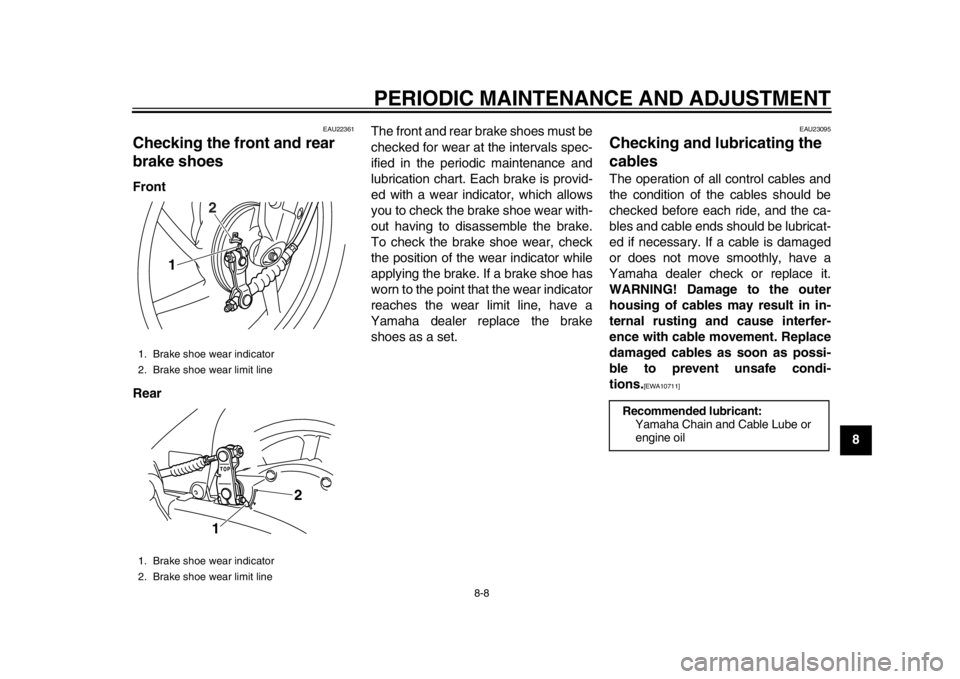
brake shoes Front
Rear The front and rear brake shoes must be
checked for wear at the intervals spec-
ified in the periodic maintenance and
lubrication chart. Each brake is provid-
ed with a wear indicator, which allows
you to check the brake shoe wear with-
out having to disassemble the brake.
To check the brake shoe wear, check
the position of the wear indicator while
applying the brake. If a brake shoe has
worn to the point that the wear indicator
reaches the wear limit line, have a
Yamaha dealer replace the brake
shoes as a set.
EAU23095
Checking and lubricating the
cables The operation of all control cables and
the condition of the cables should be
checked before each ride, and the ca-
bles and cable ends should be lubricat-
ed if necessary. If a cable is damaged
or does not move smoothly, have a
Yamaha dealer check or replace it.
WARNING! Damage to the outer
housing of cables may result in in-
ternal rusting and cause interfer-
ence with cable movement. Replace
damaged cables as soon as possi-
ble to prevent unsafe condi-
tions.
[EWA10711]
1. Brake shoe wear indicator
2. Brake shoe wear limit line
1. Brake shoe wear indicator
2. Brake shoe wear limit line
1
2
1
2
Recommended lubricant:
Yamaha Chain and Cable Lube or
engine oil
1CB-9-EA.book 8 ページ 2012年4月11日 水曜日 午前9時34分
Page 58 of 78
PERIODIC MAINTENANCE AND ADJUSTMENT
8-9
1
2
3
4
5
6
78
9
EAU43631
Lubricating the front and rear
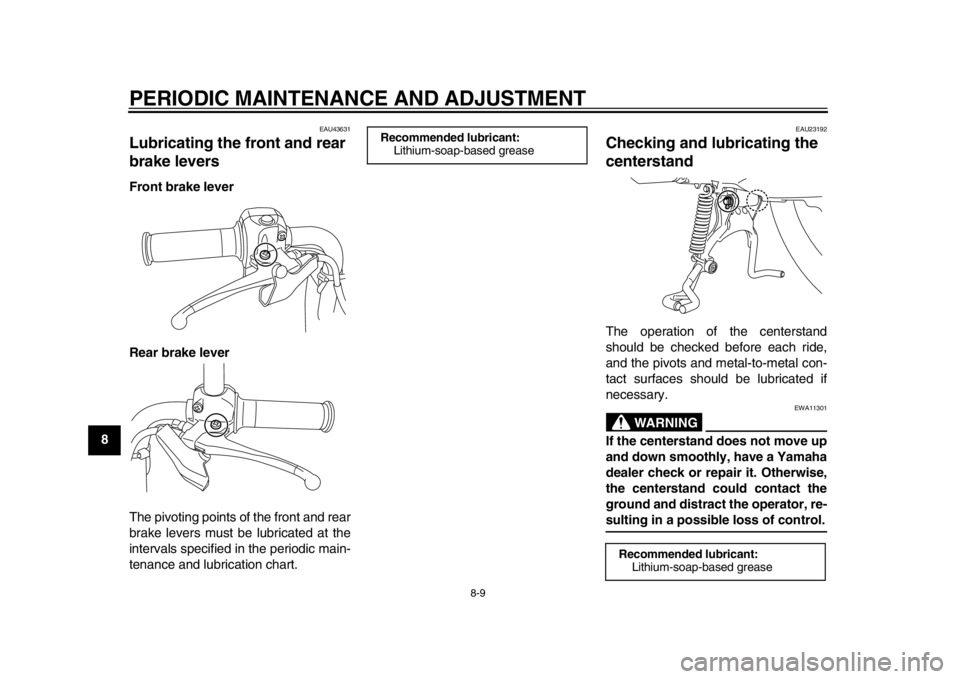
brake levers Front brake lever
Rear brake lever
The pivoting points of the front and rear
brake levers must be lubricated at the
intervals specified in the periodic main-
tenance and lubrication chart.
EAU23192
Checking and lubricating the
centerstand The operation of the centerstand
should be checked before each ride,
and the pivots and metal-to-metal con-
tact surfaces should be lubricated if
necessary.
WARNING
EWA11301
If the centerstand does not move up
and down smoothly, have a Yamaha
dealer check or repair it. Otherwise,
the centerstand could contact the
ground and distract the operator, re-sulting in a possible loss of control.
Recommended lubricant: Lithium-soap-based grease
Recommended lubricant:Lithium-soap-based grease
1CB-9-EA.book 9 ページ 2012年4月11日 水曜日 午前9時34分
Page 59 of 78
PERIODIC MAINTENANCE AND ADJUSTMENT
8-10
2
3
4
5
6
789
EAU42081
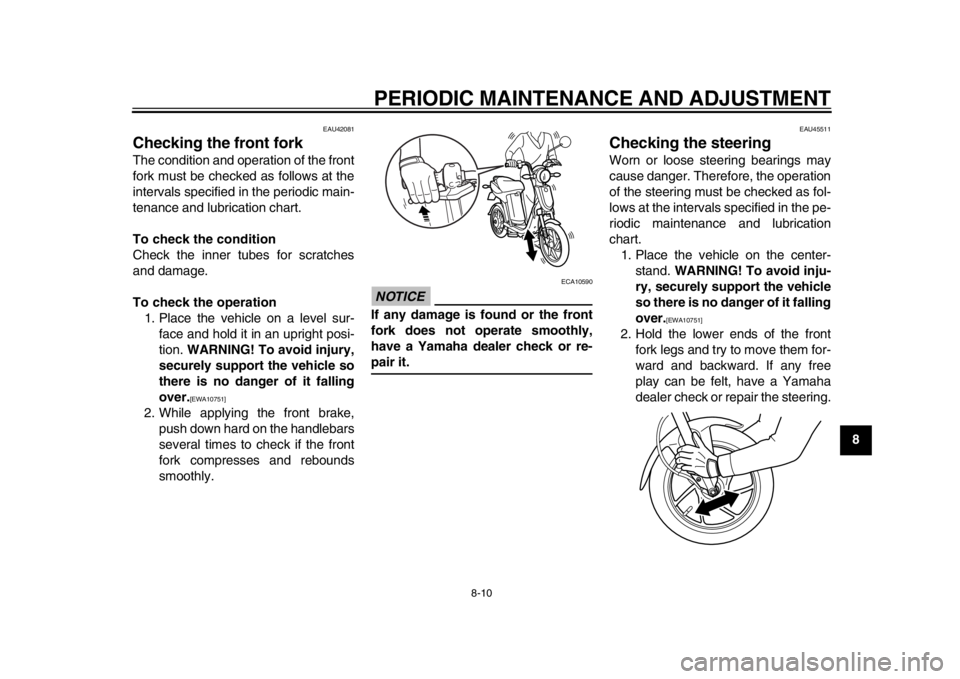
Checking the front fork The condition and operation of the front
fork must be checked as follows at the
intervals specified in the periodic main-
tenance and lubrication chart.
To check the condition
Check the inner tubes for scratches
and damage.
To check the operation1. Place the vehicle on a level sur- face and hold it in an upright posi-
tion. WARNING! To avoid injury,
securely support the vehicle so
there is no danger of it falling
over.
[EWA10751]
2. While applying the front brake, push down hard on the handlebars
several times to check if the front
fork compresses and rebounds
smoothly.
NOTICE
ECA10590
If any damage is found or the front
fork does not operate smoothly,
have a Yamaha dealer check or re-pair it.
EAU45511
Checking the steering Worn or loose steering bearings may
cause danger. Therefore, the operation
of the steering must be checked as fol-
lows at the intervals specified in the pe-
riodic maintenance and lubrication
chart.1. Place the vehicle on the center- stand. WARNING! To avoid inju-
ry, securely support the vehicle
so there is no danger of it falling
over.
[EWA10751]
2. Hold the lower ends of the front fork legs and try to move them for-
ward and backward. If any free
play can be felt, have a Yamaha
dealer check or repair the steering.
1CB-9-EA.book 10 ページ 2012年4月11日 水曜日 午前9時34分
Page 60 of 78
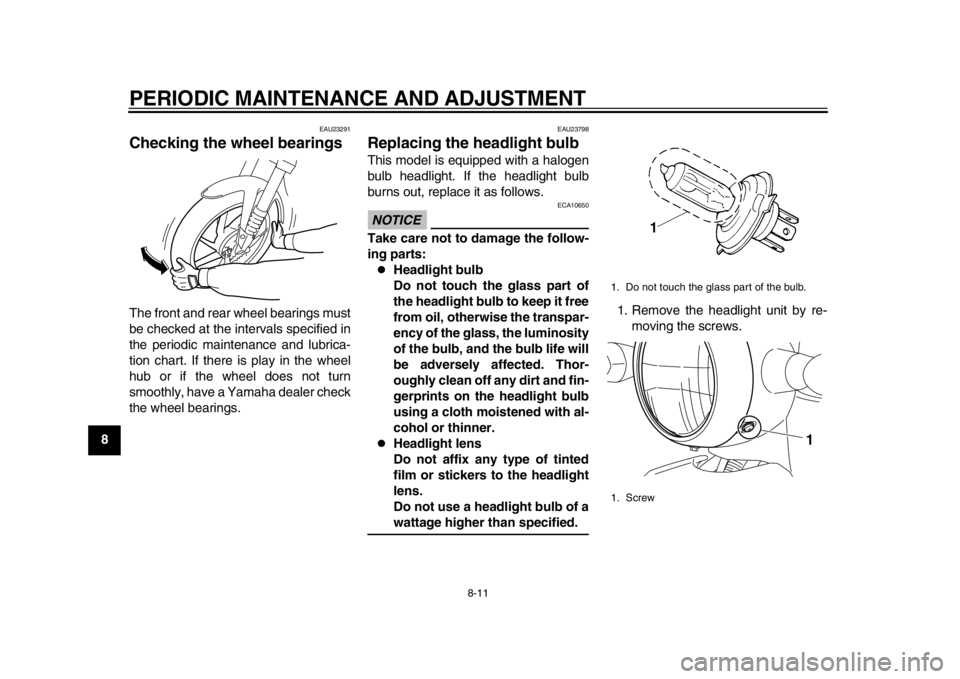
PERIODIC MAINTENANCE AND ADJUSTMENT
8-11
1
2
3
4
5
6
78
9
EAU23291
Checking the wheel bearings The front and rear wheel bearings must
be checked at the intervals specified in
the periodic maintenance and lubrica-
tion chart. If there is play in the wheel
hub or if the wheel does not turn
smoothly, have a Yamaha dealer check
the wheel bearings.
EAU23798
Replacing the headlight bulb This model is equipped with a halogen
bulb headlight. If the headlight bulb
burns out, replace it as follows.NOTICE
ECA10650
Take care not to damage the follow-
ing parts:
Headlight bulb
Do not touch the glass part of
the headlight bulb to keep it free
from oil, otherwise the transpar-
ency of the glass, the luminosity
of the bulb, and the bulb life will
be adversely affected. Thor-
oughly clean off any dirt and fin-
gerprints on the headlight bulb
using a cloth moistened with al-
cohol or thinner.
Headlight lens
Do not affix any type of tinted
film or stickers to the headlight
lens.
Do not use a headlight bulb of awattage higher than specified.1. Remove the headlight unit by re-
moving the screws.
1. Do not touch the glass part of the bulb.
1. Screw
1
1CB-9-EA.book 11 ページ 2012年4月11日 水曜日 午前9時34分