clutch YAMAHA FJR1300AE 2018 Owners Manual
[x] Cancel search | Manufacturer: YAMAHA, Model Year: 2018, Model line: FJR1300AE, Model: YAMAHA FJR1300AE 2018Pages: 122, PDF Size: 3.42 MB
Page 5 of 122

Table of contents
Safety information ............................1-1
Description ........................................2-1
Left view ..........................................2-1
Right view........................................2-2
Controls and instruments ................2-3
Instrument an d control functions ....3-1
Immobilizer system .........................3-1
Main switch/steering lock ...............3-2
Indicator lights and warning lights ............................................3-4
Cruise control system .....................3-6
Multi-function meter unit .................3-9
D-mode (drive mode) ....................3-22
Handlebar switches.......................3-22
Clutch lever ...................................3-24
Shift pedal .....................................3-24
Brake lever ....................................3-25
Brake pedal ...................................3-25
ABS ...............................................3-26
Traction control system.................3-27
Fuel tank cap.................................3-28
Fuel................................................3-29
Fuel tank overflow hose ................3-30
Catalytic converters .....................3-31
Seats .............................................3-31
Adjusting the rider seat height ......3-33
Storage compartments .................3-35
Accessory box...............................3-36
Adjusting the headlight beams......3-37
Handlebar position ........................3-37
Opening and closing the cowling vents ..........................................3-38
Rear view mirrors ..........................3-39
Adjusting the front and rear
suspension.................................3-40
Sidestand ......................................3-44
Ignition circuit cut-off system........3-45
Auxiliary DC jack ..........................3-47
Cornering lights .............................3-48 For your safety – pre-operation
checks
............................................... 4-1
Operation an d important ri din g
points ................................................. 5-1
Starting the engine.......................... 5-2
Shifting ............................................ 5-3
Tips for reducing fuel consumption................................ 5-4
Engine break-in ............................... 5-5
Parking ............................................ 5-6
Perio dic maintenance an d
a d justment ........................................ 6-1
Owner’s tool kit ............................... 6-2
Periodic maintenance chart for the emission control system.............. 6-3
General maintenance and lubrication chart........................... 6-4
Removing and installing panels ...... 6-7
Checking the spark plugs ............. 6-10
Canister......................................... 6-11
Engine oil and oil filter cartridge ... 6-11
Final gear oil.................................. 6-14
Coolant ......................................... 6-16
Cleaning the air filter element ....... 6-17
Checking the engine idling
speed......................................... 6-19
Checking the throttle grip free
play ............................................ 6-19
Valve clearance ............................. 6-20
Tires .............................................. 6-20
Cast wheels .................................. 6-23
Clutch lever ................................... 6-23
Checking the brake lever free play ............................................ 6-24
Brake light switches ...................... 6-24
Checking the front and rear brake pads................................. 6-25
Checking the brake and clutch fluid levels .................................. 6-26
Changing the brake and clutch fluids .......................................... 6-27
Checking and lubricating the cables ........................................ 6-28
UB96E1E0.book Page 1 Monday, July 10, 2017 10:57 AM
Page 6 of 122

Table of contents
Checking and lubricating the
throttle grip and cable ............... 6-28
Checking and lubricating the brake and shift pedals............... 6-29
Checking and lubricating the
brake and clutch levers ............. 6-29
Checking and lubricating the centerstand and sidestand ....... 6-30
Checking the front fork................. 6-30
Checking the steering................... 6-31
Checking the wheel bearings ....... 6-31
Battery .......................................... 6-32
Replacing the fuses ...................... 6-33
Vehicle lights ................................ 6-35
Troubleshooting............................ 6-35
Troubleshooting charts................. 6-36
Motorcycle care an d stora ge.......... 7-1
Matte color caution ........................ 7-1
Care ................................................ 7-1
Storage ........................................... 7-4
Specifications ................................... 8-1
Consumer information ..................... 9-1
Identification numbers .................... 9-1
Diagnostic connector ..................... 9-2
In dex ................................................ 10-1
UB96E1E0.book Page 2 Monday, July 10, 2017 10:57 AM
Page 14 of 122
Description
2-3
2
EAU63401
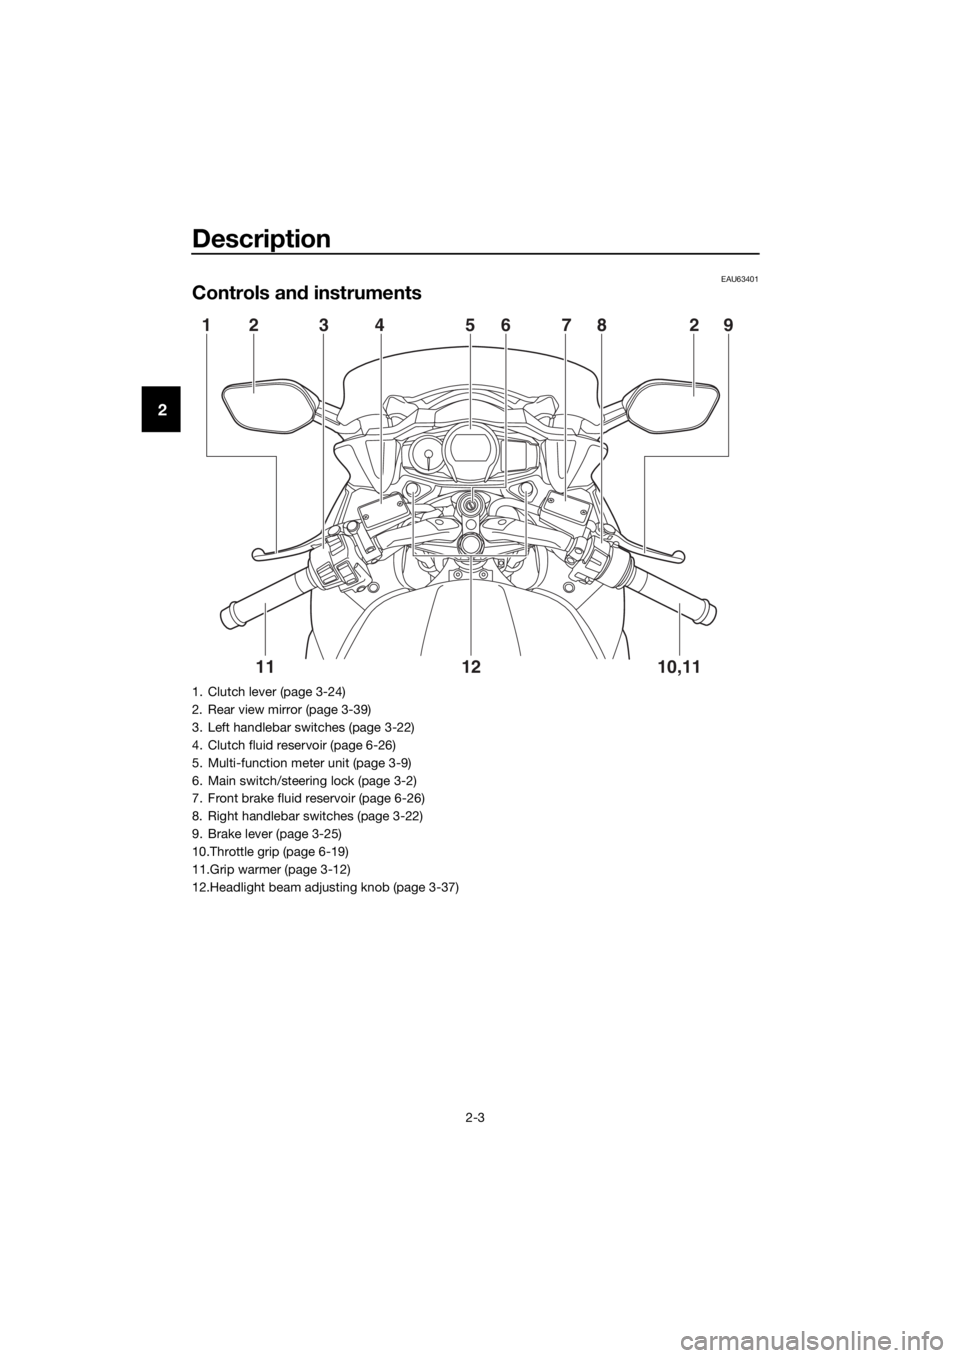
Controls and instruments
12 3 4 5678 29
10,11
12
11
1. Clutch lever (page 3-24)
2. Rear view mirror (page 3-39)
3. Left handlebar switches (page 3-22)
4. Clutch fluid reservoir (page 6-26)
5. Multi-function meter unit (page 3-9)
6. Main switch/steering lock (page 3-2)
7. Front brake fluid reservoir (page 6-26)
8. Right handlebar switches (page 3-22)
9. Brake lever (page 3-25)
10.Throttle grip (page 6-19)
11.Grip warmer (page 3-12)
12.Headlight beam adjusting knob (page 3-37)
UB96E1E0.book Page 3 Monday, July 10, 2017 10:57 AM
Page 22 of 122

Instrument and control functions
3-8
3
Apply the front or rear brake.
Disengage the clutch.
Push the power switch to turn off the
cruise control system. The “ ” indica-
tor light and the “SET” indicator light
will go off.
TIP
Traveling speed decreases as soon as
the cruise control system is deactivat-
ed; unless the throttle grip is turned.
Usin g the resume function
Push the “RES+” side of the cruise
control setting switch to reactivate the
cruise control system. The traveling
speed will return to the previously set
cruising speed. The “SET” indicator
light will come on.
WARNING
EWA16351
It is d angerous to use the resume
function when the previously set
cruisin g speed is too hi gh for current
con ditions.
TIP
Pushing the power switch while the
system is operating will turn the system
off completely and erase the previously set cruising speed. You will not be able
to use the resume function until a new
cruising speed has been set.
Automatic deactivation of the cruise
control system
The cruise control system for this mod-
el is electronically controlled and is
linked with the other control systems.
The cruise control system will auto-
matically become deactivated under
the following conditions:
The cruise control system is not
able to maintain the set cruising
speed.
Wheel slip or wheel spin is detect-
ed. (If the traction control system
has not been turned off, the trac-
tion control system will work.)
The start/engine stop switch is set
to the “ ” position.
The engine stalls.
The sidestand is lowered.
When traveling with a set cruising
speed, if the cruise control system is
deactivated under the above condi-
tions, the “ ” indicator light will go off
and the “SET” indicator light will flash
for 4 seconds, and then go off.
When not traveling with a set cruising
speed, if the start/engine stop switch is
set to the “ ” position, the engine
stalls, or the sidestand is lowered, then
the “ ” indicator light will go off (the
“SET” indicator light will not flash).
If the cruise control system is automat-
ically deactivated, please stop and
confirm that your vehicle is in good op-
erating condition.
Before using the cruise control system
again, activate it using the power
switch.
1. Closed position
2. Cruise control cancel direction
21
UB96E1E0.book Page 8 Monday, July 10, 2017 10:57 AM
Page 38 of 122
Instrument and control functions
3-24
3
EAU12832
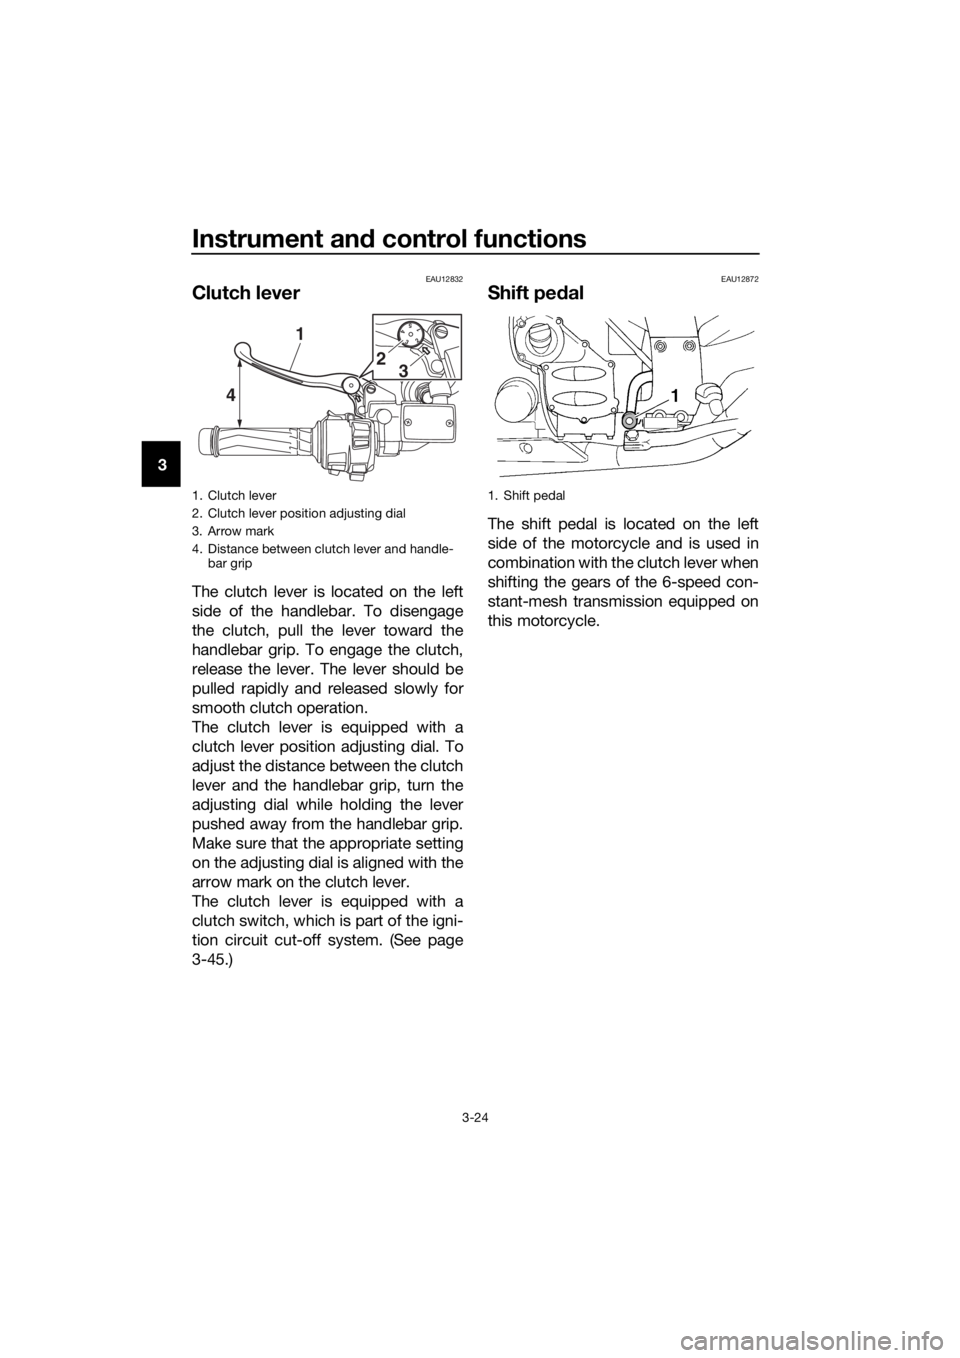
Clutch lever
The clutch lever is located on the left
side of the handlebar. To disengage
the clutch, pull the lever toward the
handlebar grip. To engage the clutch,
release the lever. The lever should be
pulled rapidly and released slowly for
smooth clutch operation.
The clutch lever is equipped with a
clutch lever position adjusting dial. To
adjust the distance between the clutch
lever and the handlebar grip, turn the
adjusting dial while holding the lever
pushed away from the handlebar grip.
Make sure that the appropriate setting
on the adjusting dial is aligned with the
arrow mark on the clutch lever.
The clutch lever is equipped with a
clutch switch, which is part of the igni-
tion circuit cut-off system. (See page
3-45.)
EAU12872
Shift pe dal
The shift pedal is located on the left
side of the motorcycle and is used in
combination with the clutch lever when
shifting the gears of the 6-speed con-
stant-mesh transmission equipped on
this motorcycle.
1. Clutch lever
2. Clutch lever position adjusting dial
3. Arrow mark
4. Distance between clutch lever and handle-
bar grip
15432
4 1
2
3
1. Shift pedal
UB96E1E0.book Page 24 Monday, July 10, 2017 10:57 AM
Page 59 of 122

Instrument and control functions
3-45
3
EAU63430
Ig nition circuit cut-off system
The ignition circuit cut-off system
(comprising the sidestand switch,
clutch switch and neutral switch) has
the following functions.
It prevents starting when the
transmission is in gear and the
sidestand is up, but the clutch le-
ver is not pulled.
It prevents starting when the
transmission is in gear and the
clutch lever is pulled, but the side-
stand is still down.
It cuts the running engine when
the transmission is in gear and the
sidestand is moved down.
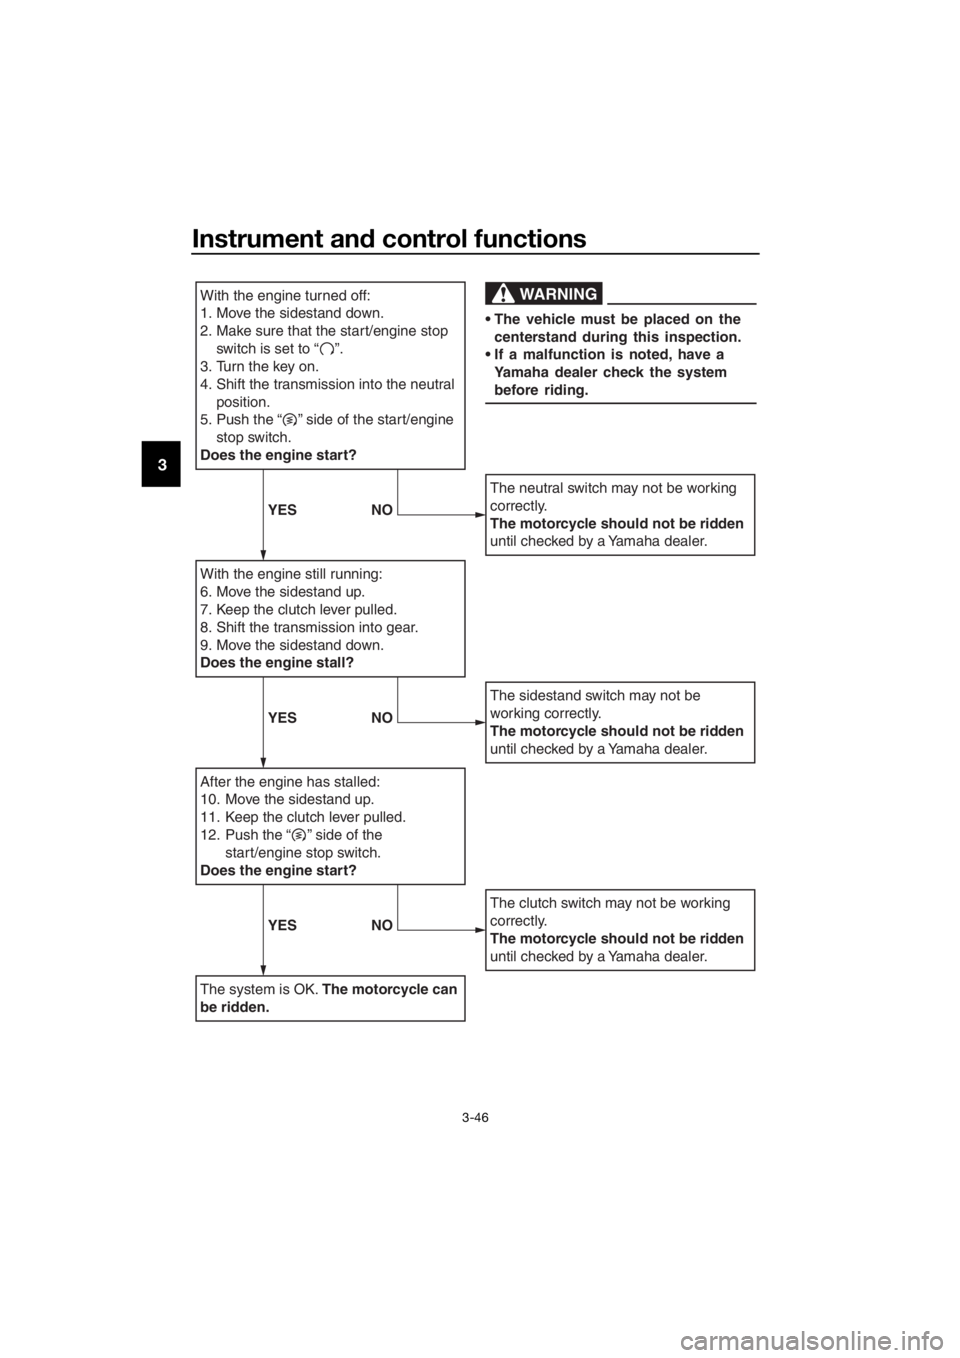
Periodically check the operation of the
ignition circuit cut-off system accord-
ing to the following procedure.
UB96E1E0.book Page 45 Monday, July 10, 2017 10:57 AM
Page 60 of 122
Instrument and control functions
3-46
3
With the engine turned off:
1. Move the sidestand down.
2.
Make sure that the start/engine stop
switch is set to “ ”.
3. Turn the key on.
4. Shift the transmission into the neutral position.
5.
Push the “ ” side of the start/engine
stop switch.
Does the engine start?
With the engine still running:
6. Move the sidestand up.
7. Keep the clutch lever pulled.
8. Shift the transmission into gear.
9. Move the sidestand down.
Does the engine stall?
After the engine has stalled:
10. Move the sidestand up.
11. Keep the clutch lever pulled.
12.
Push the “ ” side of the
start/engine stop switch.
Does the engine start?
The system is OK. The motorcycle can
be ridden.
The neutral switch may not be working
correctly.
The motorcycle should not be ridden
until checked by a Yamaha dealer.
The sidestand switch may not be
working correctly.
The motorcycle should not be ridden
until checked by a Yamaha dealer.
The clutch switch may not be working
correctly.
The motorcycle should not be ridden
until checked by a Yamaha dealer.
WARNING
The vehicle must be placed on the centerstand during this inspection.
If a malfunction is noted, have a Yamaha dealer check the system
before riding.
YES NO
YESNO
YESNO
UB96E1E0.book Page 46 Monday, July 10, 2017 10:57 AM
Page 64 of 122

For your safety – pre-operation checks
4-2
4
Clutch• Check operation.
• If soft or spongy, have Yamaha dealer bleed hydraulic
system.
• Check fluid level in reservoir.
• If necessary, add specified brake fluid to specified level.
• Check hydraulic system for leakage. 6-23,
6-26
Throttle grip • Make sure that operation is smooth.
• Check throttle grip free play.
• If necessary, have Yamaha dealer adjust throttle grip
free play and lubricate cable and grip housing. 6-19,
6-28
Control ca bles • Make sure that operation is smooth.
• Lubricate if necessary.
6-28
Wheels an d tires •Check for damage.
• Check tire condition and tread depth.
• Check air pressure.
• Correct if necessary. 6-20,
6-23
Brake an d shift pe dals • Make sure that operation is smooth.
• Lubricate pedal pivoting points if necessary. 6-29
Brake an d clutch le-
vers • Make sure that operation is smooth.
• Lubricate lever pivoting points if necessary.
6-29
Centerstan d, si de-
stan d • Make sure that operation is smooth.
• Lubricate pivots if necessary.
6-30
Chassis fasteners • Make sure that all nuts, bolts and screws are properly
tightened.
• Tighten if necessary. —
Instruments, li ghts,
si gnals an d switches • Check operation.
• Correct if necessary.
—
Si destan d switch • Check operation of ignition circuit cut-off system.
• If system is not working correctly, have Yamaha dealer
check vehicle. 3-44
ITEM CHECKS PAGE
UB96E1E0.book Page 2 Monday, July 10, 2017 10:57 AM
Page 66 of 122
Operation and important rid ing points
5-2
5
EAU58242
Startin g the en gine
In order for the ignition circuit cut-off
system to enable starting, one of the
following conditions must be met:
The transmission is in the neutral
position.
The transmission is in gear with
the clutch lever pulled and the
sidestand up.
See page 3-45 for more informa-
tion.
1. Turn the key to “ON” and make sure that the start/engine stop
switch is set to “ ”.
The following warning lights and
indicator lights should come on for
a few seconds, then go off. Oil level warning light
Engine trouble warning light
Traction control system indi-
cator light
Cruise control indicator lights
Suspension sy stem warning
light
Immobilizer system indicator
light
NOTICE
ECA11834
If a warnin g or in dicator li ght does
not come on initially when the key is
turne d to “ON”, or if a warnin g or in-
d icator li ght remains on, see pag e
3-4 for the correspon din g warnin g
an d in dicator li ght circuit check.
The ABS warning light should
come on when the key is turned to
“ON”, and then go off after travel-
ing at a speed of 10 km/h (6 mi/h)
or higher.
NOTICE
ECA17682
If the ABS warnin g li ght does not
come on an d then g o off as ex-
plained above, see pag e 3-4 for the
warnin g lig ht circuit check.
2. Shift the transmission into the
neutral position. The neutral indi-
cator light should come on. If not,
ask a Yamaha dealer to check the
electrical circuit.
3. Start the engine by pushing the “ ” side of the start/engine
stop switch.
If the engine fails to start, release
the start/engine stop switch, wait
a few seconds, and then try again.
Each starting attempt should be
as short as possible to preserve
the battery. Do not crank the en-
gine more than 10 seconds on any
one attempt.
NOTICE
ECA11043
For maximum en gine life, never ac-
celerate har d when the en gine is
col d!
UB96E1E0.book Page 2 Monday, July 10, 2017 10:57 AM
Page 67 of 122
Operation and important ri din g points
5-3
5
EAU16673
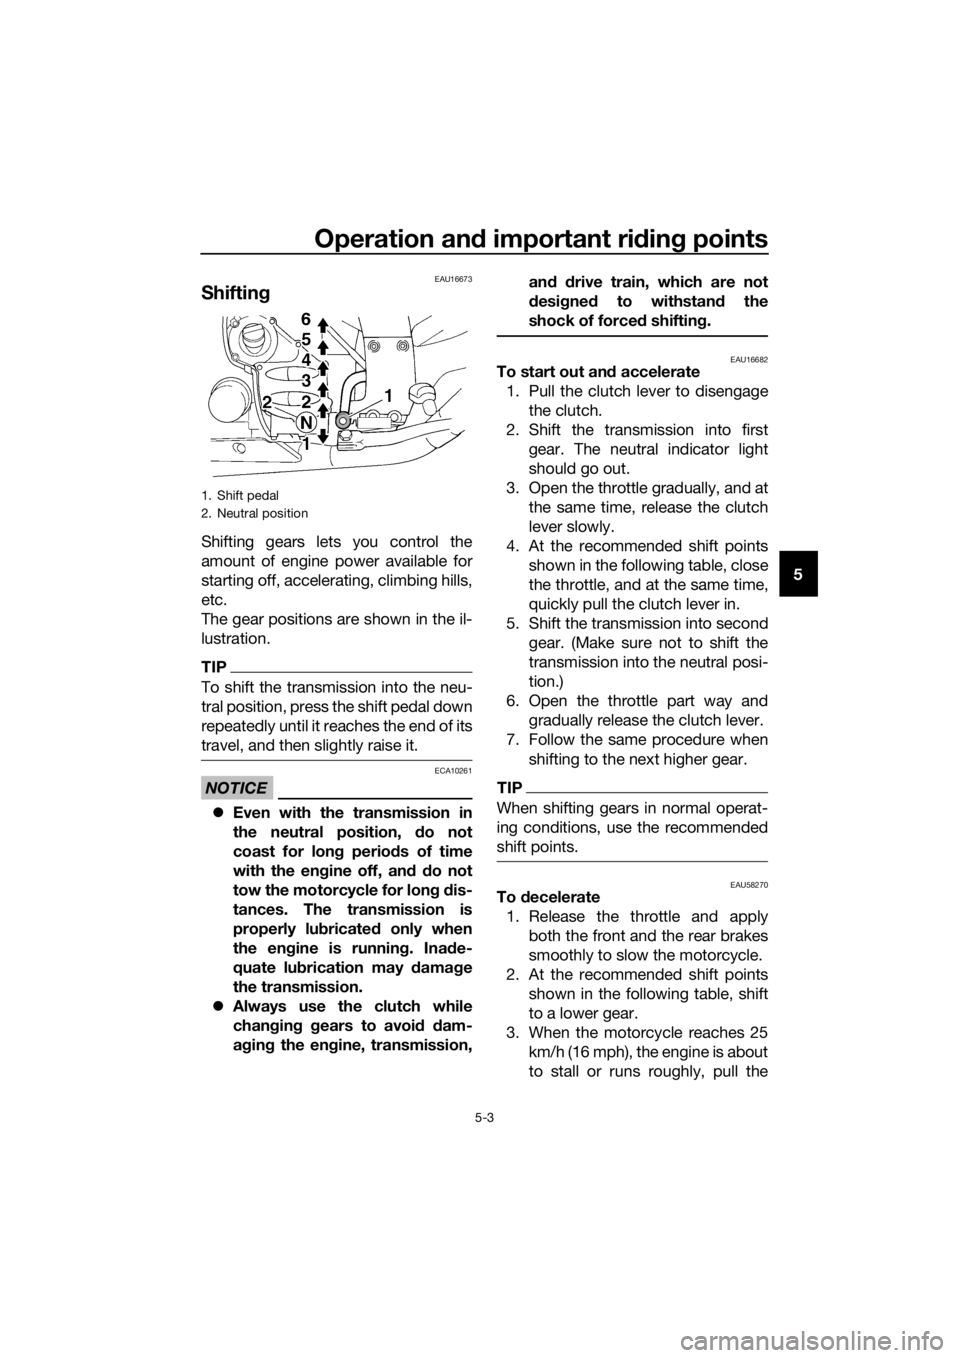
Shiftin g
Shifting gears lets you control the
amount of engine power available for
starting off, accelerating, climbing hills,
etc.
The gear positions are shown in the il-
lustration.
TIP
To shift the transmission into the neu-
tral position, press the shift pedal down
repeatedly until it reaches the end of its
travel, and then slightly raise it.
NOTICE
ECA10261
Even with the transmission in
the neutral position, d o not
coast for lon g period s of time
with the en gine off, an d d o not
tow the motorcycle for lon g d is-
tances. The transmission is
properly lu bricated only when
the en gine is runnin g. Ina de-
quate lu brication may damag e
the transmission.
Always use the clutch while
chan gin g g ears to avoi d d am-
a g in g the en gine, transmission, an
d d rive train, which are not
d esi gne d to withstan d the
shock of force d shiftin g.
EAU16682To start out an d accelerate
1. Pull the clutch lever to disengage the clutch.
2. Shift the transmission into first gear. The neutral indicator light
should go out.
3. Open the throttle gradually, and at the same time, release the clutch
lever slowly.
4. At the recommended shift points shown in the following table, close
the throttle, and at the same time,
quickly pull the clutch lever in.
5. Shift the transmission into second gear. (Make sure not to shift the
transmission into the neutral posi-
tion.)
6. Open the throttle part way and gradually release the clutch lever.
7. Follow the same procedure when
shifting to the next higher gear.
TIP
When shifting gears in normal operat-
ing conditions, use the recommended
shift points.
EAU58270To decelerate
1. Release the throttle and apply both the front and the rear brakes
smoothly to slow the motorcycle.
2. At the recommended shift points shown in the following table, shift
to a lower gear.
3. When the motorcycle reaches 25 km/h (16 mph), the engine is about
to stall or runs roughly, pull the
1. Shift pedal
2. Neutral position
UB96E1E0.book Page 3 Monday, July 10, 2017 10:57 AM