stop start YAMAHA FX SVHO 2018 User Guide
[x] Cancel search | Manufacturer: YAMAHA, Model Year: 2018, Model line: FX SVHO, Model: YAMAHA FX SVHO 2018Pages: 118, PDF Size: 5.03 MB
Page 45 of 118
Instrument operation
39
EJU42241
Multifunction information
center
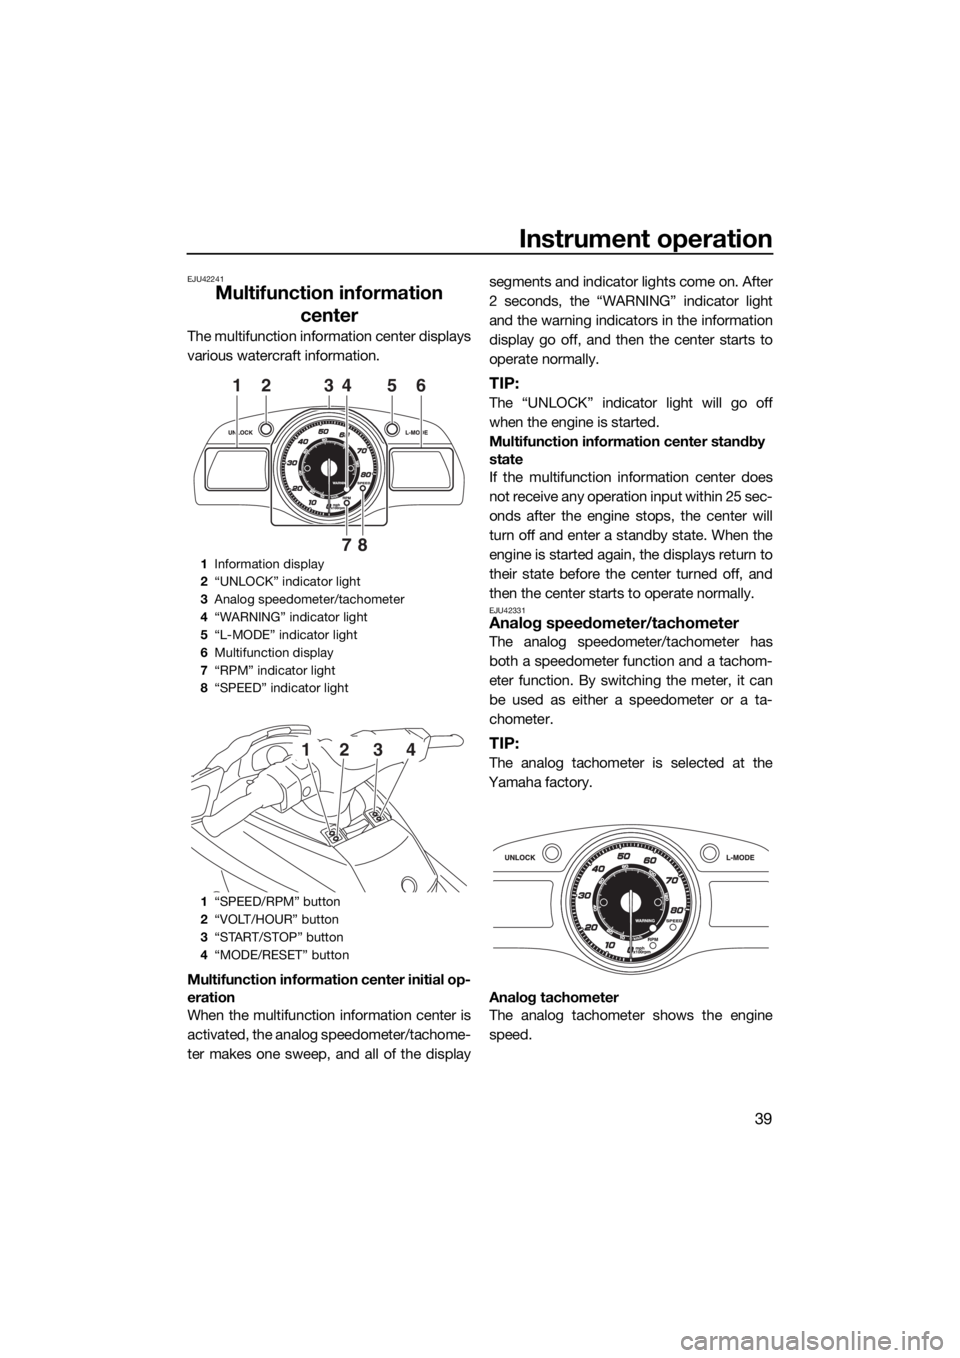
The multifunction information center displays
various watercraft information.
Multifunction information center initial op-
eration
When the multifunction information center is
activated, the analog speedometer/tachome-
ter makes one sweep, and all of the displaysegments and indicator lights come on. After
2 seconds, the “WARNING” indicator light
and the warning indicators in the information
display go off, and then the center starts to
operate normally.
TIP:
The “UNLOCK” indicator light will go off
when the engine is started.
Multifunction information center standby
state
If the multifunction information center does
not receive any operation input within 25 sec-
onds after the engine stops, the center will
turn off and enter a standby state. When the
engine is started again, the displays return to
their state before the center turned off, and
then the center starts to operate normally.
EJU42331Analog speedometer/tachometer
The analog speedometer/tachometer has
both a speedometer function and a tachom-
eter function. By switching the meter, it can
be used as either a speedometer or a ta-
chometer.
TIP:
The analog tachometer is selected at the
Yamaha factory.
Analog tachometer
The analog tachometer shows the engine
speed.
1Information display
2“UNLOCK” indicator light
3Analog speedometer/tachometer
4“WARNING” indicator light
5“L-MODE” indicator light
6Multifunction display
7“RPM” indicator light
8“SPEED” indicator light
1“SPEED/RPM” button
2“VOLT/HOUR” button
3“START/STOP” button
4“MODE/RESET” button
6134
87
25
1234
UF3J75E0.book Page 39 Friday, July 7, 2017 9:55 AM
Page 47 of 118
Instrument operation
41
By switching the display units, the speed can
be shown in kilometers per hour (km/h) or
miles per hour (mph).
TIP:
Miles are selected as the display units at the
Yamaha factory.
Digital speedometer display (mph)
The “SPEED” indicator light blinks three
times if miles are selected as the display units
when the multifunction information center is
activated.
TIP:
If the analog speedometer is selected, the
“SPEED” indicator light blinks three times,
then comes on.
Digital speedometer display (km/h)
The “SPEED” indicator light blinks once if ki-
lometers are selected as the display units
when the multifunction information center is
activated.
TIP:
If the analog speedometer is selected, the
“SPEED” indicator light blinks once, then
comes on.
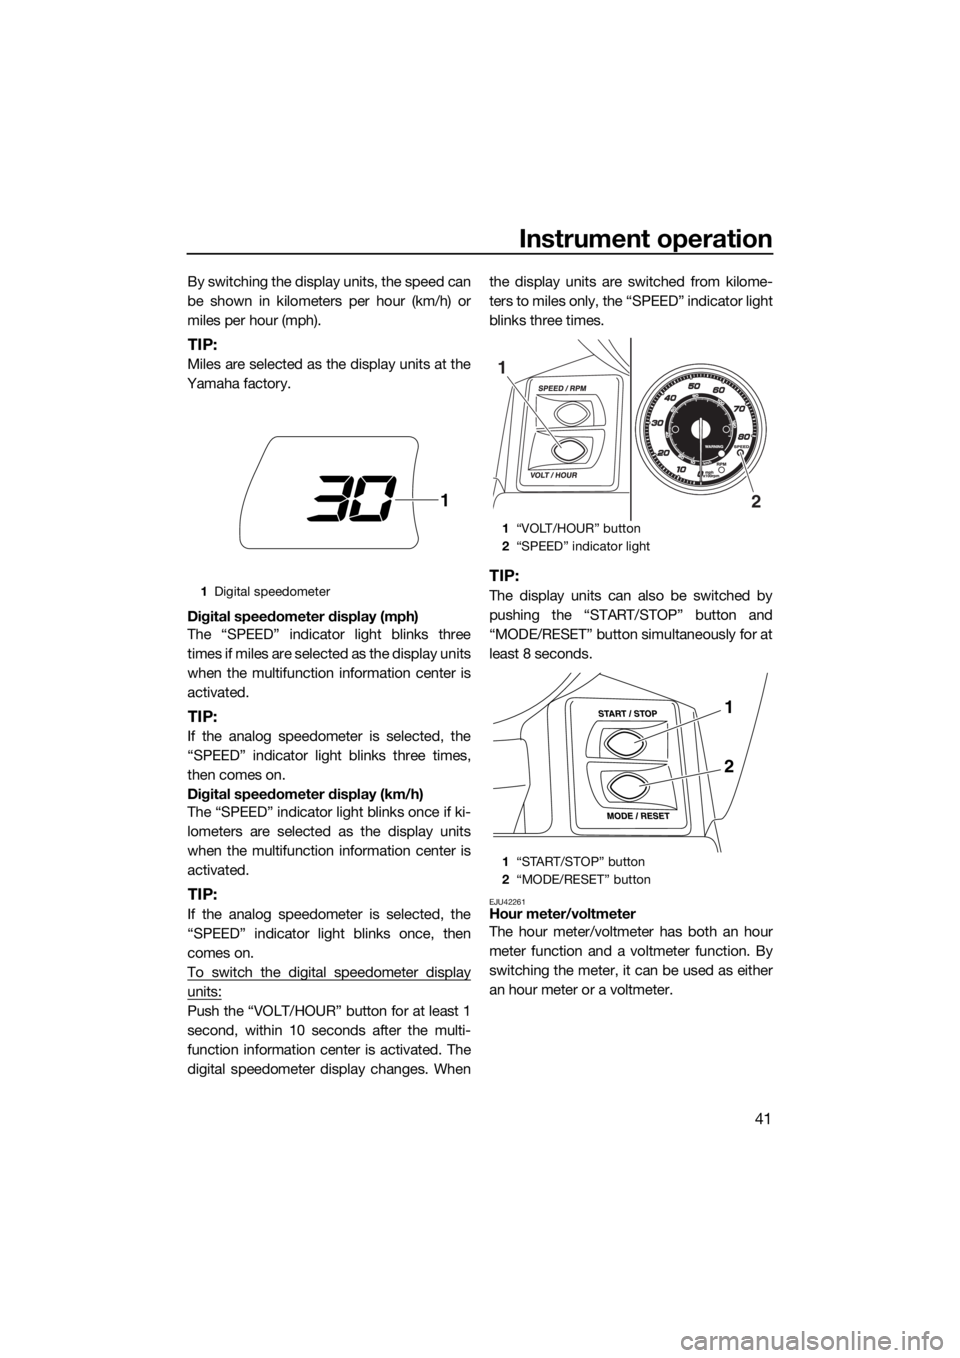
To switch the digital speedometer display
units:
Push the “VOLT/HOUR” button for at least 1
second, within 10 seconds after the multi-
function information center is activated. The
digital speedometer display changes. Whenthe display units are switched from kilome-
ters to miles only, the “SPEED” indicator light
blinks three times.
TIP:
The display units can also be switched by
pushing the “START/STOP” button and
“MODE/RESET” button simultaneously for at
least 8 seconds.
EJU42261Hour meter/voltmeter
The hour meter/voltmeter has both an hour
meter function and a voltmeter function. By
switching the meter, it can be used as either
an hour meter or a voltmeter.
1Digital speedometer
1
1“VOLT/HOUR” button
2“SPEED” indicator light
1“START/STOP” button
2“MODE/RESET” button
2
1
1
2
UF3J75E0.book Page 41 Friday, July 7, 2017 9:55 AM
Page 49 of 118
Instrument operation
43
TIP:
The accuracy of the fuel level meter varies
depending on the operating conditions. Use
this function as a reference only.
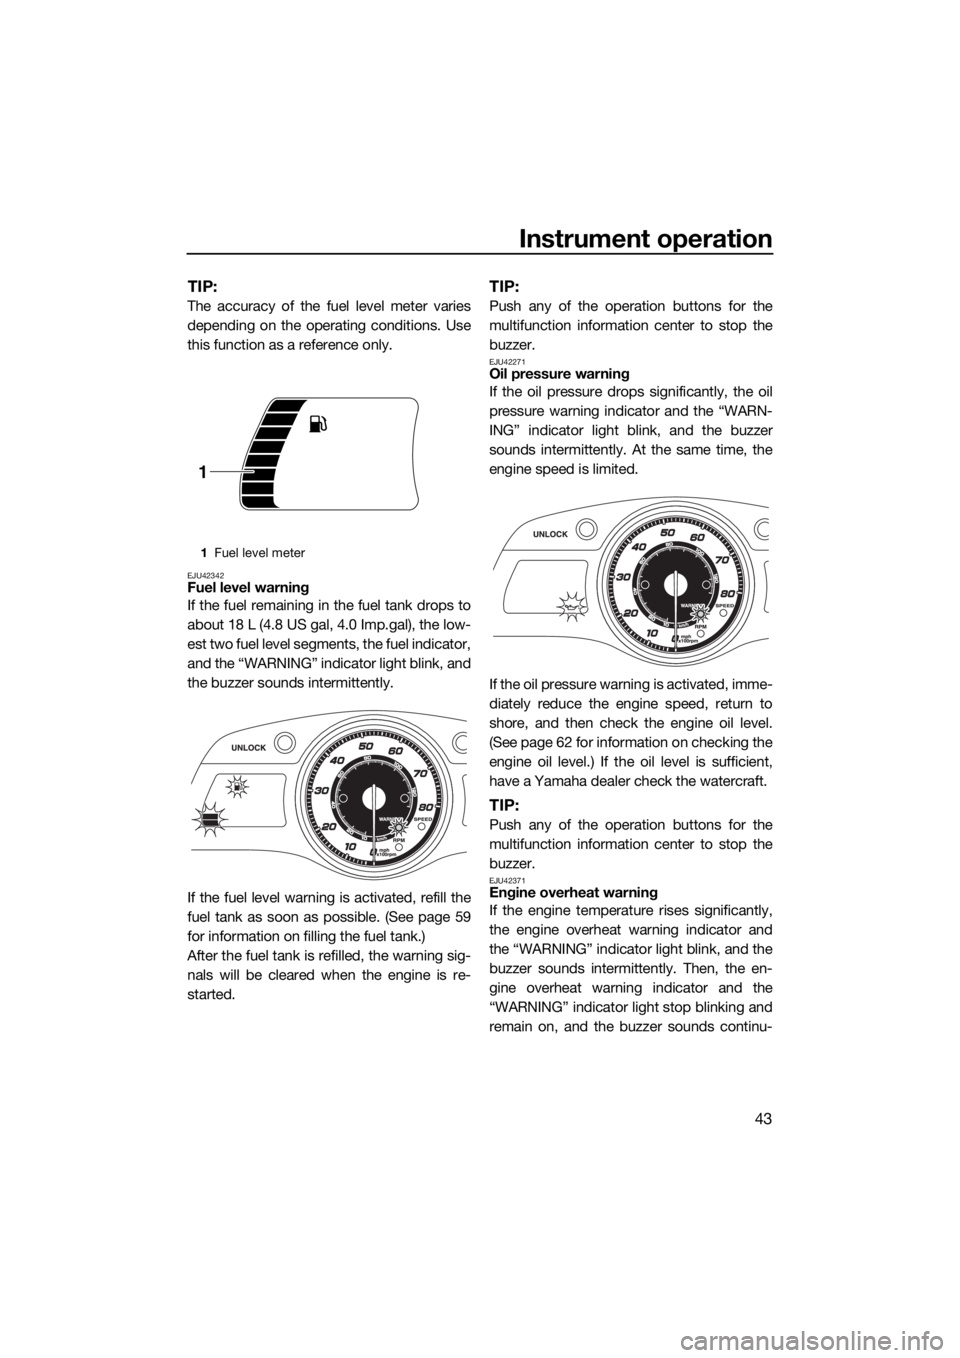
EJU42342Fuel level warning
If the fuel remaining in the fuel tank drops to
about 18 L (4.8 US gal, 4.0 Imp.gal), the low-
est two fuel level segments, the fuel indicator,
and the “WARNING” indicator light blink, and
the buzzer sounds intermittently.
If the fuel level warning is activated, refill the
fuel tank as soon as possible. (See page 59
for information on filling the fuel tank.)
After the fuel tank is refilled, the warning sig-
nals will be cleared when the engine is re-
started.
TIP:
Push any of the operation buttons for the
multifunction information center to stop the
buzzer.
EJU42271Oil pressure warning
If the oil pressure drops significantly, the oil
pressure warning indicator and the “WARN-
ING” indicator light blink, and the buzzer
sounds intermittently. At the same time, the
engine speed is limited.
If the oil pressure warning is activated, imme-
diately reduce the engine speed, return to
shore, and then check the engine oil level.
(See page 62 for information on checking the
engine oil level.) If the oil level is sufficient,
have a Yamaha dealer check the watercraft.
TIP:
Push any of the operation buttons for the
multifunction information center to stop the
buzzer.
EJU42371Engine overheat warning
If the engine temperature rises significantly,
the engine overheat warning indicator and
the “WARNING” indicator light blink, and the
buzzer sounds intermittently. Then, the en-
gine overheat warning indicator and the
“WARNING” indicator light stop blinking and
remain on, and the buzzer sounds continu-
1Fuel level meter
1
UF3J75E0.book Page 43 Friday, July 7, 2017 9:55 AM
Page 53 of 118
Instrument operation
47
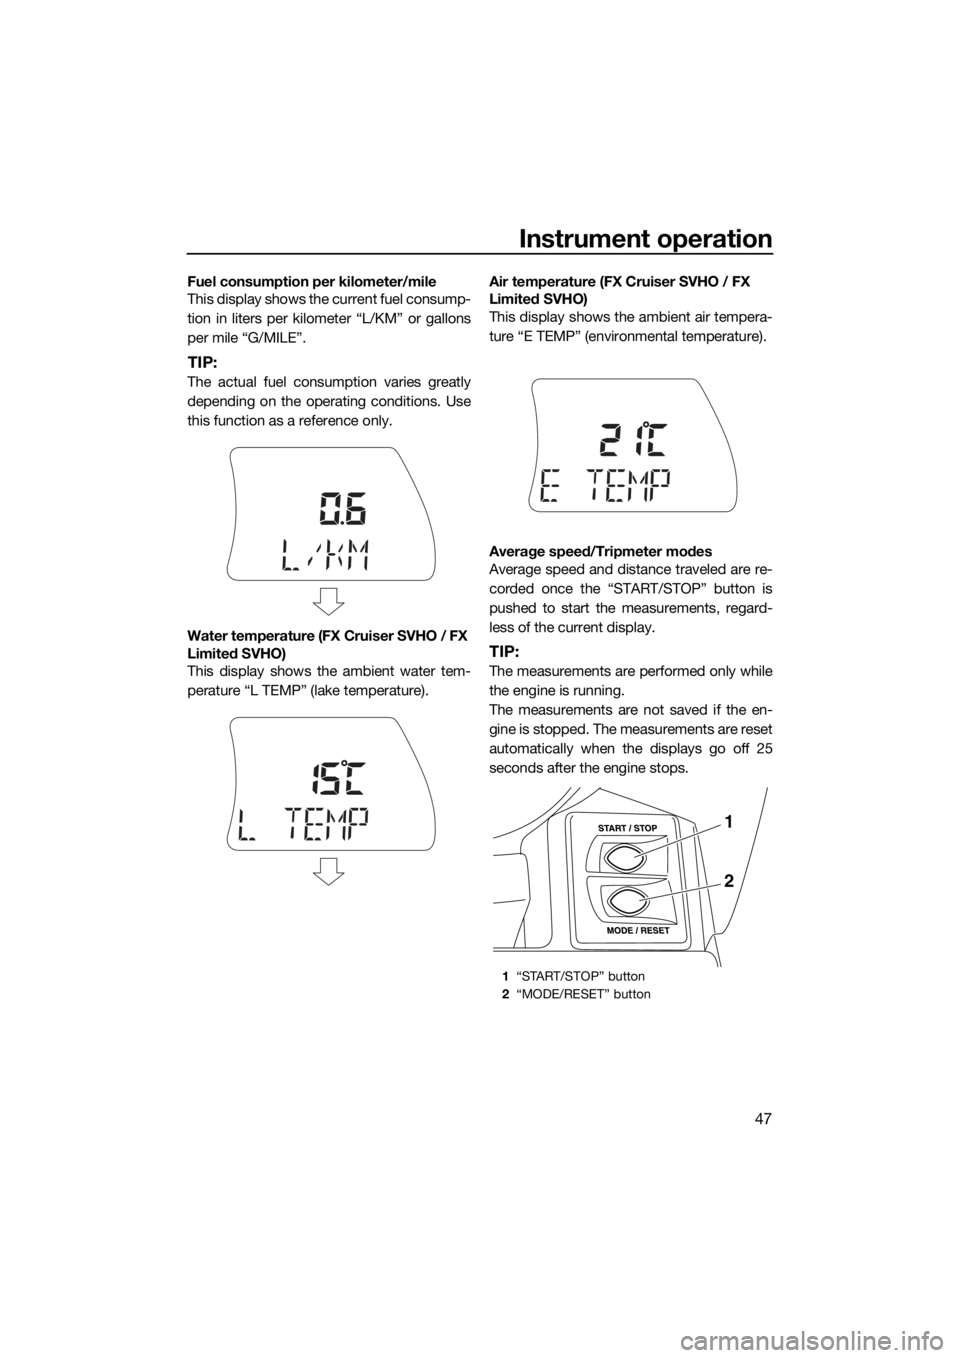
Fuel consumption per kilometer/mile
This display shows the current fuel consump-
tion in liters per kilometer “L/KM” or gallons
per mile “G/MILE”.
TIP:
The actual fuel consumption varies greatly
depending on the operating conditions. Use
this function as a reference only.
Water temperature (FX Cruiser SVHO / FX
Limited SVHO)
This display shows the ambient water tem-
perature “L TEMP” (lake temperature).Air temperature (FX Cruiser SVHO / FX
Limited SVHO)
This display shows the ambient air tempera-
ture “E TEMP” (environmental temperature).
Average speed/Tripmeter modes
Average speed and distance traveled are re-
corded once the “START/STOP” button is
pushed to start the measurements, regard-
less of the current display.
TIP:
The measurements are performed only while
the engine is running.
The measurements are not saved if the en-
gine is stopped. The measurements are reset
automatically when the displays go off 25
seconds after the engine stops.
1“START/STOP” button
2“MODE/RESET” button
1
2
UF3J75E0.book Page 47 Friday, July 7, 2017 9:55 AM
Page 54 of 118

Instrument operation
48
To start the measurements:
Push the “START/STOP” button for less than
1 second. The beeper sounds once and the
measurements start.
To stop the measurements:
Push the “START/STOP” button for less than
1 second while the measurements are being
recorded. The beeper sounds once and the
measurements stop.
To restart the measurements:
Push the “START/STOP” button for less than
1 second while the measurements are
stopped. The beeper sounds once and the
measurements restart.
To reset the measurements:
Push the “MODE/RESET” button for at least
2 seconds while the measurements are
stopped. The beeper sounds twice and the
measurements are reset.
UF3J75E0.book Page 48 Friday, July 7, 2017 9:55 AM
Page 70 of 118
Operation and handling requirements
64
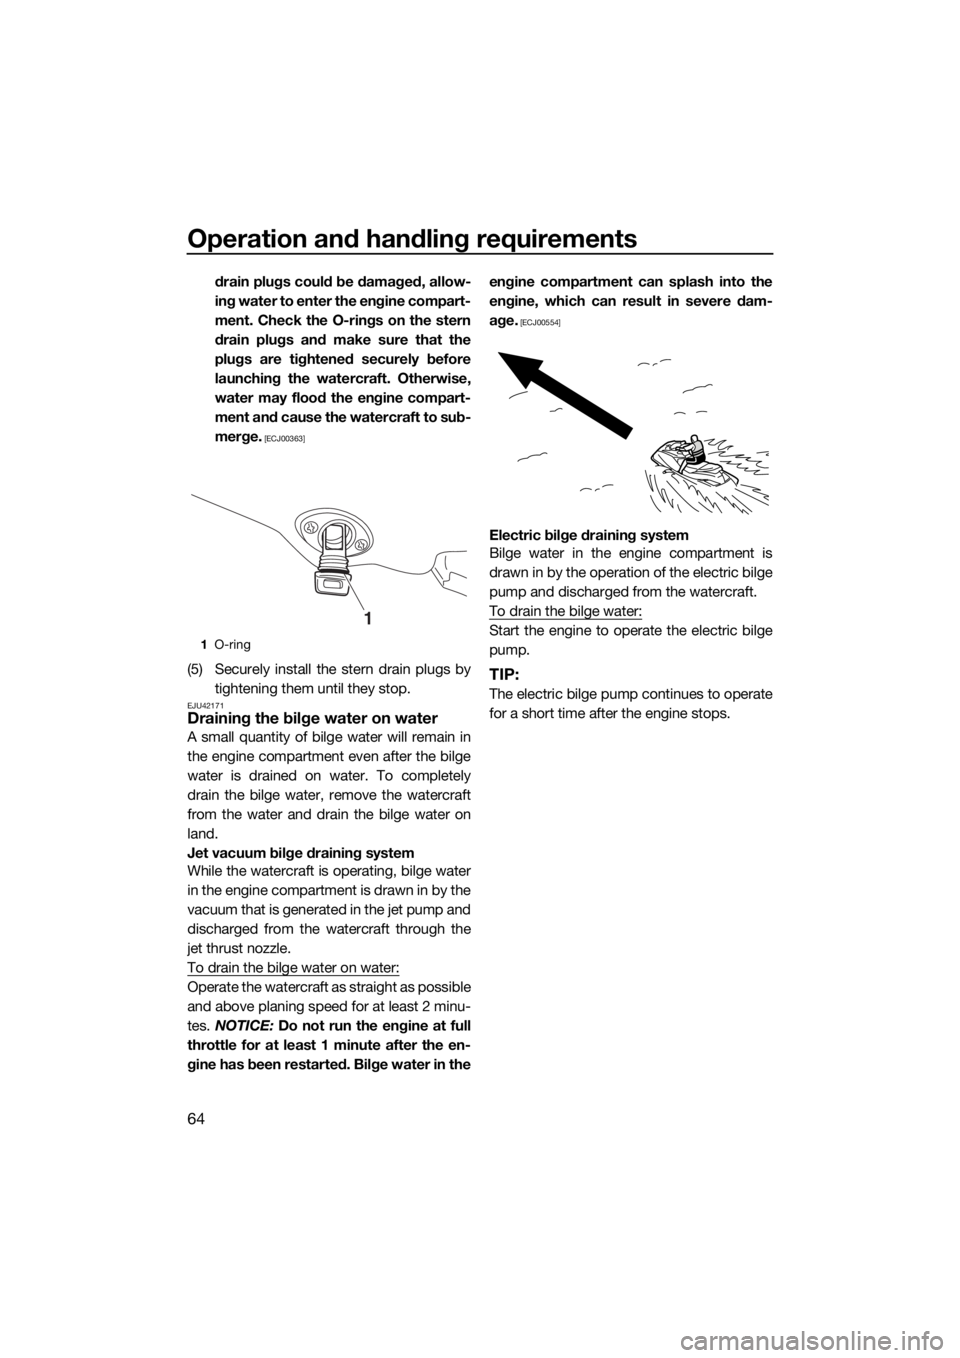
drain plugs could be damaged, allow-
ing water to enter the engine compart-
ment. Check the O-rings on the stern
drain plugs and make sure that the
plugs are tightened securely before
launching the watercraft. Otherwise,
water may flood the engine compart-
ment and cause the watercraft to sub-
merge.
[ECJ00363]
(5) Securely install the stern drain plugs by
tightening them until they stop.
EJU42171Draining the bilge water on water
A small quantity of bilge water will remain in
the engine compartment even after the bilge
water is drained on water. To completely
drain the bilge water, remove the watercraft
from the water and drain the bilge water on
land.
Jet vacuum bilge draining system
While the watercraft is operating, bilge water
in the engine compartment is drawn in by the
vacuum that is generated in the jet pump and
discharged from the watercraft through the
jet thrust nozzle.
To drain the bilge water on water:
Operate the watercraft as straight as possible
and above planing speed for at least 2 minu-
tes. NOTICE: Do not run the engine at full
throttle for at least 1 minute after the en-
gine has been restarted. Bilge water in theengine compartment can splash into the
engine, which can result in severe dam-
age.
[ECJ00554]
Electric bilge draining system
Bilge water in the engine compartment is
drawn in by the operation of the electric bilge
pump and discharged from the watercraft.
To drain the bilge water:
Start the engine to operate the electric bilge
pump.
TIP:
The electric bilge pump continues to operate
for a short time after the engine stops.
1O-ring
1
UF3J75E0.book Page 64 Friday, July 7, 2017 9:55 AM
Page 73 of 118

Pre-operation checks
67
EJU31982
WARNING
EWJ00412
Failure to inspect or maintain the watercraft properly increases the possibility of an ac-
cident or damage to the watercraft. Do not operate the watercraft if you find any prob-
lem. If a problem cannot be corrected by the procedures provided in this manual, have
the watercraft inspected by a Yamaha dealer.
EJU41234Pre-operation checklist
Before using this watercraft, be sure to perform the checks in the following checklist.
ITEM ROUTINE PAGE
PRE-LAUNCH CHECKS
Engine compartmentVentilate the engine compartment.
Check inside the engine compartment for damage.69
Fuel systemCheck the fuel system for leakage.
Check the fuel level in the fuel tank.69
Water separatorCheck the water separator for water. 70
Engine unitCheck the exterior of the engine unit for damage. 70
Engine oil levelCheck the engine oil level. 70
Bilge waterCheck the engine compartment for bilge water. 70
BatteryCheck the battery connections and electrolyte level. 70
Steering systemCheck the steering system for proper operation. 71
Adjustable tilt steering sys-
temCheck the adjustable tilt steering system for proper
operation and check that the handlebars are se-
curely locked in place.72
RiDE lever Check the RiDE lever for proper operation. 72
Throttle leverCheck the throttle lever for proper operation. 72
Remote control transmitterCheck the remote control transmitter for proper op-
eration.73
Engine shut-off cord (lan-
yard)Check the engine shut-off cord (lanyard) for dam-
age.73
SwitchesCheck the start switch, engine stop switch, and en-
gine shut-off switch for proper operation.73
Storage compartmentsCheck the storage compartments for damage and
water.74
Fire extinguisher holder,
cover, and bandCheck the fire extinguisher holder, cover, and band
for damage.74
Fire extinguisherCheck the condition of the fire extinguisher. 74
Safety equipmentCheck that safety equipment meeting the applica-
ble regulations is on board.74
Hull and deckCheck the hull and deck for damage. 74
Jet intakeCheck the jet intake for damage and clogging. 74
UF3J75E0.book Page 67 Friday, July 7, 2017 9:55 AM
Page 79 of 118
Pre-operation checks
73
throttle lever returns automatically to its fully
closed (idle) position when released.
EJU40113Remote control transmitter check
Make sure that the remote control transmitter
operates properly. (See page 26 for Yamaha
Security System setting procedures and
page 35 for Low RPM Mode activation pro-
cedures.)
EJU32664Engine shut-off cord (lanyard) check
Make sure that the engine shut-off cord (lan-
yard) is not damaged. If the cord is damaged,
replace it. WARNING! Never try to repair
the engine shut-off cord (lanyard) or tie it
together. The engine shut-off cord (lan-
yard) may not pull free when the operator
falls off, allowing the watercraft to conti-
nue to run and cause an accident.
[EWJ01221]EJU32676
Switch checks
NOTICE
ECJ01311
Do not run the engine over 4000 r/min on
land. Also, do not run the engine for more
than 15 seconds without supplying water,
otherwise the engine could overheat.
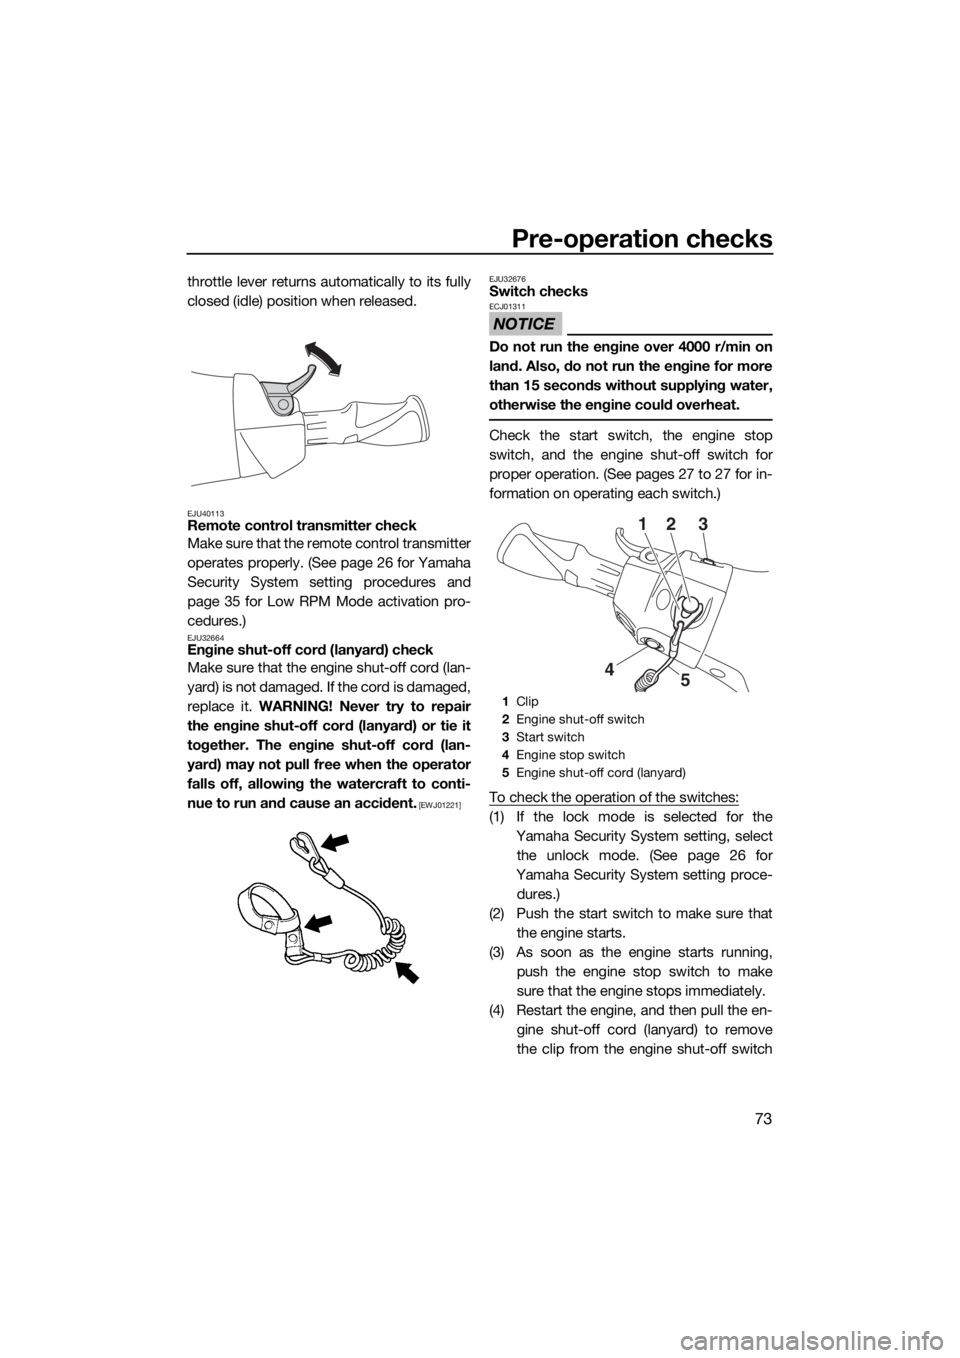
Check the start switch, the engine stop
switch, and the engine shut-off switch for
proper operation. (See pages 27 to 27 for in-
formation on operating each switch.)
To check the operation of the switches:
(1) If the lock mode is selected for the
Yamaha Security System setting, select
the unlock mode. (See page 26 for
Yamaha Security System setting proce-
dures.)
(2) Push the start switch to make sure that
the engine starts.
(3) As soon as the engine starts running,
push the engine stop switch to make
sure that the engine stops immediately.
(4) Restart the engine, and then pull the en-
gine shut-off cord (lanyard) to remove
the clip from the engine shut-off switch
1Clip
2Engine shut-off switch
3Start switch
4Engine stop switch
5Engine shut-off cord (lanyard)
12 3
5 4
UF3J75E0.book Page 73 Friday, July 7, 2017 9:55 AM
Page 85 of 118
Operation
79
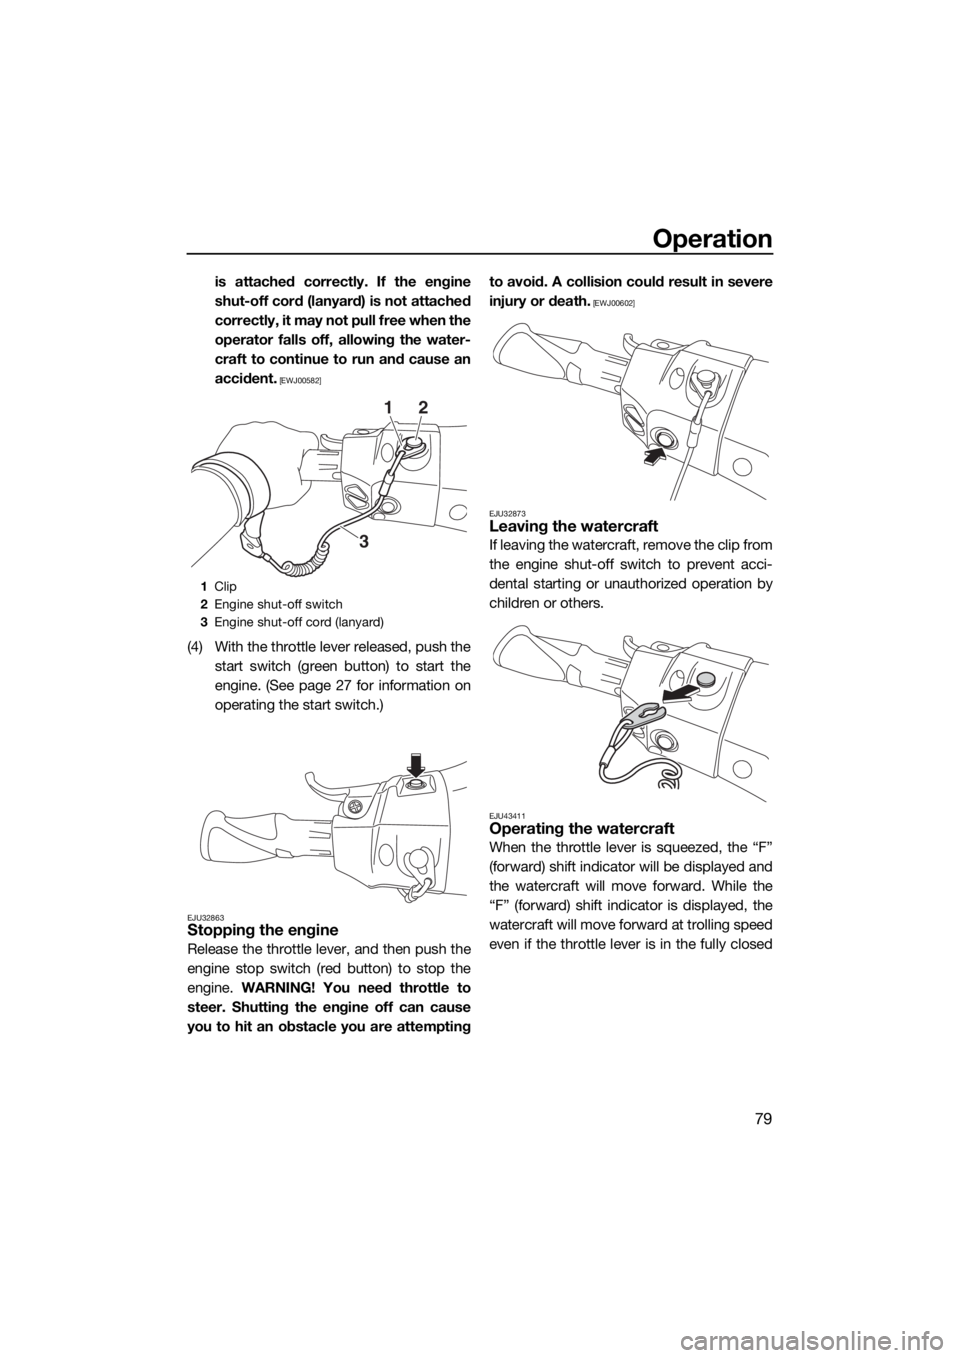
is attached correctly. If the engine
shut-off cord (lanyard) is not attached
correctly, it may not pull free when the
operator falls off, allowing the water-
craft to continue to run and cause an
accident.
[EWJ00582]
(4) With the throttle lever released, push the
start switch (green button) to start the
engine. (See page 27 for information on
operating the start switch.)
EJU32863Stopping the engine
Release the throttle lever, and then push the
engine stop switch (red button) to stop the
engine. WARNING! You need throttle to
steer. Shutting the engine off can cause
you to hit an obstacle you are attemptingto avoid. A collision could result in severe
injury or death.
[EWJ00602]
EJU32873
Leaving the watercraft
If leaving the watercraft, remove the clip from
the engine shut-off switch to prevent acci-
dental starting or unauthorized operation by
children or others.
EJU43411Operating the watercraft
When the throttle lever is squeezed, the “F”
(forward) shift indicator will be displayed and
the watercraft will move forward. While the
“F” (forward) shift indicator is displayed, the
watercraft will move forward at trolling speed
even if the throttle lever is in the fully closed
1Clip
2Engine shut-off switch
3Engine shut-off cord (lanyard)
2
3
1
UF3J75E0.book Page 79 Friday, July 7, 2017 9:55 AM
Page 90 of 118
Operation
84
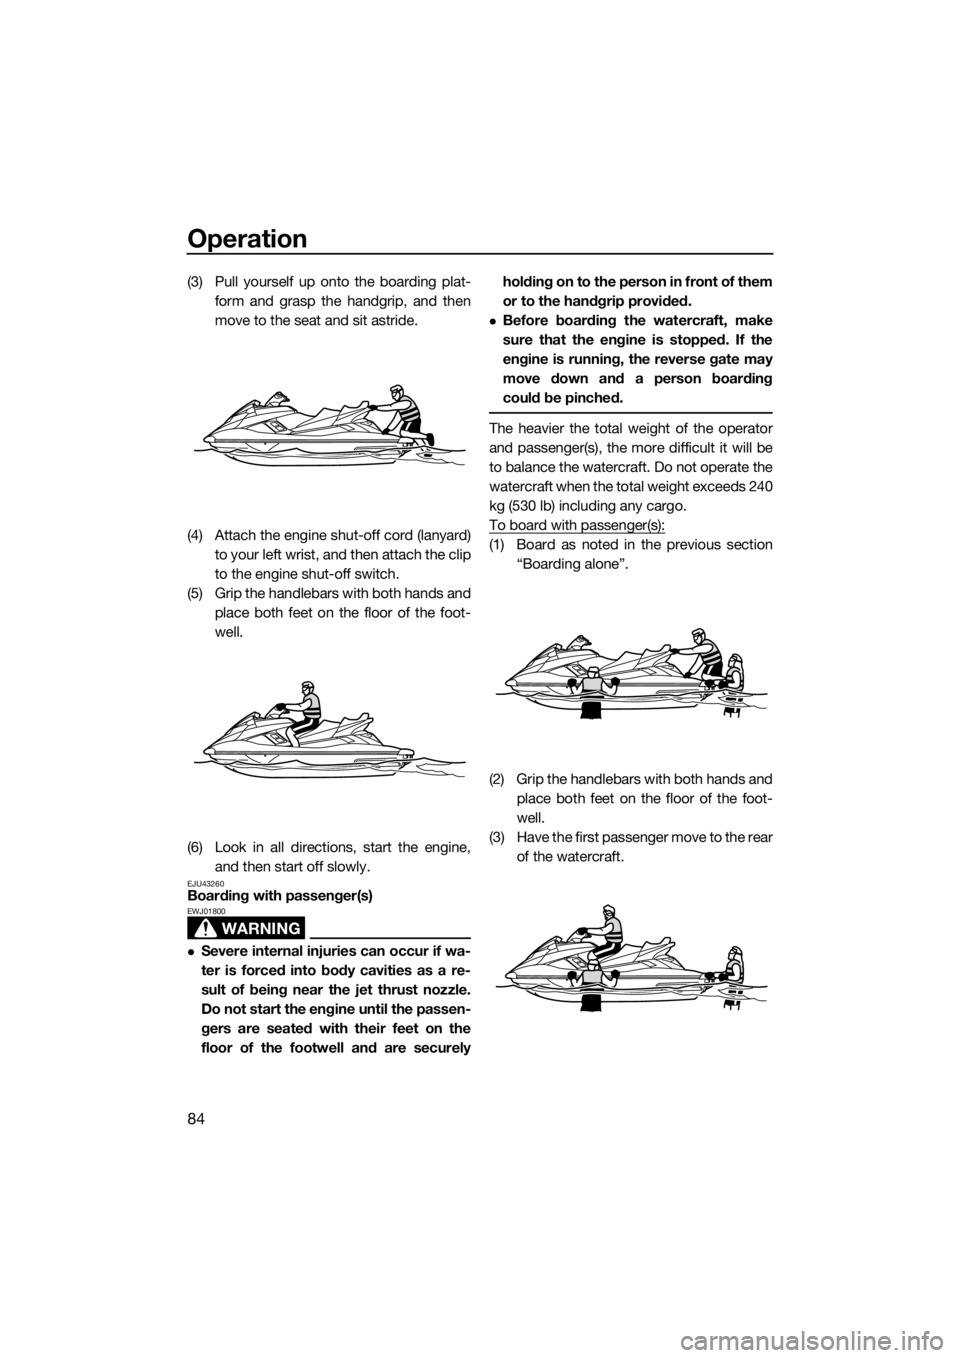
(3) Pull yourself up onto the boarding plat-
form and grasp the handgrip, and then
move to the seat and sit astride.
(4) Attach the engine shut-off cord (lanyard)
to your left wrist, and then attach the clip
to the engine shut-off switch.
(5) Grip the handlebars with both hands and
place both feet on the floor of the foot-
well.
(6) Look in all directions, start the engine,
and then start off slowly.
EJU43260Boarding with passenger(s)
WARNING
EWJ01800
Severe internal injuries can occur if wa-
ter is forced into body cavities as a re-
sult of being near the jet thrust nozzle.
Do not start the engine until the passen-
gers are seated with their feet on the
floor of the footwell and are securelyholding on to the person in front of them
or to the handgrip provided.
Before boarding the watercraft, make
sure that the engine is stopped. If the
engine is running, the reverse gate may
move down and a person boarding
could be pinched.
The heavier the total weight of the operator
and passenger(s), the more difficult it will be
to balance the watercraft. Do not operate the
watercraft when the total weight exceeds 240
kg (530 lb) including any cargo.
To board with passenger(s):
(1) Board as noted in the previous section
“Boarding alone”.
(2) Grip the handlebars with both hands and
place both feet on the floor of the foot-
well.
(3) Have the first passenger move to the rear
of the watercraft.
UF3J75E0.book Page 84 Friday, July 7, 2017 9:55 AM