belt YAMAHA GRIZZLY 125 2005 Notices Demploi (in French)
[x] Cancel search | Manufacturer: YAMAHA, Model Year: 2005, Model line: GRIZZLY 125, Model: YAMAHA GRIZZLY 125 2005Pages: 362, PDF Size: 5.52 MB
Page 18 of 362

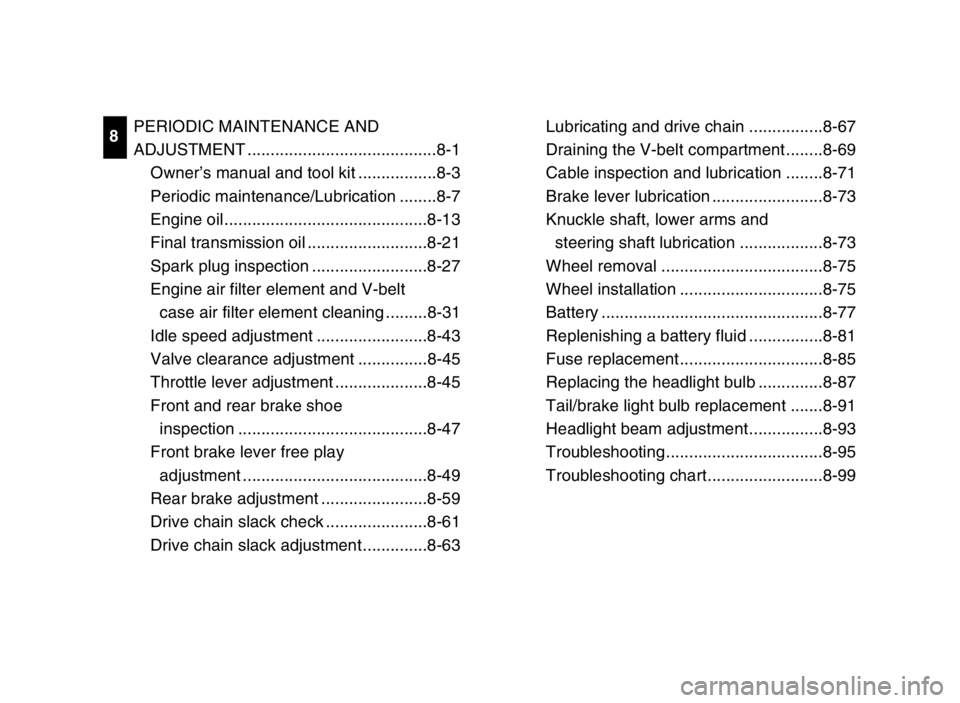
PERIODIC MAINTENANCE AND
ADJUSTMENT .........................................8-1
Owner’s manual and tool kit .................8-3
Periodic maintenance/Lubrication ........8-7
Engine oil ............................................8-13
Final transmission oil ..........................8-21
Spark plug inspection .........................8-27
Engine air filter element and V-belt
case air filter element cleaning .........8-31
Idle speed adjustment ........................8-43
Valve clearance adjustment ...............8-45
Throttle lever adjustment ....................8-45
Front and rear brake shoe
inspection .........................................8-47
Front brake lever free play
adjustment ........................................8-49
Rear brake adjustment .......................8-59
Drive chain slack check ......................8-61
Drive chain slack adjustment ..............8-63Lubricating and drive chain ................8-67
Draining the V-belt compartment ........8-69
Cable inspection and lubrication ........8-71
Brake lever lubrication ........................8-73
Knuckle shaft, lower arms and
steering shaft lubrication ..................8-73
Wheel removal ...................................8-75
Wheel installation ...............................8-75
Battery ................................................8-77
Replenishing a battery fluid ................8-81
Fuse replacement ...............................8-85
Replacing the headlight bulb ..............8-87
Tail/brake light bulb replacement .......8-91
Headlight beam adjustment ................8-93
Troubleshooting ..................................8-95
Troubleshooting chart .........................8-998
1C5-9-61-01 9/4/04 8:48 PM Page 14
Page 236 of 362

8-7
EBU02621
PERIODIC MAINTENANCE/LUBRICATION
NOTE:8For ATVs not equipped with an odometer or an hour meter, follow the month maintenance intervals.
8For ATVs equipped with an odometer or an hour meter, follow the km (mi) or hours maintenance intervals. However, keep in mind
that if the ATV isn’t used for a long period of time, the month maintenance intervals should be followed.
INITIAL EVERY
month 1 3 6 6 12
ITEM ROUTINEWhichever
km 320 1200 2400 2400 4800 comes first
(mi) (200) (750) (1500) (1500) (3000)
hours 20 75 150 150 300
Valves*• Check valve clearance.
1111
• Adjust if necessary.
• Check condition.
Spark plug• Adjust gap and clean.11111
• Replace if necessary.
Air filter element
• Clean. Every 20–40 hours
(for engine and V-belt
• Replace if necessary. (more often in wet or dusty areas)
case)
Carburetor*• Check idle speed/starter operation.
111 1
• Adjust if necessary.
Cylinder head cover• Check breather hose for cracks or damage.
111
breather system*• Replace if necessary.
• Check leakage.
Exhaust system*• Retighten if necessary.111
• Replace gasket if necessary.
Fuel line*• Check fuel hose for cracks or damage.
111
• Replace if necessary.
Engine oil• Replace (warm engine before draining).1111
1C5-9-61-08 9/4/04 9:30 AM Page 8-8
Page 237 of 362

8
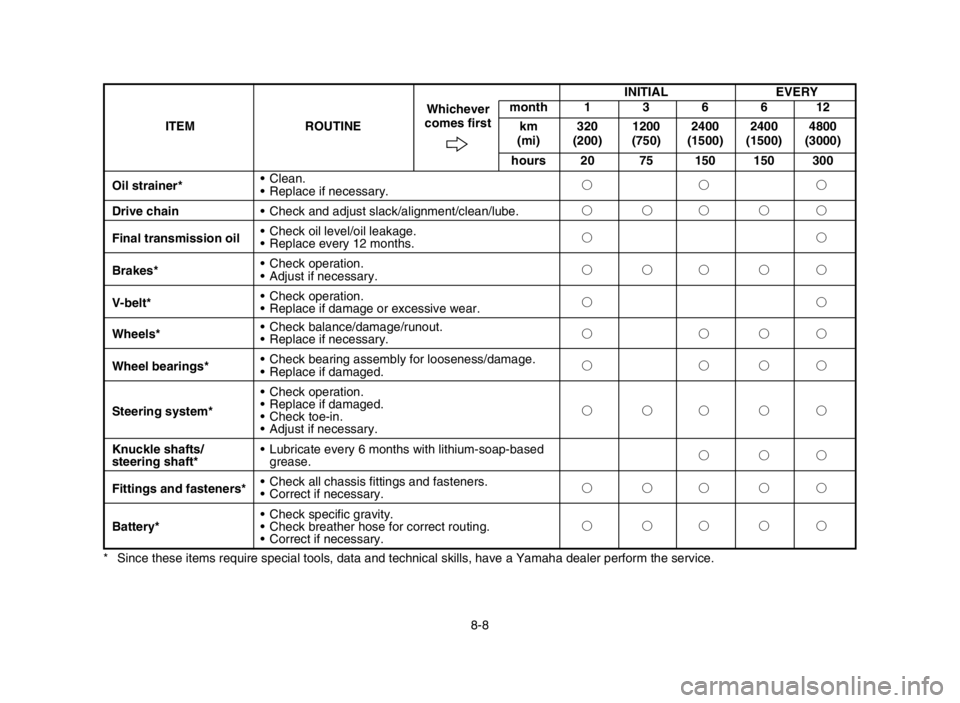
8-8 * Since these items require special tools, data and technical skills, have a Yamaha dealer perform the service.INITIAL EVERY
month 1 3 6 6 12
ITEM ROUTINEWhichever
km 320 1200 2400 2400 4800 comes first
(mi) (200) (750) (1500) (1500) (3000)
hours 20 75 150 150 300
Oil strainer*• Clean.
11 1
• Replace if necessary.
Drive chain• Check and adjust slack/alignment/clean/lube.11111
Final transmission oil• Check oil level/oil leakage.
11
• Replace every 12 months.
Brakes*• Check operation.
11111
• Adjust if necessary.
V-belt*• Check operation.
11
• Replace if damage or excessive wear.
Wheels*• Check balance/damage/runout.
1111
• Replace if necessary.
Wheel bearings*• Check bearing assembly for looseness/damage.
1111
• Replace if damaged.
• Check operation.
Steering system*• Replace if damaged.
11111
• Check toe-in.
• Adjust if necessary.
Knuckle shafts/• Lubricate every 6 months with lithium-soap-based
111
steering shaft*grease.
Fittings and fasteners*• Check all chassis fittings and fasteners.
11111
• Correct if necessary.
• Check specific gravity.
Battery*• Check breather hose for correct routing.11111
• Correct if necessary.
1C5-9-61-08 9/4/04 9:30 AM Page 8-9
Page 260 of 362

8-31
EBU14840
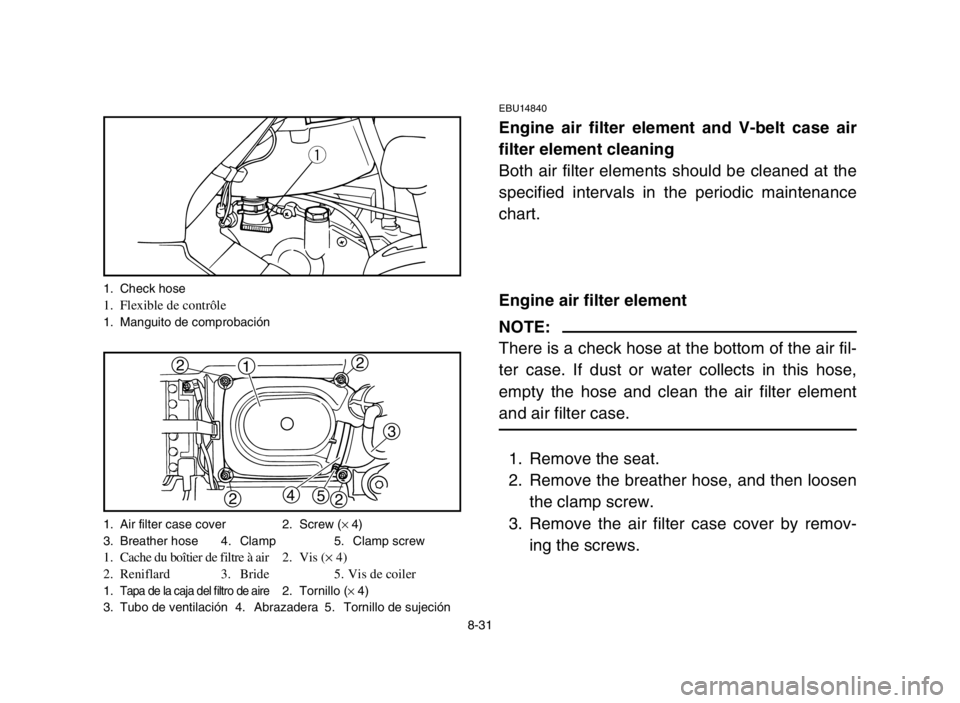
Engine air filter element and V-belt case air
filter element cleaning
Both air filter elements should be cleaned at the
specified intervals in the periodic maintenance
chart.
Engine air filter element
NOTE:
There is a check hose at the bottom of the air fil-
ter case. If dust or water collects in this hose,
empty the hose and clean the air filter element
and air filter case.
1. Remove the seat.
2. Remove the breather hose, and then loosen
the clamp screw.
3. Remove the air filter case cover by remov-
ing the screws.
q
1
3
4
5
2
2
2
2
1. Check hose1. Flexible de contrôle1. Manguito de comprobación
1. Air filter case cover 2. Screw (
× 4)
3. Breather hose 4. Clamp 5. Clamp screw
1. Cache du boîtier de filtre à air 2.Vis (× 4)
2. Reniflard 3. Bride 5. Vis de coiler
1.Tapa de la caja del filtro de aire2. Tornillo (× 4)
3. Tubo de ventilación 4. Abrazadera 5. Tornillo de sujeción
1C5-9-61-08 9/4/04 9:30 AM Page 8-32
Page 268 of 362

8-39
V-belt case air filter element
1. Remove the front carrier by removing the
bolts.
2. Remove the front cover by removing the
quick fasteners, then disconnect the coupler
shown.
1
2
2
2
1. Front carrier 2. Bolt (×6)1. Porte-bagages avant 2. Boulon (×6)1. Portapaquetes delantero 2. Tapón (×6)
1. Front cover 2. Quick fastener (×2)
1. Cache avant 2. Rivets démontables (×2)1. Tapa frontal 2. Fijadores rápidos (×2)
1
2
2
1C5-9-61-08 9/4/04 9:30 AM Page 8-40
Page 270 of 362

3. Remove the V-belt air filter element cover
by removing the screw.
4. Pull out the air filter element.
5. Tap the air filter element lightly to remove
most of the dust and dirt. Blow out the
remaining dirt with compressed air. If the air
filter element is damaged, replace it.
NOTE:
Be sure the air filter element is seated properly
against the case.
6. Install the air filter element cover by
installing the screw.
7. Connect the coupler, and then install the
front cover by installing the quick fasteners.
8. Install the front carrier by installing the bolts.
1
2
1. Front cover 2. Coupler 1. Cache avant 2. Fiche 1. Tapa frontal 2. Acoplador
1. Element cover 2. Screw
3. Element
1. Cache de l’élément 2. Vis
3. Elément
1. Tapa del elemento 2. Tornillo
3. Elemento
8-41
w
qe
1C5-9-61-08 9/4/04 9:30 AM Page 8-42
Page 280 of 362

8-51
2. Remove the front cover by removing the
quick fasteners, then disconnect the coupler
shown.
3. Remove the V-belt air filter element cover
by removing the screw.
1. Front cover 2. Quick fastener (×2) 3. Coupler1. Cache avant 2. Rivets démontables (×2) 3. Fiche 1. Tapa frontal 2. Fijadores rápidos (×2) 3. Acoplador
1
3
1
22
w
q
1. Element cover 2. Screw1. Cache de l’élément 2. Vis1. Tapa del elemento 2. Tornillo
1C5-9-61-08 9/4/04 9:30 AM Page 8-52
Page 298 of 362

8-69
2. Wipe the drive chain dry.
3. Thoroughly lubricate the drive chain with a
special O-ring chain lubricant.
cC
Do not use engine oil or any other lubricants
for the drive chain, as they may contain sub-
stances that could damage the O-rings.
EBU00355
Draining the V-belt compartment
If water leaks into the V-belt compartment such
as when the machine is driven in water, remove
the drain screw on the bottom of compartment
and drain the water. Be sure to drive slowly until
the V-belt becomes dry. If slipping is noticed,
ask a Yamaha dealer to inspect.
q
q
1. O-ring1. Joint toriques1. Junta tóricas
1. Drain screw
1. Vis de vidange1. Tornillo de drenaje
1C5-9-61-08 9/4/04 9:30 AM Page 8-70
Page 344 of 362

10-3
Model YFM125G
Air filter:
for engine Wet type element
for V-belt compartment Dry type element
Fuel:
Type Unleaded gasoline only
For Europe:Regular unleaded gasoline only with a
research octane number of 91 or higher
Fuel tank capacity 7.6 L
Fuel reserve amount 1.3 L
Carburetor:
Type/manufacturer VM18SH/MIKUNI
Spark plug:
Type/manufacturer CR7HS/NGK
Gap 0.6–0.7 mm
Clutch type: Dry, centrifugal automatic
Transmission:
Primary reduction system Helical gear/Spur gear
Primary reduction ratio 43/14 ×40/17 (7.226)
Secondary reduction system Chain drive
Secondary reduction ratio 32/12 (2.666)
Transmission type V-belt automatic
Operation Centrifugal automatic type
Reverse 49/14 ×49/15 ×40/17 (26.902)
1C5-9-61-09~11 9/4/04 9:29 AM Page 14