YAMAHA GRIZZLY 125 2013 Manual Online
Manufacturer: YAMAHA, Model Year: 2013, Model line: GRIZZLY 125, Model: YAMAHA GRIZZLY 125 2013Pages: 134, PDF Size: 3.93 MB
Page 81 of 134
8-10
8
TIPIf the spark plug shows a distinctly different color,
the engine could be operating improperly. Do not
attempt to diagnose such problems yourself. In-
stead, have a Yamaha dealer check the ATV.2. Check the spark plug for electrode erosionand excessive carbon or other deposits, and
replace it if necessary.
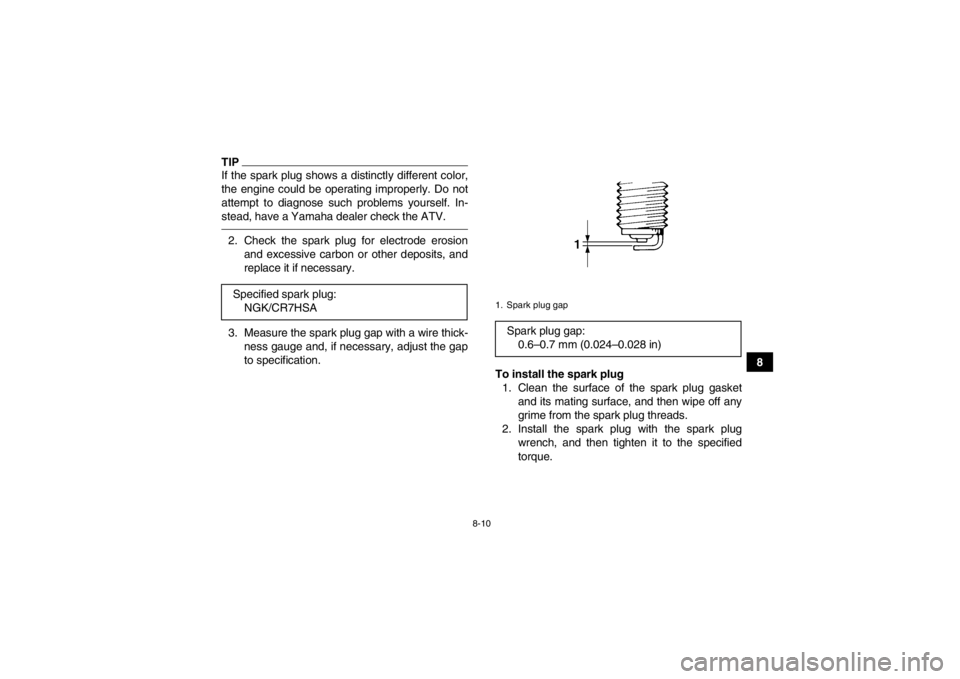
3. Measure the spark plug gap with a wire thick- ness gauge and, if necessary, adjust the gap
to specification.
To install the spark plug1. Clean the surface of the spark plug gasket and its mating surface, and then wipe off any
grime from the spark plug threads.
2. Install the spark plug with the spark plug wrench, and then tighten it to the specified
torque.
Specified spark plug:
NGK/CR7HSA
1. Spark plug gapSpark plug gap:0.6–0.7 mm (0.024–0.028 in)
U1PY61E0.book Page 10 Wednesday, March 14, 2012 5:22 PM
Page 82 of 134
8-11
8
TIPIf a torque wrench is not available when installing
the spark plug, a good estimate of the correct
torque is 1/4–1/2 turn past finger tight. However,
the spark plug should be tightened to the specified
torque as soon as possible.3. Install the spark plug cap.EBU23268Engine oil The engine oil level should be checked before
each ride. In addition, the oil must be changed at
the intervals specified in the periodic maintenance
and lubrication chart.
To check the engine oil level1. Place the ATV on a level surface.
2. Check the engine oil level on a cold engine.
TIPIf the engine was started before checking the oil
level, be sure to warm up the engine sufficiently,
and then wait at least ten minutes until the oil set-
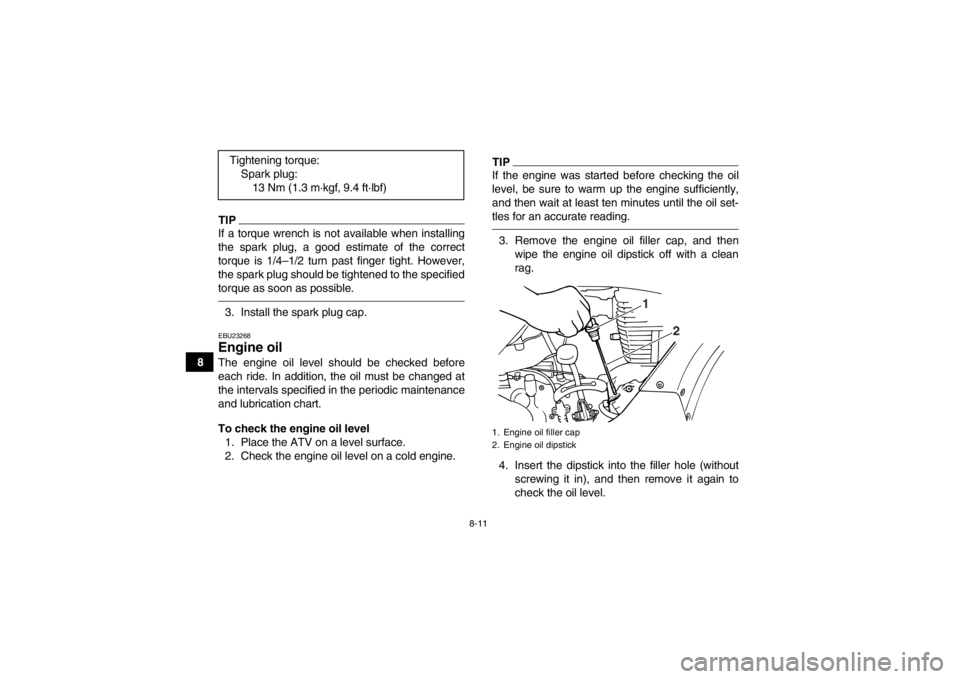
tles for an accurate reading.3. Remove the engine oil filler cap, and then wipe the engine oil dipstick off with a clean
rag.
4. Insert the dipstick into the filler hole (without screwing it in), and then remove it again to
check the oil level.
Tightening torque:
Spark plug:13 Nm (1.3 m·kgf, 9.4 ft·lbf)1. Engine oil filler cap
2. Engine oil dipstick
2
1
U1PY61E0.book Page 11 Wednesday, March 14, 2012 5:22 PM
Page 83 of 134
8-12
8
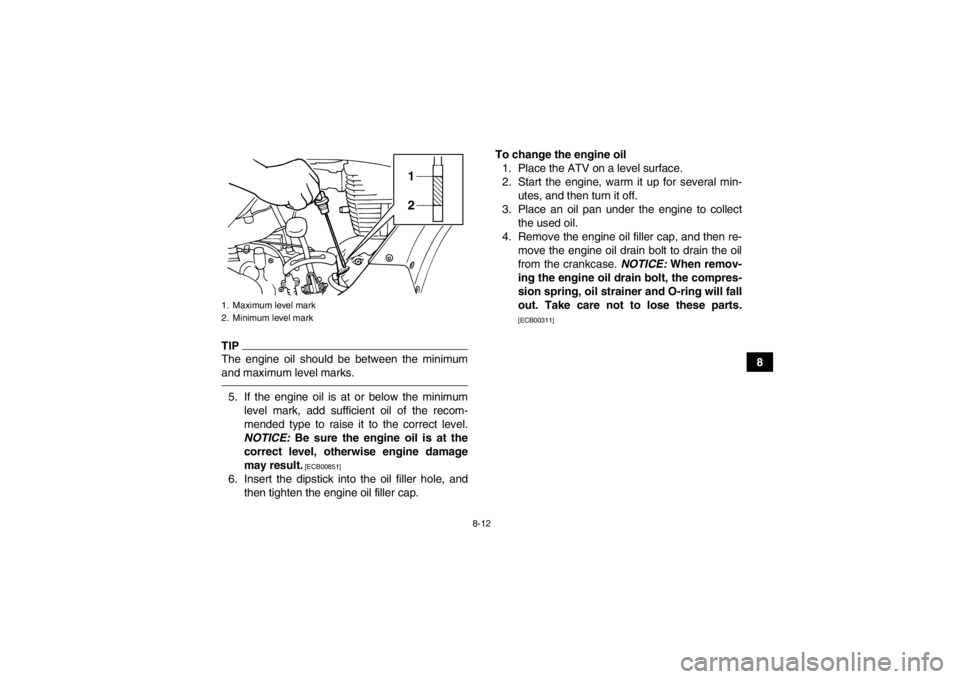
TIPThe engine oil should be between the minimum
and maximum level marks.5. If the engine oil is at or below the minimumlevel mark, add sufficient oil of the recom-
mended type to raise it to the correct level.
NOTICE: Be sure the engine oil is at the
correct level, otherwise engine damage
may result.
[ECB00851]
6. Insert the dipstick into the oil filler hole, and then tighten the engine oil filler cap. To change the engine oil
1. Place the ATV on a level surface.
2. Start the engine, warm it up for several min- utes, and then turn it off.
3. Place an oil pan under the engine to collect the used oil.
4. Remove the engine oil filler cap, and then re- move the engine oil drain bolt to drain the oil
from the crankcase. NOTICE: When remov-
ing the engine oil drain bolt, the compres-
sion spring, oil strainer and O-ring will fall
out. Take care not to lose these parts.
[ECB00311]
1. Maximum level mark
2. Minimum level mark
12
U1PY61E0.book Page 12 Wednesday, March 14, 2012 5:22 PM
Page 84 of 134
8-13
85. Clean the oil strainer with solvent.
6. Apply a thin coat of clean engine oil to a new
O-ring.
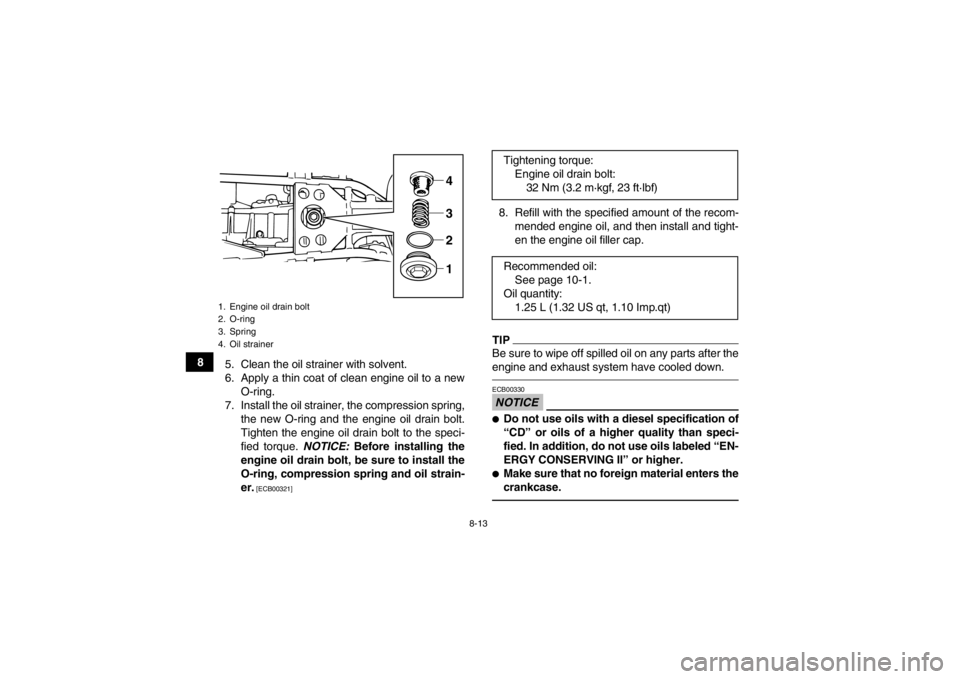
7. Install the oil strainer, the compression spring, the new O-ring and the engine oil drain bolt.
Tighten the engine oil drain bolt to the speci-
fied torque. NOTICE: Before installing the
engine oil drain bolt, be sure to install the
O-ring, compression spring and oil strain-
er.
[ECB00321]
8. Refill with the specified amount of the recom- mended engine oil, and then install and tight-
en the engine oil filler cap.TIPBe sure to wipe off spilled oil on any parts after the
engine and exhaust system have cooled down.NOTICEECB00330●Do not use oils with a diesel specification of
“CD” or oils of a higher quality than speci-
fied. In addition, do not use oils labeled “EN-
ERGY CONSERVING II” or higher.●Make sure that no foreign material enters the
crankcase.
1. Engine oil drain bolt
2. O-ring
3. Spring
4. Oil strainer
4321
Tightening torque:Engine oil drain bolt:32 Nm (3.2 m·kgf, 23 ft·lbf)
Recommended oil: See page 10-1.
Oil quantity: 1.25 L (1.32 US qt, 1.10 Imp.qt)
U1PY61E0.book Page 13 Wednesday, March 14, 2012 5:22 PM
Page 85 of 134
8-14
8
9. Start the engine, and then let it idle for several
minutes while checking it for oil leakage. If oil
is leaking, immediately turn the engine off and
check for the cause.
10. Turn the engine off, wait at least ten minutes, and then check the oil level and correct it if
necessary.
EBU27026Transmission oil The transmission oil level should be checked be-
fore each ride. In addition, the transmission oil
must be changed at the intervals specified in the
periodic maintenance and lubrication chart.
To check the transmission oil level1. Place the ATV on a level surface.
2. Start the engine, warm it up for several min- utes, and then turn it off.
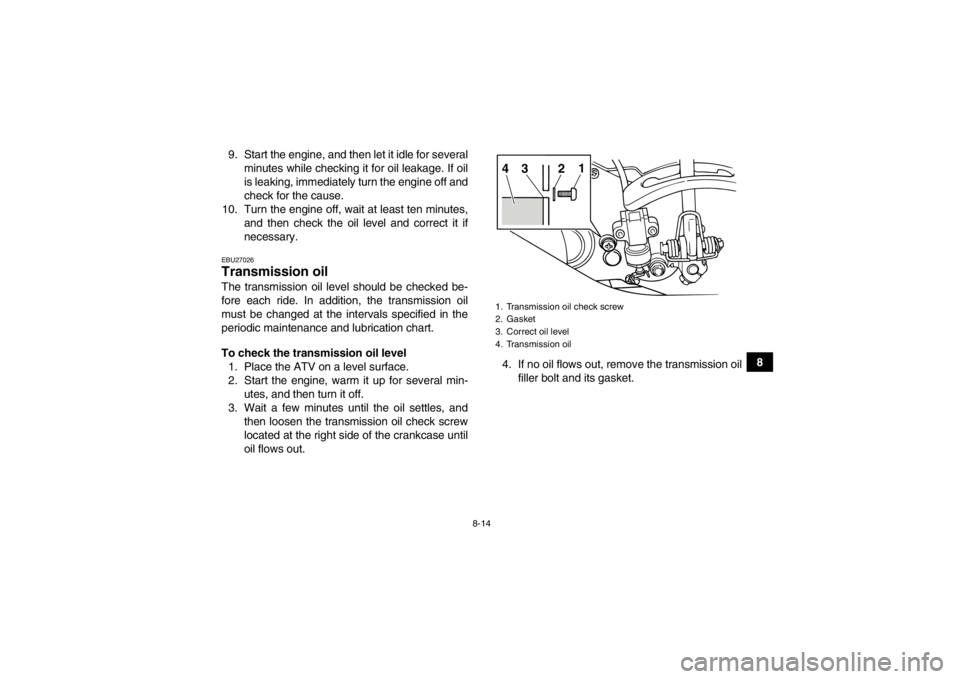
3. Wait a few minutes until the oil settles, and then loosen the transmission oil check screw
located at the right side of the crankcase until
oil flows out. 4. If no oil flows out, remove the transmission oil
filler bolt and its gasket.
1. Transmission oil check screw
2. Gasket
3. Correct oil level
4. Transmission oil4 3 1
2
U1PY61E0.book Page 14 Wednesday, March 14, 2012 5:22 PM
Page 86 of 134
8-15
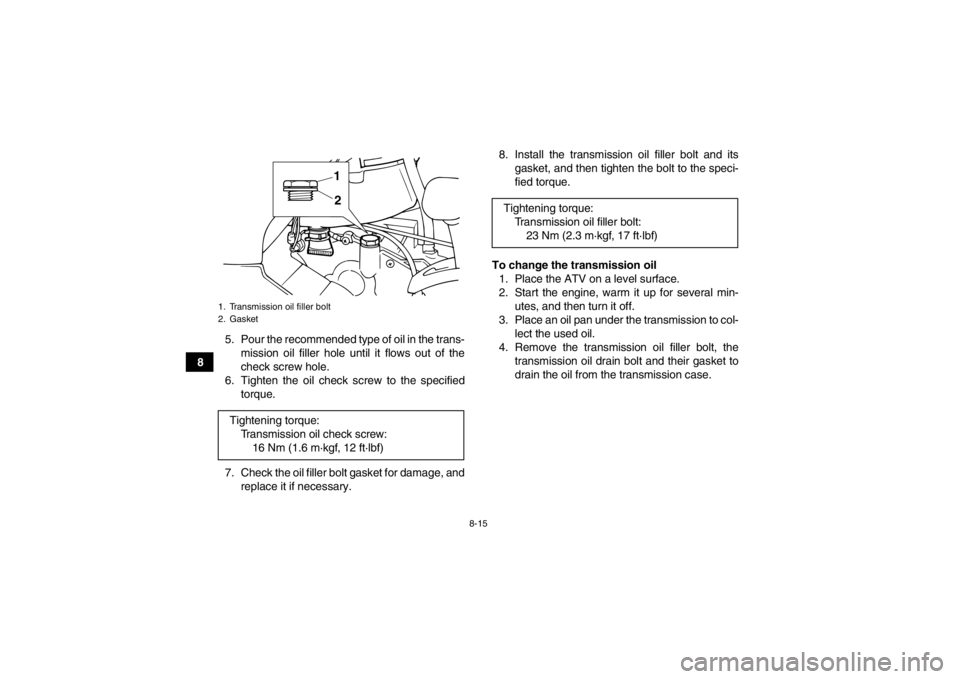
85. Pour the recommended type of oil in the trans-
mission oil filler hole until it flows out of the
check screw hole.
6. Tighten the oil check screw to the specified torque.
7. Check the oil filler bolt gasket for damage, and replace it if necessary. 8. Install the transmission oil filler bolt and its
gasket, and then tighten the bolt to the speci-
fied torque.
To change the transmission oil 1. Place the ATV on a level surface.
2. Start the engine, warm it up for several min- utes, and then turn it off.
3. Place an oil pan under the transmission to col- lect the used oil.
4. Remove the transmission oil filler bolt, the transmission oil drain bolt and their gasket to
drain the oil from the transmission case.
1. Transmission oil filler bolt
2. GasketTightening torque:Transmission oil check screw:16 Nm (1.6 m·kgf, 12 ft·lbf)
1
2
Tightening torque: Transmission oil filler bolt:23 Nm (2.3 m·kgf, 17 ft·lbf)
U1PY61E0.book Page 15 Wednesday, March 14, 2012 5:22 PM
Page 87 of 134
8-16
8
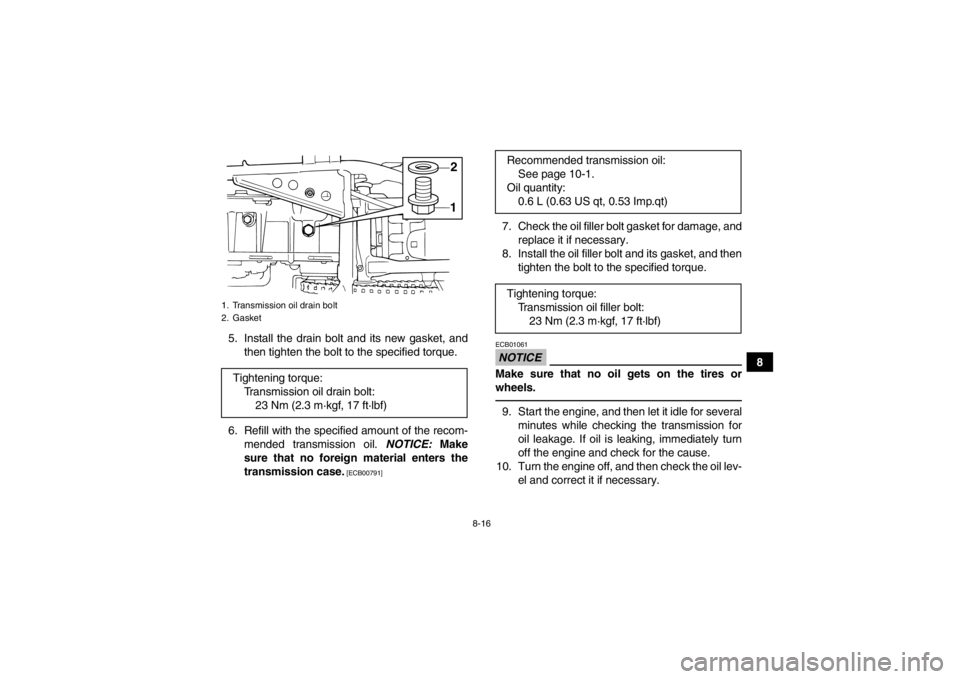
5. Install the drain bolt and its new gasket, and
then tighten the bolt to the specified torque.
6. Refill with the specified amount of the recom- mended transmission oil. NOTICE: Make
sure that no foreign material enters the
transmission case.
[ECB00791]
7. Check the oil filler bolt gasket for damage, and replace it if necessary.
8. Install the oil filler bolt and its gasket, and then tighten the bolt to the specified torque.NOTICEECB01061Make sure that no oil gets on the tires or
wheels.9. Start the engine, and then let it idle for severalminutes while checking the transmission for
oil leakage. If oil is leaking, immediately turn
off the engine and check for the cause.
10. Turn the engine off, and then check the oil lev- el and correct it if necessary.
1. Transmission oil drain bolt
2. GasketTightening torque:Transmission oil drain bolt:23 Nm (2.3 m·kgf, 17 ft·lbf)
12
Recommended transmission oil: See page 10-1.
Oil quantity: 0.6 L (0.63 US qt, 0.53 Imp.qt)
Tightening torque: Transmission oil filler bolt:23 Nm (2.3 m·kgf, 17 ft·lbf)
U1PY61E0.book Page 16 Wednesday, March 14, 2012 5:22 PM
Page 88 of 134

8-17
8
EBU2384CCleaning the engine and V-belt case air
filter elements Both air filter elements should be cleaned at the
specified intervals in the periodic maintenance
chart.
Engine air filter elementTIPThere is a check hose at the bottom of the air filter
case. If dust or water collects in this hose, empty
the hose and clean the air filter element and air fil-
ter case.
1. Place the ATV on a level surface.
2. Remove the seat. (See page 4-10.)
3. Remove the breather hose by pulling it out,
and then loosen the air filter joint screw.
4. Remove the air filter case cover by removing its screws, then disconnecting the air filter
case cover from the air filter joint.
1. Air filter case check hose
1
1. Breather hose
2. Air filter joint
3. Air filter joint screw
1
3
2
U1PY61E0.book Page 17 Wednesday, March 14, 2012 5:22 PM
Page 89 of 134
8-18
8
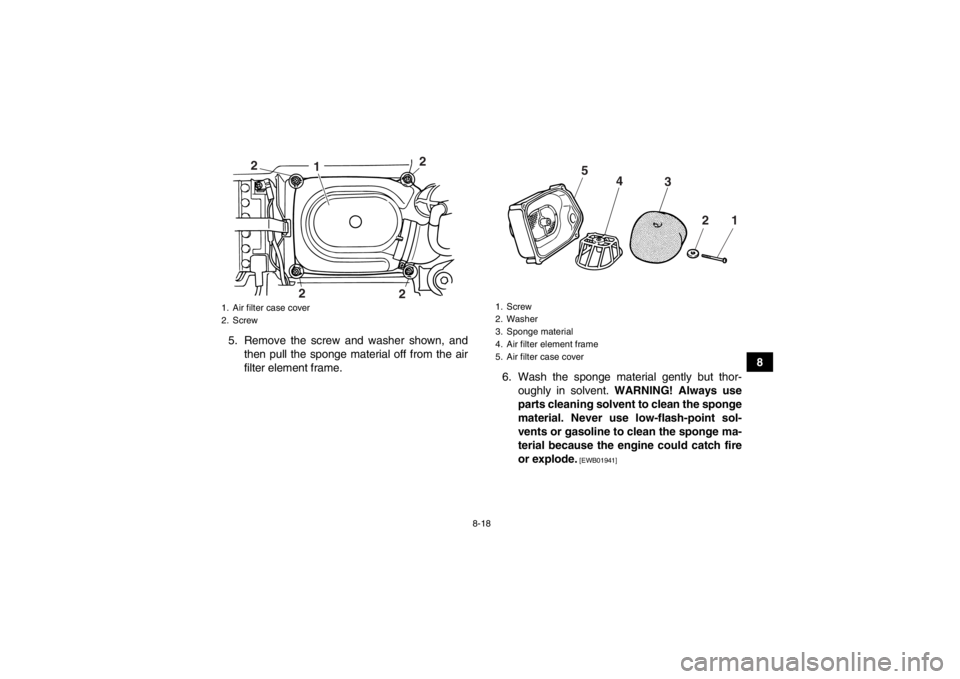
5. Remove the screw and washer shown, and
then pull the sponge material off from the air
filter element frame. 6. Wash the sponge material gently but thor-
oughly in solvent. WARNING! Always use
parts cleaning solvent to clean the sponge
material. Never use low-flash-point sol-
vents or gasoline to clean the sponge ma-
terial because the engine could catch fire
or explode.
[EWB01941]
1. Air filter case cover
2. Screw
1
2 2
2 2
1. Screw
2. Washer
3. Sponge material
4. Air filter element frame
5. Air filter case cover
3
4
21
5
U1PY61E0.book Page 18 Wednesday, March 14, 2012 5:22 PM
Page 90 of 134
![YAMAHA GRIZZLY 125 2013 Manual Online 8-19
87. Squeeze the excess solvent out of the sponge
material and let it dry. NOTICE: Do not twist
the sponge material when squeezing it.
[ECB00441]
8. Check the sponge material and replace it if da YAMAHA GRIZZLY 125 2013 Manual Online 8-19
87. Squeeze the excess solvent out of the sponge
material and let it dry. NOTICE: Do not twist
the sponge material when squeezing it.
[ECB00441]
8. Check the sponge material and replace it if da](/img/51/50324/w960_50324-89.png)
8-19
87. Squeeze the excess solvent out of the sponge
material and let it dry. NOTICE: Do not twist
the sponge material when squeezing it.
[ECB00441]
8. Check the sponge material and replace it if damaged.
9. Apply Yamaha foam air filter oil or other qual- ity foam air filter oil to the sponge material.TIPThe sponge material should be wet but not drip-
ping.10. Pull the sponge material over the air filter ele- ment frame. 11. Apply all-purpose grease to the air filter ele-
ment seat.
12. Install the washer and screw. NOTICE: Be
sure to install the washer with its curved
side facing outward as shown.
[ECB00453]
1. Air filter element seat
1
U1PY61E0.book Page 19 Wednesday, March 14, 2012 5:22 PM