AUX YAMAHA GRIZZLY 700 2013 Owners Manual
[x] Cancel search | Manufacturer: YAMAHA, Model Year: 2013, Model line: GRIZZLY 700, Model: YAMAHA GRIZZLY 700 2013Pages: 174, PDF Size: 4.21 MB
Page 8 of 174

EBU17420
TABLE OF CONTENTS
LOCATION OF THE WARNING AND
SPECIFICATION LABELS ............................ 1-1
SAFETY INFORMATION .............................. 2-1
DESCRIPTION .............................................. 3-1Left view ...................................................... 3-1
Right view.................................................... 3-1
Controls and instruments ............................ 3-2
INSTRUMENT AND CONTROL
FUNCTIONS .................................................. 4-1 Main switch ................................................ 4-1
Indicator lights and warning lights .............. 4-2
Multi-function display .................................. 4-5
Handlebar switches .................................... 4-7
Throttle lever ............................................ 4-13
Speed limiter ............................................ 4-13
Front brake lever ...................................... 4-14
Brake pedal and rear brake lever ............. 4-14
Drive select lever ...................................... 4-15
Fuel tank cap ............................................ 4-15
Fuel .......................................................... 4-16
Seat .......................................................... 4-18 Storage compartments .............................4-18
Front carrier ..............................................4-21
Rear carrier ...............................................4-21
Adjusting the front and rear shock
absorber assemblies ...............................4-21
Auxiliary DC jack .......................................4-23
PRE-OPERATION CHECKS ..........................5-1 Fuel .............................................................5-3
Engine oil ....................................................5-3
Final gear oil ...............................................5-3
Differential gear oil ......................................5-3
Coolant .......................................................5-3
Front and rear brakes .................................5-3
Throttle lever ...............................................5-4
Tires ............................................................5-4
Chassis fasteners .......................................5-7
Instruments, lights and switches .................5-7
OPERATION...................................................6-1 Starting the engine ......................................6-1
Operating the drive select lever and driving in reverse ......................................6-2
Engine break-in ...........................................6-4U1HP61E0.book Page 1 Thursday, April 5, 2012 3:33 PM
Page 29 of 174

3-2
3
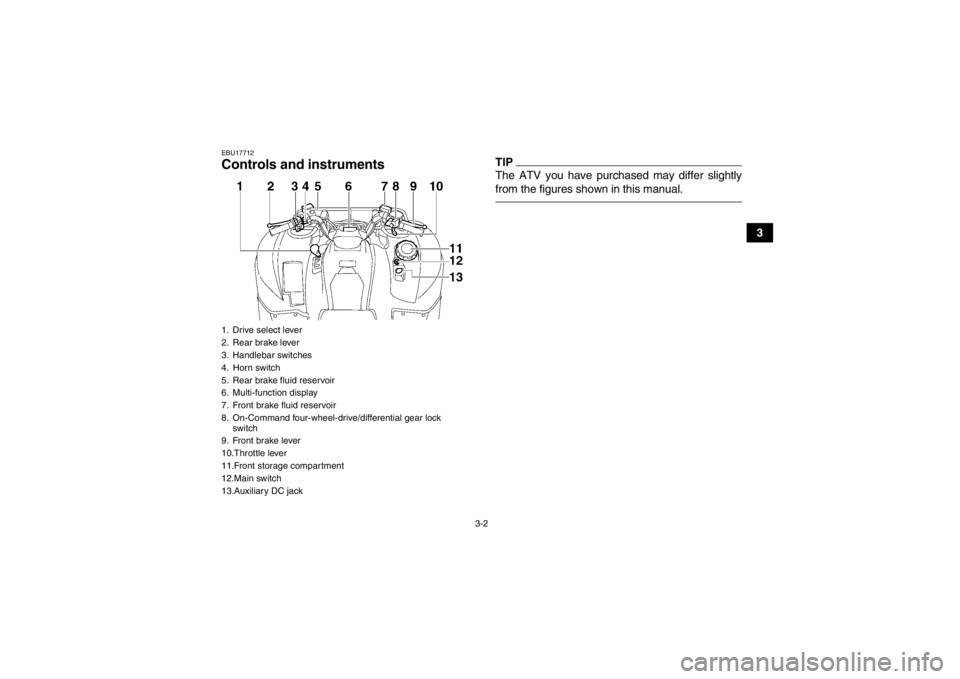
EBU17712Controls and instruments
TIPThe ATV you have purchased may differ slightly
from the figures shown in this manual.
1. Drive select lever
2. Rear brake lever
3. Handlebar switches
4. Horn switch
5. Rear brake fluid reservoir
6. Multi-function display
7. Front brake fluid reservoir
8. On-Command four-wheel-drive/differential gear lock switch
9. Front brake lever
10.Throttle lever
11.Front storage compartment
12.Main switch
13.Auxiliary DC jackU1HP61E0.book Page 2 Thursday, April 5, 2012 3:33 PM
Page 52 of 174

4-23
4Shock absorber cylinder damage could also
result in poor handling which could cause an
accident.
●Do not tamper with or attempt to open the
cylinder assembly.●Do not subject the shock absorber assembly
to an open flame or other high heat.●Do not deform or damage the cylinder in any
way.●Do not dispose of a damaged or worn out
shock absorber assembly yourself. Take the
shock absorber assembly to a Yamaha deal-
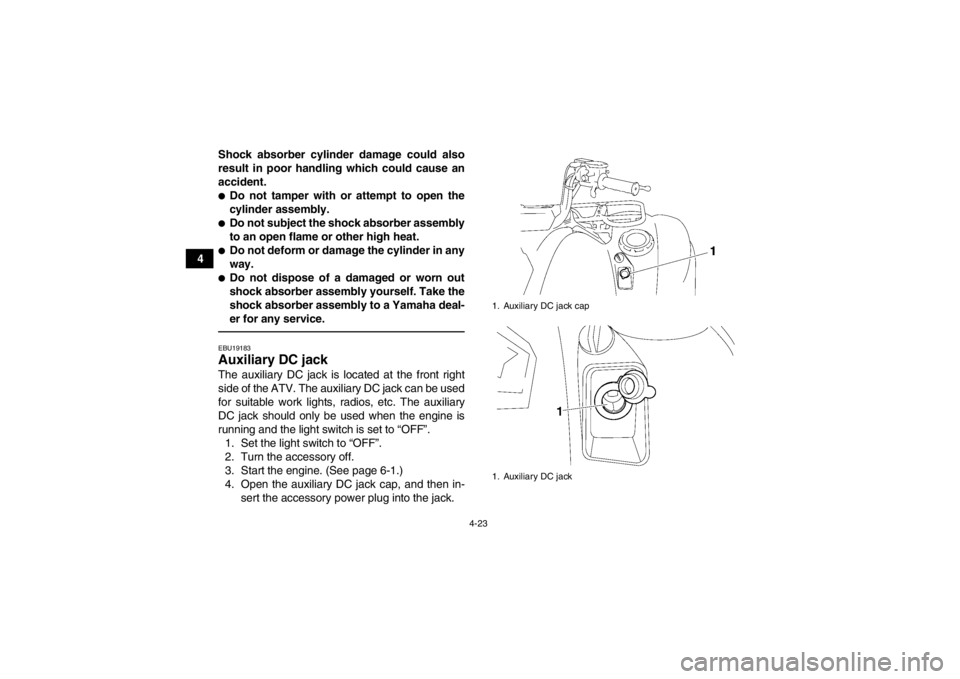
er for any service.EBU19183Auxiliary DC jack The auxiliary DC jack is located at the front right
side of the ATV. The auxiliary DC jack can be used
for suitable work lights, radios, etc. The auxiliary
DC jack should only be used when the engine is
running and the light switch is set to “OFF”.
1. Set the light switch to “OFF”.
2. Turn the accessory off.
3. Start the engine. (See page 6-1.)
4. Open the auxiliary DC jack cap, and then in- sert the accessory power plug into the jack.
1. Auxiliary DC jack cap
1. Auxiliary DC jack
U1HP61E0.book Page 23 Thursday, April 5, 2012 3:33 PM
Page 53 of 174

4-24
4
5. Turn the accessory on.
6. When the auxiliary DC jack is not being used,
cover it with the cap.
NOTICEECB00120●Do not use accessories requiring more than
the above maximum capacity. This may
overload the circuit and cause the fuse to
blow.●If accessories are used without the engine
running or with the headlights turned on, the
battery will lose its charge and engine start-
ing may become difficult.●Do not use an automotive cigarette lighter or
other accessories with a plug that gets hot
because the jack can be damaged.Maximum rated capacity for the auxiliary DC
jack:DC 12 V, 10 A (120 W)
U1HP61E0.book Page 24 Thursday, April 5, 2012 3:33 PM
Page 151 of 174

8-60
8
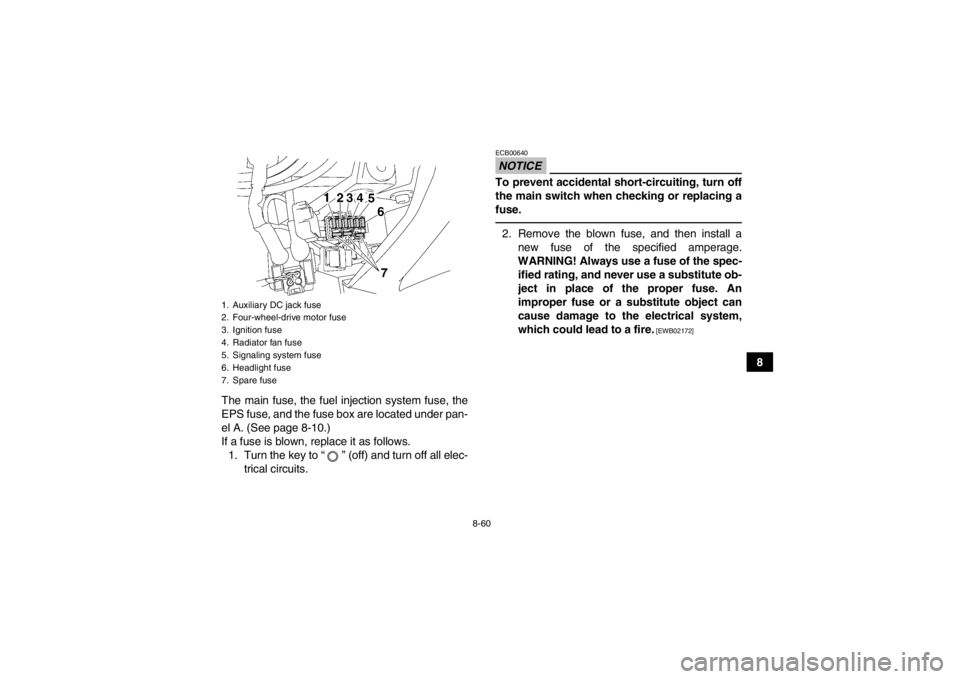
The main fuse, the fuel injection system fuse, the
EPS fuse, and the fuse box are located under pan-
el A. (See page 8-10.)
If a fuse is blown, replace it as follows. 1. Turn the key to “ ” (off) and turn off all elec- trical circuits.
NOTICEECB00640To prevent accidental short-circuiting, turn off
the main switch when checking or replacing a
fuse.2. Remove the blown fuse, and then install anew fuse of the specified amperage.
WARNING! Always use a fuse of the spec- ified rating, and never use a substitute ob-
ject in place of the proper fuse. An
improper fuse or a substitute object can
cause damage to the electrical system,
which could lead to a fire.
[EWB02172]
1. Auxiliary DC jack fuse
2. Four-wheel-drive motor fuse
3. Ignition fuse
4. Radiator fan fuse
5. Signaling system fuse
6. Headlight fuse
7. Spare fuseU1HP61E0.book Page 60 Thursday, April 5, 2012 3:33 PM
Page 152 of 174

8-61
83. Turn the key to “ ” (on) and turn on the elec-
trical circuits to check if the devices operate.
4. If the fuse immediately blows again, have a Yamaha dealer check the electrical system.
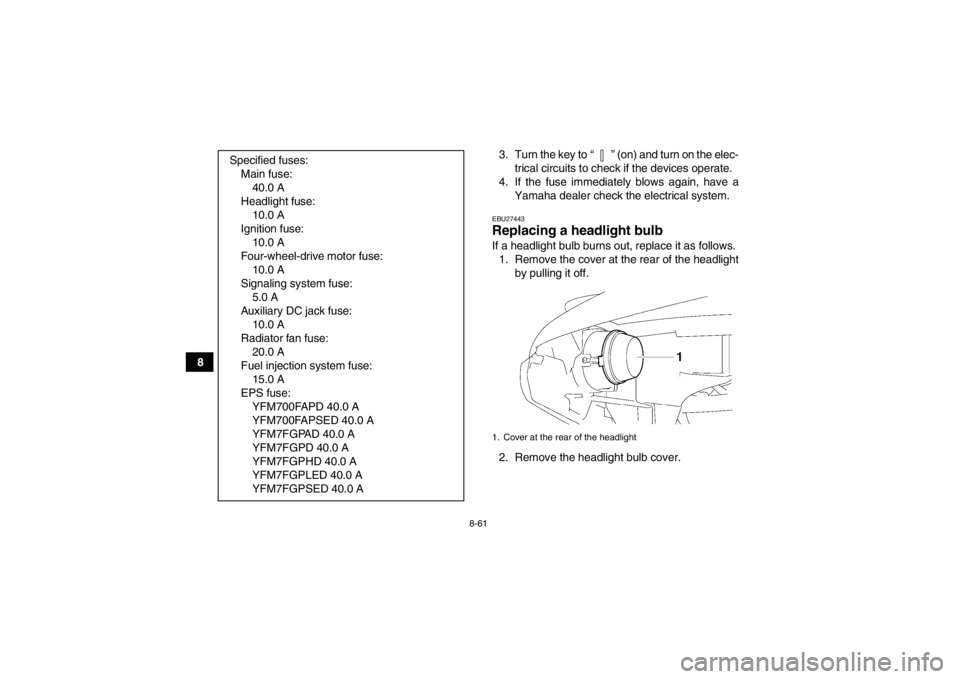
EBU27443Replacing a headlight bulb If a headlight bulb burns out, replace it as follows.1. Remove the cover at the rear of the headlight by pulling it off.
2. Remove the headlight bulb cover.
Specified fuses:
Main fuse:40.0 A
Headlight fuse: 10.0 A
Ignition fuse: 10.0 A
Four-wheel-drive motor fuse: 10.0 A
Signaling system fuse: 5.0 A
Auxiliary DC jack fuse: 10.0 A
Radiator fan fuse: 20.0 A
Fuel injection system fuse: 15.0 A
EPS fuse: YFM700FAPD 40.0 A
YFM700FAPSED 40.0 A
YFM7FGPAD 40.0 A
YFM7FGPD 40.0 A
YFM7FGPHD 40.0 A
YFM7FGPLED 40.0 A
YFM7FGPSED 40.0 A1. Cover at the rear of the headlight
U1HP61E0.book Page 61 Thursday, April 5, 2012 3:33 PM
Page 168 of 174

10-6
10
Headlight fuse:10.0 A
Signaling system fuse: 5.0 A
Ignition fuse:
10.0 A
Auxiliary DC jack fuse: 10.0 A
Four-wheel-drive motor fuse: 10.0 A
Radiator fan fuse:
20.0 AEBU30401For Europe only
The figures quoted are emission levels and are not
necessarily safe working levels. Whilst there is a
correlation between the emission and exposure
levels, this cannot be used reliably to determine
whether or not further precautions are required.
Factors that influence the actual level of exposure
of work-force include the characteristics of the
work room, the other sources of noise, etc. i.e. the
number of machines and other adjacent process-
es, and the length of time for which an operator is
exposed to the noise. Also the permissible expo- sure level can vary from country. This information,
however, will enable the user of the machine to
make a better evaluation of the hazard and risk.U1HP61E0.book Page 6 Thursday, April 5, 2012 3:33 PM
Page 171 of 174

INDEX
AAccessories and loading ................................................ 6-6
Accessories, auxiliary jack ........................................... 4-23
Air filter element, cleaning ............................................ 8-39
Axle boots .................................................................... 8-52BBattery .......................................................................... 8-56
Brake fluid, changing ................................................... 8-49
Brake fluid level, checking ........................................... 8-48
Brake lever, front .......................................................... 4-14
Brake levers, checking and lubricating ........................ 8-53
Brake pads, checking the front and rear ...................... 8-47
Brake pedal and rear brake lever ................................. 4-14
Brake pedal, checking and lubricating ......................... 8-54
Brake pedal free play, adjusting ................................... 8-50
Brakes .......................................................................... 8-46
Brakes, front and rear .................................................... 5-3CCables, checking and lubricating ................................. 8-53
Carrier, front ................................................................. 4-21
Carrier, rear .................................................................. 4-21
Chassis fasteners .......................................................... 5-7
Cleaning ......................................................................... 9-1
Coolant .................................................................. 5-3, 8-32
Coolant temperature warning light ................................. 4-3DDifferential gear oil ................................................ 5-3, 8-29
Drive select lever ......................................................... 4-15 Drive select lever and driving in reverse ........................ 6-2
Drive select lever safety system cable, adjusting ........ 8-46
EEngine break-in .............................................................. 6-4
Engine oil ....................................................................... 5-3
Engine oil and oil filter cartridge ................................... 8-22
Engine stop switch ......................................................... 4-7
Engine trouble warning light .......................................... 4-3
EPS warning light (for EPS model) ................................ 4-3FFinal gear oil ......................................................... 5-3, 8-27
Four-wheel-drive/differential gear lock indicator ............ 4-4
Front and rear brake lever free play, checking ............ 8-49
Fuel ....................................................................... 4-16, 5-3
Fuel tank cap ............................................................... 4-15
Fuses, replacing .......................................................... 8-59HHandlebar switches ....................................................... 4-7
Headlight beam, adjusting ........................................... 8-63
Headlight bulb, replacing ............................................. 8-61
High-range indicator light ............................................... 4-2
Horn switch .................................................................... 4-8IIdentification numbers .................................................. 11-1
Indicator lights and warning lights .................................. 4-2
Instruments, lights and switches .................................... 5-7LLabel locations ............................................................... 1-1
U1HP61E0.book Page 1 Thursday, April 5, 2012 3:33 PM