check oil YAMAHA JOG50R 2013 User Guide
[x] Cancel search | Manufacturer: YAMAHA, Model Year: 2013, Model line: JOG50R, Model: YAMAHA JOG50R 2013Pages: 76, PDF Size: 1.51 MB
Page 53 of 76
EAU22721
Changing the brake fluid
Have a Yamaha dealer change the
brake fluid at the intervals specified in
the TIP after the periodic maintenan-
ce and lubrication chart. In addition,
have the oil seals of the brake master
cylinder and caliper as well as the
brake hose replaced at the intervals
listed below or whenever they are
damaged or leaking.
●Oil seals: Replace every two
years.
●Brake hose: Replace every four
years.
EAU23111
Checking and lubricating the
throttle grip and cable
The operation of the throttle grip
should be checked before each ride.
In addition, the cable should be lubri-
cated at the intervals specified in the
periodic maintenance chart.
EAU43641
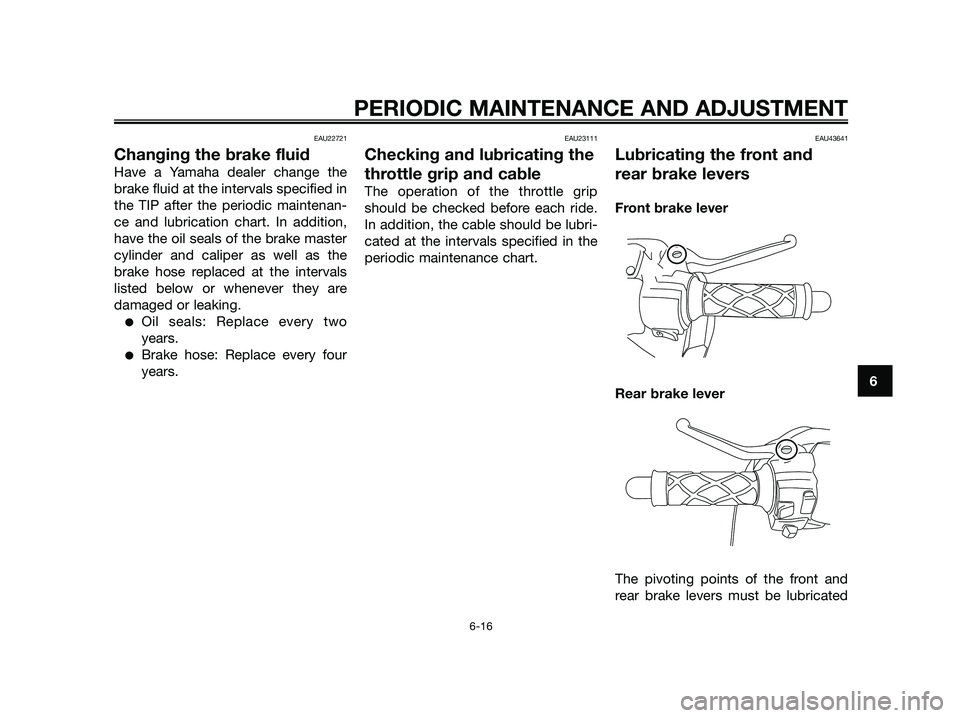
Lubricating the front and
rear brake levers
Front brake lever
Rear brake lever
The pivoting points of the front and
rear brake levers must be lubricated
PERIODIC MAINTENANCE AND ADJUSTMENT
6-16
6
Page 55 of 76
EAU23272
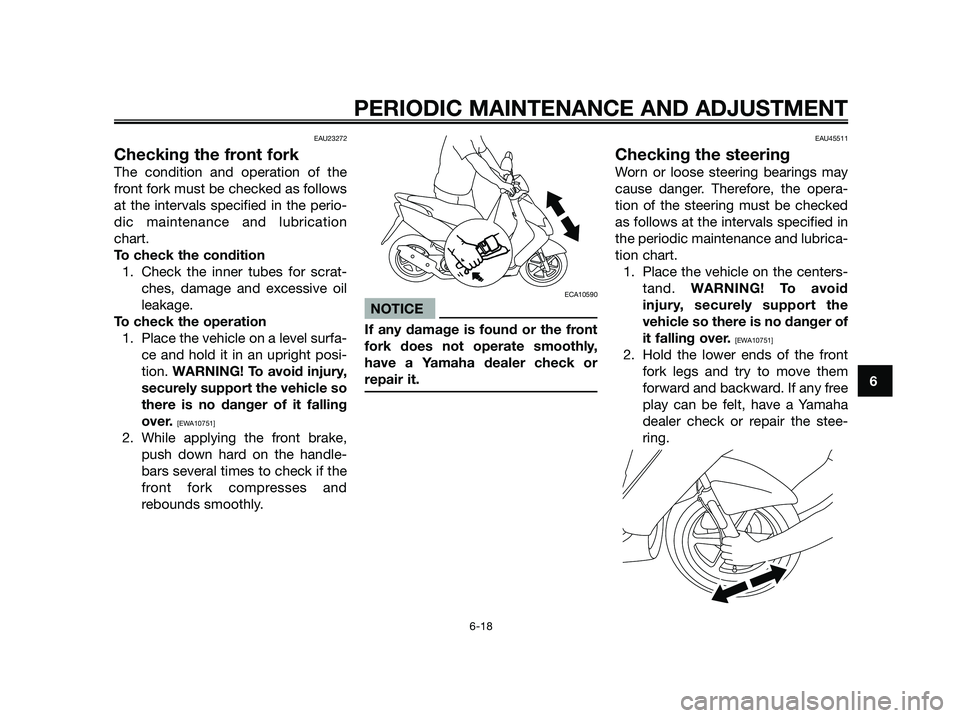
Checking the front fork
The condition and operation of the
front fork must be checked as follows
at the intervals specified in the perio-
dic maintenance and lubrication
chart.
To check the condition
1. Check the inner tubes for scrat-
ches, damage and excessive oil
leakage.
To check the operation
1. Place the vehicle on a level surfa-
ce and hold it in an upright posi-
tion. WARNING! To avoid injury,
securely support the vehicle so
there is no danger of it falling
over.
[EWA10751]
2. While applying the front brake,
push down hard on the handle-
bars several times to check if the
front fork compresses and
rebounds smoothly.
ECA10590
NOTICE
If any damage is found or the front
fork does not operate smoothly,
have a Yamaha dealer check or
repair it.
EAU45511
Checking the steering
Worn or loose steering bearings may
cause danger. Therefore, the opera-
tion of the steering must be checked
as follows at the intervals specified in
the periodic maintenance and lubrica-
tion chart.
1. Place the vehicle on the centers-
tand. WARNING! To avoid
injury, securely support the
vehicle so there is no danger of
it falling over.
[EWA10751]
2. Hold the lower ends of the front
fork legs and try to move them
forward and backward. If any free
play can be felt, have a Yamaha
dealer check or repair the stee-
ring.
PERIODIC MAINTENANCE AND ADJUSTMENT
6-18
6
Page 68 of 76
3. Fill up the fuel tank and add fuel
stabilizer (if available) to prevent
the fuel tank from rusting and the
fuel from deteriorating.
4. Perform the following steps to
protect the cylinder, piston rings,
etc. from corrosion.
a. Remove the spark plug cap
and spark plug.
b. Pour a teaspoonful of engine
oil into the spark plug bore.
c. Install the spark plug cap
onto the spark plug, and then
place the spark plug on the
cylinder head so that the
electrodes are grounded.
(This will limit sparking during
the next step.)
d. Turn the engine over several
times with the starter. (This
will coat the cylinder wall with
oil.) WARNING! To prevent
damage or injury from spar-
king, make sure to ground
the spark plug electrodes
while turning the engine
over. e. Remove the spark plug cap
from the spark plug, and then
install the spark plug and the
spark plug cap.
5. Lubricate all control cables and
the pivoting points of all levers
and pedals as well as of the
sidestand/centerstand.
6. Check and, if necessary, correct
the tire air pressure, and then lift
the scooter so that both of its
wheels are off the ground. Alter-
natively, turn the wheels a little
every month in order to prevent
the tires from becoming degra-
ded in one spot.
7. Cover the muffler outlet with a
plastic bag to prevent moisture
from entering it.
8. Remove the battery and fully
charge it. Store it in a cool, dry
place and charge it once a
month. Do not store the battery in
an excessively cold or warm pla-
ce [less than 0 °C (30 °F) or more
than 30 °C (90 °F)]. For more
information on storing the bat-
tery, see page 6-19.TIP
Make any necessary repairs before
storing the scooter.
SCOOTER CARE AND STORAGE
7-4
7
Page 74 of 76

2-stroke engine oil ...................................3-10
AAcceleration and deceleration ...................5-2
Air filter element .........................................6-9
Auxiliary light bulb, replacing ...................6-24
BBattery......................................................6-19
Brake fluid level, checking .......................6-15
Brake fluid, changing ...............................6-16
Brake lever, front ........................................3-6
Brake lever, rear .........................................3-7
Brake levers, lubricating ..........................6-16
Brake pads and shoes, checking ............6-14
Braking .......................................................5-3
CCarburetor,adjusting.................................6-10
Care............................................................7-1
Catalytic converter .....................................3-9
Centerstand, checking and lubricating ....6-17
Coolant.......................................................6-8
Cowling and panel, removing
and installing............................................6-5
DDimmer switch ...........................................3-6
EEngine break-in ..........................................5-4
FFinal transmission oil .................................6-7
Front brake lever free play, checking.......6-13
Front fork, checking .................................6-18
Fuel ............................................................3-8
Fuel and 2-stroke engine oil tank caps .....3-7
Fuel consumption, tips for reducing ..........5-3
Fuse, replacing.........................................6-20
HHandlebar switches ...................................3-6
Headlight and front turn signal light
bulb, replacing .......................................6-21
High beam indicator light...........................3-2
Horn switch ................................................3-6
IIdentification numbers ...............................9-1
Indicator and warning lights ......................3-2
KKey identification number ..........................9-1
Kickstarter ................................................3-10
LLicense plate light bulb, replacing ...........6-24
Luggage hook ..........................................3-13
M
Main switch/steering lock ..........................3-1
Matte color, caution ...................................7-1
Model label ................................................9-2
Multi-function display ................................3-4
OOil level warning light .................................3-3
PParking .......................................................5-4
Part locations .............................................1-5
Periodic maintenance and lubrication
chart .........................................................6-2
Pre-operation check list .............................4-2
RRear brake lever free play, adjusting .......6-13
Rider seat .................................................3-11
SSafe-riding points.......................................1-5
Safety information ......................................1-1Shock absorber assembly, adjusting.......3-12
Spark plug, checking .................................6-6
Specifications.............................................7-3
Speedometer .............................................3-3
Start switch ................................................3-6
Starting a cold engine ................................5-1
Starting off .................................................5-2
Steering, checking ...................................6-18
Storage.......................................................7-3
Storage compartment ..............................3-11
TTail/brake light bulb or rear turn signal
light bulb, replacing ...............................6-23
Throttle cable free play, adjusting ............6-10
Throttle grip and cable, checking and
lubricating ..............................................6-16
Tires .........................................................6-11
Troubleshooting .......................................6-25
Troubleshooting charts ............................6-26
Turn signal indicator lights .........................3-2
Turn signal switch ......................................3-6
VVehicle identification number .....................9-1
WWheel bearings, checking........................6-19
Wheels .....................................................6-12
INDEX