brake YAMAHA JOG50R 2014 User Guide
[x] Cancel search | Manufacturer: YAMAHA, Model Year: 2014, Model line: JOG50R, Model: YAMAHA JOG50R 2014Pages: 76, PDF Size: 1.51 MB
Page 35 of 76
EAU16761
Starting off
TIP
Before starting off, allow the engine to
warm up.
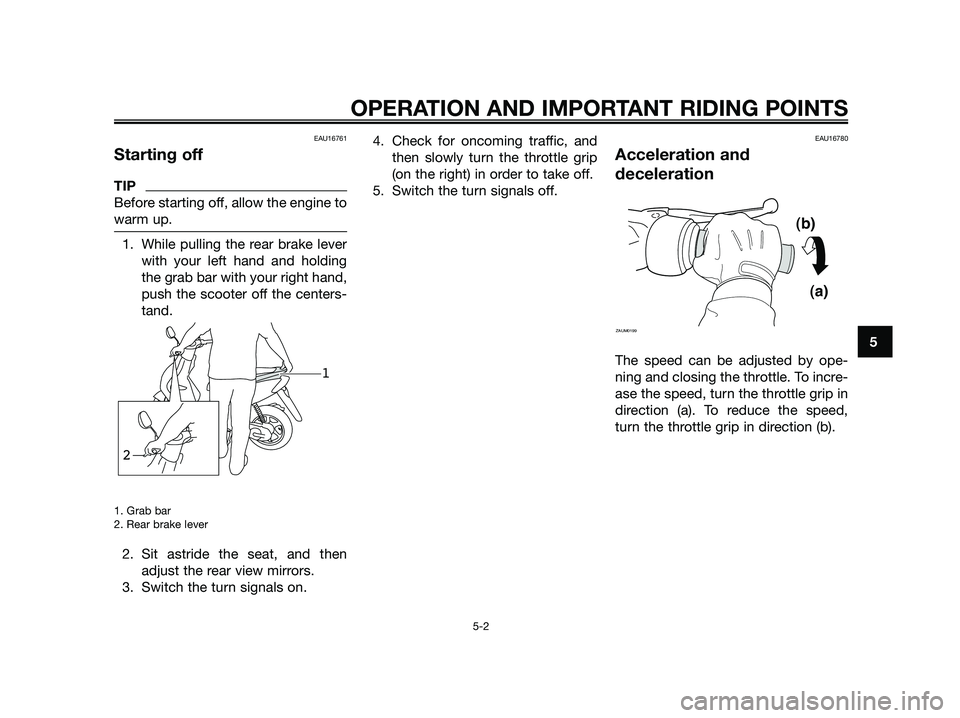
1. While pulling the rear brake lever
with your left hand and holding
the grab bar with your right hand,
push the scooter off the centers-
tand.
1. Grab bar
2. Rear brake lever
2. Sit astride the seat, and then
adjust the rear view mirrors.
3. Switch the turn signals on.4. Check for oncoming traffic, and
then slowly turn the throttle grip
(on the right) in order to take off.
5. Switch the turn signals off.
EAU16780
Acceleration and
deceleration
The speed can be adjusted by ope-
ning and closing the throttle. To incre-
ase the speed, turn the throttle grip in
direction (a). To reduce the speed,
turn the throttle grip in direction (b).
(b)
(a)
ZAUM0199
21
OPERATION AND IMPORTANT RIDING POINTS
5-2
5
Page 36 of 76
EAU16793
BrakingEWA10300
sWARNING
●Avoid braking hard or suddenly
(especially when leaning over
to one side), otherwise the sco-
oter may skid or overturn.
●Railroad crossings, streetcar
rails, iron plates on road cons-
truction sites, and manhole
covers become extremely slip-
pery when wet. Therefore, slow
down when approaching such
areas and cross them with cau-
tion.
●Keep in mind that braking on a
wet road is much more difficult.
●Ride slowly down a hill, as bra-
king downhill can be very diffi-
cult.
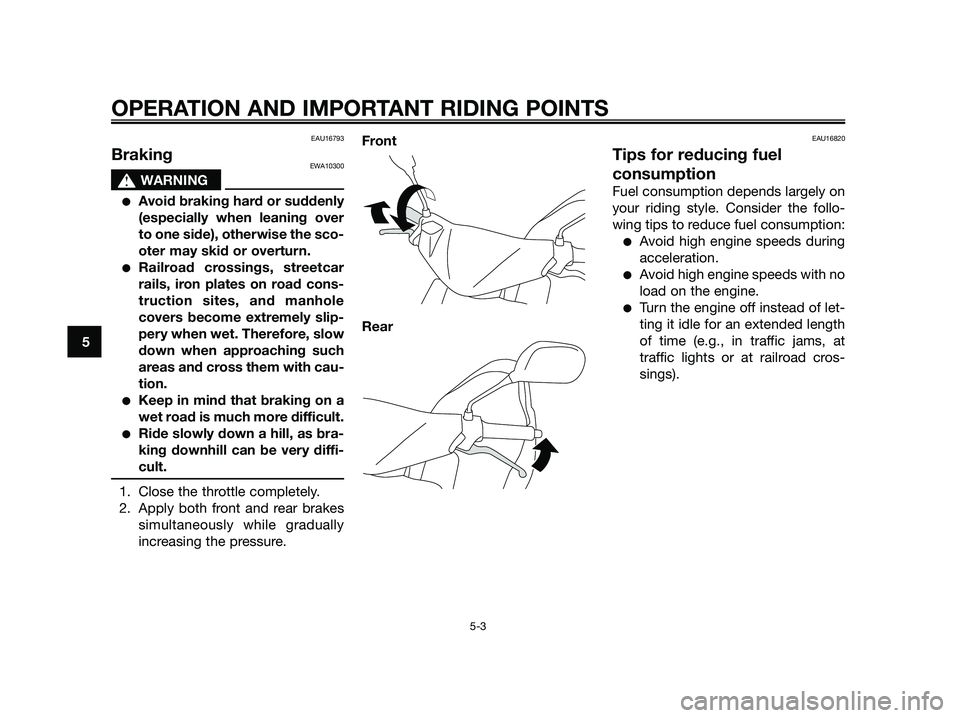
1. Close the throttle completely.
2. Apply both front and rear brakes
simultaneously while gradually
increasing the pressure.Front
Rear
EAU16820
Tips for reducing fuel
consumption
Fuel consumption depends largely on
your riding style. Consider the follo-
wing tips to reduce fuel consumption:
●Avoid high engine speeds during
acceleration.
●Avoid high engine speeds with no
load on the engine.
●Turn the engine off instead of let-
ting it idle for an extended length
of time (e.g., in traffic jams, at
traffic lights or at railroad cros-
sings).
OPERATION AND IMPORTANT RIDING POINTS
5-3
5
Page 39 of 76
PERIODIC MAINTENANCE AND ADJUSTMENT
6-2
6
EAU17715
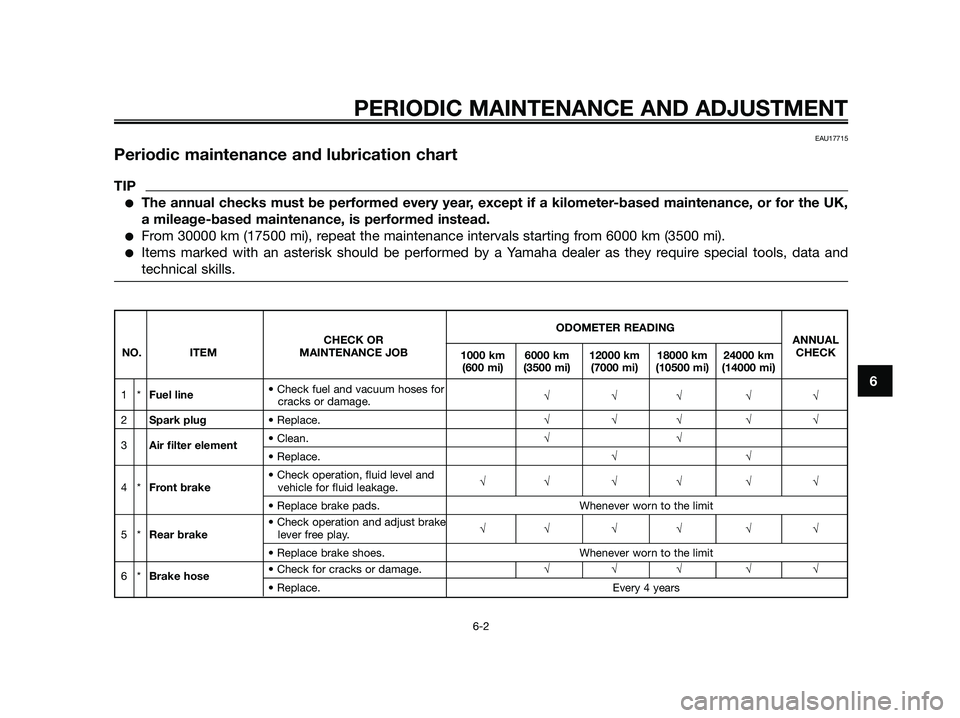
Periodic maintenance and lubrication chart
TIP
●The annual checks must be performed every year, except if a kilometer-based maintenance, or for the UK,
a mileage-based maintenance, is performed instead.
●From 30000 km (17500 mi), repeat the maintenance intervals starting from 6000 km (3500 mi).
●Items marked with an asterisk should be performed by a Yamaha dealer as they require special tools, data and
technical skills.
ODOMETER READING
CHECK OR ANNUAL
NO. ITEM MAINTENANCE JOB
1000 km 6000 km 12000 km 18000 km 24000 kmCHECK
(600 mi) (3500 mi) (7000 mi) (10500 mi) (14000 mi)
1*Fuel line• Check fuel and vacuum hoses for
cracks or damage.√√√ √√
2Spark plug• Replace.√√√ √√
3Air filter element• Clean.√√• Replace.√√
• Check operation, fluid level and
4*Front brakevehicle for fluid leakage.√√ √√ √ √
• Replace brake pads. Whenever worn to the limit
• Check operation and adjust brake
5*Rear brakelever free play.√√ √√ √ √
• Replace brake shoes. Whenever worn to the limit
6*Brake hose• Check for cracks or damage.√√√ √√
• Replace. Every 4 years
Page 40 of 76
PERIODIC MAINTENANCE AND ADJUSTMENT
6-3
6
ODOMETER READING
CHECK OR ANNUAL
NO. ITEM MAINTENANCE JOB
1000 km 6000 km 12000 km 18000 km 24000 kmCHECK
(600 mi) (3500 mi) (7000 mi) (10500 mi) (14000 mi)
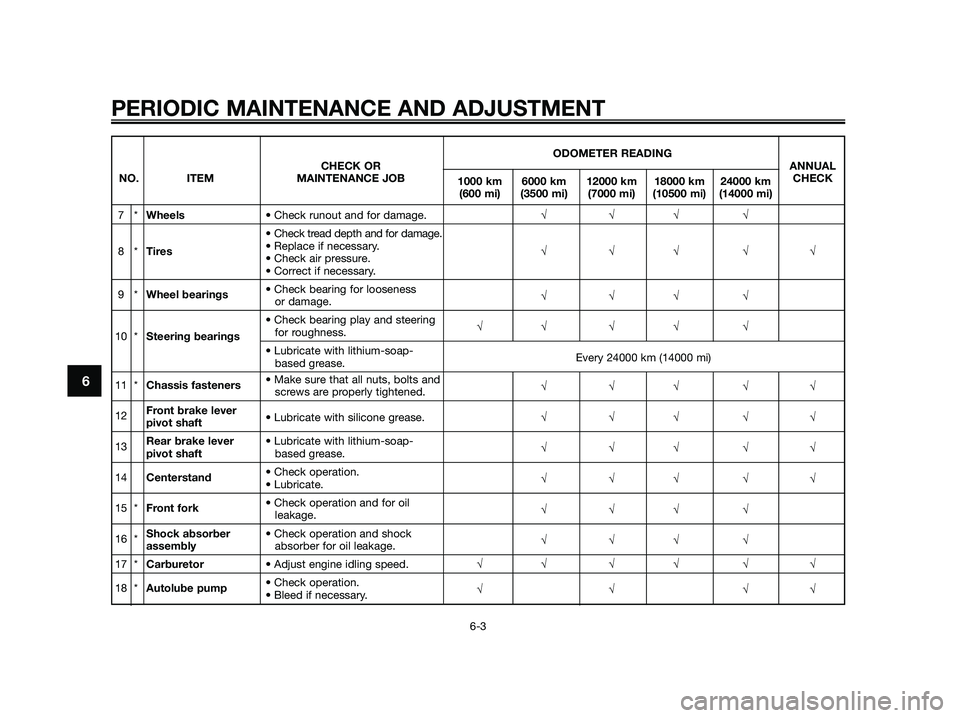
7*Wheels• Check runout and for damage.√√√ √
• Check tread depth and for damage.
8*Tires• Replace if necessary.
√√√ √√
• Check air pressure.
• Correct if necessary.
9*Wheel bearings• Check bearing for looseness
or damage.√√√ √
• Check bearing play and steering
10 *Steering bearingsfor roughness.√√ √√ √
• Lubricate with lithium-soap-
based grease.Every 24000 km (14000 mi)
11 *Chassis fasteners• Make sure that all nuts, bolts and
screws are properly tightened.√√√ √√
12Front brake lever
pivot shaft• Lubricate with silicone grease.√√√ √√
13Rear brake lever • Lubricate with lithium-soap-
pivot shaftbased grease.√√√ √√
14Centerstand• Check operation.
• Lubricate.√√√ √√
15 *Front fork• Check operation and for oil
leakage.√√√ √
16 *Shock absorber • Check operation and shock
assemblyabsorber for oil leakage.√√√ √
17 *Carburetor• Adjust engine idling speed.√√ √√ √ √
18 *Autolube pump• Check operation.
• Bleed if necessary.√√ √√
Page 41 of 76
PERIODIC MAINTENANCE AND ADJUSTMENT
6-4
6
ODOMETER READING
CHECK OR ANNUAL
NO. ITEM MAINTENANCE JOB
1000 km 6000 km 12000 km 18000 km 24000 kmCHECK
(600 mi) (3500 mi) (7000 mi) (10500 mi) (14000 mi)
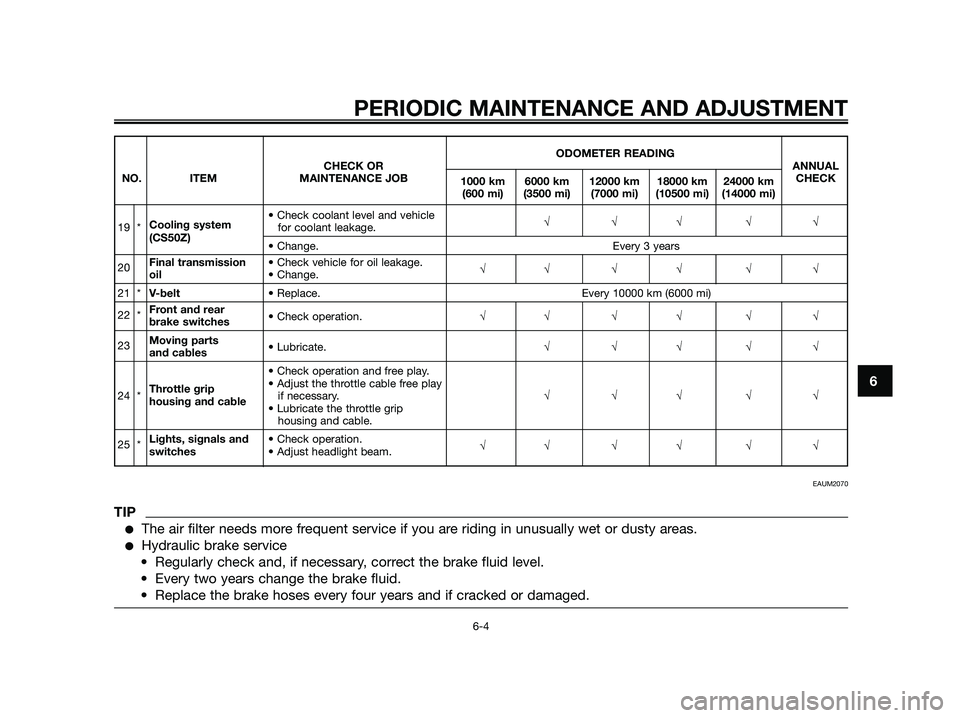
• Check coolant level and vehicle
19 *Cooling system
for coolant leakage.√√√ √√(CS50Z)
• Change. Every 3 years
20Final transmission • Check vehicle for oil leakage.
oil• Change.√√ √√ √ √
21 *V-belt• Replace. Every 10000 km (6000 mi)
22 *Front and rear
brake switches• Check operation.√√ √√ √ √
23Moving parts
and cables• Lubricate.√√√ √√
• Check operation and free play.
Throttle grip• Adjust the throttle cable free play
24 * if necessary.√√√ √√
housing and cable
• Lubricate the throttle grip
housing and cable.
25 *Lights, signals and • Check operation.
switches• Adjust headlight beam.√√ √√ √ √
EAUM2070
TIP
●The air filter needs more frequent service if you are riding in unusually wet or dusty areas.
●Hydraulic brake service
• Regularly check and, if necessary, correct the brake fluid level.
• Every two years change the brake fluid.
• Replace the brake hoses every four years and if cracked or damaged.
Page 49 of 76
TIP
The tire tread depth limits may differ
from country to country. Always
comply with the local regulations.
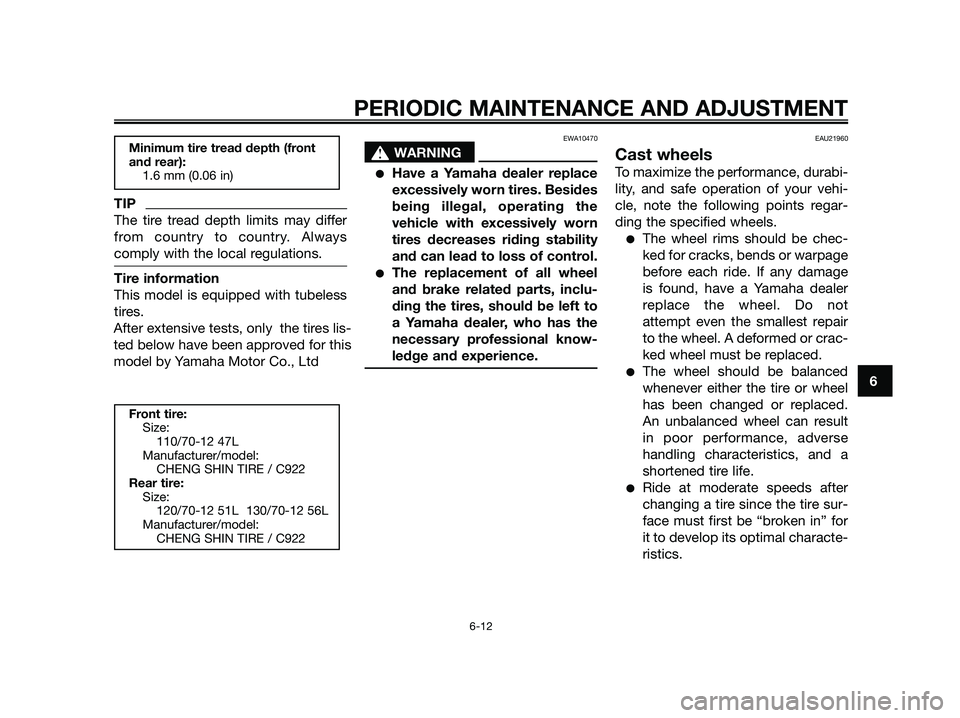
Tire information
This model is equipped with tubeless
tires.
After extensive tests, only the tires lis-
ted below have been approved for
this model by Yamaha Motor España,
S.A.
EWA10470
sWARNING
●Have a Yamaha dealer replace
excessively worn tires. Besides
being illegal, operating the
vehicle with excessively worn
tires decreases riding stability
and can lead to loss of control.
●The replacement of all wheel
and brake related parts, inclu-
ding the tires, should be left to
a Yamaha dealer, who has the
necessary professional know-
ledge and experience.
EAU21960
Cast wheels
To maximize the performance, durabi-
lity, and safe operation of your vehi-
cle, note the following points regar-
ding the specified wheels.
●The wheel rims should be chec-
ked for cracks, bends or warpage
before each ride. If any damage
is found, have a Yamaha dealer
replace the wheel. Do not
attempt even the smallest repair
to the wheel. A deformed or crac-
ked wheel must be replaced.
●The wheel should be balanced
whenever either the tire or wheel
has been changed or replaced.
An unbalanced wheel can result
in poor performance, adverse
handling characteristics, and a
shortened tire life.
●Ride at moderate speeds after
changing a tire since the tire sur-
face must first be “broken in” for
it to develop its optimal characte-
ristics.
Front tire:
Size:
110/70-12 47L
Manufacturer/model:
CHENG SHIN TIRE / C922
Rear tire:
Size:
120/70-12 51L 130/70-12 56L
Manufacturer/model:
CHENG SHIN TIRE / C922
Minimum tire tread depth (front
and rear):
1.6 mm (0.06 in)
PERIODIC MAINTENANCE AND ADJUSTMENT
6-12
6
After extensive tests, only the tires lis-
ted below have been approved for this
model by Yamaha Motor Co., Ltd
Page 50 of 76
EAUT1221
Checking the front brake
lever free play
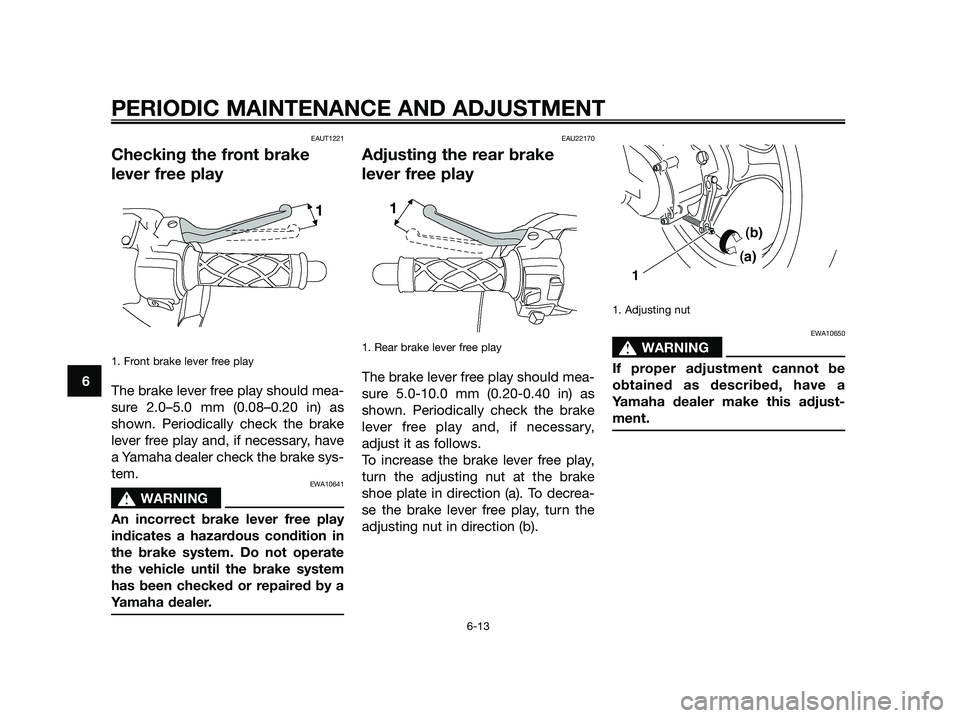
1. Front brake lever free play
The brake lever free play should mea-
sure 2.0–5.0 mm (0.08–0.20 in) as
shown. Periodically check the brake
lever free play and, if necessary, have
a Yamaha dealer check the brake sys-
tem.
EWA10641
sWARNING
An incorrect brake lever free play
indicates a hazardous condition in
the brake system. Do not operate
the vehicle until the brake system
has been checked or repaired by a
Yamaha dealer.
EAU22170
Adjusting the rear brake
lever free play
1. Rear brake lever free play
The brake lever free play should mea-
sure 5.0-10.0 mm (0.20-0.40 in) as
shown. Periodically check the brake
lever free play and, if necessary,
adjust it as follows.
To increase the brake lever free play,
turn the adjusting nut at the brake
shoe plate in direction (a). To decrea-
se the brake lever free play, turn the
adjusting nut in direction (b).
1. Adjusting nut
EWA10650
sWARNING
If proper adjustment cannot be
obtained as described, have a
Yamaha dealer make this adjust-
ment.
(a)
(b)
1
PERIODIC MAINTENANCE AND ADJUSTMENT
6-13
6
Page 51 of 76
EAU22380
Checking the front brake
pads and rear brake shoes
The front brake pads and the rear bra-
ke shoes must be checked for wear at
the intervals specified in the periodic
maintenance and lubrication chart.
EAUS1510
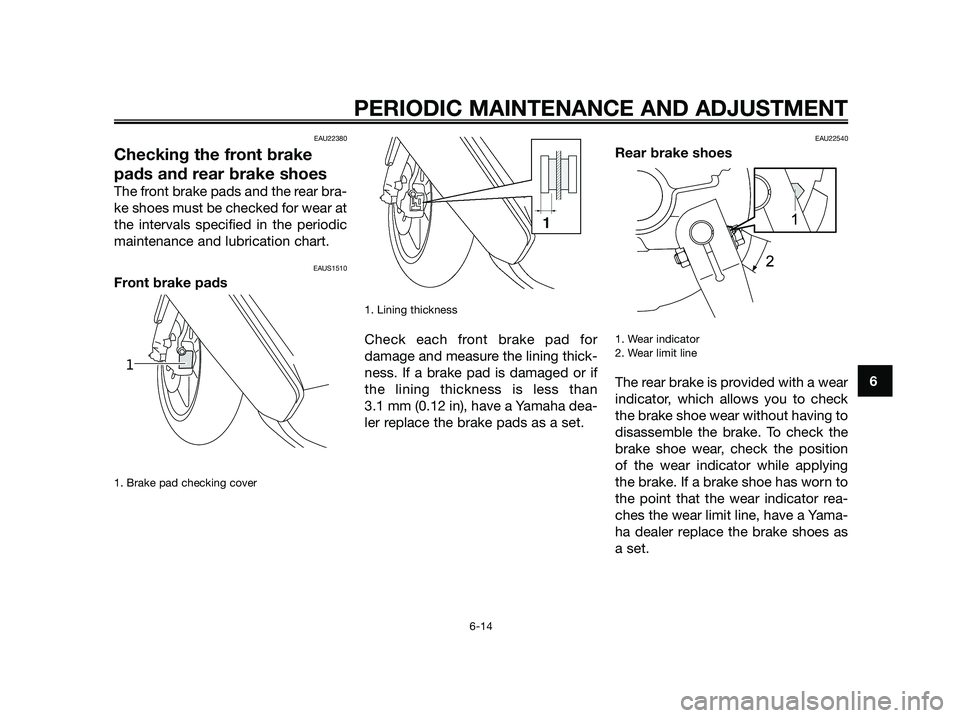
Front brake pads
1. Brake pad checking cover
1. Lining thickness
Check each front brake pad for
damage and measure the lining thick-
ness. If a brake pad is damaged or if
the lining thickness is less than
3.1 mm (0.12 in), have a Yamaha dea-
ler replace the brake pads as a set.
EAU22540
Rear brake shoes
1. Wear indicator 2. Wear limit line
The rear brake is provided with a wear
indicator, which allows you to check
the brake shoe wear without having to
disassemble the brake. To check the
brake shoe wear, check the position
of the wear indicator while applying
the brake. If a brake shoe has worn to
the point that the wear indicator rea-
ches the wear limit line, have a Yama-
ha dealer replace the brake shoes as
a set.
1
PERIODIC MAINTENANCE AND ADJUSTMENT
6-14
6
Page 52 of 76
EAU32344
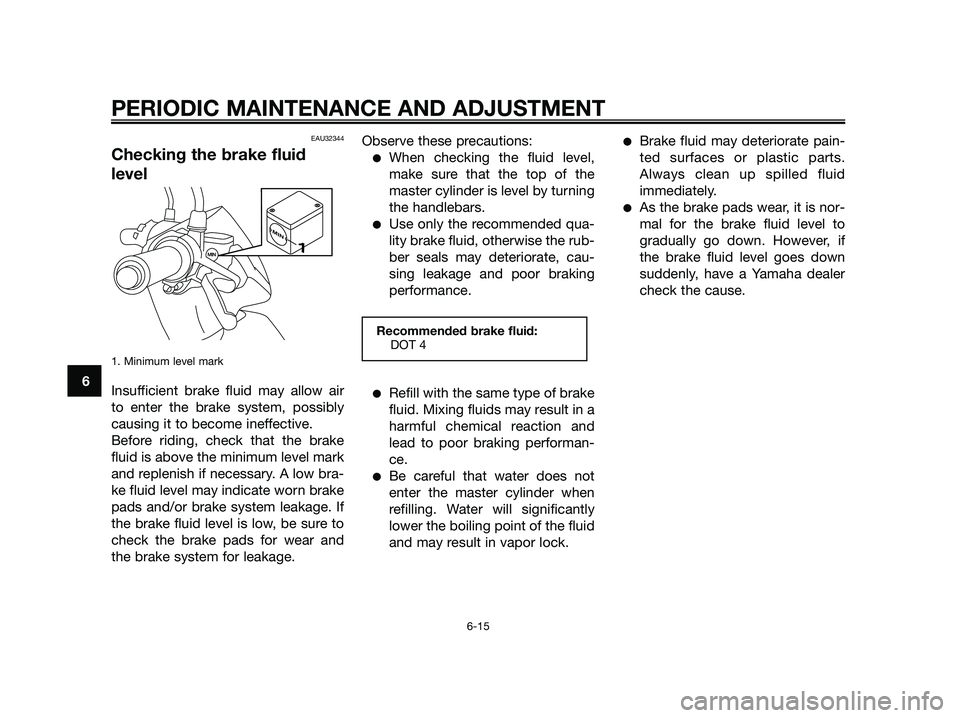
Checking the brake fluid
level
1. Minimum level mark
Insufficient brake fluid may allow air
to enter the brake system, possibly
causing it to become ineffective.
Before riding, check that the brake
fluid is above the minimum level mark
and replenish if necessary. A low bra-
ke fluid level may indicate worn brake
pads and/or brake system leakage. If
the brake fluid level is low, be sure to
check the brake pads for wear and
the brake system for leakage.Observe these precautions:
●When checking the fluid level,
make sure that the top of the
master cylinder is level by turning
the handlebars.
●Use only the recommended qua-
lity brake fluid, otherwise the rub-
ber seals may deteriorate, cau-
sing leakage and poor braking
performance.
●Refill with the same type of brake
fluid. Mixing fluids may result in a
harmful chemical reaction and
lead to poor braking performan-
ce.
●Be careful that water does not
enter the master cylinder when
refilling. Water will significantly
lower the boiling point of the fluid
and may result in vapor lock.
●Brake fluid may deteriorate pain-
ted surfaces or plastic parts.
Always clean up spilled fluid
immediately.
●As the brake pads wear, it is nor-
mal for the brake fluid level to
gradually go down. However, if
the brake fluid level goes down
suddenly, have a Yamaha dealer
check the cause.
Recommended brake fluid:
DOT 4
M
IN
1
PERIODIC MAINTENANCE AND ADJUSTMENT
6-15
6
Page 53 of 76
EAU22721
Changing the brake fluid
Have a Yamaha dealer change the
brake fluid at the intervals specified in
the TIP after the periodic maintenan-
ce and lubrication chart. In addition,
have the oil seals of the brake master
cylinder and caliper as well as the
brake hose replaced at the intervals
listed below or whenever they are
damaged or leaking.
●Oil seals: Replace every two
years.
●Brake hose: Replace every four
years.
EAU23111
Checking and lubricating the
throttle grip and cable
The operation of the throttle grip
should be checked before each ride.
In addition, the cable should be lubri-
cated at the intervals specified in the
periodic maintenance chart.
EAU43641
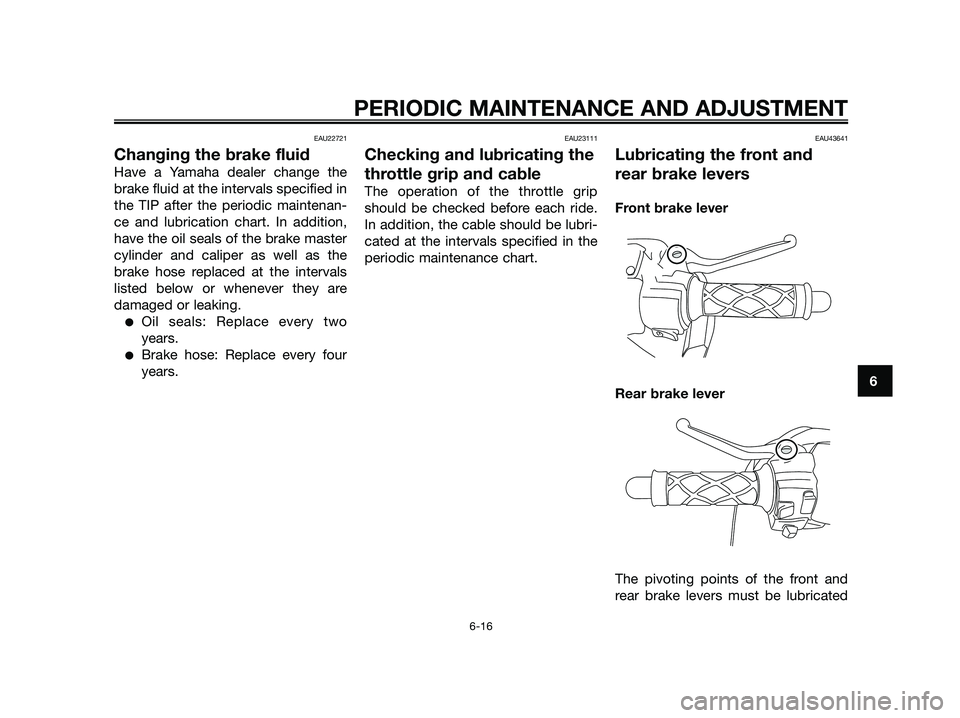
Lubricating the front and
rear brake levers
Front brake lever
Rear brake lever
The pivoting points of the front and
rear brake levers must be lubricated
PERIODIC MAINTENANCE AND ADJUSTMENT
6-16
6