Fuel system YAMAHA KODIAK 700 2016 Owners Manual
[x] Cancel search | Manufacturer: YAMAHA, Model Year: 2016, Model line: KODIAK 700, Model: YAMAHA KODIAK 700 2016Pages: 180, PDF Size: 4.6 MB
Page 28 of 180

2-5
2ungrounded or broken wiring. Visually check
for broken wiring and leaking fuel. Leaking
fuel can be confirmed by the odor of gasoline.
4. Once immediate safety hazards are con- firmed not to exist, you may remove your hel-
met to more closely inspect your vehicle.
Check for external signs of wear, broken
parts, fluid leaks, cracks in the frame, sus-
pension damage, wheel damage, and so on.
Fuel, oil, and coolant usually give off a notice-
able odor.
5. If your vehicle will not restart or if it is unsafe to ride, then turn off all vehicle systems (en-
gine stop switch, main switch, and fuel cock),
and then signal or go for help.
Aftermarket Parts, Accessories, and Modifica-
tions
While you may find aftermarket products similar in
design and quality to genuine Yamaha accesso-
ries, recognize that some aftermarket accessories
or modifications are not suitable because of po-
tential safety hazards to you or others. Installing
aftermarket products or having other modifica-
tions performed to your vehicle that change any of
the vehicle’s design or operation characteristics
can put you and others at greater risk of serious injury or death. You are responsible for injuries re-
lated to changes in the vehicle. Keep the following
guidelines in mind, as well as those provided un-
der “Loading” when mounting accessories.
Never install accessories that would impair the
performance of your ATV. Carefully inspect the
accessory before using it to make sure that it
does not in any way reduce ground clearance,
limit suspension travel, steering travel or control
operation.
Accessories fitted to the ATV can create insta-
bility due to improper weight distribution.
Bulky or large accessories may seriously affect
the stability of the ATV.
Certain accessories can displace the operator
from his or her normal riding position. This im-
proper position limits the freedom of movement
of the operator and may limit control ability,
therefore, such accessories are not recom-
mended.
Use caution when adding electrical accesso-
ries. If electrical accessories exceed the capac-
ity of the ATV’s electrical system, an electric
failure could result, which could cause a dan-
gerous loss of lights or engine power.
UB1660E0.book Page 5 Thursday, February 26, 2015 4:01 PM
Page 36 of 180

4-4
4
Start the engine after making sure that the
warning light is out. Continuous use while
the warning light is on may cause damage to
the engine.
EBU29933Fuel level warning light “ ” (YFM70KDXG /
YFM70KDHG)
This warning light comes on when the fuel level
drops below approximately 4.0 L (1.06 US gal,
0.88 Imp.gal). When this occurs, refuel as soon as
possible.
The electrical circuit of the warning light can be
checked by setting the engine stop switch to “ ”
and turning the key to “ ” (on). The warning light
should come on for a few seconds, and then go
off.
If the warning light does not come on initially when
the key is turned to “ ” (on), or if the warning
light remains on, have a Yamaha dealer check the
electrical circuit.EBU30482Engine trouble warning light “ ”
This warning light comes on or flashes when an
electrical circuit monitoring the engine is not work-
ing correctly. When this occurs, have a Yamaha dealer check the self-diagnosis system.
(YFM70KPXG / YFM70KPHG / YFM70KPSG: See
page 4-8 for an explanation of the self-diagnosis
device.)
The electrical circuit of the warning light can be
checked by turning the key to “ ” (on). The
warning light should come on for a few seconds,
and then go off.
If the warning light does not come on initially when
the key is turned to “ ” (on), or if the warning
light remains on, have a Yamaha dealer check the
electrical circuit.
EBU30571Electric Power Steering warning light “EPS”
(for EPS model)
This warning light comes on when the key is
turned to “ ” (on), and then goes off once the
engine is started. If the warning light remains on or
comes on after the engine is started, the EPS sys-
tem may not be working correctly. When this oc-
curs, have a Yamaha dealer check the EPS
system.
The electrical circuit of the warning light can be
checked by turning the key to “ ” (on). If the
warning light does not come on, have a Yamaha
dealer check the electrical circuit.
UB1660E0.book Page 4 Thursday, February 26, 2015 4:01 PM
Page 39 of 180

4-7
4
TIPPushing and holding in the “SELECT” button, and
turning the key to “ ” (on) while the button is
pushed, switches the display between “mph” and
“km/h”. Clock mode
Pushing the “CLOCK” button switches the display
between the clock mode “CLOCK” and the hour
meter mode “HOUR” in the following order:
CLOCK → HOUR → CLOCK
To set the clock1. Set the display to the clock mode.
2. Push the “SELECT” button and “RESET” but- ton together for at least three seconds.
3. When the hour digits start flashing, push the “RESET” button to set the hours.
4. Push the “SELECT” button, and the minute digits will start flashing.
5. Push the “RESET” button to set the minutes.
6. Push the “SELECT” button and then release it to start the clock. Fuel meter
The fuel meter indicates the amount of fuel in the
fuel tank. The display segments of the fuel meter
disappear from “F” (full) towards “E” (empty) as
the fuel level decreases. When the “E” segment
disappears and the fuel level warning indicator
flashes, refuel as soon as possible.
TIPThis fuel meter is equipped with a self-diagnosis
system. If the electrical circuit is not working cor-
rectly, all the display segments and fuel level
warning indicator will start flashing. If this occurs,
have a Yamaha dealer check the electrical circuit.
UB1660E0.book Page 7 Thursday, February 26, 2015 4:01 PM
Page 52 of 180

4-20
43. Wipe up any spilled fuel immediately.NOTICE: Immediately wipe off spilled fuel
with a clean, dry, soft cloth, since fuel may
deteriorate painted surfaces or plastic
parts.
[ECB00982]
4. Turn the fuel tank cap fully clockwise to make sure it is securely closed.
WARNING
EWB02532Gasoline is poisonous and can cause injury or
death. Handle gasoline with care. Never siphon
gasoline by mouth. If you should swallow some
gasoline or inhale a lot of gasoline vapor, or get
some gasoline in your eyes, see your doctor immediately. If gasoline spills on your skin,
wash with soap and water. If gasoline spills on
your clothing, change your clothes.
NOTICEECB00071Use only unleaded gasoline. The use of leaded
gasoline will cause severe damage to internal
engine parts, such as the valves and piston
rings, as well as to the exhaust system. Your Yamaha engine has been designed to use
regular unleaded gasoline with a research octane
number of 91 or higher (95 or higher for Europe). If
knocking (or pinging) occurs, use a gasoline of a
different brand. Use of unleaded fuel will extend
spark plug life and reduce maintenance costs.EBU34140SeatTo remove the seat
Pull up the seat at the rear, and then pull the seat
rearward.
Recommended fuel:
Regular unleaded gasoline only
For Europe: Regular unleaded gasoline only
with a research octane number of 95 or
higher
Fuel tank capacity: 18.0 L (4.75 US gal, 3.96 Imp.gal)
Fuel reserve amount: 4.0 L (1.06 US gal, 0.88 Imp.gal)
UB1660E0.book Page 20 Thursday, February 26, 2015 4:01 PM
Page 59 of 180

5-1
5
EBU19203
PRE-OPERATION CHECKS
EBU19226Inspect your vehicle each time you use it to make sure the vehicle is in safe operating condition. Always
follow the inspection and maintenance procedures and schedules described in the Owner’s Manual.
WARNING
EWB00482Failure to inspect or maintain the vehicle properly increases the possibility of an accident or equip-
ment damage. Do not operate the vehicle if you find any problem. If a problem cannot be corrected
by the procedures provided in this manual, have the vehicle inspected by a Yamaha dealer. Before using this vehicle, check the following points:
ITEMROUTINE PAGE
Fuel • Check fuel level in fuel tank,
and add recommended fuel if neces-
sary.
• Check fuel line for leakage. Correct if necessary. 4-19, 5-3
Engine oil • Check oil level in engine, and add recommended oil to specified
level if necessary.
• Check ATV for oil leakage. Correct if necessary. 5-3, 8-21
Final gear oil • Check ATV for oil leakage. Correct if necessary. 5-3, 8-25
Differential gear oil • Check ATV for oil leakage. Correct if necessary. 5-3, 8-28
Coolant • Check coolant level in reservoir, and add recommended coolant to
specified level if necessary.
• Check cooling system for leakage. Correct if necessary. 5-3, 8-30
UB1660E0.book Page 1 Thursday, February 26, 2015 4:01 PM
Page 61 of 180

5-3
5
EBU19542FuelMake sure that there is sufficient fuel in the tank.
(See page 4-19.)EBU19561Engine oilMake sure that the engine oil is at the specified
level. Add oil as necessary. (See page 8-21.)EBU19591Final gear oilMake sure that the final gear oil is at the specified
level. Add oil as necessary. (See page 8-25.)EBU19601Differential gear oilMake sure that the differential gear oil is at the
specified level. Add oil as necessary. (See page
8-28.)EBU19632CoolantMake sure that the coolant is at the specified level.
Add coolant as necessary. (See page 8-30.)
TIPThe coolant level must be checked on a cold en-
gine since the level varies with engine tempera-
ture. EBU28533Front and rear brakesBrake levers and brake pedal
Check that there is no free play in the front
brake lever. If there is free play, have a Yamaha
dealer check the brake system.
Check for correct free play in the rear brake le-
ver and brake pedal. If the free play is incorrect,
adjust it. (See page 8-46.)
Check operation of the levers and pedal. They
should move smoothly and there should be a
firm feeling when the brake is applied. If not,
have a Yamaha dealer check them.
Brake fluid level (front brake)
Check the brake fluid level. Add fluid if necessary.
(See page 8-44.)
Specified brake fluid:DOT 4
UB1660E0.book Page 3 Thursday, February 26, 2015 4:01 PM
Page 66 of 180
6-1
6
EBU19882
OPERATION
EBU19902Read the Owner’s Manual carefully before riding
the ATV. If there is a control or function you do not
understand, ask your Yamaha dealer.
WARNING
EWB00632Read the Owner’s Manual carefully to become
familiar with all controls in order to help pre-
vent any loss of control, which could cause an
accident or injury. EBU34160Starting the engineNOTICEECB00151See the “Engine break-in” section on page 6-4
prior to operating the engine for the first time. 1. Turn the key to “ ” (on) and the engine stopswitch to “ ”.
The EPS warning light (for equipped models)
should come on and stay on until the engine
is started. The following warning lights should come on
for a few seconds, then go off.
Coolant temperature warning light
Engine trouble warning light
Fuel level warning light (for equipped mod-
els)
NOTICEECB00825If a warning light does not go off, see page 4-2
for the corresponding warning light circuit
check. To avoid possible damage, do not oper-
ate the ATV if a warning light stays on. 2. Apply the brake pedal, and then shift the drive
select lever into the neutral or park position.
The corresponding indicator light should
come on. If the indicator light does not come
on, have a Yamaha dealer check the electrical
circuit.TIPThis model is equipped with an ignition circuit cut-
off system. The engine can be started under the
following conditions:
UB1660E0.book Page 1 Thursday, February 26, 2015 4:01 PM
Page 99 of 180

8-3
8
EBU21745Periodic maintenance chart for the emission control systemTIPFor ATVs not equipped with an odometer or an hour meter, follow the month maintenance intervals.
For ATVs equipped with an odometer or an hour meter, follow the km (mi) or hours maintenance inter-
vals. However, keep in mind that if the ATV isn’t used for a long period of time, the month maintenance
intervals should still be followed.
Items marked with an asterisk should be performed by a Yamaha dealer as they require special tools,
data and technical skills. NO. ITEM CHECK OR MAINTENANCE
JOB INITIAL
EVERY
Whichev- er comes first month136612
km (mi) 320
(200) 1300
(800) 2500
(1600) 2500
(1600) 5000
(3200)
hours 20 80 160 160 320
1 *Fuel line • Check fuel hoses for cracks or other damage, and
replace if necessary. √√√
2Spark plug • Check condition and clean, regap, or replace if
necessary. √√√√√
3 *Va l v e s • Check valve clearance and adjust if necessary. √ √√√
4 *Crankcase breath-
er system • Check breather hose for cracks or other damage,
and replace if necessary. √√√
5 *Exhaust system • Check for leakage and replace gasket(s) if neces-
sary.
• Check for looseness and tighten all screw clamps and joints if necessary. √√√
UB1660E0.book Page 3 Thursday, February 26, 2015 4:01 PM
Page 136 of 180
8-40
8case. Never operate the engine with the air
filter element removed. Doing so would al-
low unfiltered air to enter the engine, caus-
ing rapid engine wear and possible engine
damage. Additionally, the fuel injection
system would be affected resulting in poor
engine performance and possible over-
heating.
[ECB00763]
12. Install the seat.TIPThe air filter element should be cleaned every 20–
40 hours. It should be cleaned and lubricated
more often if the ATV is operated in extremely
dusty areas. Each time the air filter element main-
tenance is performed, check the air inlet of the air
filter case for obstructions. Check the air filter
case rubber joint to the throttle body and the rub-
ber joint manifold fittings for an air-tight seal.
Tighten all fittings securely to avoid the possibility
of unfiltered air entering the engine. EBU28904Cleaning the spark arresterBe sure the exhaust pipe and muffler are cool be-
fore cleaning the spark arrester.
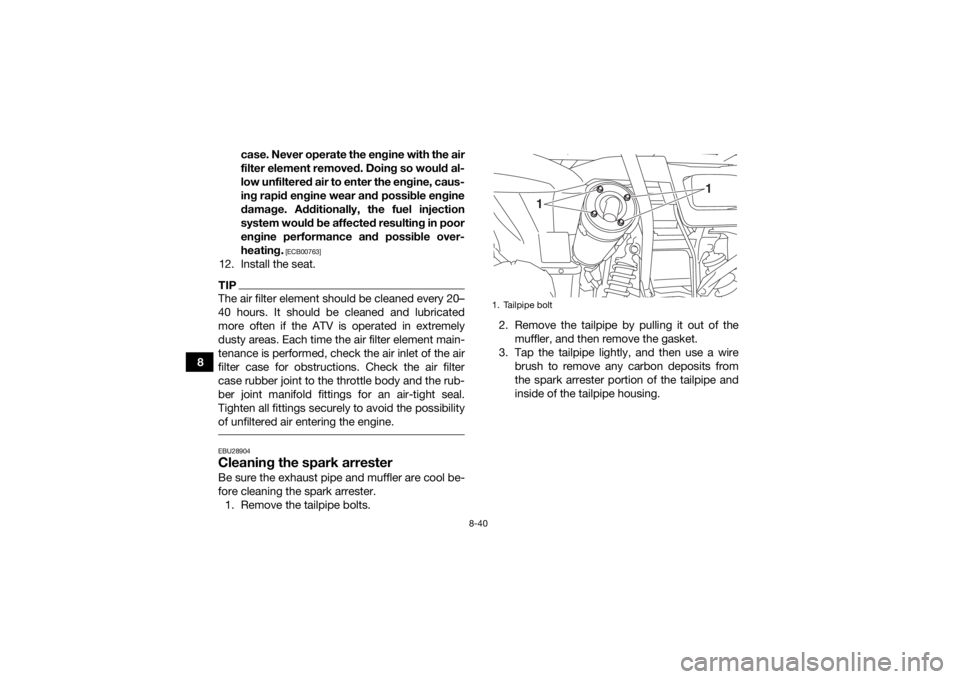
1. Remove the tailpipe bolts. 2. Remove the tailpipe by pulling it out of the
muffler, and then remove the gasket.
3. Tap the tailpipe lightly, and then use a wire brush to remove any carbon deposits from
the spark arrester portion of the tailpipe and
inside of the tailpipe housing.
1. Tailpipe bolt
1
1
UB1660E0.book Page 40 Thursday, February 26, 2015 4:01 PM
Page 153 of 180

8-57
8
5. Install the panel.
EBU30521Replacing a fuse
Tightening torques:
Carrier bolt (upper):34 Nm (3.4 m·kgf, 25 ft·lbf)
Carrier bolt (lower): 34 Nm (3.4 m·kgf, 25 ft·lbf)
Carrier bolt (under the fenders): 7 Nm (0.7 m·kgf, 5.1 ft·lbf)
1. Fuse box
2. Main fuse
3. EPS fuse (for EPS model)
4. Fuel injection system spare fuse
5. Fuel injection system fuse
2345
1
UB1660E0.book Page 57 Thursday, February 26, 2015 4:01 PM