YAMAHA KODIAK 700 2020 Owners Manual
Manufacturer: YAMAHA, Model Year: 2020, Model line: KODIAK 700, Model: YAMAHA KODIAK 700 2020Pages: 178, PDF Size: 6.7 MB
Page 121 of 178
9-24
9
Yamaha’s experience gained over many years of
research and development into oil since the
1960’s helps make Yamalube the best choice for
your Yamaha engine.
EBU27308Final gear oilThe final gear case must be checked for oil leak-
age before each ride. If any leakage is found, have
a Yamaha dealer check and repair the ATV. In ad-
dition, the final gear oil level must be checked and
the oil changed as follows at the intervals speci-
fied in the periodic maintenance and lubrication
chart.
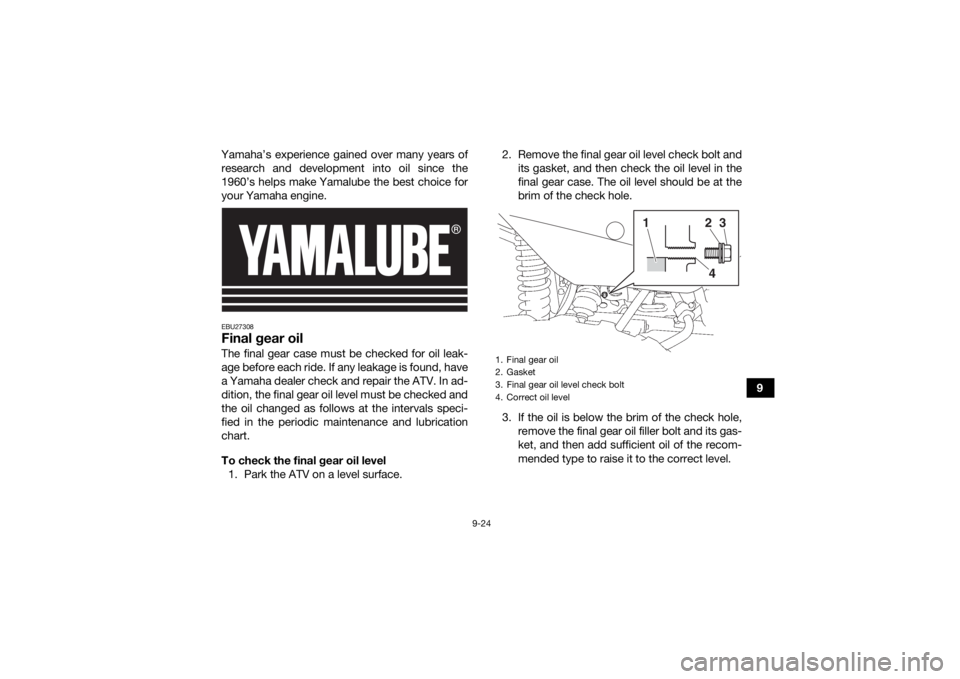
To check the final gear oil level 1. Park the ATV on a level surface. 2. Remove the final gear oil level check bolt and
its gasket, and then check the oil level in the
final gear case. The oil level should be at the
brim of the check hole.
3. If the oil is below the brim of the check hole, remove the final gear oil filler bolt and its gas-
ket, and then add sufficient oil of the recom-
mended type to raise it to the correct level.
1. Final gear oil
2. Gasket
3. Final gear oil level check bolt
4. Correct oil level
1
243
UB5K62E0.book Page 24 Thursday, May 9, 2019 2:59 PM
Page 122 of 178
9-25
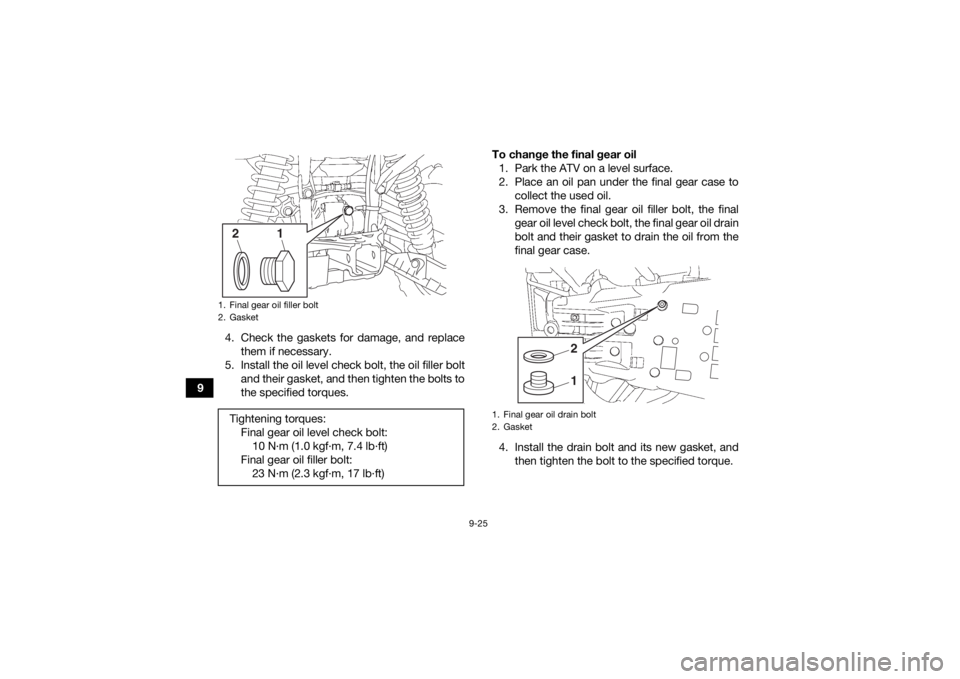
94. Check the gaskets for damage, and replace
them if necessary.
5. Install the oil level check bolt, the oil filler bolt and their gasket, and then tighten the bolts to
the specified torques. To change the final gear oil
1. Park the ATV on a level surface.
2. Place an oil pan under the final gear case to collect the used oil.
3. Remove the final gear oil filler bolt, the final gear oil level check bolt, the final gear oil drain
bolt and their gasket to drain the oil from the
final gear case.
4. Install the drain bolt and its new gasket, and then tighten the bolt to the specified torque.
1. Final gear oil filler bolt
2. GasketTightening torques:Final gear oil level check bolt:10 N·m (1.0 kgf·m, 7.4 lb·ft)
Final gear oil filler bolt: 23 N·m (2.3 kgf·m, 17 lb·ft)
1
2
1. Final gear oil drain bolt
2. Gasket
12
UB5K62E0.book Page 25 Thursday, May 9, 2019 2:59 PM
Page 123 of 178
![YAMAHA KODIAK 700 2020 Owners Manual 9-26
9
5. Refill with the recommended final gear oil to
the brim of the check hole as shown.
NOTICE: Be sure no foreign material en-
ters the final gear case.
[ECB00422]
6. Check the oil level check YAMAHA KODIAK 700 2020 Owners Manual 9-26
9
5. Refill with the recommended final gear oil to
the brim of the check hole as shown.
NOTICE: Be sure no foreign material en-
ters the final gear case.
[ECB00422]
6. Check the oil level check](/img/51/50557/w960_50557-122.png)
9-26
9
5. Refill with the recommended final gear oil to
the brim of the check hole as shown.
NOTICE: Be sure no foreign material en-
ters the final gear case.
[ECB00422]
6. Check the oil level check bolt gasket and the oil filler bolt gasket for damage, and replace
them if necessary.
7. Install the oil level check bolt, the oil filler bolt and their gasket, and then tighten the bolts to
the specified torques.
8. Check the final gear case for oil leakage. If oil is leaking, check for the cause.EBU23428Differential gear oilThe differential gear case must be checked for oil
leakage before each ride. If any leakage is found,
have a Yamaha dealer check and repair the ATV.
In addition, the differential gear oil level must be
checked and the oil changed as follows at the in-
tervals specified in the periodic maintenance and
lubrication chart.
Tightening torque:
Final gear oil drain bolt:23 N·m (2.3 kgf·m, 17 lb·ft)
1. Final gear oil
2. Gasket
3. Final gear oil level check bolt
4. Correct oil levelRecommended final gear oil: See page 11-1.
1
243
Tightening torques:Final gear oil level check bolt:10 N·m (1.0 kgf·m, 7.4 lb·ft)
Final gear oil filler bolt: 23 N·m (2.3 kgf·m, 17 lb·ft)
UB5K62E0.book Page 26 Thursday, May 9, 2019 2:59 PM
Page 124 of 178
9-27
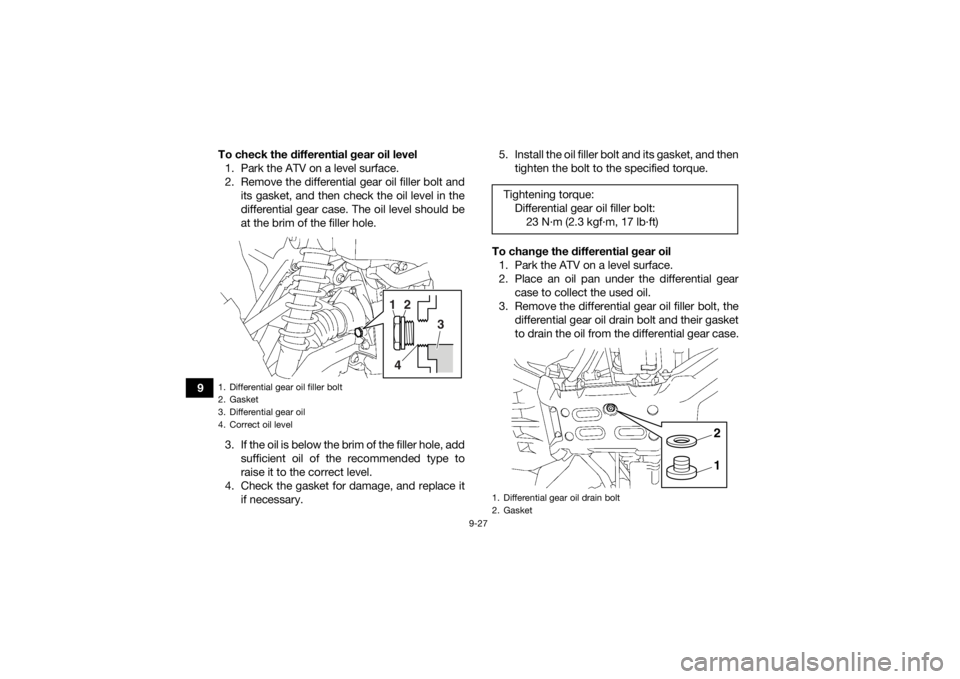
9To check the differential gear oil level
1. Park the ATV on a level surface.
2. Remove the differential gear oil filler bolt and its gasket, and then check the oil level in the
differential gear case. The oil level should be
at the brim of the filler hole.
3. If the oil is below the brim of the filler hole, add sufficient oil of the recommended type to
raise it to the correct level.
4. Check the gasket for damage, and replace it if necessary. 5. Install the oil filler bolt and its gasket, and then
tighten the bolt to the specified torque.
To change the differential gear oil 1. Park the ATV on a level surface.
2. Place an oil pan under the differential gear case to collect the used oil.
3. Remove the differential gear oil filler bolt, the differential gear oil drain bolt and their gasket
to drain the oil from the differential gear case.
1. Differential gear oil filler bolt
2. Gasket
3. Differential gear oil
4. Correct oil level
1
2
3
4
Tightening torque: Differential gear oil filler bolt:23 N·m (2.3 kgf·m, 17 lb·ft)1. Differential gear oil drain bolt
2. Gasket
12
UB5K62E0.book Page 27 Thursday, May 9, 2019 2:59 PM
Page 125 of 178
9-28
9
4. Install the drain bolt and its new gasket, and
then tighten the bolt to the specified torque.
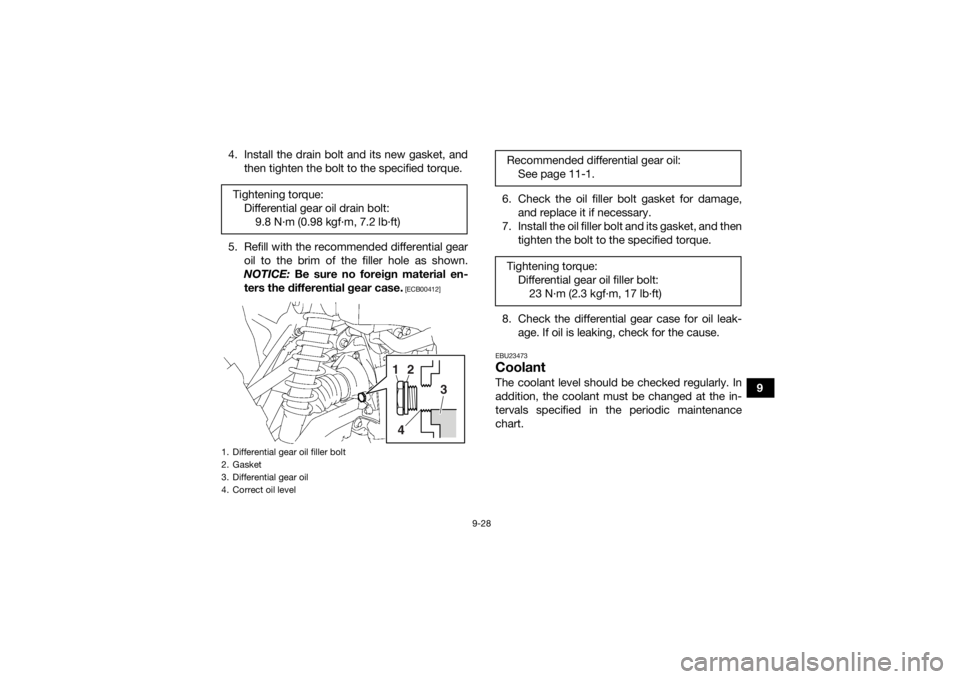
5. Refill with the recommended differential gear oil to the brim of the filler hole as shown.
NOTICE: Be sure no foreign material en-
ters the differential gear case.
[ECB00412]
6. Check the oil filler bolt gasket for damage, and replace it if necessary.
7. Install the oil filler bolt and its gasket, and then tighten the bolt to the specified torque.
8. Check the differential gear case for oil leak- age. If oil is leaking, check for the cause.EBU23473CoolantThe coolant level should be checked regularly. In
addition, the coolant must be changed at the in-
tervals specified in the periodic maintenance
chart.
Tightening torque:
Differential gear oil drain bolt:9.8 N·m (0.98 kgf·m, 7.2 lb·ft)
1. Differential gear oil filler bolt
2. Gasket
3. Differential gear oil
4. Correct oil level
1
2
3
4
Recommended differential gear oil: See page 11-1.
Tightening torque: Differential gear oil filler bolt:23 N·m (2.3 kgf·m, 17 lb·ft)
UB5K62E0.book Page 28 Thursday, May 9, 2019 2:59 PM
Page 126 of 178
9-29
9
TIPIf genuine Yamaha coolant is not available, use an
ethylene glycol antifreeze containing corrosion in-
hibitors for aluminum engines and mix with dis-
tilled water at a 1:1 ratio. NOTICEECB02190Mix antifreeze with distilled water only. Howev-
er, if distilled water is not available, soft water
may be used for refilling. Do not use hard water
or salt water since they are harmful to the en-
gine. EBU34201To check the coolant level1. Park the ATV on a level surface.
TIPThe coolant level must be checked on a cold en-
gine since the level varies with engine tempera-
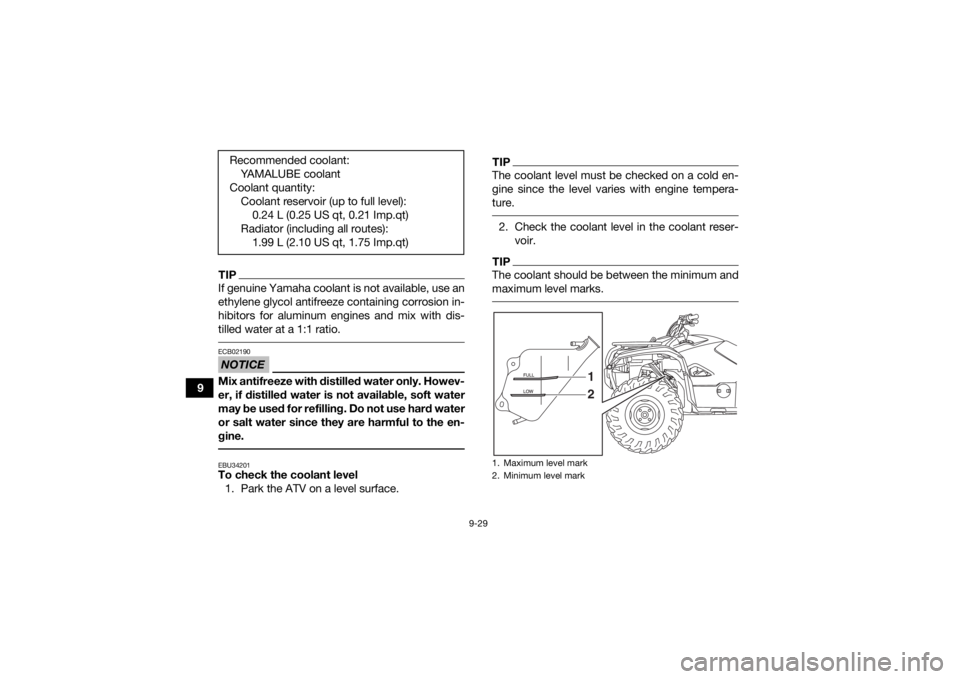
ture. 2. Check the coolant level in the coolant reser- voir.TIPThe coolant should be between the minimum and
maximum level marks.
Recommended coolant:YAMALUBE coolant
Coolant quantity: Coolant reservoir (up to full level):0.24 L (0.25 US qt, 0.21 Imp.qt)
Radiator (including all routes): 1.99 L (2.10 US qt, 1.75 Imp.qt)
1. Maximum level mark
2. Minimum level mark
12
UB5K62E0.book Page 29 Thursday, May 9, 2019 2:59 PM
Page 127 of 178
9-30
9
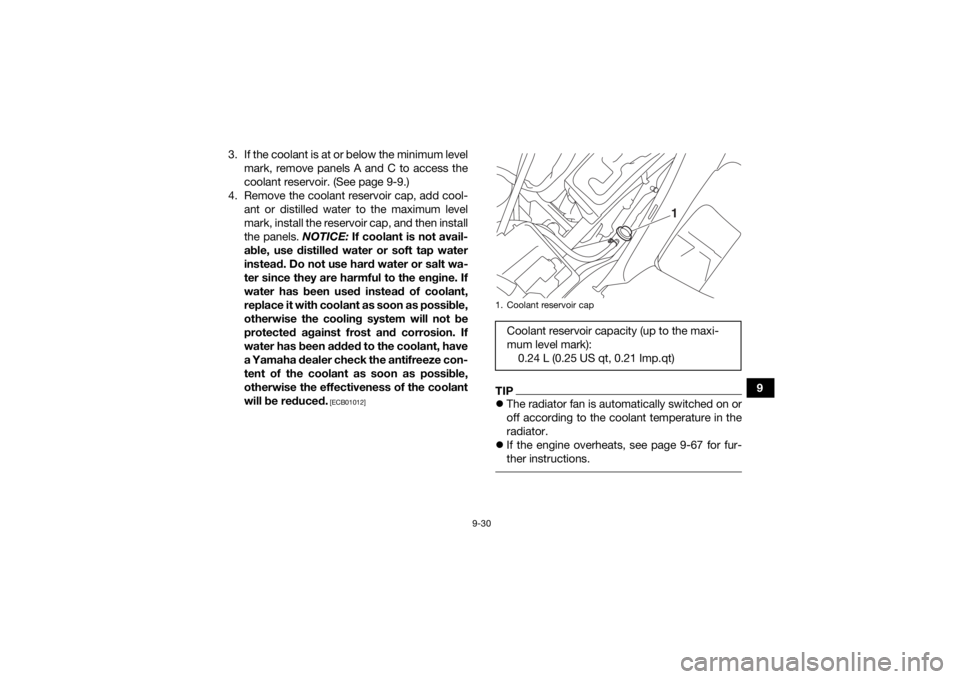
3. If the coolant is at or below the minimum level
mark, remove panels A and C to access the
coolant reservoir. (See page 9-9.)
4. Remove the coolant reservoir cap, add cool- ant or distilled water to the maximum level
mark, install the reservoir cap, and then install
the panels. NOTICE: If coolant is not avail-
able, use distilled water or soft tap water
instead. Do not use hard water or salt wa-
ter since they are harmful to the engine. If
water has been used instead of coolant,
replace it with coolant as soon as possible,
otherwise the cooling system will not be
protected against frost and corrosion. If
water has been added to the coolant, have
a Yamaha dealer check the antifreeze con-
tent of the coolant as soon as possible,
otherwise the effectiveness of the coolant
will be reduced.
[ECB01012]
TIP The radiator fan is automatically switched on or
off according to the coolant temperature in the
radiator.
If the engine overheats, see page 9-67 for fur-
ther instructions. 1. Coolant reservoir capCoolant reservoir capacity (up to the maxi-
mum level mark):
0.24 L (0.25 US qt, 0.21 Imp.qt)
1
UB5K62E0.book Page 30 Thursday, May 9, 2019 2:59 PM
Page 128 of 178
9-31
9
EBU34213To change the coolant
WARNING
EWB01891Wait for the engine and radiator to cool before
removing the radiator cap. You could be
burned by hot fluid and steam blown out under
pressure. Always place a thick rag over the cap
when opening. Allow any remaining pressure
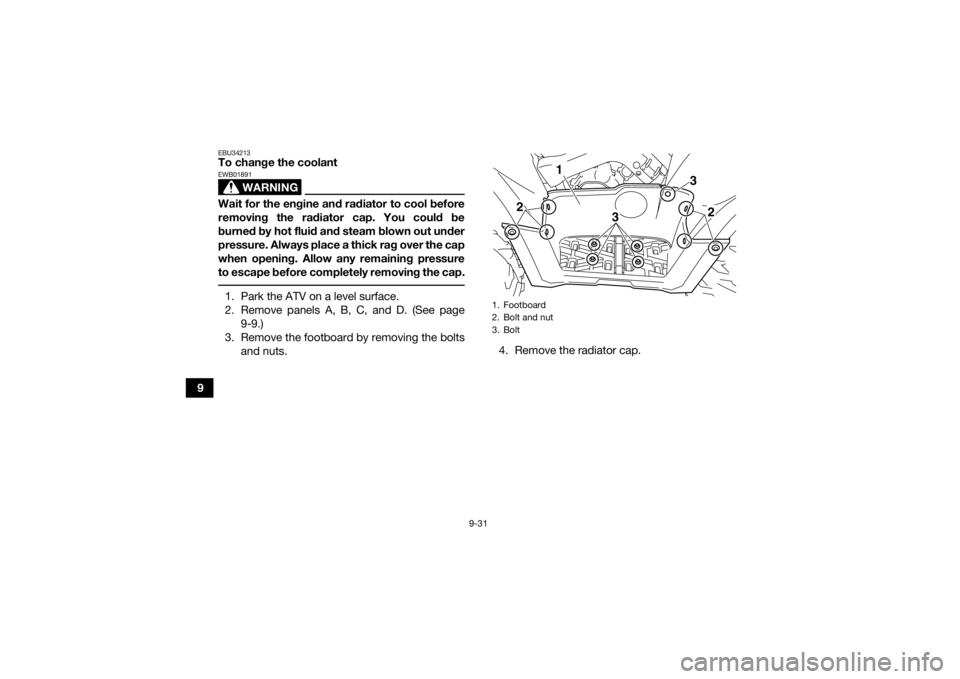
to escape before completely removing the cap. 1. Park the ATV on a level surface.
2. Remove panels A, B, C, and D. (See page9-9.)
3. Remove the footboard by removing the bolts and nuts. 4. Remove the radiator cap.
1. Footboard
2. Bolt and nut
3. Bolt
3
2
2
3
1
UB5K62E0.book Page 31 Thursday, May 9, 2019 2:59 PM
Page 129 of 178
9-32
9
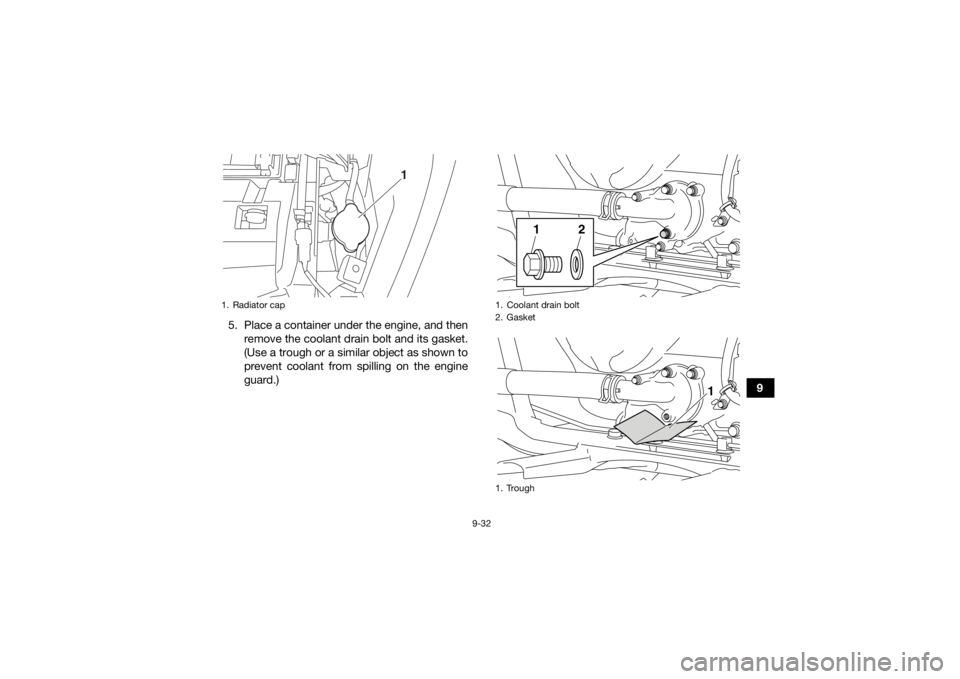
5. Place a container under the engine, and then
remove the coolant drain bolt and its gasket.
(Use a trough or a similar object as shown to
prevent coolant from spilling on the engine
guard.)
1. Radiator cap
1
1. Coolant drain bolt
2. Gasket
1. Trough
1
2
1
UB5K62E0.book Page 32 Thursday, May 9, 2019 2:59 PM
Page 130 of 178
9-33
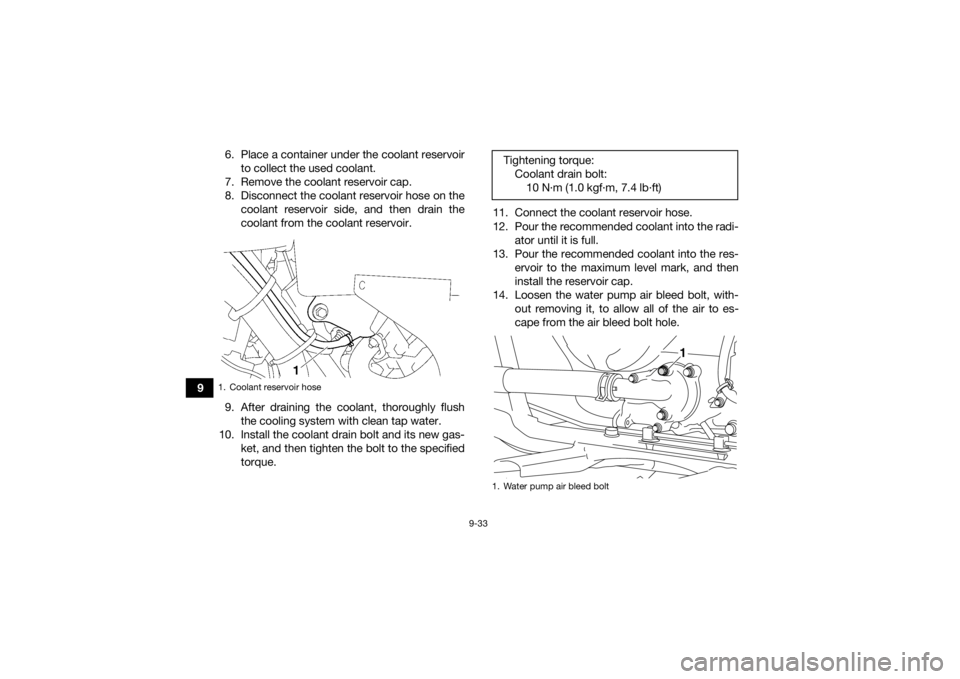
96. Place a container under the coolant reservoir
to collect the used coolant.
7. Remove the coolant reservoir cap.
8. Disconnect the coolant reservoir hose on the coolant reservoir side, and then drain the
coolant from the coolant reservoir.
9. After draining the coolant, thoroughly flush the cooling system with clean tap water.
10. Install the coolant drain bolt and its new gas- ket, and then tighten the bolt to the specified
torque. 11. Connect the coolant reservoir hose.
12. Pour the recommended coolant into the radi-
ator until it is full.
13. Pour the recommended coolant into the res- ervoir to the maximum level mark, and then
install the reservoir cap.
14. Loosen the water pump air bleed bolt, with- out removing it, to allow all of the air to es-
cape from the air bleed bolt hole.
1. Coolant reservoir hose
Tightening torque:Coolant drain bolt:10 N·m (1.0 kgf·m, 7.4 lb·ft)1. Water pump air bleed bolt
1
UB5K62E0.book Page 33 Thursday, May 9, 2019 2:59 PM