9-2 YAMAHA KODIAK 700 2021 Owners Manual
[x] Cancel search | Manufacturer: YAMAHA, Model Year: 2021, Model line: KODIAK 700, Model: YAMAHA KODIAK 700 2021Pages: 176, PDF Size: 4.75 MB
Page 9 of 176

OPERATION ................................................... 7-1Starting the engine ...................................... 7-1
Operating the drive select lever and driving in reverse ....................................... 7-2
Engine break-in ........................................... 7-4
Parking ........................................................ 7-4
Parking on a slope ...................................... 7-5
Accessories and loading ............................. 7-5
RIDING YOUR ATV ........................................ 8-1 GETTING TO KNOW YOUR ATV ................ 8-2
RIDE WITH CARE AND GOOD JUDGMENT .............................................. 8-2
BE CAREFUL WHERE YOU RIDE ............... 8-9
TURNING YOUR ATV................................ 8-12
CLIMBING UPHILL ................................... 8-13
RIDING DOWNHILL .................................. 8-16
CROSSING A SLOPE................................ 8-17
CROSSING THROUGH SHALLOW WATER .................................................... 8-18
RIDING OVER ROUGH TERRAIN ............. 8-20
SLIDING AND SKIDDING.......................... 8-21
WHAT TO DO IF... ..................................... 8-22
PERIODIC MAINTENANCE AND
ADJUSTMENT................................................ 9-1 Owner’s Manuals and Tool Kit .................... 9-2 Periodic maintenance chart: Emission
control system .......................................... 9-3
Periodic maintenance chart: General maintenance and lubrication .................... 9-5
Removing and installing panels .................. 9-9
Checking the spark plug........................... 9-17
Engine oil and oil filter cartridge ............... 9-19
Why Yamalube ......................................... 9-23
Final gear oil ............................................. 9-24
Differential gear oil .................................... 9-26
Coolant ..................................................... 9-28
Cleaning the air filter element ................... 9-36
Cleaning the spark arrester ...................... 9-39
V-belt case drain plug............................... 9-40
Adjusting the throttle lever free play ......... 9-41
Valve clearance......................................... 9-41
Brakes....................................................... 9-41
Checking the front brake pads and rear brake friction plates ................................ 9-42
Checking the brake fluid level .................. 9-43
Changing the brake fluid .......................... 9-44
Checking the front brake lever free play... 9-44
Adjusting the rear brake lever and brake pedal free play ........................................ 9-44
Axle boots................................................. 9-47
Brake light switches ................................. 9-48
Checking and lubricating the cables ........ 9-48UB5K63E0.book Page 2 Monday, October 12, 2020 4:59 PM
Page 59 of 176

6-1
6
EBU19203
PRE-OPERATION CHECKS
EBU19227Inspect your vehicle each time you use it to make sure the vehicle is in safe operating condition. Always
follow the inspection and maintenance procedures and schedules described in the Owner’s Manual.
WARNING
EWB00482Failure to inspect or maintain the vehicle properly increases the possibility of an accident or equip-
ment damage. Do not operate the vehicle if you find any problem. If a problem cannot be corrected
by the procedures provided in this manual, have the vehicle inspected by a Yamaha dealer. Before using this vehicle, check the following points:
ITEMROUTINE PAGE
Fuel • Check fuel level in fuel tank,
and add recommended fuel if neces-
sary.
• Check fuel line for leakage. Correct if necessary. 5-22, 6-3
Engine oil • Check oil level in engine, and add recommended oil to specified
level if necessary.
• Check ATV for oil leakage. Correct if necessary. 6-3, 9-19
Final gear oil • Check ATV for oil leakage. Correct if necessary. 6-3, 9-24
Differential gear oil • Check ATV for oil leakage. Correct if necessary. 6-3, 9-26
Coolant • Check coolant level in reservoir, and add recommended coolant to
specified level if necessary.
• Check cooling system for leakage. Correct if necessary. 6-3, 9-28
UB5K63E0.book Page 1 Monday, October 12, 2020 4:59 PM
Page 61 of 176

6-3
6
EBU38000FuelMake sure there is sufficient gasoline in the tank
before starting off. Refuel if necessary. (See page
5-22.)EBU19561Engine oilMake sure that the engine oil is at the specified
level. Add oil as necessary. (See page 9-19.)EBU19591Final gear oilMake sure that the final gear oil is at the specified
level. Add oil as necessary. (See page 9-24.)EBU19601Differential gear oilMake sure that the differential gear oil is at the
specified level. Add oil as necessary. (See page
9-26.)EBU19632CoolantMake sure that the coolant is at the specified level.
Add coolant as necessary. (See page 9-28.)
TIPThe coolant level must be checked on a cold en-
gine since the level varies with engine tempera-
ture. EBU28533Front and rear brakesBrake levers and brake pedal
Check that there is no free play in the front
brake lever. If there is free play, have a Yamaha
dealer check the brake system.
Check for correct free play in the rear brake le-
ver and brake pedal. If the free play is incorrect,
adjust it. (See page 9-44.)
Check operation of the levers and pedal. They
should move smoothly and there should be a
firm feeling when the brake is applied. If not,
have a Yamaha dealer check them.
Brake fluid level (front brake)
Check the brake fluid level. Add fluid if necessary.
(See page 9-43.)
Specified brake fluid:DOT 4
UB5K63E0.book Page 3 Monday, October 12, 2020 4:59 PM
Page 97 of 176
9-2
9
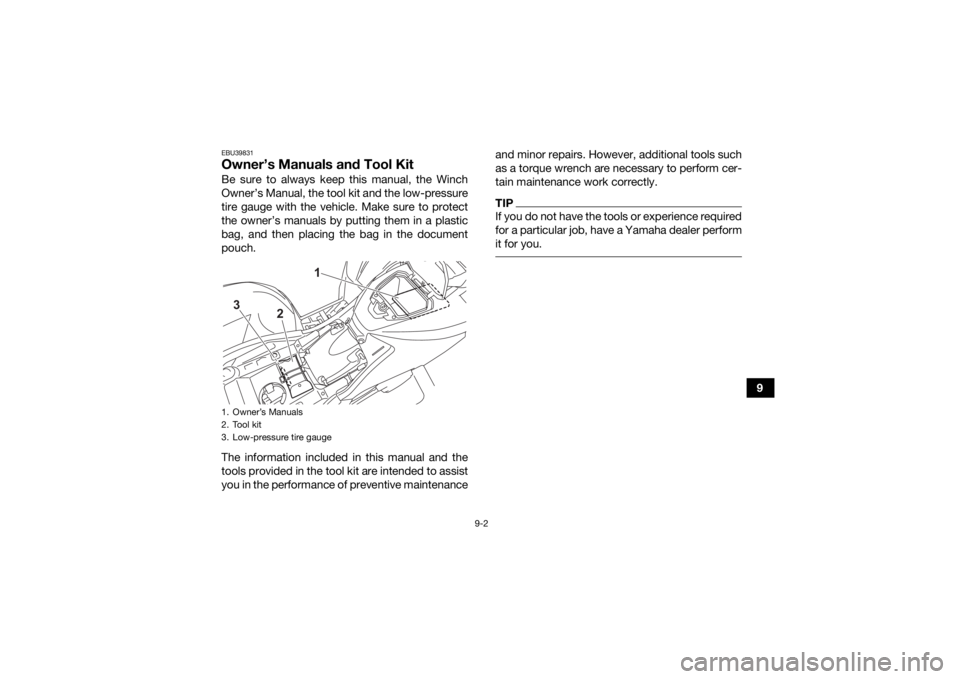
EBU39831Owner’s Manuals and Tool KitBe sure to always keep this manual, the Winch
Owner’s Manual, the tool kit and the low-pressure
tire gauge with the vehicle. Make sure to protect
the owner’s manuals by putting them in a plastic
bag, and then placing the bag in the document
pouch.
The information included in this manual and the
tools provided in the tool kit are intended to assist
you in the performance of preventive maintenanceand minor repairs. However, additional tools such
as a torque wrench are necessary to perform cer-
tain maintenance work correctly.
TIPIf you do not have the tools or experience required
for a particular job, have a Yamaha dealer perform
it for you.
1. Owner’s Manuals
2. Tool kit
3. Low-pressure tire gauge
1
2
3
UB5K63E0.book Page 2 Monday, October 12, 2020 4:59 PM
Page 115 of 176
9-20
9
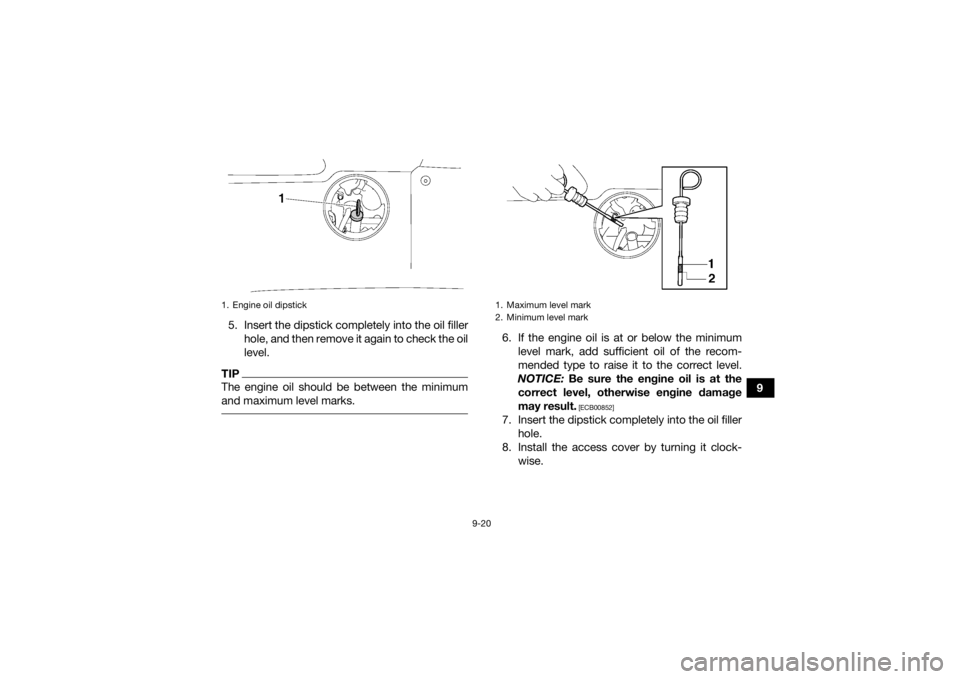
5. Insert the dipstick completely into the oil filler
hole, and then remove it again to check the oil
level.
TIPThe engine oil should be between the minimum
and maximum level marks.
6. If the engine oil is at or below the minimumlevel mark, add sufficient oil of the recom-
mended type to raise it to the correct level.
NOTICE: Be sure the engine oil is at the
correct level, otherwise engine damage
may result.
[ECB00852]
7. Insert the dipstick completely into the oil filler hole.
8. Install the access cover by turning it clock- wise.
1. Engine oil dipstick
1. Maximum level mark
2. Minimum level mark
UB5K63E0.book Page 20 Monday, October 12, 2020 4:59 PM
Page 116 of 176
9-21
9To change the engine oil (with or without oil fil-
ter cartridge replacement)
1. Park the ATV on a level surface.
2. Start the engine, warm it up for several min- utes, and then turn it off.
3. Remove the access cover by turning it coun- terclockwise.
4. Place an oil pan under the engine to collect the used oil.
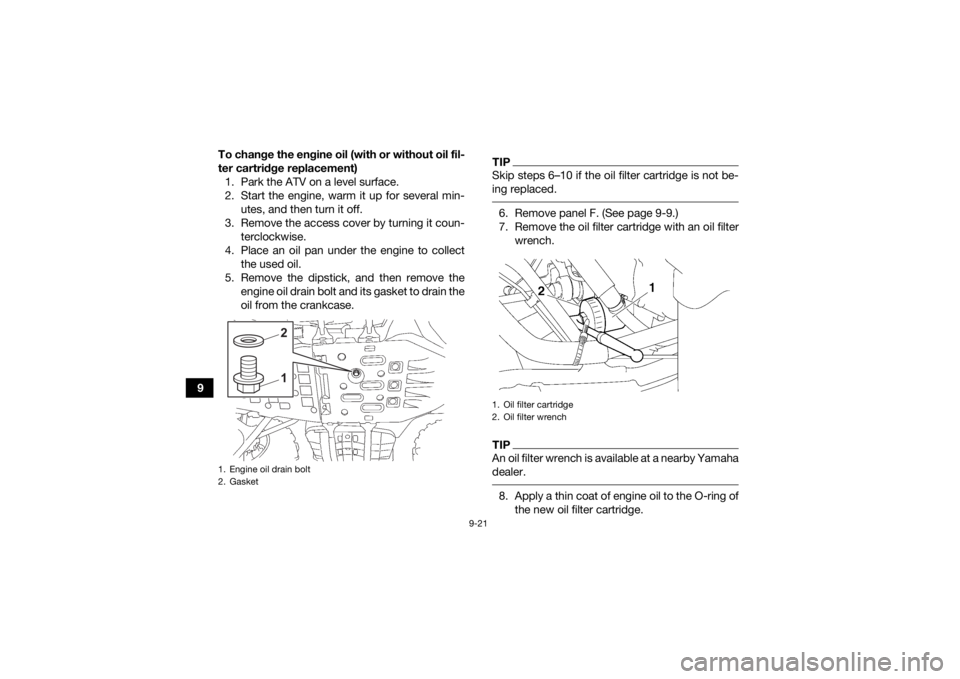
5. Remove the dipstick, and then remove the engine oil drain bolt and its gasket to drain the
oil from the crankcase.
TIPSkip steps 6–10 if the oil filter cartridge is not be-
ing replaced. 6. Remove panel F. (See page 9-9.)
7. Remove the oil filter cartridge with an oil filterwrench.TIPAn oil filter wrench is available at a nearby Yamaha
dealer. 8. Apply a thin coat of engine oil to the O-ring ofthe new oil filter cartridge.
1. Engine oil drain bolt
2. Gasket
12
1. Oil filter cartridge
2. Oil filter wrench
UB5K63E0.book Page 21 Monday, October 12, 2020 4:59 PM
Page 117 of 176
9-22
9
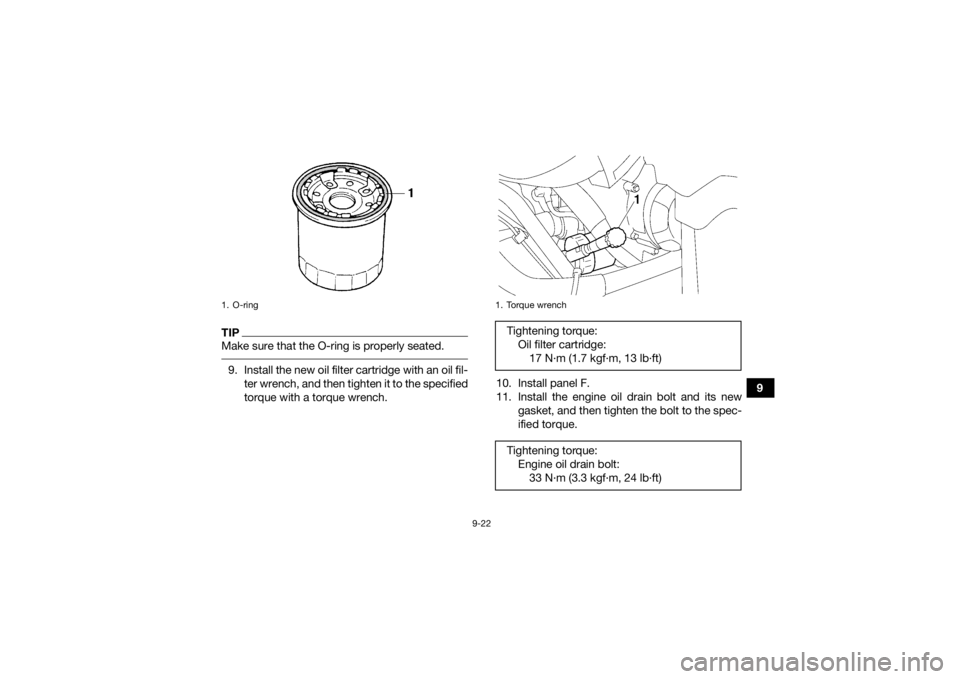
TIPMake sure that the O-ring is properly seated. 9. Install the new oil filter cartridge with an oil fil-ter wrench, and then tighten it to the specified
torque with a torque wrench. 10. Install panel F.
11. Install the engine oil drain bolt and its new
gasket, and then tighten the bolt to the spec-
ified torque.1. O-ring
1. Torque wrenchTightening torque:Oil filter cartridge:17 N·m (1.7 kgf·m, 13 lb·ft)
Tightening torque: Engine oil drain bolt:33 N·m (3.3 kgf·m, 24 lb·ft)
UB5K63E0.book Page 22 Monday, October 12, 2020 4:59 PM
Page 118 of 176
9-23
912. Refill with the specified amount of the recom-
mended engine oil, and then insert the dip-
stick completely into the oil filler hole.
TIPBe sure to wipe off spilled oil on any parts after the
engine and exhaust system have cooled down. NOTICEECB00301In order to prevent clutch slippage (since the
engine oil also lubricates the clutch), do not
mix any chemical additives. Do not use oils
with a diesel specification of “CD” or oils of
a higher quality than specified. In addition,
do not use oils labeled “ENERGY CONSERV-
ING II” or higher.
Make sure that no foreign material enters the
crankcase.
13. Start the engine, and then let it idle for several
minutes while checking it for oil leakage. If oil
is leaking, immediately turn the engine off and
check for the cause.
14. Turn the engine off, wait at least ten minutes, and then check the oil level and correct it if
necessary.
15. Install the access cover by turning it clock- wise.EBU38620Why YamalubeYAMALUBE oil is a Genuine YAMAHA Part born ofthe engineers’ passion and belief that engine oil is
an important liquid engine component. We form
teams of specialists in the fields of mechanical en-
gineering, chemistry, electronics and track test-
ing, and have them develop the engine together
with the oil it will use. Yamalube oils take full ad-
vantage of the base oil’s qualities and blend in the
ideal balance of additives to make sure the final oil
clears our performance standards. Thus,
Yamalube mineral, semi synthetic and synthetic
oils have their own distinct characters and value.
Recommended oil:
See page 11-1.
Oil quantity: Without oil filter cartridge replacement:2.00 L (2.11 US qt, 1.76 Imp.qt)
With oil filter cartridge replacement: 2.10 L (2.22 US qt, 1.85 Imp.qt)
UB5K63E0.book Page 23 Monday, October 12, 2020 4:59 PM
Page 119 of 176
9-24
9
Yamaha’s experience gained over many years of
research and development into oil since the
1960’s helps make Yamalube the best choice for
your Yamaha engine.
EBU27309Final gear oilThe final gear case must be checked for oil leak-
age before each ride. If any leakage is found, have
a Yamaha dealer check and repair the ATV. In ad-
dition, the final gear oil level must be checked and
the oil changed as follows at the intervals speci-
fied in the periodic maintenance chart.
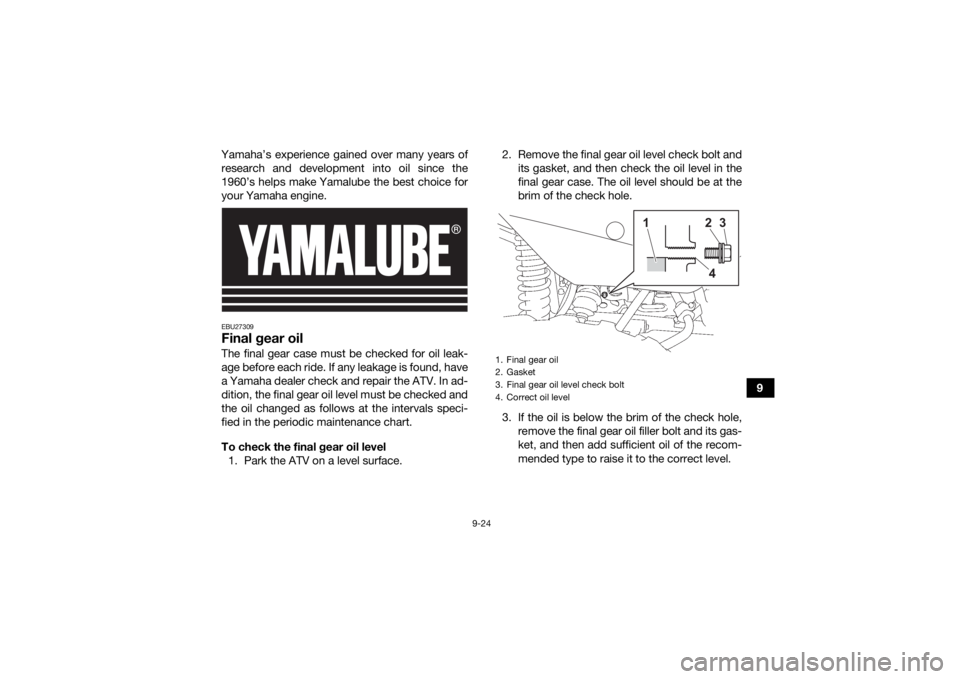
To check the final gear oil level 1. Park the ATV on a level surface. 2. Remove the final gear oil level check bolt and
its gasket, and then check the oil level in the
final gear case. The oil level should be at the
brim of the check hole.
3. If the oil is below the brim of the check hole, remove the final gear oil filler bolt and its gas-
ket, and then add sufficient oil of the recom-
mended type to raise it to the correct level.
1. Final gear oil
2. Gasket
3. Final gear oil level check bolt
4. Correct oil level
1
243
UB5K63E0.book Page 24 Monday, October 12, 2020 4:59 PM
Page 120 of 176
9-25
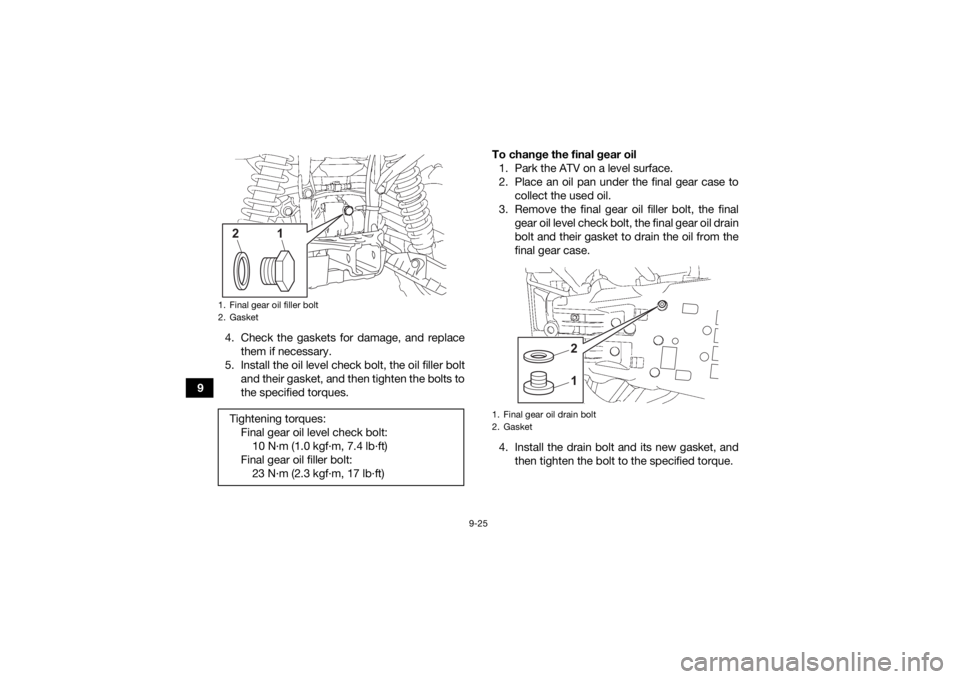
94. Check the gaskets for damage, and replace
them if necessary.
5. Install the oil level check bolt, the oil filler bolt and their gasket, and then tighten the bolts to
the specified torques. To change the final gear oil
1. Park the ATV on a level surface.
2. Place an oil pan under the final gear case to collect the used oil.
3. Remove the final gear oil filler bolt, the final gear oil level check bolt, the final gear oil drain
bolt and their gasket to drain the oil from the
final gear case.
4. Install the drain bolt and its new gasket, and then tighten the bolt to the specified torque.
1. Final gear oil filler bolt
2. GasketTightening torques:Final gear oil level check bolt:10 N·m (1.0 kgf·m, 7.4 lb·ft)
Final gear oil filler bolt: 23 N·m (2.3 kgf·m, 17 lb·ft)
1
2
1. Final gear oil drain bolt
2. Gasket
12
UB5K63E0.book Page 25 Monday, October 12, 2020 4:59 PM