brake YAMAHA MAJESTY 250 2003 Owners Manual
[x] Cancel search | Manufacturer: YAMAHA, Model Year: 2003, Model line: MAJESTY 250, Model: YAMAHA MAJESTY 250 2003Pages: 116, PDF Size: 2.07 MB
Page 11 of 116

1-2
QGIVE SAFETY THE RIGHT OF WAY
1
EAU03099
Further safe-riding pointsSafe-riding points8Be sure to signal clearly when making turns.
8Braking can be extremely difficult on a wet road. Avoid hard braking, because the scooter could
slide. Apply the brakes slowly when stopping on a wet surface.
8Slow down as you approach a corner or turn. Once you have completed a turn, accelerate slowly.
8Be careful when passing parked cars. A driver might not see you and open a door in your path.
8Railroad crossings, streetcar rails, iron plates on road construction sites, and manhole covers
become extremely slippery when wet. Slow down and cross them with caution. Keep the scooter
upright, otherwise it could slide out from under you.
8The brake pads could get wet when you wash the scooter. After washing the scooter, check the
brakes before riding.
8Always wear a helmet, gloves, trousers (tapered around the cuff and ankle so they do not flap),
and a bright colored jacket.
8Do not carry too much luggage on the scooter. An overloaded scooter is unstable.
5SJ-28199-E1 7/11/02 11:03 AM Page 9
Page 16 of 116
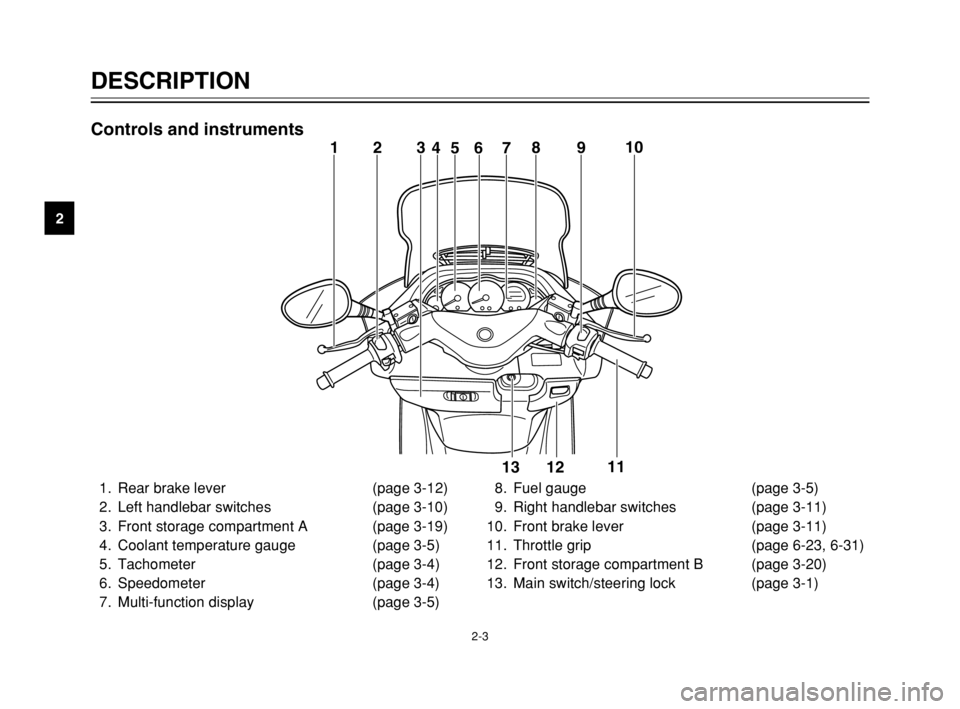
2-3
DESCRIPTION
2
1
23
46578910
11
12 13
Controls and instruments
1. Rear brake lever (page 3-12)
2. Left handlebar switches (page 3-10)
3. Front storage compartment A (page 3-19)
4. Coolant temperature gauge (page 3-5)
5. Tachometer (page 3-4)
6. Speedometer (page 3-4)
7. Multi-function display (page 3-5)8. Fuel gauge (page 3-5)
9. Right handlebar switches (page 3-11)
10. Front brake lever (page 3-11)
11. Throttle grip (page 6-23, 6-31)
12. Front storage compartment B (page 3-20)
13. Main switch/steering lock (page 3-1)
5SJ-28199-E1 7/11/02 11:03 AM Page 14
Page 17 of 116
INSTRUMENT AND CONTROL FUNCTIONS
Main switch/steering lock ...................................................................3-1
Indicator and warning lights ...............................................................3-2
Speedometer .....................................................................................3-4
Tachometer .......................................................................................3-4
Fuel gauge .........................................................................................3-5
Coolant temperature gauge ...............................................................3-5
Multi-function display .........................................................................3-5
Anti-theft alarm (optional) ................................................................3-10
Handlebar switches .........................................................................3-10
Front brake lever .............................................................................3-11
Rear brake lever ..............................................................................3-12
ABS .................................................................................................3-13
Fuel tank cap ...................................................................................3-15
Fuel ..................................................................................................3-16
Catalytic converter ...........................................................................3-17
Rider seat ........................................................................................3-18
Adjusting the rider seat ....................................................................3-18
Storage compartments ....................................................................3-19
Adjusting the shock absorber assemblies .......................................3-21
Sidestand .........................................................................................3-22
Ignition circuit cut-off system ...........................................................3-22
3
5SJ-28199-E1 7/11/02 11:03 AM Page 15
Page 20 of 116

3-3
EWA00069
w
When the ABS warning light
comes on or flashes while riding,
the brake system reverts to con-
ventional braking. Therefore, be
careful not to cause the wheel to
lock during emergency braking.
NOTE:
The ABS warning light may come on
while pushing the start switch and
while accelerating the engine with the
scooter on its centerstand, but this
does not indicate a malfunction.
EAU00063
High beam indicator light “&”High beam indicator lightThis indicator light comes on when
the high beam of the headlight is
switched on.
INSTRUMENT AND CONTROL FUNCTIONS
3
EAU03734
Oil change indicator light “7”Oil change indicator lightThis indicator light comes on at the
initial 1,000 km and every 3,000 km
thereafter to indicate that the engine
oil should be changed.
If the engine oil is changed before the
oil change indicator comes on (i.e.
before the periodic oil change interval
has been reached), the indicator light
must be reset after the oil change for
the next periodic oil change to be
indicated at the correct time. (See
page 6-17 for the resetting proce-
dure.)
The electrical circuit of the indicator
light can be checked according to the
following procedure.
1. Set the engine stop switch to “#”
and turn the key to “ON”.
2. Check that the indicator comes
on for a few seconds and then
goes off.
3. If the indicator light does not
come on, have a Yamaha dealer
check the electrical circuit.
NOTE:
The oil change indicator light may
flash when the engine is revved with
the scooter on the centerstand, but
this does not indicate a malfunction.
5SJ-28199-E1 7/11/02 11:03 AM Page 18
Page 28 of 116
3-11
EAU03890
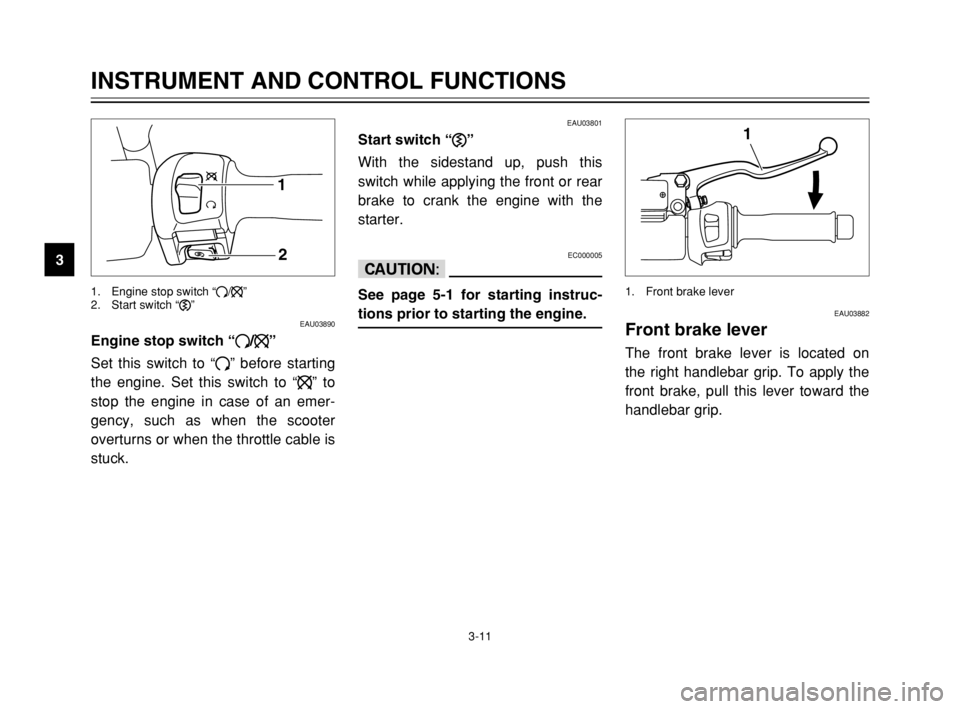
Engine stop switch “#/$”Engine stop switchSet this switch to “#” before starting
the engine. Set this switch to “$” to
stop the engine in case of an emer-
gency, such as when the scooter
overturns or when the throttle cable is
stuck.
INSTRUMENT AND CONTROL FUNCTIONS
3
1
2
1. Engine stop switch “#/$”
2. Start switch “,”
EAU03801
Start switch “,”Start switchWith the sidestand up, push this
switch while applying the front or rear
brake to crank the engine with the
starter.
EC000005
cC
See page 5-1 for starting instruc-
tions prior to starting the engine.
EAU03882
Front brake leverBrake lever, frontThe front brake lever is located on
the right handlebar grip. To apply the
front brake, pull this lever toward the
handlebar grip.
1
1. Front brake lever
5SJ-28199-E1 7/11/02 11:03 AM Page 26
Page 29 of 116

3-12
INSTRUMENT AND CONTROL FUNCTIONS
3
EAU00163
Rear brake leverBrake lever, rearThe rear brake lever is located on the
left handlebar grip. To apply the rear
brake, pull this lever toward the han-
dlebar grip.
1
1. Rear brake lever
5SJ-28199-E1 7/11/02 11:03 AM Page 27
Page 30 of 116

3-13
EAU03631
ABSABSThe Yamaha ABS (Anti-lock Brake
System) features a dual electronic
control system, which acts on the
front and rear brakes independently.
The ABS securely controls wheel
lockup during emergency braking on
changing road surfaces and under
various weather conditions, thereby
maximizing tire adhesion and perfor-
mance while providing a smooth
braking action. The ABS is monitored
by an ECU (Electronic Control Unit),
which will have recourse to manual
braking if a malfunction occurs.
INSTRUMENT AND CONTROL FUNCTIONS
3
EW000020
w
8 8
The ABS performs best on
long braking distances.
8 8
On certain (rough or gravel)
roads, the braking distance
may be longer with than with-
out the ABS. Therefore, always
keep a sufficient distance to
the vehicle ahead to match the
riding speed.
NOTE:
8When the ABS is activated, the
brakes are operated in the usual
way. A pulsating action may be
felt at the brake levers, but this
does not indicate a malfunction.
8This ABS has a test mode which
allows the owner to experience
the pulsating at the brake levers
when the ABS is operating.
However, special tools are
required, so please consult your
Yamaha dealer when performing
this test.
5SJ-28199-E1 7/11/02 11:03 AM Page 28
Page 31 of 116
3-14
INSTRUMENT AND CONTROL FUNCTIONS
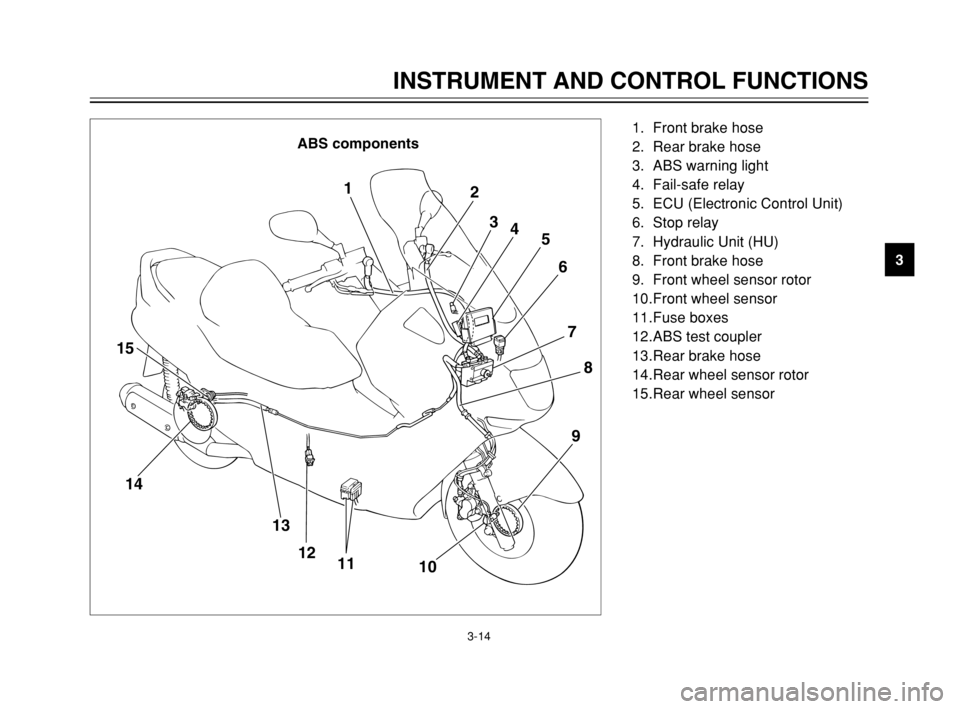
3 ABS components
1
2
3
4
5
6
7
8
9
10 11 12 13 14 15
1. Front brake hose
2. Rear brake hose
3. ABS warning light
4. Fail-safe relay
5. ECU (Electronic Control Unit)
6. Stop relay
7. Hydraulic Unit (HU)
8. Front brake hose
9. Front wheel sensor rotor
10.Front wheel sensor
11.Fuse boxes
12.ABS test coupler
13.Rear brake hose
14.Rear wheel sensor rotor
15.Rear wheel sensor
5SJ-28199-E1 7/11/02 11:03 AM Page 29
Page 39 of 116
3-22
INSTRUMENT AND CONTROL FUNCTIONS
3
EAU00330
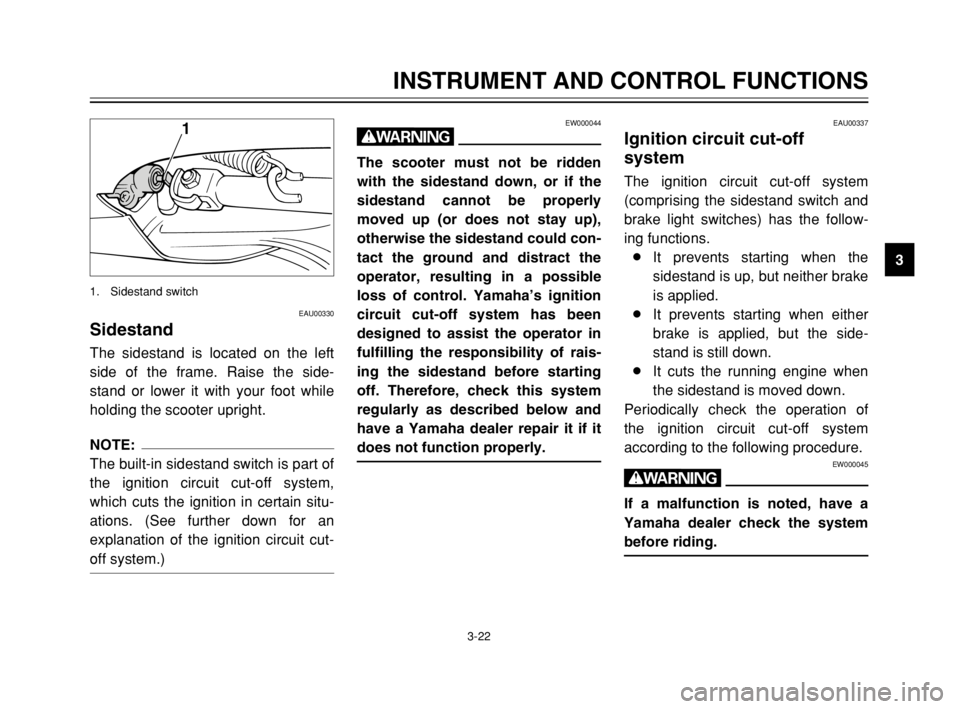
SidestandSidestandThe sidestand is located on the left
side of the frame. Raise the side-
stand or lower it with your foot while
holding the scooter upright.
NOTE:
The built-in sidestand switch is part of
the ignition circuit cut-off system,
which cuts the ignition in certain situ-
ations. (See further down for an
explanation of the ignition circuit cut-
off system.)
1
1. Sidestand switch
EAU00337
Ignition circuit cut-off
system
Ignition circuit cut-off systemThe ignition circuit cut-off system
(comprising the sidestand switch and
brake light switches) has the follow-
ing functions.
8It prevents starting when the
sidestand is up, but neither brake
is applied.
8It prevents starting when either
brake is applied, but the side-
stand is still down.
8It cuts the running engine when
the sidestand is moved down.
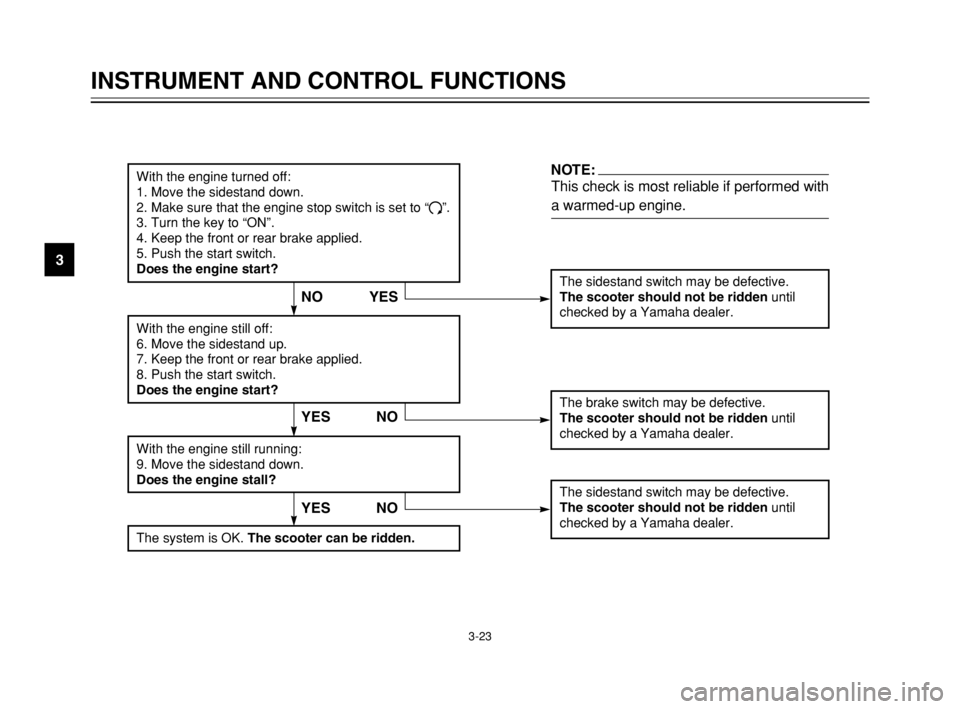
Periodically check the operation of
the ignition circuit cut-off system
according to the following procedure.
EW000045
w
If a malfunction is noted, have a
Yamaha dealer check the system
before riding.
EW000044
w
The scooter must not be ridden
with the sidestand down, or if the
sidestand cannot be properly
moved up (or does not stay up),
otherwise the sidestand could con-
tact the ground and distract the
operator, resulting in a possible
loss of control. Yamaha’s ignition
circuit cut-off system has been
designed to assist the operator in
fulfilling the responsibility of rais-
ing the sidestand before starting
off. Therefore, check this system
regularly as described below and
have a Yamaha dealer repair it if it
does not function properly.
5SJ-28199-E1 7/11/02 11:03 AM Page 37
Page 40 of 116
3-23
INSTRUMENT AND CONTROL FUNCTIONS
3
The sidestand switch may be defective.
The scooter should not be ridden until
checked by a Yamaha dealer.YES NO
With the engine turned off:
1. Move the sidestand down.
2. Make sure that the engine stop switch is set to “#”.
3. Turn the key to “ON”.
4. Keep the front or rear brake applied.
5. Push the start switch.
Does the engine start?
The brake switch may be defective.
The scooter should not be ridden until
checked by a Yamaha dealer.
With the engine still off:
6. Move the sidestand up.
7. Keep the front or rear brake applied.
8. Push the start switch.
Does the engine start?
With the engine still running:
9. Move the sidestand down.
Does the engine stall?
The sidestand switch may be defective.
The scooter should not be ridden until
checked by a Yamaha dealer.
NOTE:
This check is most reliable if performed with
a warmed-up engine.
YES NO
The system is OK. The scooter can be ridden.
YES NO
5SJ-28199-E1 7/11/02 11:03 AM Page 38