wheel YAMAHA MAJESTY 250 2003 Owners Manual
[x] Cancel search | Manufacturer: YAMAHA, Model Year: 2003, Model line: MAJESTY 250, Model: YAMAHA MAJESTY 250 2003Pages: 116, PDF Size: 2.07 MB
Page 20 of 116

3-3
EWA00069
w
When the ABS warning light
comes on or flashes while riding,
the brake system reverts to con-
ventional braking. Therefore, be
careful not to cause the wheel to
lock during emergency braking.
NOTE:
The ABS warning light may come on
while pushing the start switch and
while accelerating the engine with the
scooter on its centerstand, but this
does not indicate a malfunction.
EAU00063
High beam indicator light “&”High beam indicator lightThis indicator light comes on when
the high beam of the headlight is
switched on.
INSTRUMENT AND CONTROL FUNCTIONS
3
EAU03734
Oil change indicator light “7”Oil change indicator lightThis indicator light comes on at the
initial 1,000 km and every 3,000 km
thereafter to indicate that the engine
oil should be changed.
If the engine oil is changed before the
oil change indicator comes on (i.e.
before the periodic oil change interval
has been reached), the indicator light
must be reset after the oil change for
the next periodic oil change to be
indicated at the correct time. (See
page 6-17 for the resetting proce-
dure.)
The electrical circuit of the indicator
light can be checked according to the
following procedure.
1. Set the engine stop switch to “#”
and turn the key to “ON”.
2. Check that the indicator comes
on for a few seconds and then
goes off.
3. If the indicator light does not
come on, have a Yamaha dealer
check the electrical circuit.
NOTE:
The oil change indicator light may
flash when the engine is revved with
the scooter on the centerstand, but
this does not indicate a malfunction.
5SJ-28199-E1 7/11/02 11:03 AM Page 18
Page 30 of 116

3-13
EAU03631
ABSABSThe Yamaha ABS (Anti-lock Brake
System) features a dual electronic
control system, which acts on the
front and rear brakes independently.
The ABS securely controls wheel
lockup during emergency braking on
changing road surfaces and under
various weather conditions, thereby
maximizing tire adhesion and perfor-
mance while providing a smooth
braking action. The ABS is monitored
by an ECU (Electronic Control Unit),
which will have recourse to manual
braking if a malfunction occurs.
INSTRUMENT AND CONTROL FUNCTIONS
3
EW000020
w
8 8
The ABS performs best on
long braking distances.
8 8
On certain (rough or gravel)
roads, the braking distance
may be longer with than with-
out the ABS. Therefore, always
keep a sufficient distance to
the vehicle ahead to match the
riding speed.
NOTE:
8When the ABS is activated, the
brakes are operated in the usual
way. A pulsating action may be
felt at the brake levers, but this
does not indicate a malfunction.
8This ABS has a test mode which
allows the owner to experience
the pulsating at the brake levers
when the ABS is operating.
However, special tools are
required, so please consult your
Yamaha dealer when performing
this test.
5SJ-28199-E1 7/11/02 11:03 AM Page 28
Page 31 of 116
3-14
INSTRUMENT AND CONTROL FUNCTIONS
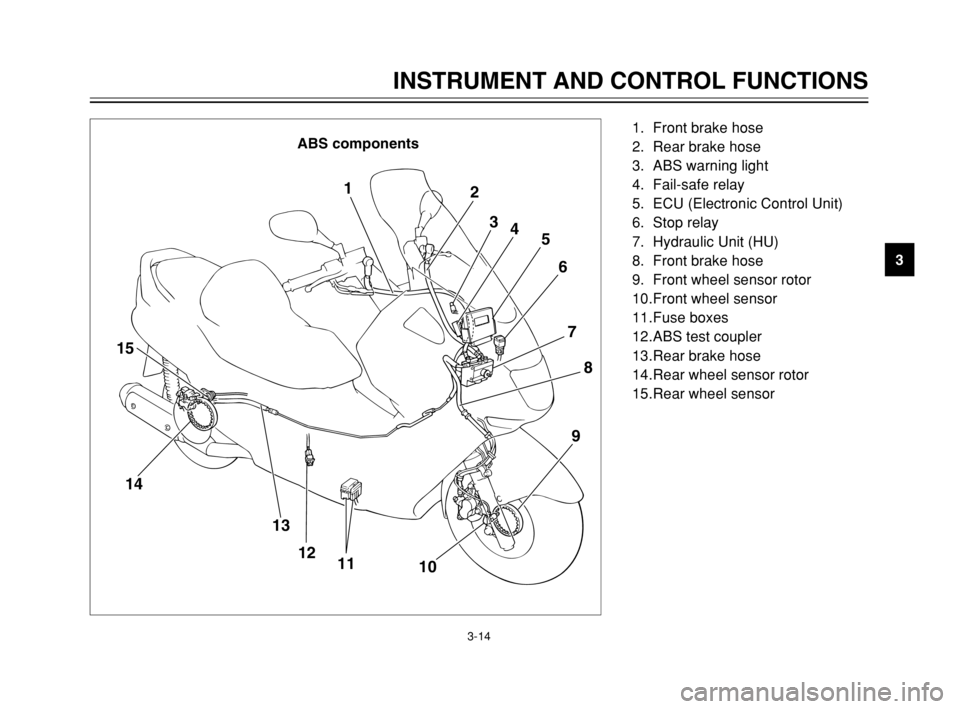
3 ABS components
1
2
3
4
5
6
7
8
9
10 11 12 13 14 15
1. Front brake hose
2. Rear brake hose
3. ABS warning light
4. Fail-safe relay
5. ECU (Electronic Control Unit)
6. Stop relay
7. Hydraulic Unit (HU)
8. Front brake hose
9. Front wheel sensor rotor
10.Front wheel sensor
11.Fuse boxes
12.ABS test coupler
13.Rear brake hose
14.Rear wheel sensor rotor
15.Rear wheel sensor
5SJ-28199-E1 7/11/02 11:03 AM Page 29
Page 43 of 116

4-2
PRE-OPERATION CHECKS
4
Rear brake•Check operation.
•If soft or spongy, have Yamaha dealer bleed hydraulic system.
•Check fluid level in reservoir.
•If necessary, add recommended brake fluid to specified level.
•Check hydraulic system for leakage.3-12, 6-27–6-30
Throttle grip•Make sure that operation is smooth.
•Check cable free play.
•If necessary, have Yamaha dealer adjust cable free play and lubricate cable and
grip housing.6-23, 6-31
Wheels and tires•Check for damage.
•Check tire condition and tread depth.
•Check air pressure.
•Correct if necessary.6-24–6-27
Brake levers•Make sure that operation is smooth.
•Lubricate lever pivoting points if necessary.3-11–3-12, 6-27, 6-31
Centerstand, sidestand•Make sure that operation is smooth.
•Lubricate pivots if necessary.6-31–6-32
Chassis fasteners•Make sure that all nuts, bolts and screws are properly tightened.
•Tighten if necessary.—
Instruments, lights, signals
and switches•Check operation.
•Correct if necessary.3-2–3-11, 6-37–6-42
Sidestand switch•Check operation of ignition circuit cut-off system.
•If system is defective, have Yamaha dealer check vehicle.3-22–3-23 ITEM CHECKS PAGE
5SJ-28199-E1 7/11/02 11:03 AM Page 41
Page 51 of 116
PERIODIC MAINTENANCE AND MINOR REPAIR
Owner’s tool kit ....................................................6-1
Periodic maintenance and lubrication chart .........6-3
Removing and installing the cowlings and
panel .................................................................6-6
Checking the spark plug ....................................6-12
Engine oil ...........................................................6-14
Final transmission oil .........................................6-18
Coolant ..............................................................6-19
Air filter and V-belt case air filter elements ........6-21
Air flow louver ....................................................6-23
Adjusting the throttle cable free play .................6-23
Adjusting the valve clearance ...........................6-23
Tires ...................................................................6-24
Cast wheels .......................................................6-26
Adjusting the front and rear brake lever
free play ..........................................................6-27
Checking the front and rear brake pads ............6-28
Checking the brake fluid level ............................6-29
Changing the brake fluid ....................................6-30
Checking and lubricating the cables ..................6-30
Checking and lubricating the throttle grip
and cable ........................................................6-31
Lubricating the front and rear brake levers ........6-31Checking and lubricating the centerstand
and sidestand .................................................6-31
Checking the front fork ......................................6-32
Checking the steering ........................................6-33
Checking the wheel bearings ............................6-33
Removing the battery cover ...............................6-34
Battery ...............................................................6-34
Replacing the fuses ...........................................6-36
Replacing a headlight bulb ................................6-37
Replacing a front turn signal light bulb ..............6-39
Replacing a rear turn signal light bulb ...............6-40
Replacing a tail/brake light bulb .........................6-40
Replacing the license plate light bulb ................6-41
Troubleshooting .................................................6-42
Troubleshooting charts ......................................6-43
6
5SJ-28199-E1 7/11/02 11:03 AM Page 49
Page 55 of 116

6-4
PERIODIC MAINTENANCE AND MINOR REPAIR
6
8*Brake hoses•Check for cracks or damage.√√√√ √
•Replace. (See NOTE on page 6-5.)Every 4 years
9
*Wheels•Check runout and for damage.√√√√
10
*Tires•Check tread depth and for damage.
•Replace if necessary.
•Check air pressure.
•Correct if necessary.√√√√ √
11
*Wheel bearings•Check bearing for looseness or damage.√√√√
12
*Steering bearings•Check bearing play and steering for roughness.√√√√√
•Lubricate with lithium-soap-based grease.Every 20,000 km
13
*Chassis fasteners•Make sure that all nuts, bolts and screws are properly tightened.√√√√ √
14 Sidestand, centerstand•Check operation.
•Lubricate.√√√√ √
15
*Sidestand switch•Check operation.√√√√√ √
16
*Front fork•Check operation and for oil leakage.√√√√
17
*Shock absorber
assemblies•Check operation and shock absorbers for oil leakage.√√√√
18
*Carburetor•Adjust engine idling speed.√√√√√ √
19 Engine oil•Change. (See page 3-3 and 6-17 for more information
about the oil change indicator light.)√When the oil change indicator light comes on
(every 3,000 km)
•Check oil level and vehicle for oil leakage.Every 3,000 km√ NO. ITEM CHECK OR MAINTENANCE JOBODOMETER READING (× 1,000 km)
ANNUAL
CHECK
1 10203040
5SJ-28199-E1 7/11/02 11:03 AM Page 53
Page 69 of 116
6-18
PERIODIC MAINTENANCE AND MINOR REPAIR
6
EAU04228
Final transmission oilFinal transmission oilThe final transmission case must be
checked for oil leakage before each
ride. If any leakage is found, have a
Yamaha dealer check and repair the
scooter. In addition, the final trans-
mission oil must be changed as fol-
lows at the intervals specified in the
periodic maintenance and lubrication
chart.
1. Start the engine, warm it up by
riding the scooter for several
minutes, and then stop the
engine.
2. Place the scooter on the center-
stand.
3. Place an oil pan under the final
transmission case to collect the
used oil.
EWA00062
w
8 8
Make sure that no foreign
material enters the final trans-
mission case.
8 8
Make sure that no oil gets on
the tire or wheel.
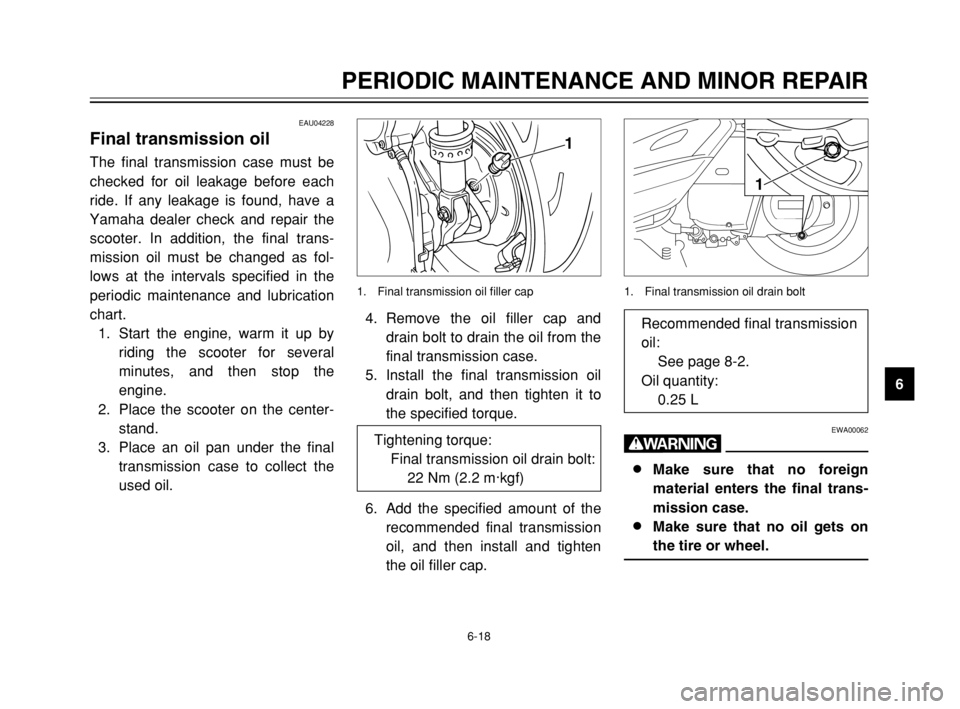
1
1. Final transmission oil drain bolt
4. Remove the oil filler cap and
drain bolt to drain the oil from the
final transmission case.
5. Install the final transmission oil
drain bolt, and then tighten it to
the specified torque.
6. Add the specified amount of the
recommended final transmission
oil, and then install and tighten
the oil filler cap.
1
1. Final transmission oil filler cap
Tightening torque:
Final transmission oil drain bolt:
22 Nm (2.2 m·kgf)
Recommended final transmission
oil:
See page 8-2.
Oil quantity:
0.25 L
5SJ-28199-E1 7/11/02 11:03 AM Page 67
Page 77 of 116

6-26
PERIODIC MAINTENANCE AND MINOR REPAIR
6
NOTE:
The tire tread depth limits may differ
from country to country. Always com-
ply with the local regulations.
Tire information
This scooter is equipped with tube-
less tires.
EAU03773
Cast wheelsWheelsTo maximize the performance, dura-
bility, and safe operation of your
scooter, note the following points
regarding the specified wheels.
8The wheel rims should be
checked for cracks, bends or
warpage before each ride. If any
damage is found, have a
Yamaha dealer replace the
wheel. Do not attempt even the
smallest repair to the wheel. A
deformed or cracked wheel must
be replaced.
8The wheel should be balanced
whenever either the tire or wheel
has been changed or replaced.
An unbalanced wheel can result
in poor performance, adverse
handling characteristics, and a
shortened tire life.
EAU00683
w
8 8
Have a Yamaha dealer replace
excessively worn tires.
Besides being illegal, operat-
ing the scooter with exces-
sively worn tires decreases
riding stability and can lead to
loss of control.
8 8
The replacement of all wheel
and brake related parts,
including the tires, should be
left to a Yamaha dealer, who
has the necessary profession-
al knowledge and experience.
FRONT
Manufacturer Size Model
IRC 110/90-12 64L MB67
MICHELIN 110/90-12 64L BOPPER
REAR
Manufacturer Size Model
IRC 130/70-12 62L MB67
MICHELIN 130/70-12 62L BOPPER
5SJ-28199-E1 7/11/02 11:03 AM Page 75
Page 84 of 116
6-33
PERIODIC MAINTENANCE AND MINOR REPAIR
6
EAU00794
Checking the steeringSteering, checkingWorn or loose steering bearings may
cause danger. Therefore, the opera-
tion of the steering must be checked
as follows at the intervals specified in
the periodic maintenance and lubrica-
tion chart.
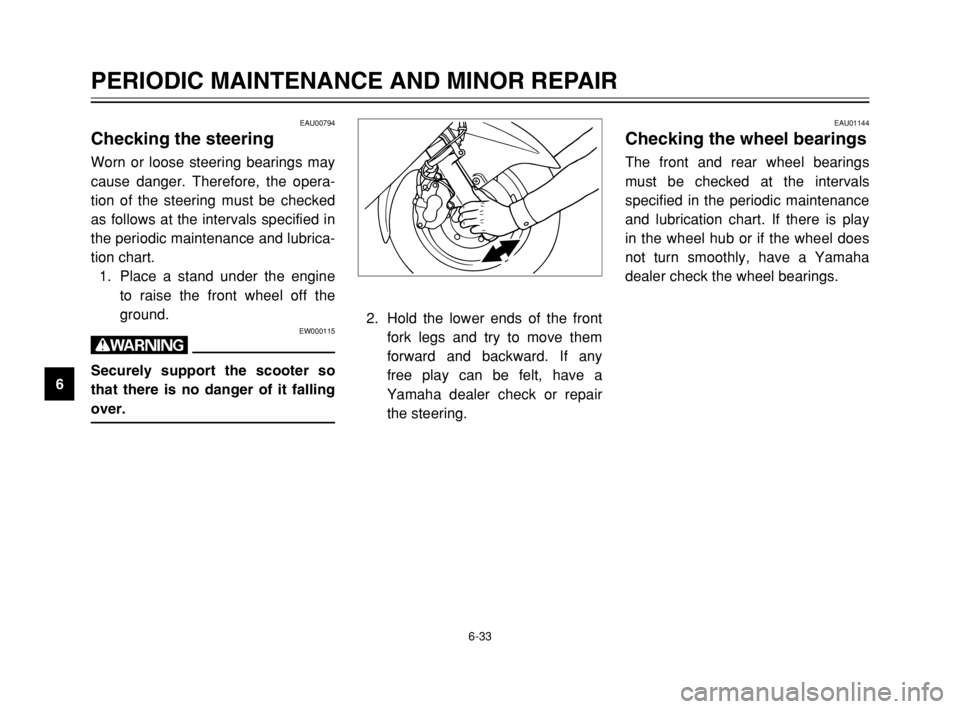
1. Place a stand under the engine
to raise the front wheel off the
ground.
EW000115
w
Securely support the scooter so
that there is no danger of it falling
over.
EAU01144
Checking the wheel bearingsWheel bearings, checkingThe front and rear wheel bearings
must be checked at the intervals
specified in the periodic maintenance
and lubrication chart. If there is play
in the wheel hub or if the wheel does
not turn smoothly, have a Yamaha
dealer check the wheel bearings.
2. Hold the lower ends of the front
fork legs and try to move them
forward and backward. If any
free play can be felt, have a
Yamaha dealer check or repair
the steering.
5SJ-28199-E1 7/11/02 11:03 AM Page 82
Page 98 of 116
7-1
EAU03434
SCOOTER CARE AND STORAGE
7
CareCareWhile the open design of a scooter
reveals the attractiveness of the tech-
nology, it also makes it more vulnera-
ble. Rust and corrosion can develop
even if high-quality components are
used. A rusty exhaust pipe may go
unnoticed on a car, however, it
detracts from the overall appearance
of a scooter. Frequent and proper
care does not only comply with the
terms of the warranty, but it will also
keep your scooter looking good,
extend its life and optimize its perfor-
mance.Before cleaning
1. Cover the muffler outlet with a
plastic bag after the engine has
cooled down.
2. Make sure that all caps and cov-
ers as well as all electrical cou-
plers and connectors, including
the spark plug cap, are tightly
installed.
3. Remove extremely stubborn dirt,
like oil burnt onto the crankcase,
with a degreasing agent and a
brush, but never apply such
products onto seals, gaskets and
wheel axles. Always rinse the dirt
and degreaser off with water.Cleaning
ECA00011
cC
8
8
Avoid using strong acidic
wheel cleaners, especially on
spoked wheels. If such prod-
ucts are used on hard-to-
remove dirt, do not leave the
cleaner on the affected area
any longer than instructed.
Also, thoroughly rinse the area
off with water, immediately dry
it, and then apply a corrosion
protection spray.
8 8
Improper cleaning can damage
windshields, cowlings, panels
and other plastic parts. Use
only a soft, clean cloth or
sponge with mild detergent
and water to clean plastic.
5SJ-28199-E1 7/11/02 11:03 AM Page 96