chain YAMAHA MT-07 2020 Owners Manual
[x] Cancel search | Manufacturer: YAMAHA, Model Year: 2020, Model line: MT-07, Model: YAMAHA MT-07 2020Pages: 100, PDF Size: 5.73 MB
Page 6 of 100

Table of contentsSafety information ............................ 1-1
Description ....................................... 2-1
Left view ......................................... 2-1
Right view ....................................... 2-2
Controls and instruments ............... 2-3
Instrument an d control functions ... 3-1
Immobilizer system......................... 3-1
Main switch/steering lock............... 3-2
Indicator lights and warning lights............................................ 3-3
Multi-function meter unit ................ 3-6
Handlebar switches ...................... 3-12
Clutch lever .................................. 3-13
Shift pedal .................................... 3-13
Brake lever.................................... 3-13
Brake pedal .................................. 3-14
ABS .............................................. 3-14
Fuel tank cap ................................ 3-15
Fuel ............................................... 3-16
Fuel tank overflow hose ............... 3-17
Catalytic converter ....................... 3-18
Seats ............................................ 3-19
Helmet holding cable.................... 3-20
Storage compartment .................. 3-21
Adjusting the shock absorber assembly ................................... 3-22
Luggage strap holders ................. 3-24
Auxiliary DC connector ................. 3-24
Sidestand ..................................... 3-25 Ignition circuit cut-off system ....... 3-25
For your safety – pre-operation
checks ............................................... 4-1
Operation an d important ri din g
points ................................................. 5-1
Starting the engine .......................... 5-1
Shifting ............................................ 5-2
Tips for reducing fuel consumption ................................ 5-3
Engine break-in ............................... 5-4
Parking ............................................ 5-4
Perio dic maintenance an d
a d justment ........................................ 6-1
Tool kit ............................................ 6-2
Periodic maintenance charts .......... 6-3
Periodic maintenance chart for the emission control system .............. 6-3
General maintenance and lubrication chart ........................... 6-5
Checking the spark plugs ............... 6-9
Canister ........................................ 6-10
Engine oil and oil filter cartridge.... 6-10
Why Yamalube .............................. 6-13
Coolant.......................................... 6-14
Replacing the air filter element and cleaning the check hose..... 6-15
Checking the throttle grip free play ............................................ 6-16 Valve clearance............................. 6-16
Tires .............................................. 6-16
Cast wheels .................................. 6-19
Adjusting the clutch lever free
play ............................................ 6-19
Checking the brake lever free play ............................................ 6-20
Brake light switches ..................... 6-20
Checking the front and rear
brake pads ................................ 6-21
Checking the brake fluid level ...... 6-21
Changing the brake fluid .............. 6-23
Drive chain slack........................... 6-23
Cleaning and lubricating the
drive chain ................................. 6-25
Checking and lubricating the cables ........................................ 6-25
Checking and lubricating the throttle grip and cable ............... 6-26
Checking and lubricating the
brake and shift pedals............... 6-26
Checking and lubricating the brake and clutch levers ............. 6-27
Checking and lubricating the sidestand................................... 6-27
Lubricating the swingarm
pivots......................................... 6-28
Checking the front fork ................. 6-28
Checking the steering................... 6-29
Checking the wheel bearings ....... 6-29
Battery .......................................... 6-29UB4CE1E0.book Page 1 Friday, August 3, 2018 10:57 AM
Page 43 of 100

For your safety – pre-operation checks
4-2
4
Rear brake • Check operation.
• If soft or spongy, have Yamaha dealer bleed hydraulic system.
• Check brake pads for wear.
• Replace if necessary.
• Check fluid level in reservoir.
• If necessary, add specified brake fluid to specified level.
• Check hydraulic system for leakage. 6-21, 6-21
Clutch • Check operation.
• Lubricate cable if necessary.
• Check lever free play.
• Adjust if necessary.
6-19
Throttle grip • Make sure that operation is smooth.
• Check throttle grip free play.
• If necessary, have Yamaha dealer adjust throttle grip free play and lubricate ca-
ble and grip housing. 6-16, 6-26
Control ca bles • Make sure that operation is smooth.
• Lubricate if necessary. 6-25
Drive chain • Check chain slack.
• Adjust if necessary.
• Check chain condition.
• Lubricate if necessary.
6-23, 6-25
Wheels an d tires • Check for damage.
• Check tire condition and tread depth.
• Check air pressure.
• Correct if necessary.
6-16, 6-19
Brake an d shift pe dals • Make sure that operation is smooth.
• Lubricate pedal pivoting points if necessary. 6-26
Brake an d clutch levers • Make sure that operation is smooth.
• Lubricate lever pivoting points if necessary.
6-27
Si destan d • Make sure that operation is smooth.
• Lubricate pivot if necessary.
6-27
ITEM CHECKS PAGE
UB4CE1E0.book Page 2 Friday, August 3, 2018 10:57 AM
Page 54 of 100

Periodic maintenance an d a djustment
6-6
6
11 *Wheel bearin gs • Check bearing for looseness or
damage. √√√√
12 *Swin
garm pivot
b earin gs • Check operation and for exces-
sive play. √√√√
• Lubricate with lithium-soap- based grease. Every 50000 km (30000 mi)
13 Drive chain • Check chain slack, alignment and
condition.
• Adjust and lubricate chain with a special O-ring chain lubricant
thoroughly. Every 1000 km (600 mi) and after washing the motorcycle, riding in the rain or
riding in wet areas
14 *Steerin g b earin gs • Check bearing assemblies for
looseness. √√ √
• Moderately repack with lithium- soap-based grease. √√
15 *Chassis fasteners • Make sure that all nuts, bolts and
screws are properly tightened. √√√√√
16 Brake lever pivot
shaft
• Lubricate with silicone grease.
√√√√√
17 Brake ped
al pivot
shaft • Lubricate with lithium-soap-
based grease. √√√√√
18 Clutch lever pivot
shaft • Lubricate with lithium-soap-
based grease. √√√√√
19 Shift pe
dal pivot
shaft • Lubricate with lithium-soap-
based grease. √√√√√
NO. ITEM CHECK OR MAINTENANCE JOB
ODOMETER READING
ANNUAL
CHECK
1000 km
(600 mi) 10000 km
(6000 mi) 20000 km
(12000 mi) 30000 km
(18000 mi) 40000 km
(24000 mi)UB4CE1E0.book Page 6 Friday, August 3, 2018 10:57 AM
Page 71 of 100

Periodic maintenance an d a djustment
6-23
6
EAU22734
Chan gin g the brake flui dHave a Yamaha dealer change the
brake fluid every 2 years. In addition,
have the seals of the master cylinders
and brake calipers, as well as the brake
hoses replaced at the intervals listed
below or sooner if they are damaged or
leaking.
Brake seals: every 2 years
Brake hoses: every 4 years
EAU22762
Drive chain slackThe drive chain slack should be
checked before each ride and adjusted
if necessary.
EAU60046
To check the drive chain slack
1. Place the motorcycle on the side- stand.TIPWhen checking and adjusting the drive
chain slack, there should be no weight
on the motorcycle.2. Shift the transmission into the neutral position.
3. Push down on the drive chain un- der the end of the drive chain
guard.
4. Measure distance A between the drive chain guard and the center
of the chain as shown. 5. If distance A is incorrect, adjust it
as follows. NOTICE: Improper
d rive chain slack will overloa d
the en gine as well as other vital
parts of the motorcycle an d can
lea d to chain slippa ge or b reak-
a g e. If distance A is more than
58.0 mm (2.28 in), the chain can
d ama ge the frame, swin garm,
an d other parts. To prevent this
from occurrin g, keep the d rive
chain slack within the specifie d
limits.
[ECA23070]
1. Drive chain guard
2. Distance A
Distance A: 51.0–56.0 mm (2.01–2.20 in)
2
1
UB4CE1E0.book Page 23 Friday, August 3, 2018 10:57 AM
Page 72 of 100
Periodic maintenance an d a djustment
6-24
6
EAU59921
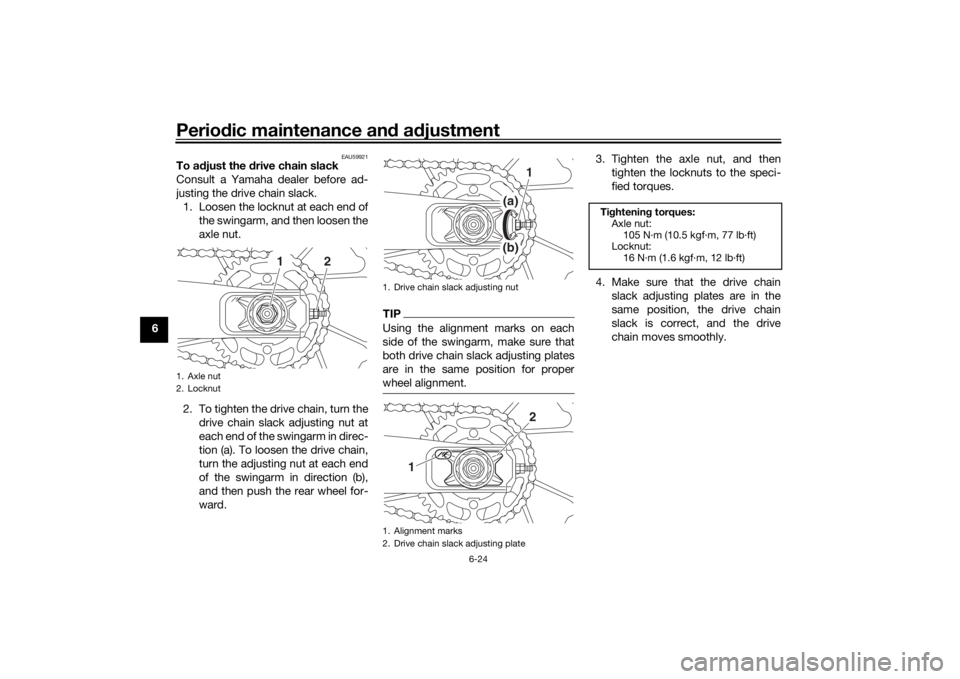
To a djust the d rive chain slack
Consult a Yamaha dealer before ad-
justing the drive chain slack. 1. Loosen the locknut at each end of the swingarm, and then loosen the
axle nut.
2. To tighten the drive chain, turn the drive chain slack adjusting nut at
each end of the swingarm in direc-
tion (a). To loosen the drive chain,
turn the adjusting nut at each end
of the swingarm in direction (b),
and then push the rear wheel for-
ward.
TIPUsing the alignment marks on each
side of the swingarm, make sure that
both drive chain slack adjusting plates
are in the same position for proper
wheel alignment.
3. Tighten the axle nut, and thentighten the locknuts to the speci-
fied torques.
4. Make sure that the drive chain slack adjusting plates are in the
same position, the drive chain
slack is correct, and the drive
chain moves smoothly.
1. Axle nut
2. Locknut
2
1
1. Drive chain slack adjusting nut
1. Alignment marks
2. Drive chain slack adjusting plate
1
(a)(b)
2
1
Tightenin g torques:
Axle nut: 105 N·m (10.5 kgf·m, 77 lb·ft)
Locknut:
16 N·m (1.6 kgf·m, 12 lb·ft)
UB4CE1E0.book Page 24 Friday, August 3, 2018 10:57 AM
Page 73 of 100
Periodic maintenance an d a djustment
6-25
6
EAU23026
Cleanin g an d lu bricatin g the
d rive chainThe drive chain must be cleaned and
lubricated at the intervals specified in
the periodic maintenance and lubrica-
tion chart, otherwise it will quickly wear
out, especially when riding in dusty or
wet areas. Service the drive chain as
follows.NOTICE
ECA10584
The drive chain must b e lubricate d
after washin g the motorcycle, ri din g
in the rain or ri din g in wet areas.1. Clean the drive chain with kero-
sene and a small soft brush.
NOTICE: To prevent damag ing
the O-rin gs, do not clean the
d rive chain with steam cleaners,
hi gh-pressure washers or inap-
propriate solvents.
[ECA11122]
2. Wipe the drive chain dry.
3. Thoroughly lubricate the drive chain with a special O-ring chain
lubricant. NOTICE: Do not use
en gine oil or any other lu bri-
cants for the drive chain, as they may contain su
bstances that
coul d damag e the O-rin gs.
[ECA11112] EAU23098
Checkin
g an d lu bricatin g the
ca blesThe operation of all control cables and
the condition of the cables should be
checked before each ride, and the ca-
bles and cable ends should be lubri-
cated if necessary. If a cable is
damaged or does not move smoothly,
have a Yamaha dealer check or re-
place it. WARNING! Dama ge to the
outer housin g of cab les may result
in internal rustin g an d cause inter-
ference with ca ble movement. Re-
place damag ed cab les as soon as
possi ble to prevent unsafe con di-
tions.
[EWA10712]
Recommen ded lu bricant:
Yamaha cable lubricant or other
suitable cable lubricant
UB4CE1E0.book Page 25 Friday, August 3, 2018 10:57 AM
Page 89 of 100

Motorcycle care and stora ge
7-2
7
chemicals such as, solvents,
g
asoline, rust removers, b rake
flui d, or antifreeze, etc.
Before washin g
1. Park the vehicle out of direct sun- light and allow it to cool. This will
help avoid water spots.
2. Make sure all caps, covers, elec- trical couplers and connectors are
tightly installed.
3. Cover the muffler end with a plas- tic bag and a strong rubber band.
4. Pre-soak stubborn stains like in- sects or bird droppings with a wet
towel for a few minutes.
5. Remove road grime and oil stains with a quality degreasing agent
and a plastic-bristle brush or
sponge. NOTICE: Do not use
d eg reasin g a gent on areas re-
quirin g lu brication such as
seals, gaskets, an d wheel axles.
Follow pro duct instructions.
[ECA26290]
Washin g
1. Rinse off any degreaser and spray down the vehicle with a garden
hose. Use only enough pressure
to do the job. Avoid spraying wa-
ter directly into the muffler, instru-
ment panel, air inlet, or other inner
areas such as underseat storage
compartments.
2. Wash the vehicle with a quality au- tomotive-type detergent mixed
with cool water and a soft, clean
towel or sponge. Use an old tooth-
brush or plastic-bristle brush for
hard-to-reach places. NOTICE:
Use col d water if the vehicle has
b een exposed to salt. Warm wa-
ter will increase salt’s corrosive
properties.
[ECA26301]
3. For windshield-equipped vehicles: Clean the windshield with a soft
towel or sponge dampened with
water and a pH neutral detergent.
If necessary, use a high-quality
windshield cleaner or polish for
motorcycles. NOTICE: Never use
any stron g chemicals to clean
the wind shield. Additionally,
some cleanin g compoun ds for plastic may scratch the win
d-
shiel d, so b e sure to test all
cleanin g pro ducts before gen-
eral application.
[ECA26310]
4. Rinse off thoroughly with clean water. Be sure to remove all deter-
gent residues, as they can be
harmful to plastic parts.
After washin g
1. Dry the vehicle with a chamois or absorbent towel, preferably mi-
crofiber terrycloth.
2. For drive chain-equipped models: Dry and then lubricate the drive
chain to prevent rust.
3. Use a chrome polish to shine chrome, aluminum, and stainless
steel parts. Often the thermally in-
duced discoloring of stainless
steel exhaust systems can be re-
moved through polishing.
4. Apply a corrosion protection spray on all metal parts including
chrome or nickel-plated surfaces.
WARNING! Do not apply sili- cone or oil spray to seats, han d
g rips, ru bber foot pe gs or tire
trea ds. Otherwise these parts
UB4CE1E0.book Page 2 Friday, August 3, 2018 10:57 AM
Page 97 of 100

10-1
10
Index
AABS....................................................... 3-14
ABS warning light ................................... 3-5
Air filter element and check hose,
replacing and cleaning ....................... 6-15
Auxiliary DC connector ......................... 3-24
Auxiliary light bulb, replacing ............... 6-34BBattery .................................................. 6-29
Brake and clutch levers, checking and lubricating ................................... 6-27
Brake and shift pedals, checking and
lubricating........................................... 6-26
Brake fluid, changing............................ 6-23
Brake fluid level, checking.................... 6-21
Brake lever............................................ 3-13
Brake lever free play, checking ............ 6-20
Brake light switches ............................. 6-20
Brake pedal .......................................... 3-14
Brake/tail light....................................... 6-34CCables, checking and lubricating ......... 6-25
Canister ................................................ 6-10
Care ........................................................ 7-1
Catalytic converter ............................... 3-18
Clutch lever........................................... 3-13
Clutch lever free play, adjusting ........... 6-19
Coolant ................................................. 6-14
Coolant temperature warning light ......... 3-4DData recording, vehicle........................... 9-2
Diagnostic connector ............................. 9-2
Dimmer switch...................................... 3-12
Drive chain, cleaning and lubricating ... 6-25 Drive chain slack .................................. 6-23
EEngine break-in ...................................... 5-4
Engine oil and oil filter cartridge........... 6-10
Engine serial number ............................. 9-1
Engine trouble warning light .................. 3-4FFront and rear brake pads, checking ... 6-21
Front fork, checking ............................. 6-28
Fuel ...................................................... 3-16
Fuel consumption, tips for reducing ...... 5-3
Fuel tank cap........................................ 3-15
Fuel tank overflow hose ....................... 3-17
Fuses, replacing ................................... 6-31HHandlebar switches ............................. 3-12
Hazard switch ...................................... 3-12
Headlight bulb, replacing ..................... 6-32
Helmet holding cable ........................... 3-20
High beam indicator light ....................... 3-4
Horn switch .......................................... 3-12IIdentification numbers ........................... 9-1
Ignition circuit cut-off system .............. 3-25
Immobilizer system ................................ 3-1
Immobilizer system indicator light ......... 3-5
Indicator lights and warning lights ......... 3-3LLicense plate light bulb, replacing ....... 6-35
Luggage strap holders ......................... 3-24MMain switch/steering lock ...................... 3-2
Maintenance and lubrication, periodic... 6-5
Maintenance, emission control
system .................................................. 6-3
Matte color, caution................................ 7-1
Model label ............................................. 9-1
Multi-function meter unit ........................ 3-6
NNeutral indicator light ............................. 3-4OOil pressure warning light ....................... 3-4PParking.................................................... 5-4
Part locations.......................................... 2-1
Pass switch........................................... 3-12SSafety information................................... 1-1
Seats ..................................................... 3-19
Shifting.................................................... 5-2
Shift pedal............................................. 3-13
Shock absorber assembly, adjusting ... 3-22
Sidestand.............................................. 3-25
Sidestand, checking and lubricating .... 6-27
Spark plugs, checking ............................ 6-9
Specifications ......................................... 8-1
Start/Engine stop switch ...................... 3-12
Starting the engine ................................. 5-1
Steering, checking ................................ 6-29
Storage ................................................... 7-3
Storage compartment........................... 3-21
Supporting the motorcycle ................... 6-36
Swingarm pivots, lubricating ................ 6-28TThrottle grip and cable, checking and lubricating ........................................... 6-26
Throttle grip free play, checking ........... 6-16
UB4CE1E0.book Page 1 Friday, August 3, 2018 10:57 AM