engine oil YAMAHA MT-10 2020 User Guide
[x] Cancel search | Manufacturer: YAMAHA, Model Year: 2020, Model line: MT-10, Model: YAMAHA MT-10 2020Pages: 108, PDF Size: 9.22 MB
Page 69 of 108
Periodic maintenance and adjustment7-11
1
2
3
4
5
678
9
10
11
12
rial enters the crankcase.
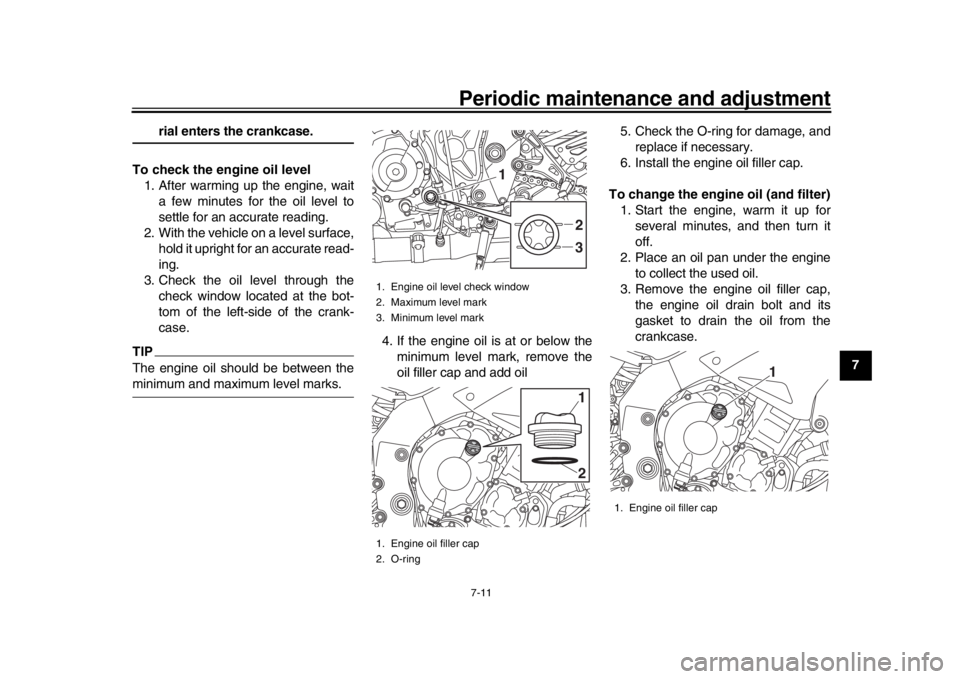
To check the engine oil level 1. After warming up the engine, wait a few minutes for the oil level to
settle for an accurate reading.
2. With the vehicle on a level surface, hold it upright for an accurate read-
ing.
3. Check the oil level through the check window located at the bot-
tom of the left-side of the crank-
case.
TIPThe engine oil should be between theminimum and maximum level marks. 4. If the engine oil is at or below the
minimum level mark, remove the
oil filler cap and add oil 5. Check the O-ring for damage, and
replace if necessary.
6. Install the engine oil filler cap.
To change the engine oil (and filter) 1. Start the engine, warm it up for several minutes, and then turn it
off.
2. Place an oil pan under the engine to collect the used oil.
3. Remove the engine oil filler cap, the engine oil drain bolt and its
gasket to drain the oil from the
crankcase.
1. Engine oil level check window
2. Maximum level mark
3. Minimum level mark
1. Engine oil filler cap
2. O-ring
2
1
312
1. Engine oil filler cap
1
B67-9-E4.book 11 ページ 2019年7月19日 金曜日 午後4時23分
Page 70 of 108
Periodic maintenance and adjustment
7-12
1
2
3
4
5
67
8
9
10
11
12
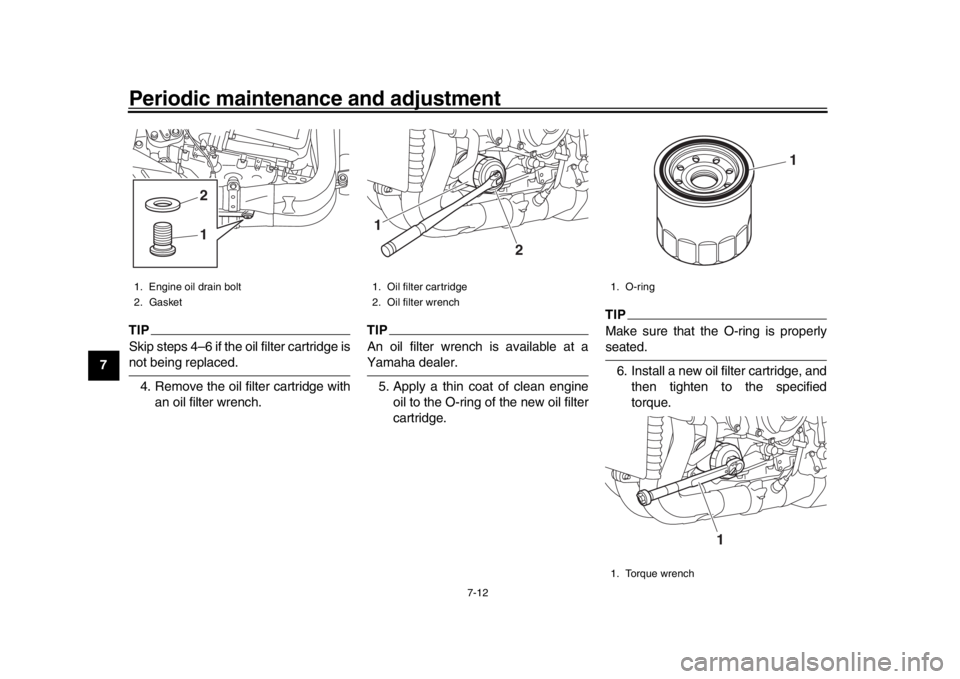
TIPSkip steps 4–6 if the oil filter cartridge isnot being replaced. 4. Remove the oil filter cartridge with an oil filter wrench.
TIPAn oil filter wrench is available at aYamaha dealer.
5. Apply a thin coat of clean engine oil to the O-ring of the new oil filter
cartridge.
TIPMake sure that the O-ring is properlyseated.
6. Install a new oil filter cartridge, and then tighten to the specified
torque.
1. Engine oil drain bolt
2. Gasket
12
1. Oil filter cartridge
2. Oil filter wrench1
2
1. O-ring
1. Torque wrench
1
1
B67-9-E4.book 12 ページ 2019年7月19日 金曜日 午後4時23分
Page 71 of 108
Periodic maintenance and adjustment7-13
1
2
3
4
5
678
9
10
11
12
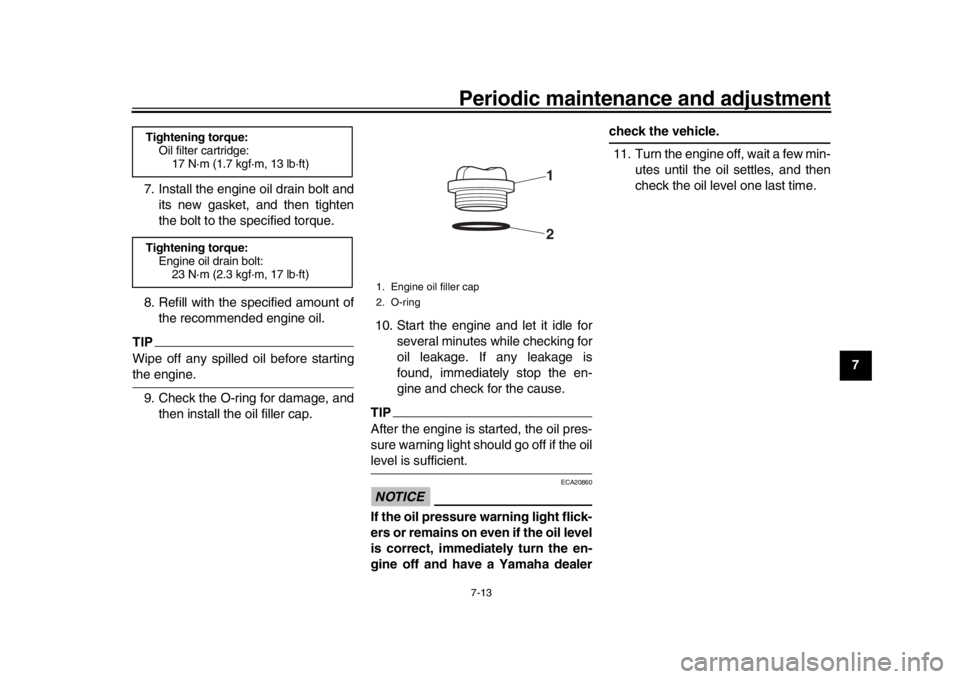
7. Install the engine oil drain bolt and
its new gasket, and then tighten
the bolt to the specified torque.
8. Refill with the specified amount of the recommended engine oil.
TIPWipe off any spilled oil before startingthe engine.
9. Check the O-ring for damage, and then install the oil filler cap. 10. Start the engine and let it idle for
several minutes while checking for
oil leakage. If any leakage is
found, immediately stop the en-
gine and check for the cause.
TIPAfter the engine is started, the oil pres-
sure warning light should go off if the oillevel is sufficient.NOTICE
ECA20860
If the oil pressure warning light flick-
ers or remains on even if the oil level
is correct, immediately turn the en-
gine off and have a Yamaha dealer
check the vehicle.
11. Turn the engine off, wait a few min- utes until the oil settles, and then
check the oil level one last time.
Tightening torque:Oil filter cartridge: 17 N·m (1.7 kgf·m, 13 lb·ft)
Tightening torque: Engine oil drain bolt: 23 N·m (2.3 kgf·m, 17 lb·ft)
1. Engine oil filler cap
2. O-ring
12
B67-9-E4.book 13 ページ 2019年7月19日 金曜日 午後4時23分
Page 72 of 108
Periodic maintenance and adjustment
7-14
1
2
3
4
5
67
8
9
10
11
12
EAU85450
Why YamalubeYAMALUBE oil is a Genuine YAMAHA
Part born of the engineers’ passion and
belief that engine oil is an important liq-
uid engine component. We form teams
of specialists in the fields of mechanical
engineering, chemistry, electronics and
track testing, and have them develop
the engine together with the oil it will
use. Yamalube oils take full advantage
of the base oil’s qualities and blend in
the ideal balance of additives to make
sure the final oil clears our performance
standards. Thus, Yamalube mineral,
semisynthetic and synthetic oils have
their own distinct characters and value.
Yamaha’s experience gained over
many years of research and develop-
ment into oil since the 1960’s helps
make Yamalube the best choice for
your Yamaha engine.
EAUS1203
CoolantThe coolant level should be checked
regularly. In addition, the coolant must
be changed at the intervals specified in
the periodic maintenance chart.TIPIf genuine Yamaha coolant is not avail-
able, use an ethylene glycol antifreeze
containing corrosion inhibitors for alu-
minum engines and mix with distilledwater at a 1:1 ratio.
EAU20097
To check the coolant level
Since the coolant level varies with en-
gine temperature, check when the en-
gine is cold. 1. Park the vehicle on a level surface.
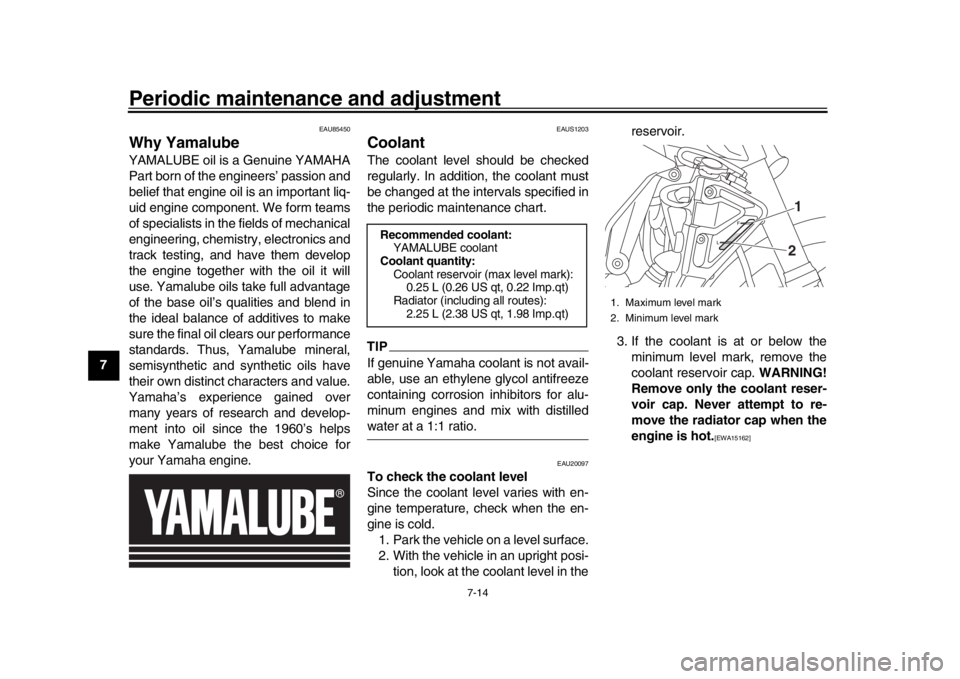
2. With the vehicle in an upright posi- tion, look at the coolant level in the reservoir.
3. If the coolant is at or below the minimum level mark, remove the
coolant reservoir cap. WARNING!
Remove only the coolant reser-
voir cap. Never attempt to re-
move the radiator cap when the
engine is hot.
[EWA15162]
Recommended coolant: YAMALUBE coolant
Coolant quantity: Coolant reservoir (max level mark):0.25 L (0.26 US qt, 0.22 Imp.qt)
Radiator (including all routes): 2.25 L (2.38 US qt, 1.98 Imp.qt)
1. Maximum level mark
2. Minimum level mark
21
B67-9-E4.book 14 ページ 2019年7月19日 金曜日 午後4時23分
Page 82 of 108
Periodic maintenance and adjustment
7-24
1
2
3
4
5
67
8
9
10
11
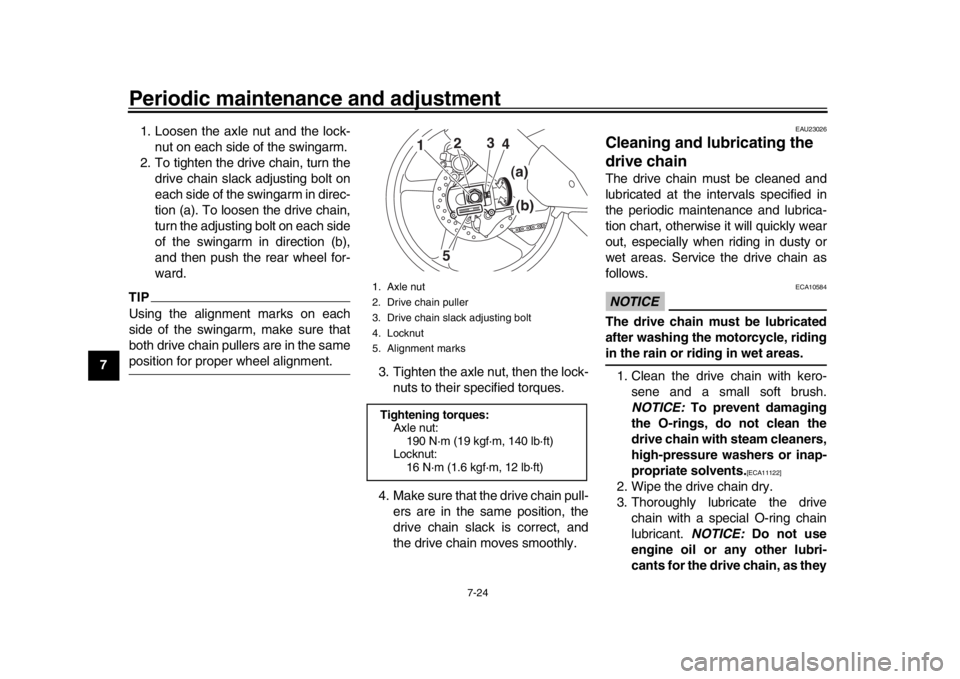
12 1. Loosen the axle nut and the lock-
nut on each side of the swingarm.
2. To tighten the drive chain, turn the drive chain slack adjusting bolt on
each side of the swingarm in direc-
tion (a). To loosen the drive chain,
turn the adjusting bolt on each side
of the swingarm in direction (b),
and then push the rear wheel for-
ward.
TIPUsing the alignment marks on each
side of the swingarm, make sure that
both drive chain pullers are in the sameposition for proper wheel alignment. 3. Tighten the axle nut, then the lock-
nuts to their specified torques.
4. Make sure that the drive chain pull- ers are in the same position, the
drive chain slack is correct, and
the drive chain moves smoothly.
EAU23026
Cleaning and lubricating the
drive chainThe drive chain must be cleaned and
lubricated at the intervals specified in
the periodic maintenance and lubrica-
tion chart, otherwise it will quickly wear
out, especially when riding in dusty or
wet areas. Service the drive chain as
follows.NOTICE
ECA10584
The drive chain must be lubricated
after washing the motorcycle, ridingin the rain or riding in wet areas.
1. Clean the drive chain with kero- sene and a small soft brush.
NOTICE: To prevent damaging
the O-rings, do not clean the
drive chain with steam cleaners,
high-pressure washers or inap-
propriate solvents.
[ECA11122]
2. Wipe the drive chain dry.
3. Thoroughly lubricate the drive chain with a special O-ring chain
lubricant. NOTICE: Do not use
engine oil or any other lubri-
cants for the drive chain, as they
1. Axle nut
2. Drive chain puller
3. Drive chain slack adjusting bolt
4. Locknut
5. Alignment marksTightening torques: Axle nut:190 N·m (19 kgf·m, 140 lb·ft)
Locknut: 16 N·m (1.6 kgf·m, 12 lb·ft)
1
2 3
45
(a)
(b)
B67-9-E4.book 24 ページ 2019年7月19日 金曜日 午後4時23分
Page 97 of 108
![YAMAHA MT-10 2020 User Guide Motorcycle care and storage
8-3
1
2
3
4
5
6
789
10
11
12
operating the vehicle.
[EWA20650]
5. Treat rubber, vinyl, and unpainted
plastic parts with a suitable care
product.
6. Touch up minor paint dam YAMAHA MT-10 2020 User Guide Motorcycle care and storage
8-3
1
2
3
4
5
6
789
10
11
12
operating the vehicle.
[EWA20650]
5. Treat rubber, vinyl, and unpainted
plastic parts with a suitable care
product.
6. Touch up minor paint dam](/img/51/50902/w960_50902-96.png)
Motorcycle care and storage
8-3
1
2
3
4
5
6
789
10
11
12
operating the vehicle.
[EWA20650]
5. Treat rubber, vinyl, and unpainted
plastic parts with a suitable care
product.
6. Touch up minor paint damage caused by stones, etc.
7. Wax all painted surfaces using a non-abrasive wax or use a detail
spray for motorcycles.
8. When finished cleaning, start the engine and let it idle for several
minutes to help dry any remaining
moisture.
9. If the headlight lens has fogged up, start the engine and turn on the
headlight to help remove the mois-
ture.
10. Let the vehicle dry completely be- fore storing or covering it.NOTICE
ECA26320
Do not apply wax to rubber or
unpainted plastic parts.
Do not use abrasive polishing
compounds as they will wear
away the paint.
Apply sprays and wax sparing-ly. Wipe off excess afterwards.
WARNING
EWA20660
Contaminants left on the brakes or
tires can cause loss of control.
Make sure there is no lubricant
or wax on the brakes or tires.
If necessary, wash the tires with
warm water and a mild deter-
gent.
If necessary, clean the brake
discs and pads with brake
cleaner or acetone.
Before riding at higher speeds,
test the vehicle’s braking perfor-mance and cornering behavior.
EAU83450
Cleaning the titanium muffler
This model is equipped with a titanium
muffler which requires special care.
Use only a soft cloth or sponge and
mild detergent with water to clean the
muffler. This should remove finger-
prints and other oil stains. If necessary,
an alkaline pH cleaning product and
soft brush may be used. However, do
not use abrasive compounds or special
treatments to clean the muffler, as
these will wear away the protective fin- ish.
TIPThe thermally induced discoloring of
the exhaust pipe leading into the titani-
um muffler is normal and cannot be re-moved.
B67-9-E4.book 3 ページ 2019年7月19日 金曜日 午後4時23分
Page 98 of 108
Motorcycle care and storage
8-4
1
2
3
4
5
6
78
9
10
11
12
EAU83472
StorageAlways store the vehicle in a cool, dry
place. If necessary, protect it against
dust with a porous cover. Be sure the
engine and the exhaust system are
cool before covering the vehicle. If the
vehicle often sits for weeks at a time
between uses, the use of a quality fuel
stabilizer is recommended after each
fill-up.NOTICE
ECA21170
Storing the vehicle in a poorly
ventilated room or covering it
with a tarp, while it is still wet,
will allow water and humidity to
seep in and cause rust.
To prevent corrosion, avoid
damp cellars, stables (because
of the presence of ammonia)
and areas where strong chemi-cals are stored.
Long term storage
Before storing the vehicle long term (60
days or more): 1. Make all necessary repairs and perform any outstanding mainte-
nance.
2. Follow all instructions in the Care section of this chapter.
3. Fill up the fuel tank, adding fuel stabilizer according to product in-
structions. Run the engine for 5
minutes to distribute treated fuel
through the fuel system.
4. For vehicles equipped with a fuel cock: Turn the fuel cock lever to
the off position.
5. For vehicles with a carburetor: To prevent fuel deposits from building
up, drain the fuel in the carburetor
float chamber into a clean contain-
er. Retighten the drain bolt and
pour the fuel back into the fuel
tank.
6. Use a quality engine fogging oil ac- cording to product instructions to
protect internal engine compo-
nents from corrosion. If engine fog-
ging oil is not available, perform
the following steps for each cylin-
der:
a. Remove the spark plug cap and spark plug.
b. Pour a teaspoonful of engine oil into the spark plug bore.
c. Install the spark plug cap onto the spark plug, and then place
the spark plug on the cylinder
head so that the electrodes are
grounded. (This will limit spark-
ing during the next step.)
d. Turn the engine over several times with the starter. (This will
coat the cylinder wall with oil.)
WARNING! To prevent dam-
age or injury from sparking,
make sure to ground the
spark plug electrodes while
turning the engine
over.
[EWA10952]
e. Remove the spark plug capfrom the spark plug, and then
install the spark plug and the
spark plug cap.
7. Lubricate all control cables, pivots, levers and pedals, as well as the
sidestand and centerstand (if
equipped).
8. Check and correct the tire air pres- sure, and then lift the vehicle so
that all wheels are off the ground.
Otherwise, turn the wheels a little
once a month in order to prevent
B67-9-E4.book 4 ページ 2019年7月19日 金曜日 午後4時23分
Page 100 of 108
9-1
1
2
3
4
5
6
7
89
10
11
12
Specifications
EAU84922
Dimensions:Overall length: 2095 mm (82.5 in)
Overall width: 800 mm (31.5 in)
Overall height: 1110 mm (43.7 in)
Seat height:
825 mm (32.5 in)
Wheelbase: 1400 mm (55.1 in)
Ground clearance: 130 mm (5.12 in)
Minimum turning radius:
3.3 m (10.83 ft)Weight:Curb weight:210 kg (463 lb)Engine:Combustion cycle:4-stroke
Cooling system: Liquid cooled
Valve train:
DOHC
Cylinder arrangement: Inline
Number of cylinders: 4-cylinder
Displacement:
998 cm
3
Bore stroke:
79.0 50.9 mm (3.11 2.00 in) Starting system:
Electric starter
Engine oil:Recommended brand:
Type:Full synthetic
SAE viscosity grades: 10W-40
Recommended engine oil grade:
API service SG type or higher, JASO stan-
dard MA
Engine oil quantity:
Oil change: 3.90 L (4.12 US qt, 3.43 Imp.qt)
With oil filter removal:
4.10 L (4.33 US qt, 3.61 Imp.qt)Coolant quantity:Coolant reservoir (up to the maximum level
mark):0.25 L (0.26 US qt, 0.22 Imp.qt)
Radiator (including all routes): 2.25 L (2.38 US qt, 1.98 Imp.qt)Fuel:Recommended fuel:Premium unleaded gasoline (Gasohol
[E10] acceptable)
Fuel tank capacity: 17 L (4.5 US gal, 3.7 Imp.gal)
Fuel reserve amount: 4.0 L (1.06 US gal, 0.88 Imp.gal)
Fuel injection:Throttle body:ID mark: B671 00Drivetrain:Gear ratio:
1st:2.600 (39/15)
2nd: 2.176 (37/17)
3rd: 1.842 (35/19)
4th:
1.579 (30/19)
5th: 1.381 (29/21)
6th: 1.250 (30/24)Front tire:Type:Tubeless
Size: 120/70ZR17M/C(58W)
Manufacturer/model:
BRIDGESTONE/BATTLAX HYPERS-
PORT S20FRear tire:Type:Tubeless
Size: 190/55ZR17M/C(75W)
Manufacturer/model:
BRIDGESTONE/BATTLAX HYPERS-
PORT S20R
B67-9-E4.book 1 ページ 2019年7月19日 金曜日 午後4時23分
Page 105 of 108

11-1
1
2
3
4
5
6
7
8
9
101112
Index
AABS ...................................................... 4-17
ABS warning light ................................... 4-6
Air filter element.................................... 7-15
Auxiliary DC jack .................................. 4-27BBattery .................................................. 7-29
Brake and clutch levers, checking and lubricating .................................... 7-26
Brake and shift pedals, checking
and lubricating .................................... 7-26
Brake fluid, changing ............................ 7-23
Brake fluid level, checking .................... 7-22
Brake lever ........................................... 4-16
Brake lever free play, checking ............ 7-20
Brake light switches .............................. 7-21
Brake pedal .......................................... 4-17CCables, checking and lubricating .......... 7-25
Canister ................................................ 7-10
Care ........................................................ 8-1
Catalytic converter ................................ 4-21
Clutch lever........................................... 4-16
Clutch lever free play, adjusting ........... 7-19
Coolant ................................................. 7-14
Coolant temperature warning light.......... 4-6
Cruise control indicator lights ................. 4-5
Cruise control switches........................... 4-4
Cruise control system ............................. 3-1DData recording, vehicle ......................... 10-2
Diagnostic connecto r ............................ 10-2
Dimmer/Pass switch ............................... 4-3
D-mode (drive mode).............................. 3-3 Drive chain, cleaning
and lubricating .... 7-24
Drive chain slack ................................... 7-23
Drive mode switch ................................... 4-4
EEngine break-in ....................................... 6-3
Engine idling speed, checking............... 7-16
Engine oil .............................................. 7-10
Engine serial number ............................ 10-1
Engine trouble warning light .................... 4-6
EXUP system ........................................ 4-27FFront and rear brake pads, checking .... 7-21
Front fork, adjusting .............................. 4-22
Front fork, checking............................... 7-28
Fuel ....................................................... 4-19
Fuel consumption, tips for reducing ........6-3
Fuel tank cap......................................... 4-18
Fuel tank overflow hose ........................ 4-21
Fuses, replacing .................................... 7-30HHandlebar switches ................................. 4-3
Hazard switch.......................................... 4-4
High beam indicator light .........................4-5
Horn switch .............................................4-4IIdentification numbers ........................... 10-1
Ignition circuit cut-off system ................. 4-29
Immobilizer system ................................. 4-1
Immobilizer system indicator light ........... 4-7
Indicator lights and warning lights ........... 4-5LLuggage strap holders .......................... 4-27MMain switch/steering lock ........................4-2 Maintenance and lubrication, periodic .... 7-5
Maintenance, emission control
system .................................................. 7-3
Matte color, caution ................................ 8-1
Model label ........................................... 10-2
Multi-function meter unit ......................... 4-8
NNeutral indicator light .............................. 4-5OOil pressure warning light ....................... 4-5PParking.................................................... 6-4
Part locations .......................................... 2-1QQuick shift system................................... 3-6SSafety information ................................... 1-1
Seat ...................................................... 4-22
SELECT switch ....................................... 4-4
Shift indicator light .................................. 4-7
Shifting .................................................... 6-2
Shift pedal ............................................. 4-16
Shock absorber assembly, adjusting .... 4-24
Sidestand .............................................. 4-28
Sidestand, checking and lubricating ..... 7-27
Spark plugs, checking ............................. 7-9
Special features ...................................... 3-1
Specifications.......................................... 9-1
Starting the engine.................................. 6-1
Steering, checking ................................ 7-28
Steering damper warning light ................ 4-7
Stop/Run/Start switch ............................. 4-4
Storage ................................................... 8-4
Supporting the motorcycle .................... 7-34
B67-9-E4.book 1 ページ 2019年7月19日 金曜日 午後4時23分