Level YAMAHA MT-125 2018 User Guide
[x] Cancel search | Manufacturer: YAMAHA, Model Year: 2018, Model line: MT-125, Model: YAMAHA MT-125 2018Pages: 96, PDF Size: 7.1 MB
Page 51 of 96

Periodic maintenance and adjustment
6-9
6 To install the spark plug
1. Clean the surface of the spark
plug gasket and its mating sur-
face, and then wipe off any grime
from the spark plug threads.
2. Install the spark plug with the
spark plug wrench, and then tight-
en it to the specified torque.
TIP
If a torque wrench is not available
when installing a spark plug, a good
estimate of the correct torque is 1/4…
1/2 turn past finger tight. However, the
spark plug should be tightened to the
specified torque as soon as possible.
3. Install the spark plug cap.
EAUM3491
Engine oil and oil filter ele-
ment
The engine oil level should be checked
before each ride. In addition, the oil
must be changed and the oil filter ele-
ment replaced at the intervals specified
in the periodic maintenance and lubri-
cation chart.
To check the engine oil level
1. Place the vehicle on a level sur-
face and hold it in an upright posi-
tion. A slight tilt to the side can
result in a false reading.
2. Start the engine, warm it up for
several minutes, and then turn it
off.
3. Wait a few minutes until the oil set-
tles, remove the oil filler cap, wipe
the dipstick clean, insert it back
into the oil filler hole (without
screwing it in), and then remove it
again to check the oil level.
NOTICE: Do not operate the ve-
hicle until you know that the en-
gine oil level is sufficient.
[ECA10012]
TIP
The engine oil should be between the
minimum and maximum level marks.
Tightening torque:
Spark plug:
12.5 N·m (1.25 kgf·m, 9.04 lb·ft)
1. Engine oil filler cap
UBR3E1E0.book Page 9 Wednesday, August 10, 2016 9:45 AM
Page 52 of 96
Periodic maintenance and adjustment
6-10
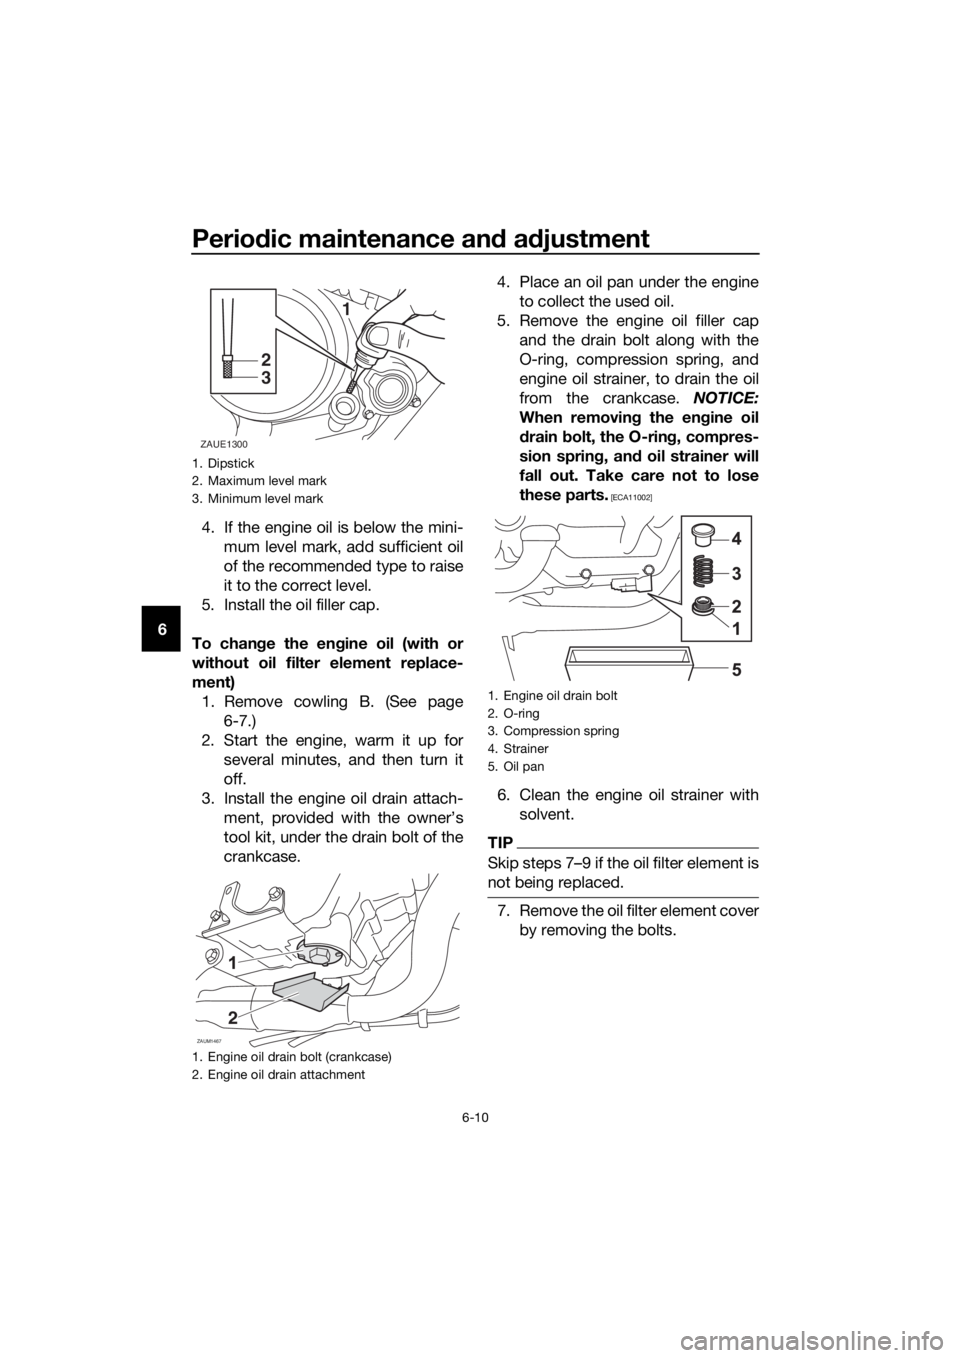
64. If the engine oil is below the mini-
mum level mark, add sufficient oil
of the recommended type to raise
it to the correct level.
5. Install the oil filler cap.
To change the engine oil (with or
without oil filter element replace-
ment)
1. Remove cowling B. (See page
6-7.)
2. Start the engine, warm it up for
several minutes, and then turn it
off.
3. Install the engine oil drain attach-
ment, provided with the owner’s
tool kit, under the drain bolt of the
crankcase.4. Place an oil pan under the engine
to collect the used oil.
5. Remove the engine oil filler cap
and the drain bolt along with the
O-ring, compression spring, and
engine oil strainer, to drain the oil
from the crankcase. NOTICE:
When removing the engine oil
drain bolt, the O-ring, compres-
sion spring, and oil strainer will
fall out. Take care not to lose
these parts.
[ECA11002]
6. Clean the engine oil strainer with
solvent.
TIP
Skip steps 7…9 if the oil filter element is
not being replaced.
7. Remove the oil filter element cover
by removing the bolts.
1. Dipstick
2. Maximum level mark
3. Minimum level mark
1. Engine oil drain bolt (crankcase)
2. Engine oil drain attachment
1
2
3
ZAUE1300
ZAUM1467
2
1. Engine oil drain bolt
2. O-ring
3. Compression spring
4. Strainer
5. Oil pan
UBR3E1E0.book Page 10 Wednesday, August 10, 2016 9:45 AM
Page 54 of 96
Periodic maintenance and adjustment
6-12
613. Turn the engine off, and then
check the oil level and correct it if
necessary.
14. Reset the oil change indicator.
(See page 3-10.)
EAU20071
Coolant
The coolant level should be checked
before each ride. In addition, the cool-
ant must be changed at the intervals
specified in the periodic maintenance
and lubrication chart.
EAUM1726To check the coolant level
1. Place the vehicle on a level sur-
face and hold it in an upright posi-
tion.
TIP
The coolant level must be
checked on a cold engine since
the level varies with engine tem-
perature.
Make sure that the vehicle is posi-
tioned straight up when checking
the coolant level. A slight tilt to the
side can result in a false reading.
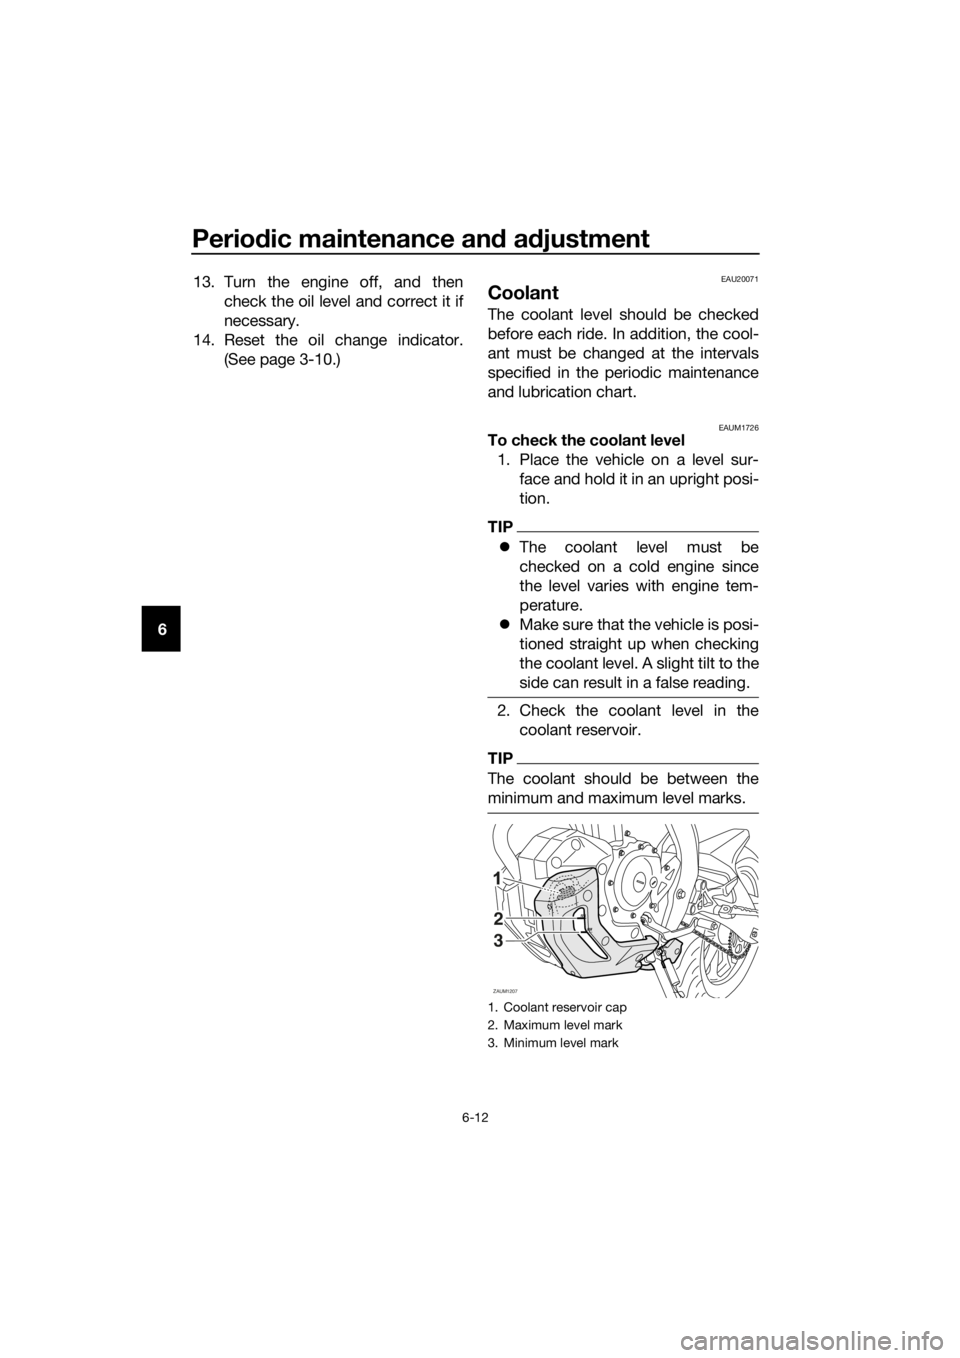
2. Check the coolant level in the
coolant reservoir.
TIP
The coolant should be between the
minimum and maximum level marks.
1. Coolant reservoir cap
2. Maximum level mark
3. Minimum level mark
ZAUM1207
FULL
LOW2
3
UBR3E1E0.book Page 12 Wednesday, August 10, 2016 9:45 AM
Page 55 of 96

Periodic maintenance and adjustment
6-13
6 3. If the coolant is at or below the
minimum level mark, remove
cowling A (See page 6-7.), and
then open the reservoir cap.
WARNING! Remove only the
coolant reservoir cap. Never at-
tempt to remove the radiator
cap when the engine is hot.
[EWA15162]
4. Add coolant to the maximum level
mark, and then close the reservoir
cap. NOTICE: If coolant is not
available, use distilled water or
soft tap water instead. Do not
use hard water or salt water
since it is harmful to the engine.
If water has been used instead
of coolant, replace it with cool-
ant as soon as possible, other-
wise the cooling system will not
be protected against frost and
corrosion. If water has been
added to the coolant, have a
Yamaha dealer check the anti-
freeze content of the coolant as
soon as possible, otherwise the
effectiveness of the coolant will
be reduced.
[ECA10473]
5. Install the cowling.
EAU33032Changing the coolant
The coolant must be changed at the in-
tervals specified in the periodic mainte-
nance and lubrication chart. Have a
Yamaha dealer change the coolant.WARNING! Never attempt to remove
the radiator cap when the engine is
hot.
[EWA10382]
Coolant reservoir capacity (up to
the maximum level mark):
0.25 L (0.26 US qt, 0.22 Imp.qt)
UBR3E1E0.book Page 13 Wednesday, August 10, 2016 9:45 AM
Page 65 of 96
Periodic maintenance and adjustment
6-23
6
EAU40262
Checking the brake fluid level
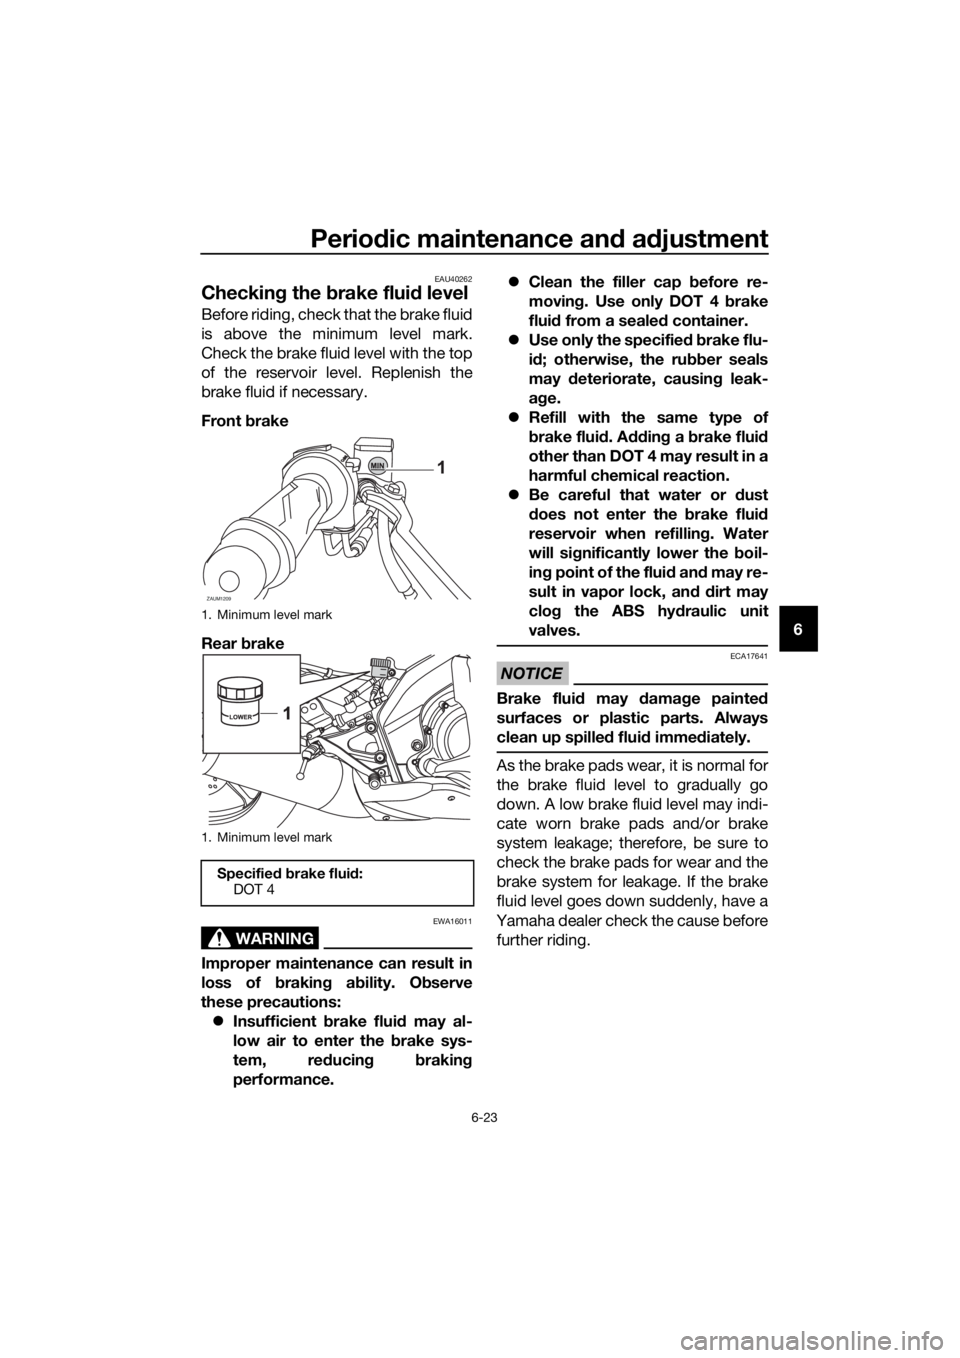
Before riding, check that the brake fluid
is above the minimum level mark.
Check the brake fluid level with the top
of the reservoir level. Replenish the
brake fluid if necessary.
Front brake
Rear brake
WARNING
EWA16011
Improper maintenance can result in
loss of braking ability. Observe
these precautions:
Insufficient brake fluid may al-
low air to enter the brake sys-
tem, reducing braking
performance.Clean the filler cap before re-
moving. Use only DOT 4 brake
fluid from a sealed container.
Use only the specified brake flu-
id; otherwise, the rubber seals
may deteriorate, causing leak-
age.
Refill with the same type of
brake fluid. Adding a brake fluid
other than DOT 4 may result in a
harmful chemical reaction.
Be careful that water or dust
does not enter the brake fluid
reservoir when refilling. Water
will significantly lower the boil-
ing point of the fluid and may re-
sult in vapor lock, an
d dirt may
clog the ABS hydraulic unit
valves.
NOTICE
ECA17641
Brake fluid may damage painted
surfaces or plastic parts. Always
clean up spilled fluid immediately.
As the brake pads wear, it is normal for
the brake fluid level to gradually go
down. A low brake fluid level may indi-
cate worn brake pads and/or brake
system leakage; therefore, be sure to
check the brake pads for wear and the
brake system for leakage. If the brake
fluid level goes down suddenly, have a
Yamaha dealer check the cause before
further riding.
1. Minimum level mark
1. Minimum level mark
Specified brake fluid:
DOT 4
ZAUM1209
I
NFOI
NFO
UBR3E1E0.book Page 23 Wednesday, August 10, 2016 9:45 AM
Page 71 of 96
Periodic maintenance and adjustment
6-29
6
EAUM1653
Lubricating the swingarm piv-
ots
The swingarm pivots must be lubricat-
ed by a Yamaha dealer at the intervals
specified in the periodic maintenance
and lubrication chart.
EAU23273
Checking the front fork
The condition and operation of the
front fork must be checked as follows
at the intervals specified in the periodic
maintenance and lubrication chart.
To check the condition
Check the inner tubes for scratches,
damage and excessive oil leakage.
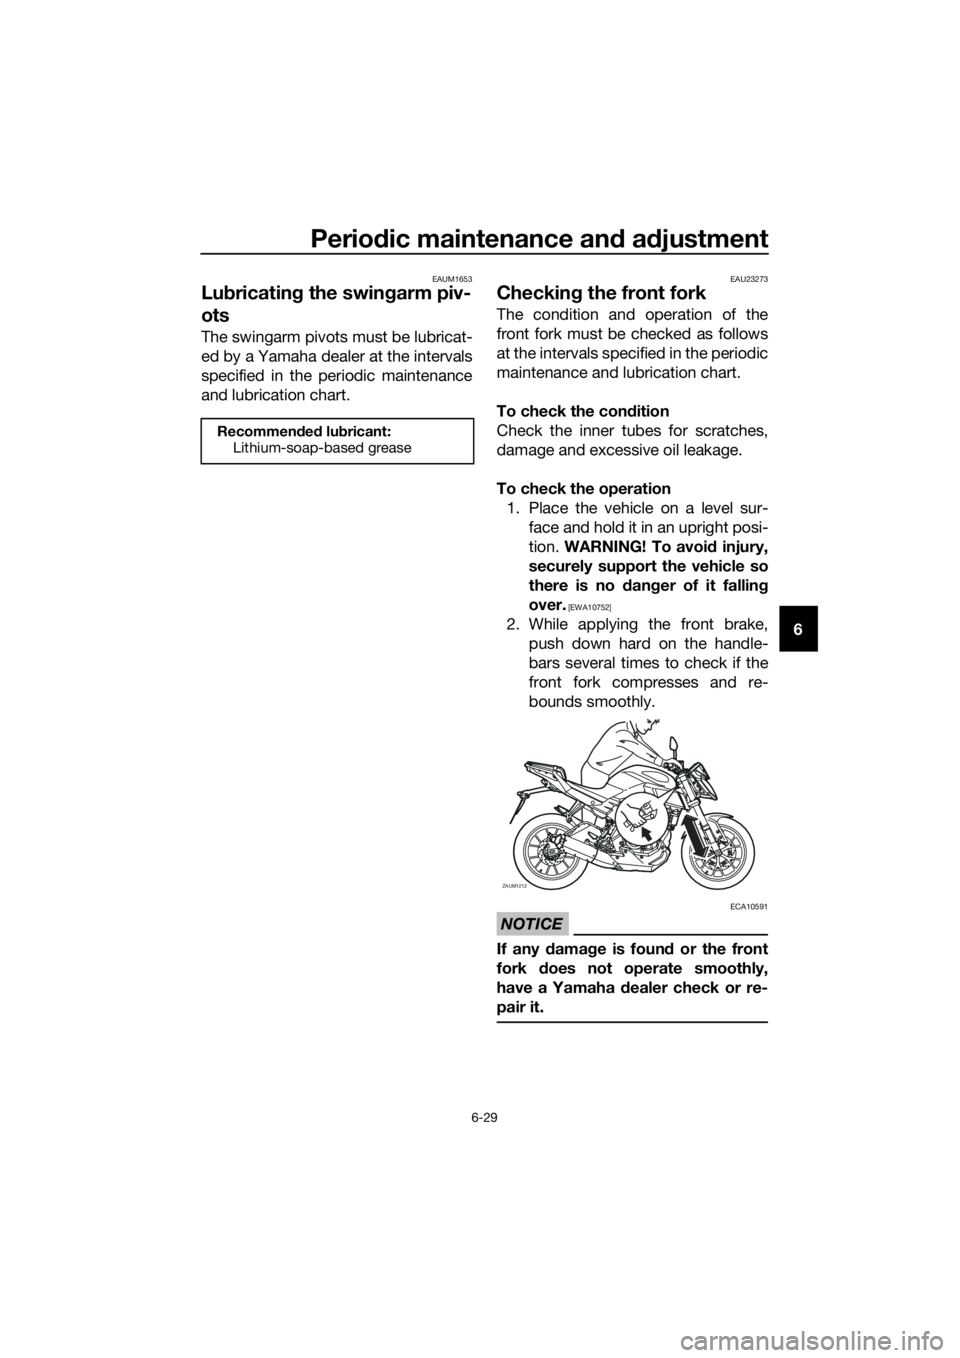
To check the operation
1. Place the vehicle on a level sur-
face and hold it in an upright posi-
tion. WARNING! To avoid injury,
securely support the vehicle so
there is no danger of it falling
over.
[EWA10752]
2. While applying the front brake,
push down hard on the handle-
bars several times to check if the
front fork compresses and re-
bounds smoothly.
NOTICE
ECA10591
If any damage is found or the front
fork does not operate smoothly,
have a Yamaha dealer check or re-
pair it.
Recommended lubricant:
Lithium-soap-based grease
ZAUM1212
YA M A H A
UBR3E1E0.book Page 29 Wednesday, August 10, 2016 9:45 AM
Page 73 of 96
Periodic maintenance and adjustment
6-31
6
EAU23315
Battery
A poorly maintained battery will cor-
rode and discharge quickly. The elec-
trolyte level, battery lead connections
and breather hose routing should be
checked before each ride and at the in-
tervals specified in the periodic mainte-
nance and lubrication chart.
WARNING
EWA10771
Electrolyte is poisonous and
dangerous since it contains sul-
furic acid, which causes severe
burns. Avoid any contact with
skin, eyes or clothing and al-
ways shield your eyes when
working near batteries. In case
of contact, administer the fol-
lowing FIRST AID.
EXTERNAL: Flush with plenty
of water.
INTERNAL: Drink large quan-
tities of water or milk and im-
mediately call a physician.
EYES: Flush with water for 15
minutes and seek prompt
medical attention.
Batteries produce explosive hy-
drogen gas. Therefore, keep
sparks, flames, cigarettes, etc.,
away from the battery and pro-
vide sufficient ventilation when
charging it in an enclosed
space.
Take care not to spill electrolyte
on the drive chain, as this may
weaken it, shorten chain life and
possibly result in an accident.
KEEP THIS AND ALL BATTER-
IES OUT OF THE REACH OF
CHILDREN.
To check the electrolyte level
1. Place the vehicle on a level sur-
face and hold it in an upright posi-
tion.
TIP
Make sure that the vehicle is posi-
tioned straight up when checking the
electrolyte level.
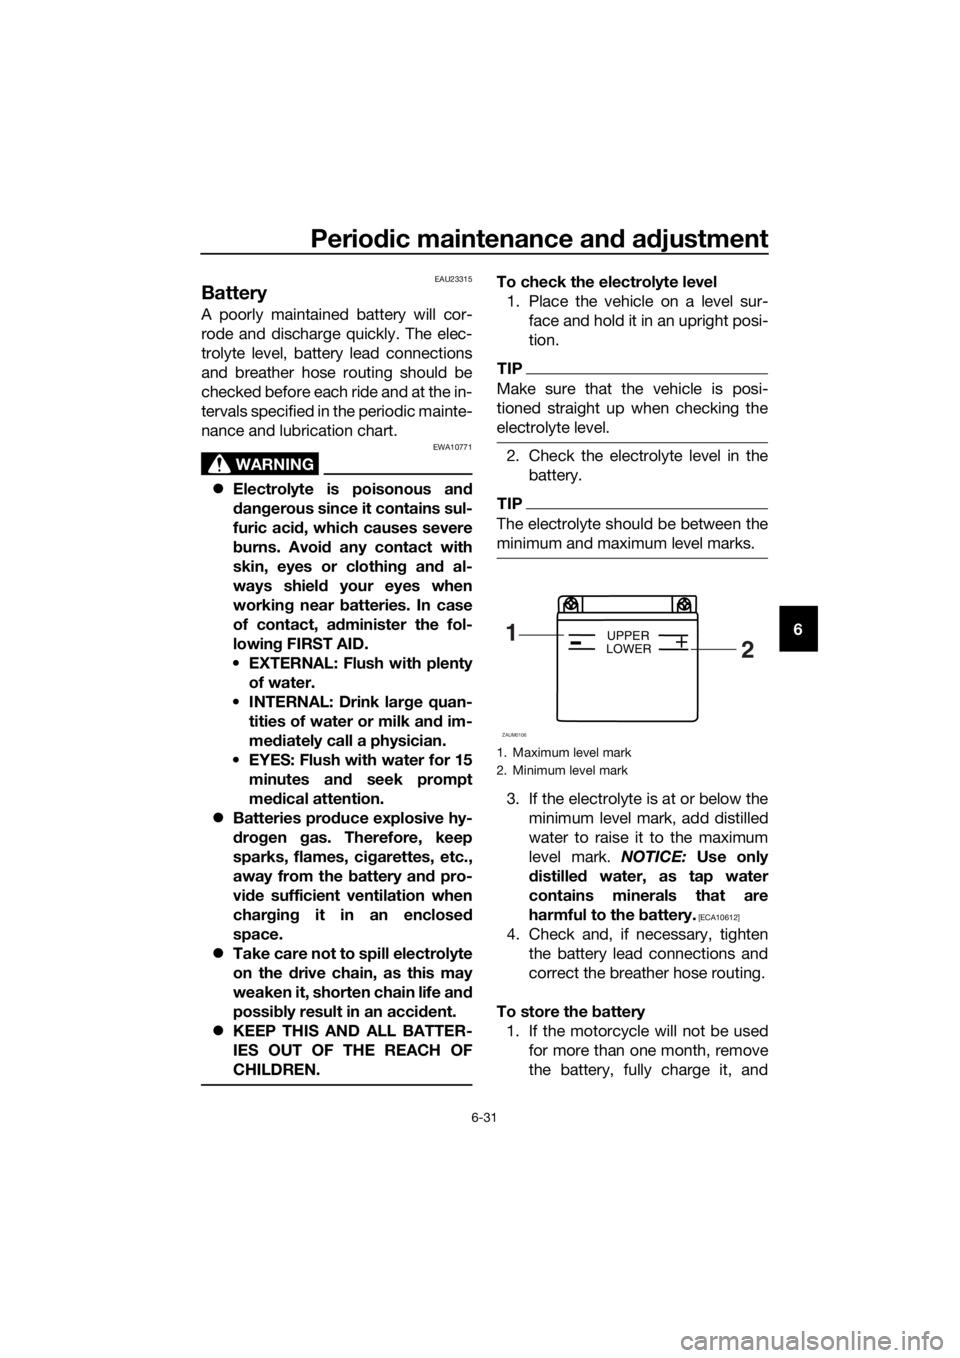
2. Check the electrolyte level in the
battery.
TIP
The electrolyte should be between the
minimum and maximum level marks.
3. If the electrolyte is at or below the
minimum level mark, add distilled
water to raise it to the maximum
level mark. NOTICE: Use only
distilled water, as tap water
contains minerals that are
harmful to the battery.
[ECA10612]
4. Check and, if necessary, tighten
the battery lead connections and
correct the breather hose routing.
To store the battery
1. If the motorcycle will not be used
for more than one month, remove
the battery, fully charge it, and
1. Maximum level mark
2. Minimum level mark
1
2+UPPER
LOWER
ZAUM0106
UBR3E1E0.book Page 31 Wednesday, August 10, 2016 9:45 AM
Page 79 of 96
Periodic maintenance and adjustment
6-37
6
EAU67131
Supporting the motorcycle
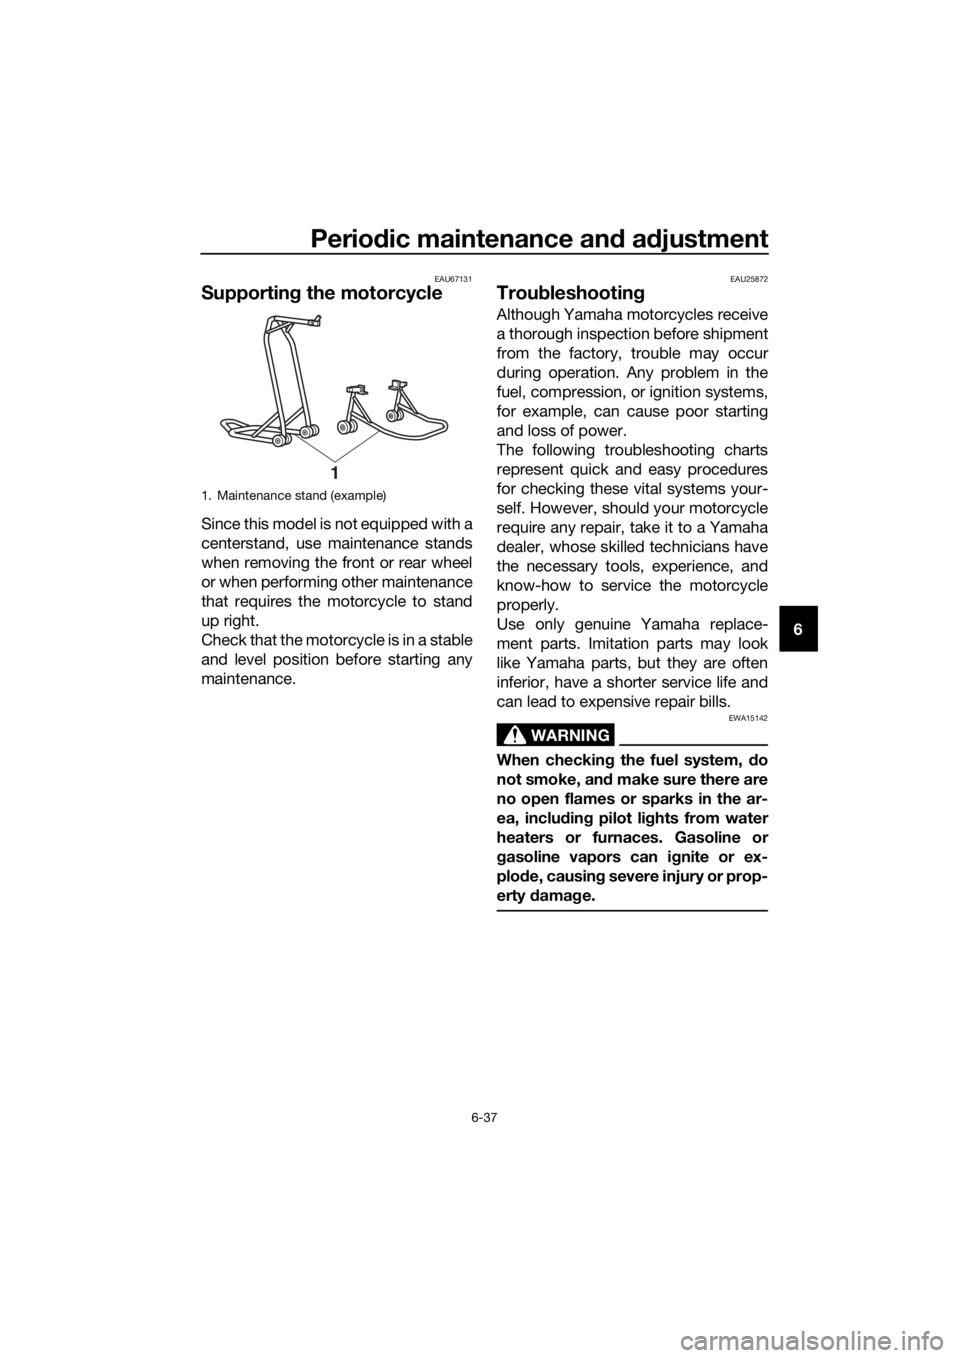
Since this model is not equipped with a
centerstand, use maintenance stands
when removing the front or rear wheel
or when performing other maintenance
that requires the motorcycle to stand
up right.
Check that the motorcycle is in a stable
and level position before starting any
maintenance.
EAU25872
Troubleshooting
Although Yamaha motorcycles receive
a thorough inspection before shipment
from the factory, trouble may occur
during operation. Any problem in the
fuel, compression, or ignition systems,
for example, can cause poor starting
and loss of power.
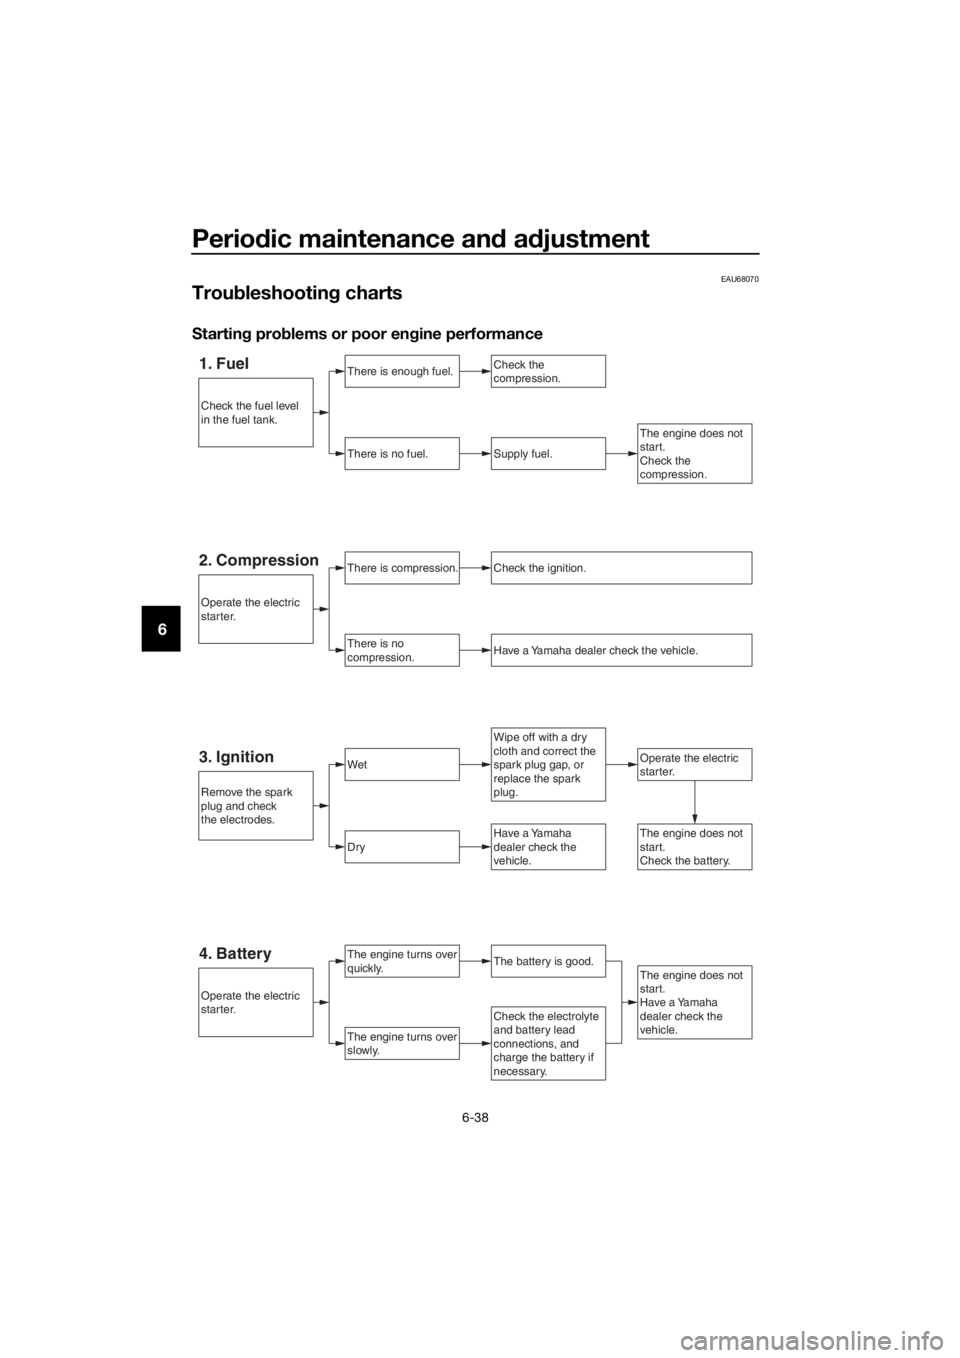
The following troubleshooting charts
represent quick and easy procedures
for checking these vital systems your-
self. However, should your motorcycle
require any repair, take it to a Yamaha
dealer, whose skilled technicians have
the necessary tools, experience, and
know-how to service the motorcycle
properly.
Use only genuine Yamaha replace-
ment parts. Imitation parts may look
like Yamaha parts, but they are often
inferior, have a shorter service life and
can lead to expensive repair bills.
WARNING
EWA15142
When checking the fuel system, do
not smoke, and make sure there are
no open flames or sparks in the ar-
ea, including pilot lights from water
heaters or furnaces. Gasoline or
gasoline vapors can ignite or ex-
plode, causing severe injury or prop-
erty damage.
1. Maintenance stand (example)
1
UBR3E1E0.book Page 37 Wednesday, August 10, 2016 9:45 AM
Page 80 of 96
Periodic maintenance and adjustment
6-38
6
EAU68070
Troubleshooting charts
Starting problems or poor engine performance
1. FuelThere is enough fuel.
There is no fuel.Supply fuel.
The engine turns over
quickly.
Operate the electric
starter.
Check the
compression.
The engine turns over
slowly.
Wipe off with a dry
cloth and correct the
spark plug gap, or
replace the spark
plug.
Check the electrolyte
and battery lead
connections, and
charge the battery if
necessary.
The engine does not
start.
Have a Yamaha
dealer check the
vehicle.
4. BatteryThe battery is good.
3. IgnitionWet
Dry
The engine does not
start.
Check the
compression.
Have a Yamaha
dealer check the
vehicle.The engine does not
start.
Check the battery.
Remove the spark
plug and check
the electrodes.
Check the fuel level
in the fuel tank.
Operate the electric
starter.
Operate the electric
starter.
There is compression.
There is no
compression.Have a Yamaha dealer check the vehicle.
Check the ignition.2. Compression
UBR3E1E0.book Page 38 Wednesday, August 10, 2016 9:45 AM
Page 81 of 96
Periodic maintenance and adjustment
6-39
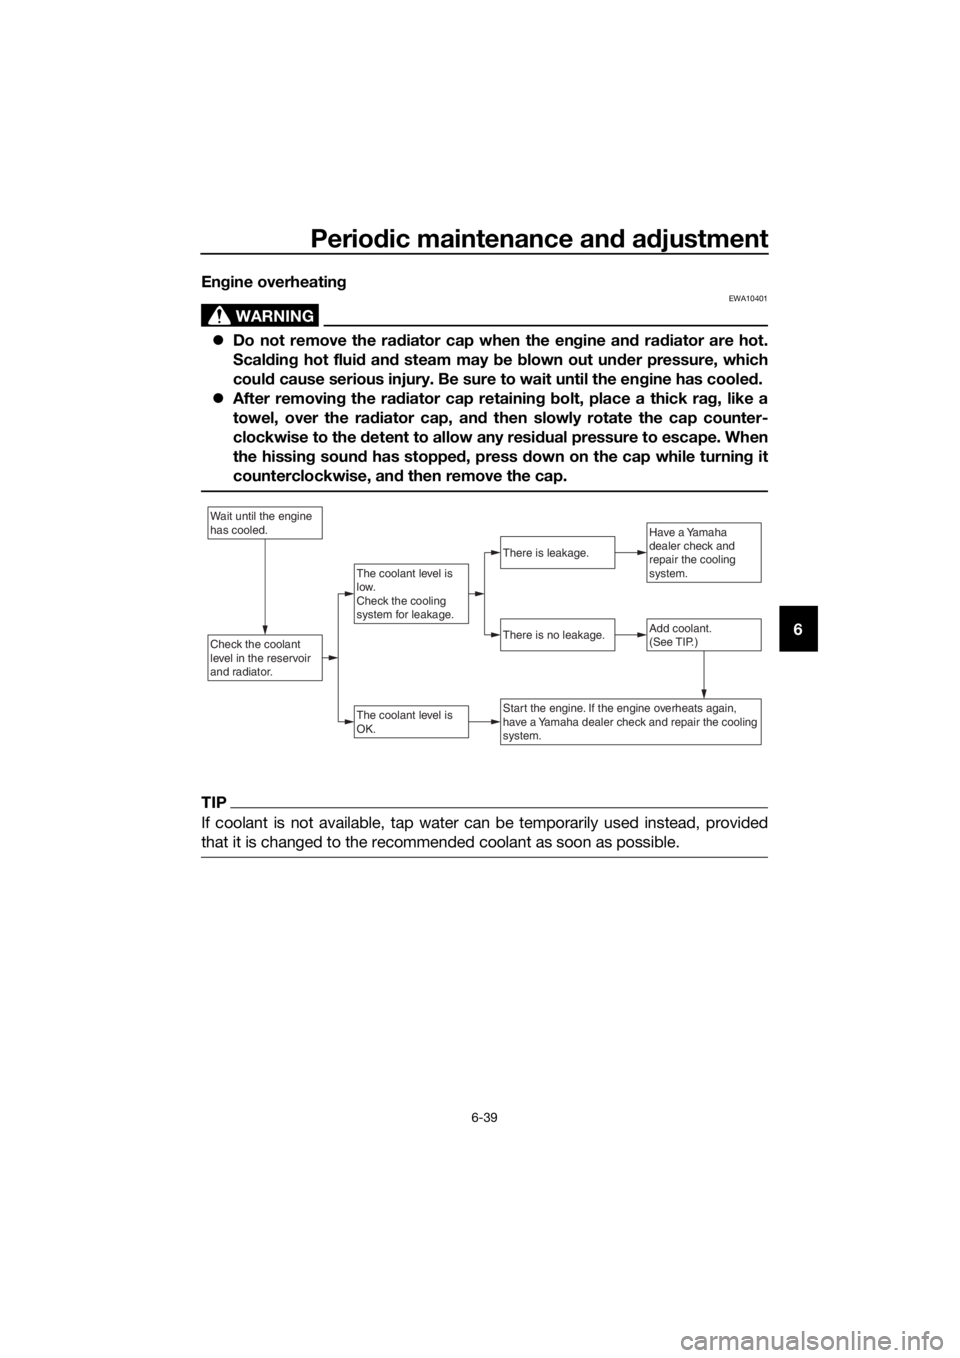
6 Engine overheating
WARNING
EWA10401
Do not remove the radiator cap when the engine and radiator are hot.
Scalding hot fluid and steam may be blown out under pressure, which
could cause serious injury. Be sure to wait until the engine has cooled.
After removing the radiator cap retaining bolt, place a thick rag, like a
towel, over the radiator cap, and then slowly rotate the cap counter-
clockwise to the detent to allow any residual pressure to escape. When
the hissing sound has stopped, press down on the cap while turning it
counterclockwise, and then remove the cap.
TIP
If coolant is not available, tap water can be temporarily used instead, provided
that it is changed to the recommended coolant as soon as possible.
Wait until the engine
has cooled.
Check the coolant
level in the reservoir
and radiator.Add coolant.
(See TIP.)
The coolant level is
OK.
There is no leakage.
There is leakage.
The coolant level is
low.
Check the cooling
system for leakage.
Have a Yamaha
dealer check and
repair the cooling
system.
Start the engine. If the engine overheats again,
have a Yamaha dealer check and repair the cooling
system.
UBR3E1E0.book Page 39 Wednesday, August 10, 2016 9:45 AM