brake light YAMAHA NMAX 125 2021 User Guide
[x] Cancel search | Manufacturer: YAMAHA, Model Year: 2021, Model line: NMAX 125, Model: YAMAHA NMAX 125 2021Pages: 114, PDF Size: 10.63 MB
Page 94 of 114
Periodic maintenance and adjustment
9-31
9
EAUN2261
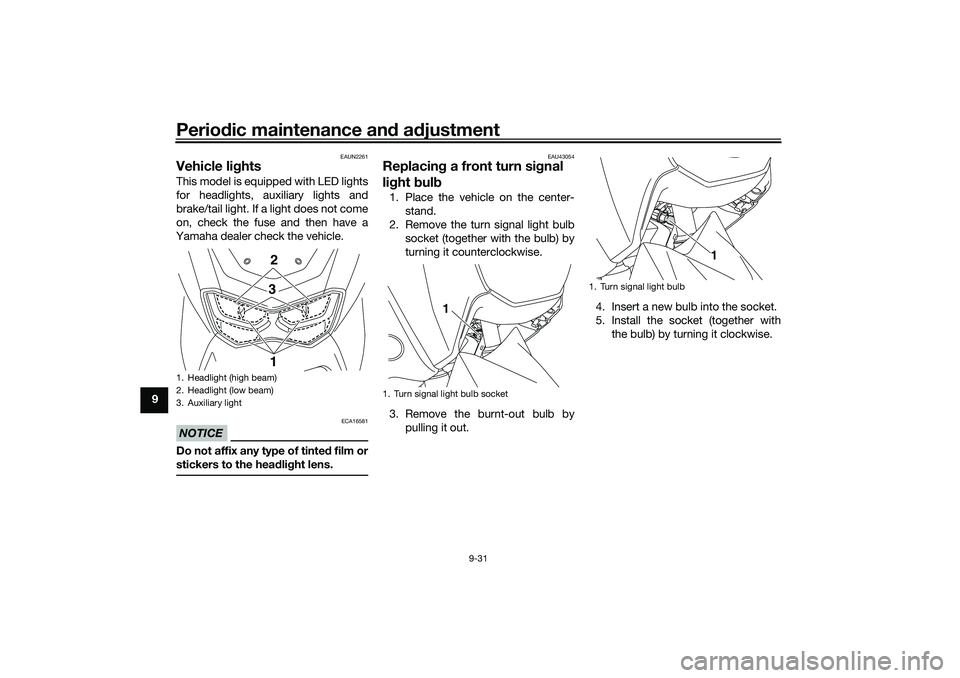
Vehicle lightsThis model is equipped with LED lights
for headlights, auxiliary lights and
brake/tail light. If a light does not come
on, check the fuse and then have a
Yamaha dealer check the vehicle.NOTICE
ECA16581
Do not affix any type of tinted film or
stickers to the headlight lens.
EAU43054
Replacing a front turn signal
light bulb1. Place the vehicle on the center-
stand.
2. Remove the turn signal light bulb
socket (together with the bulb) by
turning it counterclockwise.
3. Remove the burnt-out bulb by
pulling it out.4. Insert a new bulb into the socket.
5. Install the socket (together with
the bulb) by turning it clockwise.
1. Headlight (high beam)
2. Headlight (low beam)
3. Auxiliary light
2
3
1
1. Turn signal light bulb socket
1
1. Turn signal light bulb
1
UBALE0E0.book Page 31 Wednesday, September 30, 2020 1:37 PM
Page 104 of 114
Motorcycle care and storage
10-2
10chemicals such as, solvents,
gasoline, rust removers, brake
fluid, or antifreeze, etc.
Before washing
1. Park the vehicle out of direct sun-
light and allow it to cool. This will
help avoid water spots.
2. Make sure all caps, covers, elec-
trical couplers and connectors are
tightly installed.
3. Cover the muffler end with a plas-
tic bag and a strong rubber band.
4. Pre-soak stubborn stains like in-
sects or bird droppings with a wet
towel for a few minutes.
5. Remove road grime and oil stains
with a quality degreasing agent
and a plastic-bristle brush or
sponge. NOTICE: Do not use
degreasing agent on areas re-
quiring lubrication such as
seals, gaskets, and wheel axles.
Follow product instructions.
[ECA26290]
Washing
1. Rinse off any degreaser and spray
down the vehicle with a garden
hose. Use only enough pressure
to do the job. Avoid spraying wa-
ter directly into the muffler, instru-
ment panel, air inlet, or other inner
areas such as underseat storage
compartments.
2. Wash the vehicle with a quality au-
tomotive-type detergent mixed
with cool water and a soft, clean
towel or sponge. Use an old tooth-
brush or plastic-bristle brush for
hard-to-reach places. NOTICE:
Use cold water if the vehicle has
been exposed to salt. Warm wa-
ter will increase salt’s corrosive
properties.
[ECA26301]
3. For windshield-equipped vehicles:
Clean the windshield with a soft
towel or sponge dampened with
water and a pH neutral detergent.
If necessary, use a high-quality
windshield cleaner or polish for
motorcycles. NOTICE: Never use
any strong chemicals to clean
the windshield. Additionally,
some cleaning compounds forplastic may scratch the wind-
shield, so be sure to test all
cleaning products before gen-
eral application.
[ECA26310]
4. Rinse off thoroughly with clean
water. Be sure to remove all deter-
gent residues, as they can be
harmful to plastic parts.
After washing
1. Dry the vehicle with a chamois or
absorbent towel, preferably mi-
crofiber terrycloth.
2. For drive chain-equipped models:
Dry and then lubricate the drive
chain to prevent rust.
3. Use a chrome polish to shine
chrome, aluminum, and stainless
steel parts. Often the thermally in-
duced discoloring of stainless
steel exhaust systems can be re-
moved through polishing.
4. Apply a corrosion protection spray
on all metal parts including
chrome or nickel-plated surfaces.
WARNING! Do not apply sili-
cone or oil spray to seats, hand
grips, rubber foot pegs or tire
treads. Otherwise these parts
UBALE0E0.book Page 2 Wednesday, September 30, 2020 1:37 PM
Page 105 of 114

Motorcycle care and storage
10-3
10 will become slippery, which
could cause loss of control.
Thoroughly clean the surfaces
of these parts before operating
the vehicle.
[EWA20650]
5. Treat rubber, vinyl, and unpainted
plastic parts with a suitable care
product.
6. Touch up minor paint damage
caused by stones, etc.
7. Wax all painted surfaces using a
non-abrasive wax or use a detail
spray for motorcycles.
8. When finished cleaning, start the
engine and let it idle for several
minutes to help dry any remaining
moisture.
9. If the headlight lens has fogged
up, start the engine and turn on
the headlight to help remove the
moisture.
10. Let the vehicle dry completely be-
fore storing or covering it.NOTICE
ECA26320
Do not apply wax to rubber or
unpainted plastic parts.Do not use abrasive polishing
compounds as they will wear
away the paint.
Apply sprays and wax sparingly.
Wipe off excess afterwards.
WARNING
EWA20660
Contaminants left on the brakes or
tires can cause loss of control.
Make sure there is no lubricant
or wax on the brakes or tires.
If necessary, wash the tires with
warm water and a mild deter-
gent.
If necessary, clean the brake
discs and pads with brake
cleaner or acetone.
Before riding at higher speeds,
test the vehicle’s braking per-
formance and cornering behav-
ior.
EAU83472
StorageAlways store the vehicle in a cool, dry
place. If necessary, protect it against
dust with a porous cover. Be sure the
engine and the exhaust system are
cool before covering the vehicle. If the
vehicle often sits for weeks at a time
between uses, the use of a quality fuel
stabilizer is recommended after each
fill-up.NOTICE
ECA21170
Storing the vehicle in a poorly
ventilated room or covering it
with a tarp, while it is still wet,
will allow water and humidity to
seep in and cause rust.
To prevent corrosion, avoid
damp cellars, stables (because
of the presence of ammonia)
and areas where strong chemi-
cals are stored.Long term storage
Before storing the vehicle long term (60
days or more):
UBALE0E0.book Page 3 Wednesday, September 30, 2020 1:37 PM
Page 108 of 114

Specifications
11-2
11
Rear suspension:Type:
Unit swingElectrical system:System voltage:
12 VBattery:Model:
YTZ7V
Voltage, capacity:
12 V, 6.0 Ah (10 HR)Bulb wattage:Headlight:
LED
Brake/tail light:
LED
Front turn signal light:
10.0 W
Rear turn signal light:
10.0 W
Auxiliary light:
LED
License plate light:
5.0 W
UBALE0E0.book Page 2 Wednesday, September 30, 2020 1:37 PM
Page 112 of 114
13-1
13
IndexAABS ....................................................... 6-11
ABS warning light ................................... 6-2
Acceleration and deceleration ................ 8-3
Activating the Stop and Start System .... 4-1
Air filter and V-belt case air filter
elements ............................................. 9-16
App Connect icon ................................... 6-4BBattery .................................................. 9-28
Brake fluid, changing ............................ 9-24
Brake fluid level, checking .................... 9-23
Brake lever, front .................................. 6-11
Brake lever, rear.................................... 6-11
Brake levers, lubricating ....................... 9-25
Braking.................................................... 8-3CCables, checking and lubricating ......... 9-25
Canister................................................. 9-11
Care ...................................................... 10-1
Catalytic converter ................................ 6-16
CCU (Communication Control Unit) ....... 5-1
Centerstand and sidestand,
checking and lubricating .................... 9-26
Clock....................................................... 6-4
Coolant ................................................. 9-15
Coolant temperature meter .................... 6-5DData recording, vehicle ......................... 12-2
Diagnostic connector............................ 12-2
Dimmer switch ...................................... 6-10
Display units, switching .......................... 6-4EEmergency mode.................................. 9-38Engine break-in ...................................... 8-1
Engine oil and oil strainer ..................... 9-11
Engine overheating ............................... 9-37
Engine serial number ............................ 12-1
FFinal transmission oil ............................ 9-13
Front and rear brake lever free play,
checking............................................. 9-21
Front and rear brake pads, checking ... 9-22
Front fork, checking ............................. 9-27
Fuel ....................................................... 6-15
Fuel consumption, tips for reducing ...... 8-3
Fuel meter .............................................. 6-4
Fuel tank cap ........................................ 6-14
Fuel tank overflow hose ....................... 6-16
Fuses, replacing ................................... 9-29HHandlebar switches ................................ 6-9
Hazard switch....................................... 6-10
Helmet holders ..................................... 6-17
High beam indicator light ....................... 6-1
Horn switch .......................................... 6-10IIdentification numbers .......................... 12-1
Ignition circuit cut-off system ............... 6-22
Incoming call indicator light ................... 6-3
Incoming notification indicator light ....... 6-3
Indicator lights and warning lights ......... 6-1KKey, handling of smart and
mechanical keys................................... 3-3MMain switch ............................................ 3-7
Maintenance and lubrication, periodic ... 9-3Maintenance, emission control
system ..................................................9-2
Malfunction indicator light (MIL)..............6-1
Matte color, caution ..............................10-1
Menu switch..........................................6-10
Model label ...........................................12-1
Multi-function display .............................6-6
Multi-function meter unit .........................6-3
OOperating range of the smart key
system ..................................................3-2PPanels, removing and installing ..............9-7
Parking ....................................................8-4
Part locations ..........................................2-1
Power outlet ..........................................6-20
Precautions when using the
Stop and Start System .........................4-3SSafe-riding points....................................1-5
Safety information ...................................1-1
Seat .......................................................6-17
Shock absorber assemblies,
adjusting .............................................6-19
Sidestand ..............................................6-21
Smart key ................................................3-4
Smart key battery, replacing ...................3-6
Smart key system ...................................3-1
Smart key system indicator light.............6-2
Smart key system, troubleshooting ......9-33
Spark plug, checking ..............................9-9
Special features ......................................5-1
Specifications .......................................11-1
Speedometer ..........................................6-4
UBALE0E0.book Page 1 Wednesday, September 30, 2020 1:37 PM