steering wheel adjustment YAMAHA PW50 2009 Owners Manual
[x] Cancel search | Manufacturer: YAMAHA, Model Year: 2009, Model line: PW50, Model: YAMAHA PW50 2009Pages: 66, PDF Size: 1.25 MB
Page 9 of 66

TABLE OF CONTENTS
SAFETY INFORMATION
................... 1-1
DESCRIPTION
................................... 2-1
Left view ........................................... 2-1
Right view ......................................... 2-2
Controls and instruments ................. 2-3
INSTRUMENT AND CONTROL
FUNCTIONS
........................................ 3-1
Handlebar switch ............................. 3-1
Speed limiter and power reduction
plate ............................................. 3-1
Brake lever ...................................... 3-2
Rear brake lever .............................. 3-3
Fuel tank cap ................................... 3-3
Fuel ................................................. 3-3
Fuel tank breather hose .................. 3-5
2-stroke engine oil ........................... 3-5
Fuel cock ......................................... 3-6
Starter (choke) lever “
1
” ................ 3-6
Kickstarter ....................................... 3-7
Seat ................................................. 3-7
FOR YOUR SAFETY –
PRE-OPERATION CHECKS
............... 4-1
Pre-operation check list ................... 4-2
OPERATION AND IMPORTANT
RIDING POINTS
.................................. 5-1
Starting and warming up a cold
engine .......................................... 5-1Starting a warm engine ................... 5-1
Starting off ....................................... 5-2
Acceleration and deceleration ......... 5-2
Braking ............................................ 5-2
Engine break-in ............................... 5-3
Parking ............................................ 5-4
PERIODIC MAINTENANCE AND
ADJUSTMENT
.................................... 6-1
Owner’s tool kit ................................ 6-1
Periodic maintenance chart for the
emission control system .............. 6-2
General maintenance and lubrication
chart ............................................. 6-3
Checking the spark plug .................. 6-5
Removing the power reduction
plate ............................................. 6-6
Transmission oil .............................. 6-7
Middle and final gear cases ............ 6-8
Cleaning the air filter element ......... 6-8
Cleaning the spark arrester ............. 6-9
Adjusting the carburetor ................ 6-10
Adjusting the engine idling
speed ......................................... 6-10
Checking the throttle cable free
play ............................................ 6-11
Tires .............................................. 6-11
Panel wheels ................................. 6-13
Adjusting the front and rear brake
lever free play ............................ 6-14Checking the front and rear brake
shoes ..........................................6-15
Checking and lubricating the
cables .........................................6-15
Checking and lubricating the throttle
grip and cable .............................6-16
Adjusting the Autolube pump .........6-16
Lubricating the front and rear brake
levers ..........................................6-16
Checking and lubricating the
centerstand .................................6-17
Checking the front fork ...................6-17
Checking the steering ....................6-18
Checking the wheel bearings .........6-18
Front wheel ....................................6-18
Rear wheel .....................................6-20
Troubleshooting .............................6-23
Troubleshooting chart ....................6-24
MOTORCYCLE CARE AND
STORAGE
...........................................7-1
Matte color caution ..........................7-1
Care .................................................7-1
Storage ............................................7-3
SPECIFICATIONS
..............................8-1
CONSUMER INFORMATION
..............9-1
Identification numbers ......................9-1
Page 33 of 66

PERIODIC MAINTENANCE AND ADJUSTMENT
6-3
2
3
4
5
67
8
9
EAU41753
General maintenance and lubrication chart
NO. ITEM CHECK OR MAINTENANCE JOBINITIALTHEREAFTER
EVERY
1
month3
months6
months6
months12
months
1*Front brake
Check operation.Adjust brake lever free play.Replace brake shoes. Whenever worn to the limit
2*Rear brakeCheck operation.Adjust brake lever free play.Replace brake shoes. Whenever worn to the limit
3*WheelsCheck runout and for damage.Replace if necessary.
4*TiresCheck tread depth and for damage.Replace if necessary.Check air pressure.Correct if necessary.
5*Wheel bearingsCheck bearings for smooth operation.Replace if necessary.
6*Steering bearingsCheck bearing assemblies for looseness.Moderately repack with lithium-soap-based
grease every 2 years.
7*Middle and final gear
casesCheck for grease leakage.Check gears for damage and wear.Lubricate gears with lithium-soap-based grease.Every 2 years
8*Chassis fastenersCheck all chassis fitting and fasteners.Correct if necessary.
9*Autolube pumpCheck operation.Correct if necessary.Bleed.
Page 48 of 66

PERIODIC MAINTENANCE AND ADJUSTMENT
6-18
1
2
3
4
5
6
7
8
9
EAU45511
Checking the steering
Worn or loose steering bearings may
cause danger. Therefore, the operation
of the steering must be checked as fol-
lows at the intervals specified in the pe-
riodic maintenance and lubrication
chart.
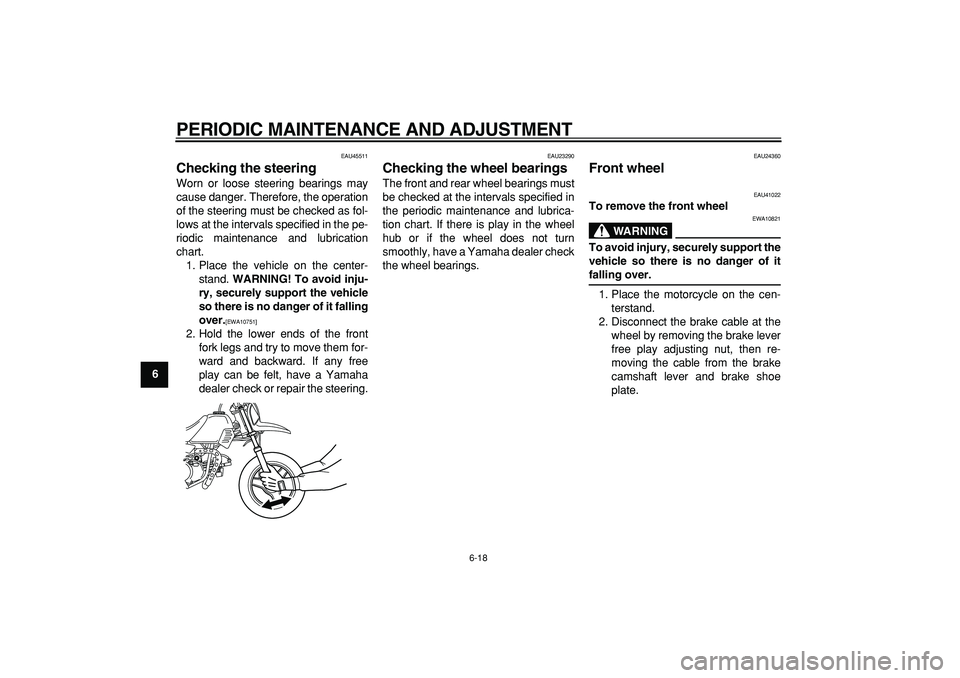
1. Place the vehicle on the center-
stand.
WARNING! To avoid inju-
ry, securely support the vehicle
so there is no danger of it falling
over.
[EWA10751]
2. Hold the lower ends of the front
fork legs and try to move them for-
ward and backward. If any free
play can be felt, have a Yamaha
dealer check or repair the steering.
EAU23290
Checking the wheel bearings
The front and rear wheel bearings must
be checked at the intervals specified in
the periodic maintenance and lubrica-
tion chart. If there is play in the wheel
hub or if the wheel does not turn
smoothly, have a Yamaha dealer check
the wheel bearings.
EAU24360
Front wheel
EAU41022
To remove the front wheel
WARNING
EWA10821
To avoid injury, securely support the
vehicle so there is no danger of it
falling over.
1. Place the motorcycle on the cen-
terstand.
2. Disconnect the brake cable at the
wheel by removing the brake lever
free play adjusting nut, then re-
moving the cable from the brake
camshaft lever and brake shoe
plate.