warning lights YAMAHA RHINO 700 2012 Owners Manual
[x] Cancel search | Manufacturer: YAMAHA, Model Year: 2012, Model line: RHINO 700, Model: YAMAHA RHINO 700 2012Pages: 492, PDF Size: 12.99 MB
Page 14 of 492
EVU00050
1 -CONTENTS
LOCATION OF THE WARNING AND
SPECIFICATION LABELS ....................... 1-1
SAFETY INFORMATION ......................... 2-1
DESCRIPTION ........................................ 3-1
INSTRUMENT AND CONTROL
FUNCTIONS ............................................ 4-1
Main switch........................................... 4-1
Indicator lights and warning lights ........ 4-3
Multi-function meter unit ..................... 4-13
Light switch......................................... 4-25
Accelerator pedal ............................... 4-29
Brake pedal ........................................ 4-31
Parking brake lever ............................ 4-31
Drive select lever ................................ 4-33
Fuel tank cap ...................................... 4-33
Doors .................................................. 4-35
Seats .................................................. 4-37
Seat belts ........................................... 4-39
Glove compartment ............................ 4-39
Cup holders ........................................ 4-41
Cargo bed........................................... 4-43
1234
Adjusting the front and rear shock
absorber assemblies (YXR7FB/
YXR700FAB) ................................... 4-49
Adjusting the front shock absorber
assemblies (YXR7FSPB)................. 4-53
Adjusting the rear shock absorber
assemblies (YXR7FSPB)................. 4-67
Trailer hitch bracket and receiver....... 4-79
Auxiliary DC jack ................................ 4-79
FOR YOUR SAFETY –
PRE-OPERATION CHECKS ................... 5-1
Front and rear brakes .......................... 5-7
Fuel .................................................... 5-11
Engine oil ........................................... 5-19
Coolant............................................... 5-21
Final gear oil ...................................... 5-23
Differential gear oil ............................. 5-23
Accelerator pedal ............................... 5-25
Seat belts ........................................... 5-25
Steering.............................................. 5-27
Fittings and fasteners......................... 5-27
Instruments, lights and switches ........ 5-29
Control cables .................................... 5-29
5
1RB60-EE.book Page 1 Thursday, April 7, 2011 10:43 AM
Page 68 of 492
4-3
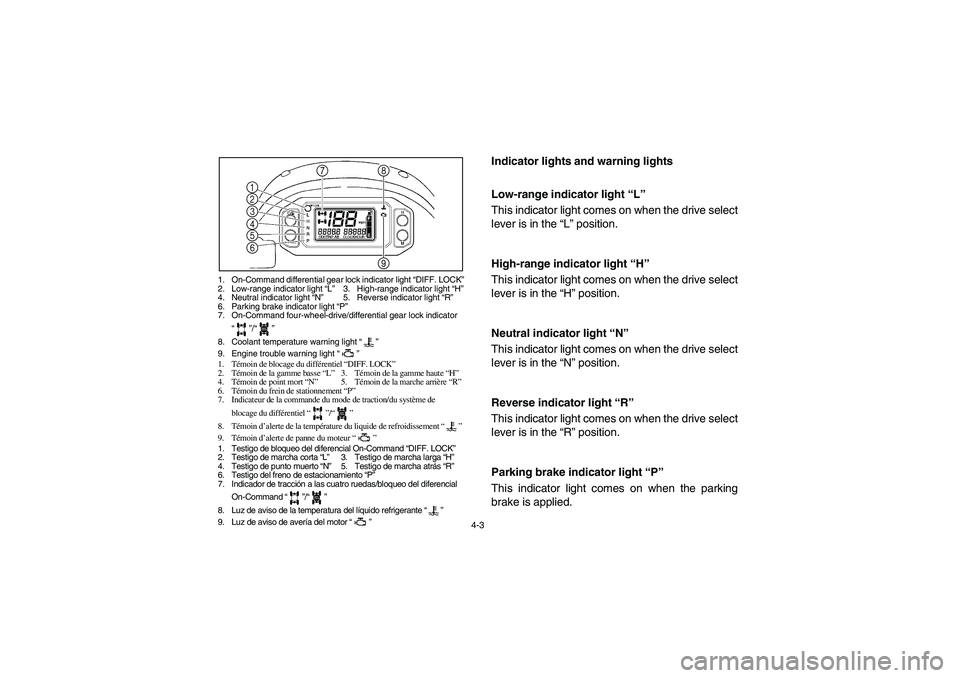
1. On-Command differential gear lock indicator light “DIFF. LOCK”
2. Low-range indicator light “L”3. High-range indicator light “H”
4. Neutral indicator light “N”5. Reverse indicator light “R”
6. Parking brake indicator light “P”
7. On-Command four-wheel-drive/differential gear lock indicator
“”/“”
8. Coolant temperature warning light “”
9. Engine trouble warning light “”
1. Témoin de blocage du différentiel “DIFF. LOCK”
2. Témoin de la gamme basse “L”3. Témoin de la gamme haute “H”
4. Témoin de point mort “N”5. Témoin de la marche arrière “R”
6. Témoin du frein de stationnement “P”
7. Indicateur de la commande du mode de traction/du système de
blocage du différentiel “”/“”
8. Témoin d’alerte de la température du liquide de refroidissement “”
9. Témoin d’alerte de panne du moteur “”
1. Testigo de bloqueo del diferencial On-Command “DIFF. LOCK”
2. Testigo de marcha corta “L”3. Testigo de marcha larga “H”
4. Testigo de punto muerto “N”5. Testigo de marcha atrás “R”
6. Testigo del freno de estacionamiento “P”
7. Indicador de tracción a las cuatro ruedas/bloqueo del diferencial
On-Command “”/“”
8. Luz de aviso de la temperatura del líquido refrigerante “”
9. Luz de aviso de avería del motor “”
1
2
3
4
5
6
8
9 7
DIFF.
LOCK
DIFF.
LOCK
DIFF.
LOCK
EVU00150
Indicator lights and warning lights
EVU01131
EVU01140
Low-range indicator light “L”
This indicator light comes on when the drive select
lever is in the “L” position.
EVU01150
High-range indicator light “H”
This indicator light comes on when the drive select
lever is in the “H” position.
EVU00170
Neutral indicator light “N”
This indicator light comes on when the drive select
lever is in the “N” position.
5B410001
Reverse indicator light “R”
This indicator light comes on when the drive select
lever is in the “R” position.
EVU00210
Parking brake indicator light “P”
This indicator light comes on when the parking
brake is applied.
1RB60-EE.book Page 3 Thursday, April 7, 2011 10:43 AM
Page 158 of 492
5-11
5B460002
Fuel
Make sure there is sufficient gasoline in the tank.
WARNING
Gasoline and gasoline vapors are extremely
flammable. To avoid fires and explosions and
to reduce the risk of injury when refueling, fol-
low these instructions.1. Before refueling, turn off the engine and be
sure that no one is sitting in the vehicle.
Never refuel while smoking, or while in the vi-
cinity of sparks, open flames, or other sourc-
es of ignition such as the pilot lights of water
heaters and clothes dryers.
2. Do not overfill the fuel tank. Because fuel ex-
pands when it heats up, heat from the engine
or the sun can cause fuel to spill out of the
fuel tank.
3. Wipe up any spilled fuel immediately.
4. Be sure the fuel tank cap is closed securely.
1RB60-EE.book Page 11 Thursday, April 7, 2011 10:43 AM
Page 176 of 492
5-29
EVU00490
Instruments, lights and switches
Check that all instruments, lights and switches are
working properly. Correct if necessary.
Control cables
When riding in cold weather, always make sure all
control cables work smoothly before you begin
riding. WARNING! Control cables can freeze in
cold weather and you could be unable to con-
trol the vehicle.
EVU00500
Tires
Check tire pressure regularly to make sure it is at
the recommended specifications. Also check for
wear and damage.
1RB60-EE.book Page 29 Thursday, April 7, 2011 10:43 AM
Page 448 of 492
8-157
EVU01010
Troubleshooting
Although Yamaha vehicles receive an inspection
before shipment from the factory, trouble may oc-
cur during operation. Any problem in the fuel, com-
pression, or ignition systems can cause poor
starting and loss of power. The troubleshooting
chart describes a quick, easy procedure for mak-
ing checks. If your vehicle requires any repair, take
it to a Yamaha dealer.
The skilled technicians at a Yamaha dealership
have the tools, experience, and know-how to prop-
erly service your vehicle. Use only genuine
Yamaha parts on your vehicle. Imitation parts may
look like Yamaha parts, but they are often inferior.
Consequently, they have a shorter service life and
can lead to expensive repair bills.
WARNING
When checking the fuel system, do not smoke
and make sure there are no open flames or
sparks in the area, including pilot lights from
water heaters or furnaces. Gasoline or gaso-
line vapors can ignite or explode, causing se-
vere injury or property damage.
1RB60-EE.book Page 157 Thursday, April 7, 2011 10:43 AM