air condition YAMAHA SLIDER 50 2006 Owners Manual
[x] Cancel search | Manufacturer: YAMAHA, Model Year: 2006, Model line: SLIDER 50, Model: YAMAHA SLIDER 50 2006Pages: 80, PDF Size: 2.06 MB
Page 28 of 80
PRE-OPERATION CHECKS
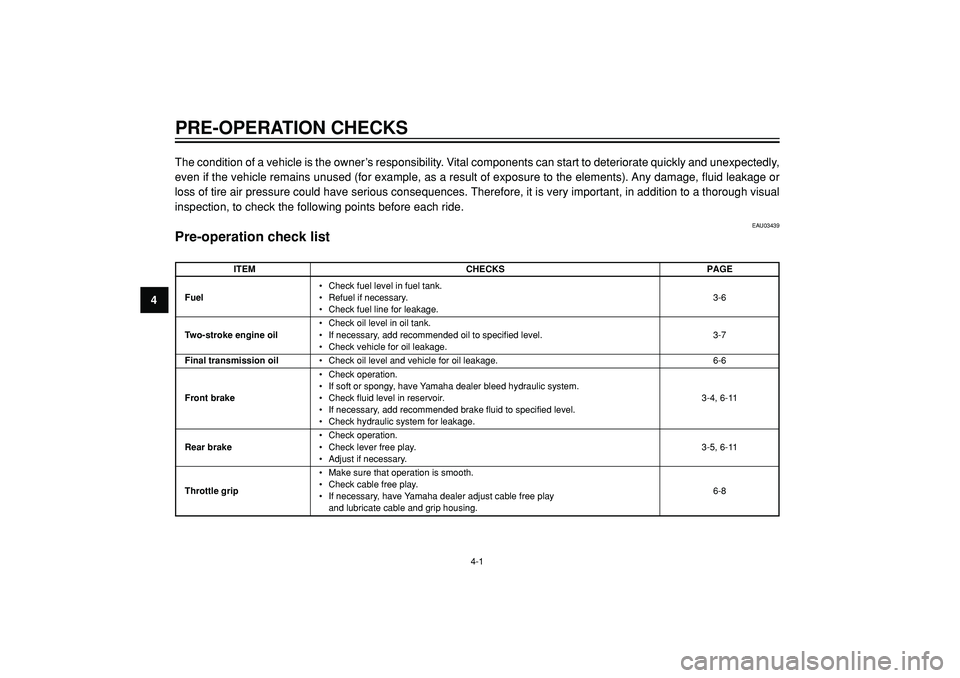
4The condition of a vehicle is the owner’s responsibility. Vital components can start to deteriorate quickly and unexpectedly,
even if the vehicle remains unused (for example, as a result of exposure to the elements). Any damage, fluid leakage or
loss of tire air pressure could have serious consequences. Therefore, it is very important, in addition to a thorough visual
inspection, to check the following points before each ride.
ITEM CHECKS PAGE
•Check fuel level in fuel tank.
Fuel•Refuel if necessary.3-6•Check fuel line for leakage.
•Check oil level in oil tank.
Two-stroke engine oil•If necessary, add recommended oil to specified level. 3-7•Check vehicle for oil leakage.
Final transmission oil•Check oil level and vehicle for oil leakage. 6-6
•Check operation.
•If soft or spongy, have Yamaha dealer bleed hydraulic system.
Front brake•Check fluid level in reservoir. 3-4, 6-11
•If necessary, add recommended brake fluid to specified level.
•Check hydraulic system for leakage.
•Check operation.
Rear brake•Check lever free play. 3-5, 6-11•Adjust if necessary.
•Make sure that operation is smooth.
Throttle grip•Check cable free play.
6-8
•If necessary, have Yamaha dealer adjust cable free playand lubricate cable and grip housing.
EAU03439
Pre-operation check list
4-1
Page 29 of 80
4
PRE-OPERATION CHECKS
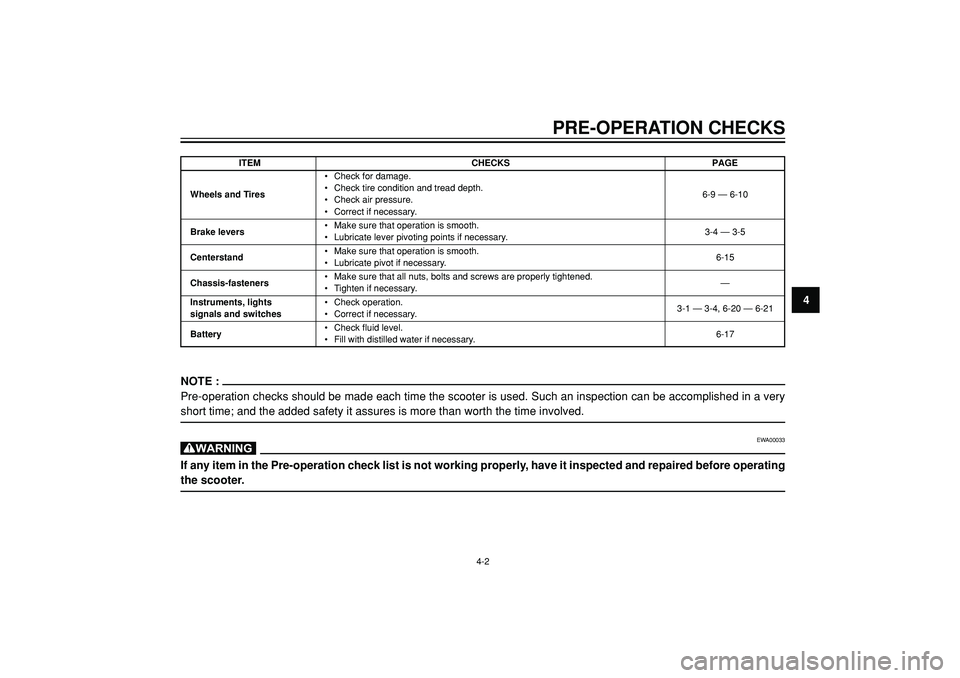
ITEM CHECKS PAGE
NOTE :
Pre-operation checks should be made each time the scooter is used. Such an inspection can be accomplished in a veryshort time; and the added safety it assures is more than worth the time involved.
EWA00033
If any item in the Pre-operation check list is not working properly, have it inspected and repaired before operatingthe scooter.
4-2 •Check for damage.
Wheels and Tires•Check tire condition and tread depth.
6-9 — 6-10
•Check air pressure.
•Correct if necessary.
Brake levers•Make sure that operation is smooth.
3-4 — 3-5•Lubricate lever pivoting points if necessary.
Centerstand•Make sure that operation is smooth.
6-15•Lubricate pivot if necessary.
Chassis-fasteners•Make sure that all nuts, bolts and screws are properly tightened.
—•Tighten if necessary.
Instruments, lights•Check operation.
3-1 — 3-4, 6-20 — 6-21
signals and switches•Correct if necessary.
Battery•Check fluid level.
6-17
•Fill with distilled water if necessary.
Page 38 of 80

PERIODIC MAINTENANCE AND MINOR REPAIR
6
EAU00466*
EW000061
This scooter is designed for use on
paved roads only. If this scooter is
operated in abnormally dusty,
muddy or wet conditions, the air
filter element should be cleaned or
replaced more frequently, otherwise
rapid engine wear may result.
Consult a Yamaha dealer for propermaintenance intervals.
EAU03453
Safety is an obligation of the owner.
Periodic inspection, adjustment and
lubrication will keep your vehicle in the
safest and most efficient condition pos-
sible. The most important points of
scooter inspection, adjustment, and
lubrication are explained on the
following pages.
EW000060
If you are not familiar with scooter
maintenance work, have a Yamahadealer do it for you.
EW000063
Modifications not approved by
Yamaha may cause loss of perfor-
mance and render the vehicle unsafe
for use. Consult a Yamaha dealerbefore attempting any changes.
6-1
Page 42 of 80
PERIODIC MAINTENANCE AND MINOR REPAIR
6
EAU01651
Checking the spark plugThe spark plug is an important engine
component, which should be checked
periodically, preferably by a Yamaha
dealer. Since heat and deposits will
cause any spark plug to slowly erode,
it should be removed and checked in
accordance with the periodic mainte-
nance and lubrication chart. In addition,
the condition of the spark plug can
reveal the condition of the engine.The porcelain insulator around the
center electrode of the spark plug
should be a medium-to-light tan (the
ideal color when the scooter is ridden
normally). If the spark plug shows a
distinctly different color, the engine
could be defective. Do not attempt to
diagnose such problems yourself.
Instead, have a Yamaha dealer check
the scooter.
If the spark plug shows signs of
electrode erosion and excessive
carbon or other deposits, it should be
replaced.
Specified spark plug:
BR8HS (NGK)
or BR9HS (NGK)
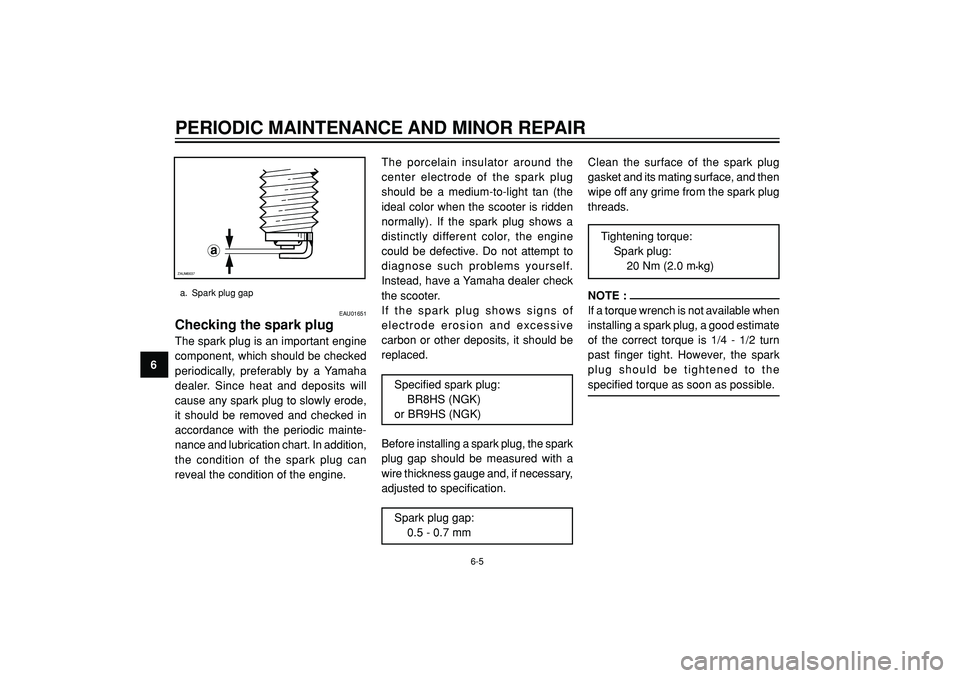
Before installing a spark plug, the spark
plug gap should be measured with a
wire thickness gauge and, if necessary,
adjusted to specification.
Spark plug gap:
0.5 - 0.7 mmClean the surface of the spark plug
gasket and its mating surface, and then
wipe off any grime from the spark plug
threads.
Tightening torque:
Spark plug:
20 Nm (2.0 m
•kg)
NOTE :
If a torque wrench is not available when
installing a spark plug, a good estimate
of the correct torque is 1/4 - 1/2 turn
past finger tight. However, the spark
plug should be tightened to thespecified torque as soon as possible.
a
ZAUM0037a. Spark plug gap
6-5
Page 46 of 80

PERIODIC MAINTENANCE AND MINOR REPAIR
6
EAU04551*
TiresTo maximize the performance,
durability, and safe operation of your
scooter, note the following points
regarding the specified tires.
Tire air pressure
The tire air pressure should be checked
and, if necessary, adjusted before each
ride.ZAUM0053
EW000082
•
The tire air pressure must be
checked and adjusted on cold
tires (i.e., when the temperature
of the tires equals the ambient
temperature).
•
The tire air pressure must be
adjusted in accordance with the
riding speed and with the total
weight of rider, passenger,
cargo, and accessoriesapproved for this model.
EW000077
Because loading has an enormous
impact on the handling, braking, per-
formance and safety characteristics of
your scooter, you should keep the
following precautions in mind.•
NEVER OVERLOAD THE SCOO-
TER! Operation of an overloaded
scooter may result in tire damage,
loss of control, or severe injury.
Make sure that the total weight of
rider, cargo, and accessories
does not exceed the specified
maximum load for the vehicle.
•
Do not carry along loosely packed
items, which can shift during a
ride.
•
Securely pack the heaviest items
close to the center of the scooter
and distribute the weight evenly
on both sides.
•
Adjust the suspension and tire air
pressure with regard to the load.
Check the tire condition and airpressure before each ride.
Tire air pressure
(measured on cold tires)
Load* Front Rear
Up to 90 kg150 kPa
1.5 kgf/cm
2
1.5 bar150 kPa
1.5 kgf/cm
2
1.5 bar
90 kg load-maximum
150 kPa
1.5 kgf/cm
2
1.5 bar170 kPa
1.7 kgf/cm
2
1.7 bar
Maximum load* 184 kg
* Total weight of rider, passenger, cargo and
accessories
6-9
Page 48 of 80

PERIODIC MAINTENANCE AND MINOR REPAIR
6
EAU03773
Cast wheelsTo maximize the performance,
durability, and safe operation of your
scooter, note the following points
regarding the specified wheels.•
The wheel rims should be
checked for cracks, bends or
warpage before each ride. If any
damage is found, have a Yamaha
dealer replace the wheel. Do not
attempt even the smallest repair
to the wheel. A deformed or
cracked wheel must be replaced.
•
The wheel should be balanced
whenever either the tire or wheel
has been changed or replaced. An
unbalanced wheel can result in
poor performance, adverse
handling characteristics, and a
shortened tire life.
•
Ride at moderate speeds after
changing a tire since the tire sur-
face must first be "broken in" for it
to develop its optimal
characteristics.
EAU00697*
Adjusting the front brake
lever free playThe brake lever free play should
measure 10 - 20 mm as shown.
Periodically check the brake lever free
play and, if necessary, have a Yamaha
dealer adjust it.
EW000100
An incorrect brake lever free play
indicates a hazardous condition in
the brake system. Do not operate the
scooter until the brake system has
been checked or repaired by aYamaha dealer.
a
ZAUM0107
aZAUM0108
a. Front brake lever free playa. Rear brake lever free play
EAU04469
Adjusting the rear brake
lever free playThe brake lever free play should
measure 10 - 20 mm as shown.
Periodically check the brake lever free
play and, if necessary, adjust it as
follows.
6-11
Page 51 of 80
PERIODIC MAINTENANCE AND MINOR REPAIR
6
EAUM0008
Changing the brake fluidHave a Yamaha dealer change the
brake fluid at the intervals specified in
the periodic maintenance and
lubrication chart. In addition, have the
brake hose replaced every four years
or whenever it is damaged or leaking.
EAU02962
Checking and lubricating the
cablesThe operation of all control cables and
the condition of the cables should be
checked before each ride, and the
cables and cable ends should be
lubricated if necessary. If a cable is
damaged or does not move smoothly,
have a Yamaha dealer check or replace
it.
Recommended lubricant:
Engine oil
EW000112
Damage to the outer sheath may
interfere with proper cable operation
and will cause the inner cable to
rust. Replace a damaged cable as
soon as possible to prevent unsafeconditions.
6-14
•
Brake fluid may deteriorate painted
surfaces or plastic parts. Always
clean up spilled fluid immediately.
•
As the brake pads wear, it is nor-
mal for the brake fluid level to
gradually go down. However, if the
brake fluid level goes down
suddenly, have a Yamaha dealer
check the cause.
Page 53 of 80
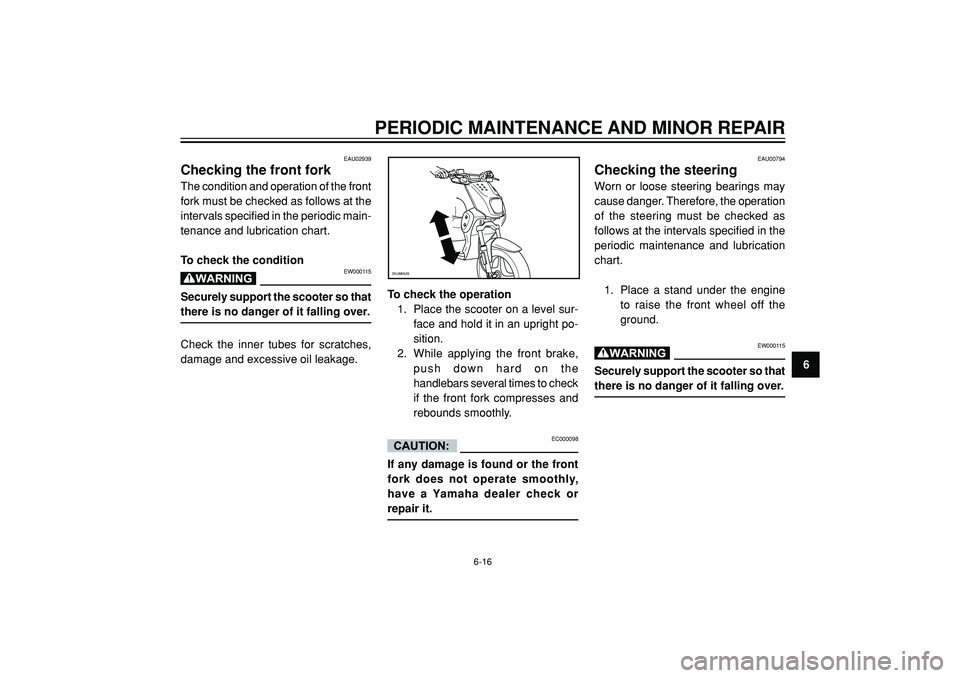
PERIODIC MAINTENANCE AND MINOR REPAIR
6
EAU02939
Checking the front forkThe condition and operation of the front
fork must be checked as follows at the
intervals specified in the periodic main-
tenance and lubrication chart.
To check the condition
EW000115
Securely support the scooter so thatthere is no danger of it falling over.
Check the inner tubes for scratches,
damage and excessive oil leakage.To check the operation
1. Place the scooter on a level sur-
face and hold it in an upright po-
sition.
2. While applying the front brake,
push down hard on the
handlebars several times to check
if the front fork compresses and
rebounds smoothly.
EC000098
If any damage is found or the front
fork does not operate smoothly,
have a Yamaha dealer check orrepair it.ZAUM0528
EAU00794
Checking the steeringWorn or loose steering bearings may
cause danger. Therefore, the operation
of the steering must be checked as
follows at the intervals specified in the
periodic maintenance and lubrication
chart.
1. Place a stand under the engine
to raise the front wheel off the
ground.
EW000115
Securely support the scooter so thatthere is no danger of it falling over.
6-16
Page 56 of 80

PERIODIC MAINTENANCE AND MINOR REPAIR
6
1. Panel A
2. Fuse
3. Battery
6-1932 1
ZAUM0162
To store the battery
1. If the scooter will not be used for
more than one month, remove the
battery, fully charge it, and then
place it in a cool, dry place.
2. If the battery will be stored for
more than two months, check the
specific gravity of the electrolyte
at least once a month and fully
charge the battery whenever
necessary.
3. Fully charge the battery before
installation.
4. After installation, make sure that
the battery leads are properly
connected to the battery terminals
and that the breather hose is
properly routed, in good condition,
and not obstructed.
EC000099
If the breather hose is positioned in
such a way that the frame is exposed
to electrolyte or gas expelled from
the battery, the frame could sufferstructural and external damages.
EAU00809
Replacing the fuseThe fuse holder is located beside the
battery compartment behind panel A.
If the fuse is blown, replace it as follows.
1. Turn the key to “
” and turn off
all electrical circuits.
2. Remove the blown fuse, and then
install a new fuse of the specified
amperage.
Specified fuse:
7 A
EC000103
Do not use a fuse of a higher
amperage rating than recommended
to avoid causing extensive damage
to the electrical system and possiblya fire.
3. Turn the key to “
” and turn on
the electrical circuits to check if the
devices operate.
4. If the fuse immediately blows
again, have a Yamaha dealer
check the electrical system.