check engine YAMAHA SLIDER 50 2013 Owners Manual
[x] Cancel search | Manufacturer: YAMAHA, Model Year: 2013, Model line: SLIDER 50, Model: YAMAHA SLIDER 50 2013Pages: 66, PDF Size: 1.58 MB
Page 6 of 66

TABLE OF CONTENTSSAFETY INFORMATION ..................1-1
Further safe-riding points ................1-5
DESCRIPTION ..................................2-1
Left view ..........................................2-1
Right view ........................................2-2
Controls and instruments.................2-3
INSTRUMENT AND CONTROL
FUNCTIONS.......................................3-1
Main switch/steering lock ................3-1
Indicator lights and warning light ....3-2
Speedometer unit ...........................3-3
Handlebar switches ........................3-3
Front brake lever ............................3-4
Rear brake lever .............................3-4
Fuel and 2-stroke engine oil tank
caps .............................................3-5
Fuel .................................................3-5
Catalytic converter ..........................3-6
2-stroke engine oil ..........................3-7
Starter (choke) lever .......................3-7
Kickstarter .......................................3-8
Seat ................................................3-8
Anti-theft device housing ................3-8
Luggage hook .................................3-9FOR YOUR SAFETY –
PRE-OPERATION CHECKS............. 4-1
OPERATION AND IMPORTANT
RIDING POINTS................................. 5-1
Starting a cold engine .................... 5-1
Starting a warm engine .................. 5-2
Starting off ...................................... 5-2
Acceleration and deceleration ........ 5-3
Braking ........................................... 5-3
Tips for reducing fuel
consumption ............................... 5-4
Engine break-in .............................. 5-4
Parking ........................................... 5-5
PERIODIC MAINTENANCE AND
ADJUSTMENT................................... 6-1
Periodic maintenance chart for the
emission control system ............. 6-2
General maintenance and
lubrication chart .......................... 6-3
Removing and installing the cowling
and panel .................................... 6-6
Checking the spark plug ................. 6-7
Final transmission oil ...................... 6-8
Cleaning the air filter element ........ 6-9
Adjusting the carburetor ............... 6-10
Checking the throttle grip free
play ........................................... 6-10
Tires ............................................. 6-10
Cast wheels .................................. 6-12Checking the front brake lever free
play ........................................... 6-13
Adjusting the rear brake lever free
play ........................................... 6-13
Checking the front brake pads and
rear brake shoes ...................... 6-14
Checking the brake fluid level ...... 6-14
Changing the brake fluid .............. 6-15
Checking and lubricating the
cables ....................................... 6-16
Checking and lubricating the
throttle grip and cable ............... 6-16
Lubricating the front and rear
brake levers .............................. 6-16
Checking and lubricating the
centerstand ............................... 6-17
Checking the front fork ................. 6-18
Checking the steering .................. 6-18
Checking the wheel bearings ....... 6-19
Battery ......................................... 6-19
Replacing the fuse ....................... 6-21
Replacing the headlight bulb ....... 6-21
Replacing the tail/brake light
bulb ........................................... 6-22
Replacing a turn signal light
bulb ........................................... 6-22
Troubleshooting ........................... 6-23
Troubleshooting chart .................. 6-24
SCOOTER CARE AND STORAGE... 7-1
Matte color caution ........................ 7-1U1S0E1E0.book Page 1 Wednesday, November 7, 2012 3:32 PM
Page 10 of 66

SAFETY INFORMATION
1-3
1Avoid Carbon Monoxide Poisoning
All engine exhaust contains carbon
monoxide, a deadly gas. Breathing car-
bon monoxide can cause headaches,
dizziness, drowsiness, nausea, confu-
sion, and eventually death.
Carbon Monoxide is a colorless, odor-
less, tasteless gas which may be
present even if you do not see or smell
any engine exhaust. Deadly levels of
carbon monoxide can collect rapidly
and you can quickly be overcome and
unable to save yourself. Also, deadly
levels of carbon monoxide can linger
for hours or days in enclosed or poorly
ventilated areas. If you experience any
symptoms of carbon monoxide poison-
ing, leave the area immediately, get
fresh air, and SEEK MEDICAL TREAT-
MENT.
●
Do not run engine indoors. Even if
you try to ventilate engine exhaust
with fans or open windows and
doors, carbon monoxide can rap-
idly reach dangerous levels.
●
Do not run engine in poorly venti-
lated or partially enclosed areas
such as barns, garages, or car-
ports.
●
Do not run engine outdoors where
engine exhaust can be drawn into
a building through openings such
as windows and doors.
Loading
Adding accessories or cargo to your
scooter can adversely affect stability
and handling if the weight distribution of
the scooter is changed. To avoid the
possibility of an accident, use extreme
caution when adding cargo or accesso-
ries to your scooter. Use extra care
when riding a scooter that has added
cargo or accessories. Here, along with
the information about accessories be-
low, are some general guidelines to fol-
low if loading cargo to your scooter:
The total weight of the operator, pas-
senger, accessories and cargo must
not exceed the maximum load limit.
Operation of an overloaded vehicle
could cause an accident.
When loading within this weight limit,
keep the following in mind:
●
Cargo and accessory weight
should be kept as low and close to
the scooter as possible. Securely
pack your heaviest items as close
to the center of the vehicle as pos-
sible and make sure to distribute
the weight as evenly as possible
on both sides of the scooter to min-
imize imbalance or instability.
●
Shifting weights can create a sud-
den imbalance. Make sure that ac-
cessories and cargo are securely
attached to the scooter before
riding. Check accessory mounts
and cargo restraints frequently.
Properly adjust the suspension
for your load (suspension-ad-
justable models only), and
check the condition and pres-
sure of your tires.
Never attach any large or heavy
items to the handlebar, front
fork, or front fender. Such items
can create unstable handling or
a slow steering response.
●
This vehicle is not designed to
pull a trailer or to be attached to
a sidecar.
Maximum load:
184 kg (406 lb)
U1S0E1E0.book Page 3 Wednesday, November 7, 2012 3:32 PM
Page 17 of 66
INSTRUMENT AND CONTROL FUNCTIONS
3-1
3
EAU10461
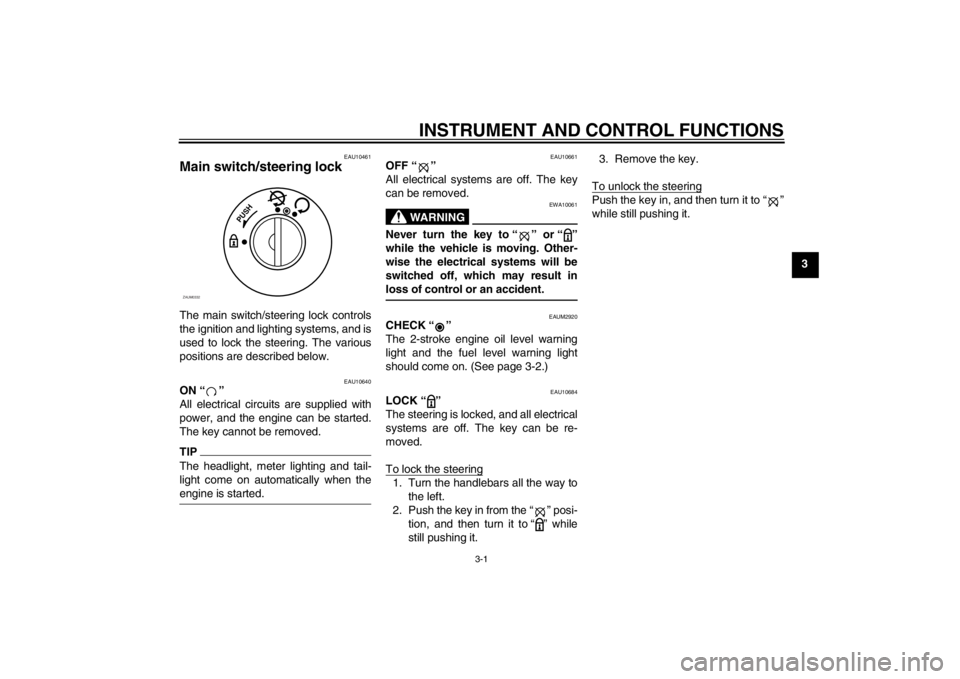
Main switch/steering lock The main switch/steering lock controls
the ignition and lighting systems, and is
used to lock the steering. The various
positions are described below.
EAU10640
ON “ ”
All electrical circuits are supplied with
power, and the engine can be started.
The key cannot be removed.TIPThe headlight, meter lighting and tail-
light come on automatically when the
engine is started.
EAU10661
OFF “ ”
All electrical systems are off. The key
can be removed.
WARNING
EWA10061
Never turn the key to “ ” or “ ”
while the vehicle is moving. Other-
wise the electrical systems will be
switched off, which may result in
loss of control or an accident.
EAUM2920
CHECK “ ”
The 2-stroke engine oil level warning
light and the fuel level warning light
should come on. (See page 3-2.)
EAU10684
LOCK “ ”
The steering is locked, and all electrical
systems are off. The key can be re-
moved.
To lock the steering1. Turn the handlebars all the way to
the left.
2. Push the key in from the “ ” posi-
tion, and then turn it to “ ” while
still pushing it.3. Remove the key.
To unlock the steering
Push the key in, and then turn it to “ ”
while still pushing it.
P
U
S
H
ZAUM0332
U1S0E1E0.book Page 1 Wednesday, November 7, 2012 3:32 PM
Page 18 of 66
INSTRUMENT AND CONTROL FUNCTIONS
3-2
3
EAU11006
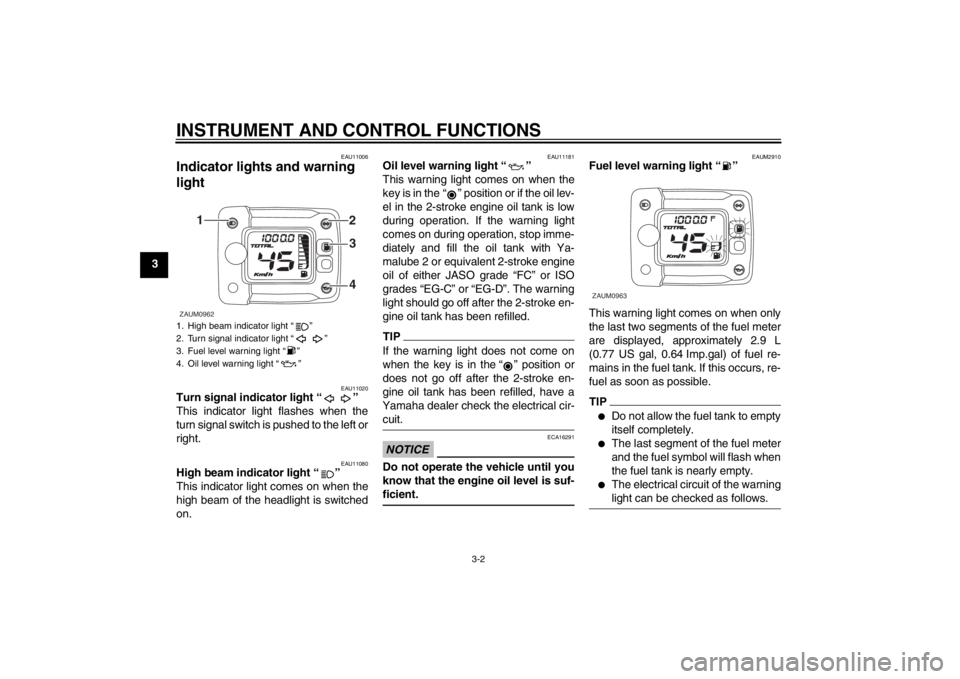
Indicator lights and warning
light
EAU11020
Turn signal indicator light “ ”
This indicator light flashes when the
turn signal switch is pushed to the left or
right.
EAU11080
High beam indicator light “ ”
This indicator light comes on when the
high beam of the headlight is switched
on.
EAU11181
Oil level warning light “ ”
This warning light comes on when the
key is in the “ ” position or if the oil lev-
el in the 2-stroke engine oil tank is low
during operation. If the warning light
comes on during operation, stop imme-
diately and fill the oil tank with Ya-
malube 2 or equivalent 2-stroke engine
oil of either JASO grade “FC” or ISO
grades “EG-C” or “EG-D”. The warning
light should go off after the 2-stroke en-
gine oil tank has been refilled.TIPIf the warning light does not come on
when the key is in the “ ” position or
does not go off after the 2-stroke en-
gine oil tank has been refilled, have a
Yamaha dealer check the electrical cir-
cuit.NOTICE
ECA16291
Do not operate the vehicle until you
know that the engine oil level is suf-
ficient.
EAUM2910
Fuel level warning light “ ”
This warning light comes on when only
the last two segments of the fuel meter
are displayed, approximately 2.9 L
(0.77 US gal, 0.64 Imp.gal) of fuel re-
mains in the fuel tank. If this occurs, re-
fuel as soon as possible.TIP●
Do not allow the fuel tank to empty
itself completely.
●
The last segment of the fuel meter
and the fuel symbol will flash when
the fuel tank is nearly empty.
●
The electrical circuit of the warning
light can be checked as follows.
1. High beam indicator light “ ”
2. Turn signal indicator light “ ”
3. Fuel level warning light “ ”
4. Oil level warning light “ ”ZAUM0962
3
42 1
ZAUM0963
U1S0E1E0.book Page 2 Wednesday, November 7, 2012 3:32 PM
Page 26 of 66
FOR YOUR SAFETY – PRE-OPERATION CHECKS
4-1
4
EAU15597
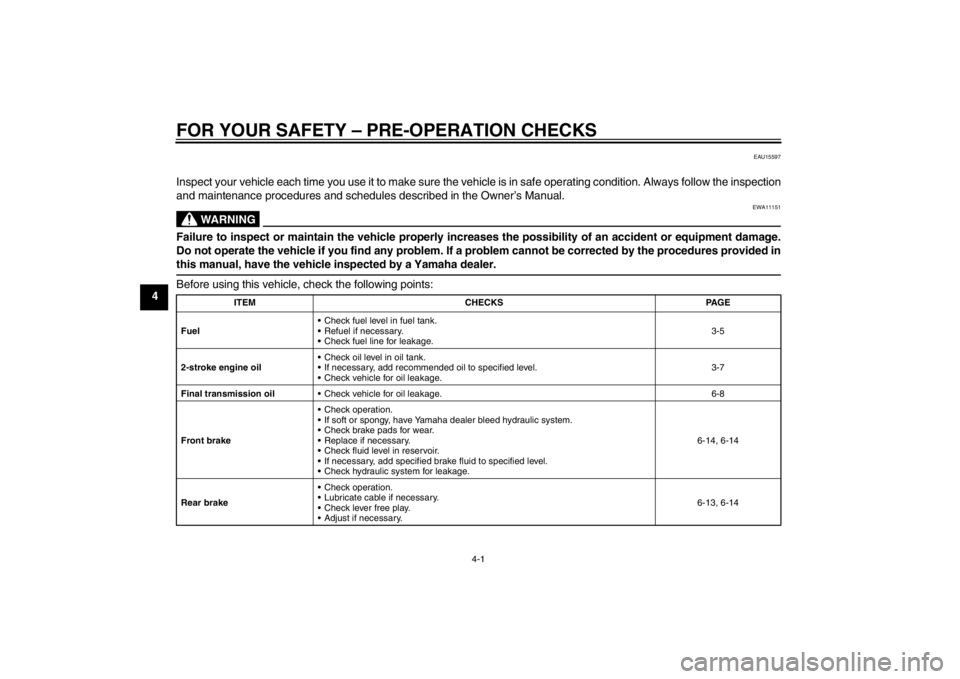
Inspect your vehicle each time you use it to make sure the vehicle is in safe operating condition. Always follow the inspection
and maintenance procedures and schedules described in the Owner’s Manual.
WARNING
EWA11151
Failure to inspect or maintain the vehicle properly increases the possibility of an accident or equipment damage.
Do not operate the vehicle if you find any problem. If a problem cannot be corrected by the procedures provided in
this manual, have the vehicle inspected by a Yamaha dealer.Before using this vehicle, check the following points:
ITEM CHECKS PAGE
Fuel Check fuel level in fuel tank.
Refuel if necessary.
Check fuel line for leakage.3-5
2-stroke engine oil Check oil level in oil tank.
If necessary, add recommended oil to specified level.
Check vehicle for oil leakage.3-7
Final transmission oil Check vehicle for oil leakage. 6-8
Front brake Check operation.
If soft or spongy, have Yamaha dealer bleed hydraulic system.
Check brake pads for wear.
Replace if necessary.
Check fluid level in reservoir.
If necessary, add specified brake fluid to specified level.
Check hydraulic system for leakage.6-14, 6-14
Rear brake Check operation.
Lubricate cable if necessary.
Check lever free play.
Adjust if necessary.6-13, 6-14
U1S0E1E0.book Page 1 Wednesday, November 7, 2012 3:32 PM
Page 28 of 66
OPERATION AND IMPORTANT RIDING POINTS
5-1
5
EAU15951
Read the Owner’s Manual carefully to
become familiar with all controls. If
there is a control or function you do not
understand, ask your Yamaha dealer.
WARNING
EWA10271
Failure to familiarize yourself with
the controls can lead to loss of con-
trol, which could cause an accident
or injury.
EAUM2126
Starting a cold engine NOTICE
ECA10250
See page 5-4 for engine break-in in-
structions prior to operating the ve-
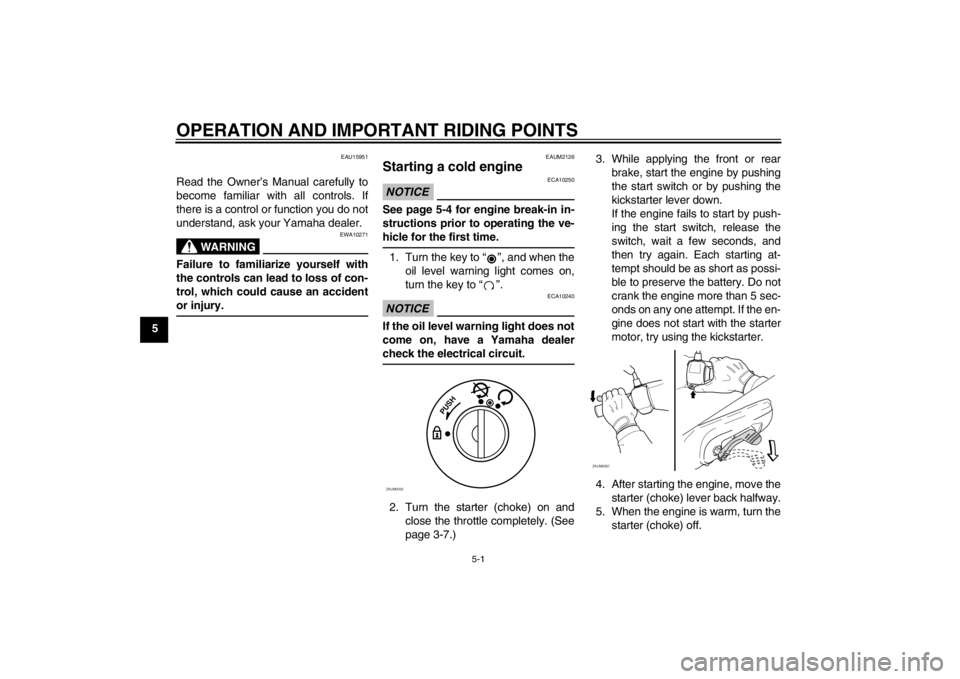
hicle for the first time.1. Turn the key to “ ”, and when the
oil level warning light comes on,
turn the key to “ ”.NOTICE
ECA10240
If the oil level warning light does not
come on, have a Yamaha dealer
check the electrical circuit.2. Turn the starter (choke) on and
close the throttle completely. (See
page 3-7.)3. While applying the front or rear
brake, start the engine by pushing
the start switch or by pushing the
kickstarter lever down.
If the engine fails to start by push-
ing the start switch, release the
switch, wait a few seconds, and
then try again. Each starting at-
tempt should be as short as possi-
ble to preserve the battery. Do not
crank the engine more than 5 sec-
onds on any one attempt. If the en-
gine does not start with the starter
motor, try using the kickstarter.
4. After starting the engine, move the
starter (choke) lever back halfway.
5. When the engine is warm, turn the
starter (choke) off.
P
U
S
H
ZAUM0332
ZAUM0367
U1S0E1E0.book Page 1 Wednesday, November 7, 2012 3:32 PM
Page 29 of 66
OPERATION AND IMPORTANT RIDING POINTS
5-2
5
TIPThe engine is warm when it responds
quickly to the throttle with the starter
(choke) turned off.NOTICE
ECA11042
For maximum engine life, never ac-
celerate hard when the engine is
cold!
EAU16640
Starting a warm engine Follow the same procedure as for start-
ing a cold engine with the exception
that the starter (choke) is not required
when the engine is warm.
EAU16761
Starting off TIPBefore starting off, allow the engine to
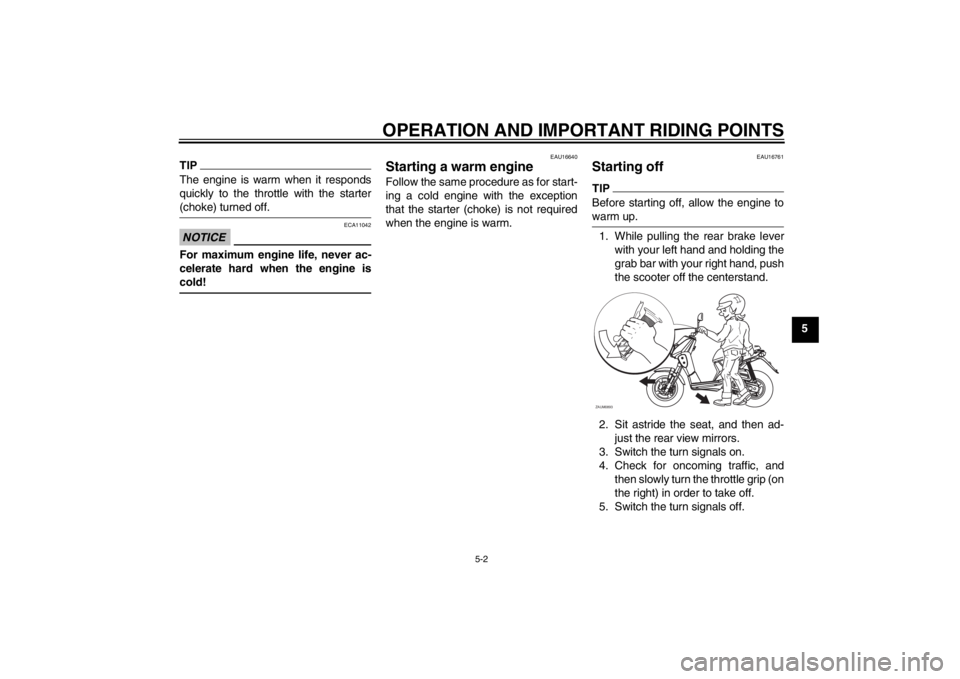
warm up.1. While pulling the rear brake lever
with your left hand and holding the
grab bar with your right hand, push
the scooter off the centerstand.
2. Sit astride the seat, and then ad-
just the rear view mirrors.
3. Switch the turn signals on.
4. Check for oncoming traffic, and
then slowly turn the throttle grip (on
the right) in order to take off.
5. Switch the turn signals off.ZAUM0893
U1S0E1E0.book Page 2 Wednesday, November 7, 2012 3:32 PM
Page 31 of 66

OPERATION AND IMPORTANT RIDING POINTS
5-4
5
EAU16820
Tips for reducing fuel con-
sumption Fuel consumption depends largely on
your riding style. Consider the following
tips to reduce fuel consumption:●
Avoid high engine speeds during
acceleration.
●
Avoid high engine speeds with no
load on the engine.
●
Turn the engine off instead of let-
ting it idle for an extended length of
time (e.g., in traffic jams, at traffic
lights or at railroad crossings).
EAU16830
Engine break-in There is never a more important period
in the life of your engine than the period
between 0 and 1000 km (600 mi). For
this reason, you should read the follow-
ing material carefully.
Since the engine is brand new, do not
put an excessive load on it for the first
1000 km (600 mi). The various parts in
the engine wear and polish themselves
to the correct operating clearances.
During this period, prolonged full-throt-
tle operation or any condition that might
result in engine overheating must be
avoided.
EAUM2091
0–150 km (0–90 mi)
Avoid prolonged operation above 1/3
throttle. Vary the speed of the scooter
from time to time. Do not operate it at
one set throttle position.
150–500 km (90–300 mi)
Avoid prolonged operation above 1/2
throttle.
500–1000 km (300–600 mi)
Avoid cruising speeds in excess of 3/4
throttle.1000 km (600 mi) and beyond
Avoid prolonged full throttle operation.
Vary speeds occasionally. NOTICE:
After 1000 km (600 mi) of operation,
the final transmission oil must be
changed.
[ECAM1071]
NOTICE
ECA10270
If any engine trouble should occur
during the engine break-in period,
immediately have a Yamaha dealer
check the vehicle.
U1S0E1E0.book Page 4 Wednesday, November 7, 2012 3:32 PM
Page 34 of 66

PERIODIC MAINTENANCE AND ADJUSTMENT
6-2
6
EAU46871
TIP●
The annual checks must be performed every year, except if a kilometer-based maintenance, or for the UK, a
mileage-based maintenance, is performed instead.
●
From 30000 km (17500 mi), repeat the maintenance intervals starting from 6000 km (3500 mi).
●
Items marked with an asterisk should be performed by a Yamaha dealer as they require special tools, data and technical
skills.
EAU46920
Periodic maintenance chart for the emission control system NO. ITEM CHECK OR MAINTENANCE JOBODOMETER READING
ANNUAL
CHECK 1000 km
(600 mi)6000 km
(3500 mi)12000 km
(7000 mi)18000 km
(10500 mi)24000 km
(14000 mi)
1*Fuel line Check fuel and vacuum hoses for
cracks or damage.√√√√√
2 Spark plug Replace.√√√√√
3*Carburetor Adjust engine idling speed.√√√√√√
U1S0E1E0.book Page 2 Wednesday, November 7, 2012 3:32 PM
Page 39 of 66
PERIODIC MAINTENANCE AND ADJUSTMENT
6-7
6
EAU19622
Checking the spark plug The spark plug is an important engine
component, which should be checked
periodically, preferably by a Yamaha
dealer. Since heat and deposits will
cause any spark plug to slowly erode, it
should be removed and checked in ac-
cordance with the periodic mainte-
nance and lubrication chart. In addition,
the condition of the spark plug can re-
veal the condition of the engine.
The porcelain insulator around the cen-
ter electrode of the spark plug should
be a medium-to-light tan (the ideal color
when the vehicle is ridden normally). If
the spark plug shows a distinctly differ-
ent color, the engine could be operating
improperly. Do not attempt to diagnose
such problems yourself. Instead, have
a Yamaha dealer check the vehicle.
If the spark plug shows signs of elec-
trode erosion and excessive carbon or
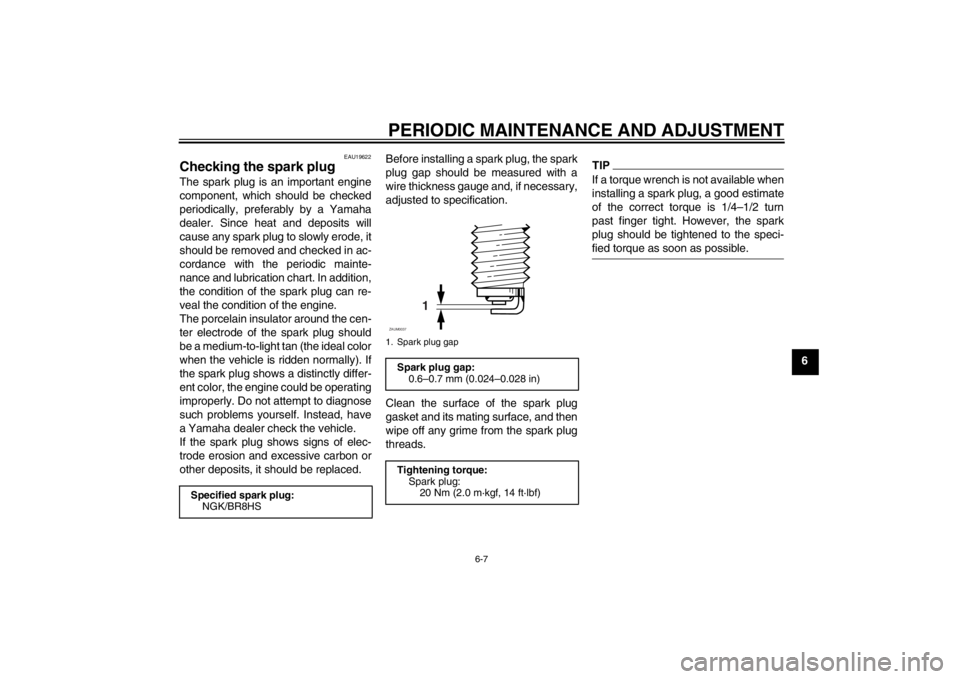
other deposits, it should be replaced.Before installing a spark plug, the spark
plug gap should be measured with a
wire thickness gauge and, if necessary,
adjusted to specification.
Clean the surface of the spark plug
gasket and its mating surface, and then
wipe off any grime from the spark plug
threads.
TIPIf a torque wrench is not available when
installing a spark plug, a good estimate
of the correct torque is 1/4–1/2 turn
past finger tight. However, the spark
plug should be tightened to the speci-
fied torque as soon as possible.
Specified spark plug:
NGK/BR8HS
1. Spark plug gap
Spark plug gap:
0.6–0.7 mm (0.024–0.028 in)
Tightening torque:
Spark plug:
20 Nm (2.0 m·kgf, 14 ft·lbf)
1
ZAUM0037
U1S0E1E0.book Page 7 Wednesday, November 7, 2012 3:32 PM