maintenance YAMAHA SUPERJET 2015 Owners Manual
[x] Cancel search | Manufacturer: YAMAHA, Model Year: 2015, Model line: SUPERJET, Model: YAMAHA SUPERJET 2015Pages: 78, PDF Size: 3.35 MB
Page 4 of 78
Important manual information
EJU30193
To the owner/operator
Thank you for choosing a Yamaha watercraft.
This owner’s/operator’s manual contains in-
formation you will need for proper operation,
maintenance, and care. If you have any ques-
tions about the operation or maintenance of
your watercraft, please consult a Yamaha
dealer.
This manual is not a course on boating safety
or seamanship. If this is your first watercraft,
or if you are changing to a type of watercraft
you are not familiar with, for your own com-
fort and safety, please ensure that you obtain
proper training or practice before operating
the watercraft by yourself. In addition, a
Yamaha dealer or boating organization will be pleased to recommend local sea schools, or
competent instructors.
In this manual, information of particular im-
portance is distinguished in the following
ways:
This is the safety alert symbol. It is used
to alert you to potential personal injury haz-
ards. Obey all safety messages that follow
this symbol to avoid possible injury or death.
WARNING
EWJ00072
A WARNING indicates a hazardous situa-
tion which, if not avoided, could result in
death or serious injury.
NOTICE
ECJ00092
A NOTICE indicates special precautions
that must be taken to avoid damage to the
watercraft or other property.
TIP:
A TIP provides key information to make pro-
cedures easier or clearer.
EJU40411
Because Yamaha has a policy of continuing
product improvement, this product may not
be exactly as described in this owner’s/oper-
ator’s manual. Specifications are subject to
change without notice.
This manual should be considered a perma-
nent part of this wate rcraft and should remain
with it even if the watercraft is subsequently
sold.
EJU30213
WaveRunner SuperJet
OWNER’S/OPERATOR’S MANUAL ©2014 by Yamaha Motor Co., Ltd.
1st Edition, March 2014All rights reserved.
Any reprinting or unauthorized use
without the written permission of Ya m a h a M o t o r C o . , L t d . is expressly prohibited.
Printed in Japan
UF4D70E0.book Page 2 Wednesday, May 7, 2014 10:53 AM
Page 6 of 78

Table of contents
Capsized watercraft ......................... 48
Beaching the watercraft ................... 49
Operating in weeded areas .............. 49
After removing the watercraft from the water ....................................... 49
Care and storage............................. 50Post-operation care ...................... 50
Flushing the cooling water
passages....................................... 50
Cleaning the watercraft .................... 51
Battery care ...................................... 51
Long-term storage ........................ 54
Cleaning ........................................... 54
Lubrication ....................................... 54
Rustproofing..................................... 55
Maintenance .................................... 56 Maintenance.................................. 56
Tool kit.............................................. 56
Adjusting the steering friction .......... 56
Adjusting the jet thrust nozzle
angle ............................................. 57
Periodic maintenance chart ............. 59
Checking the spark plugs ................ 60
Lubrication points ............................ 61
Checking the fuel filter ..................... 61
Adjusting the choke cable................ 61
Adjusting the carburetor................... 61
Specifications .................................. 63 Specifications................................ 63
Trouble recovery ............................. 64 Troubleshooting ............................ 64
Troubleshooting chart ...................... 64
Emergency procedures ................. 66
Cleaning the jet intake and
impeller ......................................... 66
Jumping the battery ......................... 67
Replacing the fuse ........................... 67
Towing the watercraft ...................... 68
Submerged watercraft ..................... 69
Index................................................. 70
UF4D70E0.book Page 2 Wednesday, May 7, 2014 10:53 AM
Page 21 of 78

Safety information
15
EJU30992
Enjoy your watercraft responsibly
You share the areas you enjoy when riding
your watercraft with others and with nature.
So your enjoyment includes a responsibility
to treat these other people, and the lands,
waters, and wildlife with respect and courte-
sy.
Whenever and wherever you ride, think of
yourself as the guest of those around you.
Remember, for example, that the sound of
your watercraft may be music to you, but it
could be just noise to others. And the exciting
splash of your wake can make waves others
won’t enjoy.
Avoid riding close to shoreline homes and
waterfowl nesting areas or other wildlife ar-
eas, and keep a respectful distance from fish-
ermen, other boats, swimmers, and
populated beaches. When travel in areas like
these is unavoidable, ride slowly and obey all
laws.
Proper maintenance is necessary to ensure
that the exhaust emission and sound levels of
your watercraft will continue to be within reg-
ulated limits. You have the responsibility to
make sure that the recommended mainte-
nance in this owner’s/operator’s manual is
carried out.
Remember, pollution can be harmful to the
environment. Do not refuel or add oil where a
spill could cause damage to nature. Remove
your watercraft from the water and move it
away from the shoreline before refueling. Dis-
pose of water and any fuel and oil residue in
the engine compartment according to local
regulations. And keep your surroundings
pleasant for the people and wildlife that share
the waterways: don’t litter. When you ride responsibly, with respect and
courtesy for others, you help ensure that our
waterways stay open for the enjoyment of a
variety of recreational opportunities.
UF4D70E0.book Page 15 Wednesday, May 7, 2014 10:53 AM
Page 60 of 78
Care and storage
54
EJU33484
Long-term storage
WARNING
EWJ00321
Always turn the fuel cock knob to “OFF”
when storing the watercraft, otherwise
fuel could leak out into the engine or en-
gine compartment, which would create a
fire hazard.
Storage for long periods of time, such as win-
ter storage, requires preventive maintenance
to ensure against deterioration. It is advisable
to have the watercraft serviced by a Yamaha
dealer prior to storage.
However, the following procedures can be
performed easily by the owner.
EJU40763Cleaning
(1) Flush the cooling water passages. (Seepage 50 for information on flushing the
cooling water passages.)
TIP:
If you will be storing the watercraft for a pro-
longed period, such as winter storage, top off
the fuel tank with fresh gasoline and add fuel
stabilizer and conditioner to the fuel tank ac-
cording to the manufacturer’s instruction be-
fore starting the engine.
(2) Clean the watercraft. (See page 51 for in-formation on cleaning the watercraft.)
Wax the hull with a non-abrasive wax.
EJU40794Lubrication
Use a suitable marine grease applicator and
spray a rust inhibitor between the inner and
outer cables to lubricate the cables and
purge out any dirt and moisture.
To keep moving parts sliding or rotating
smoothly, lubricate them with water-resistant
grease.
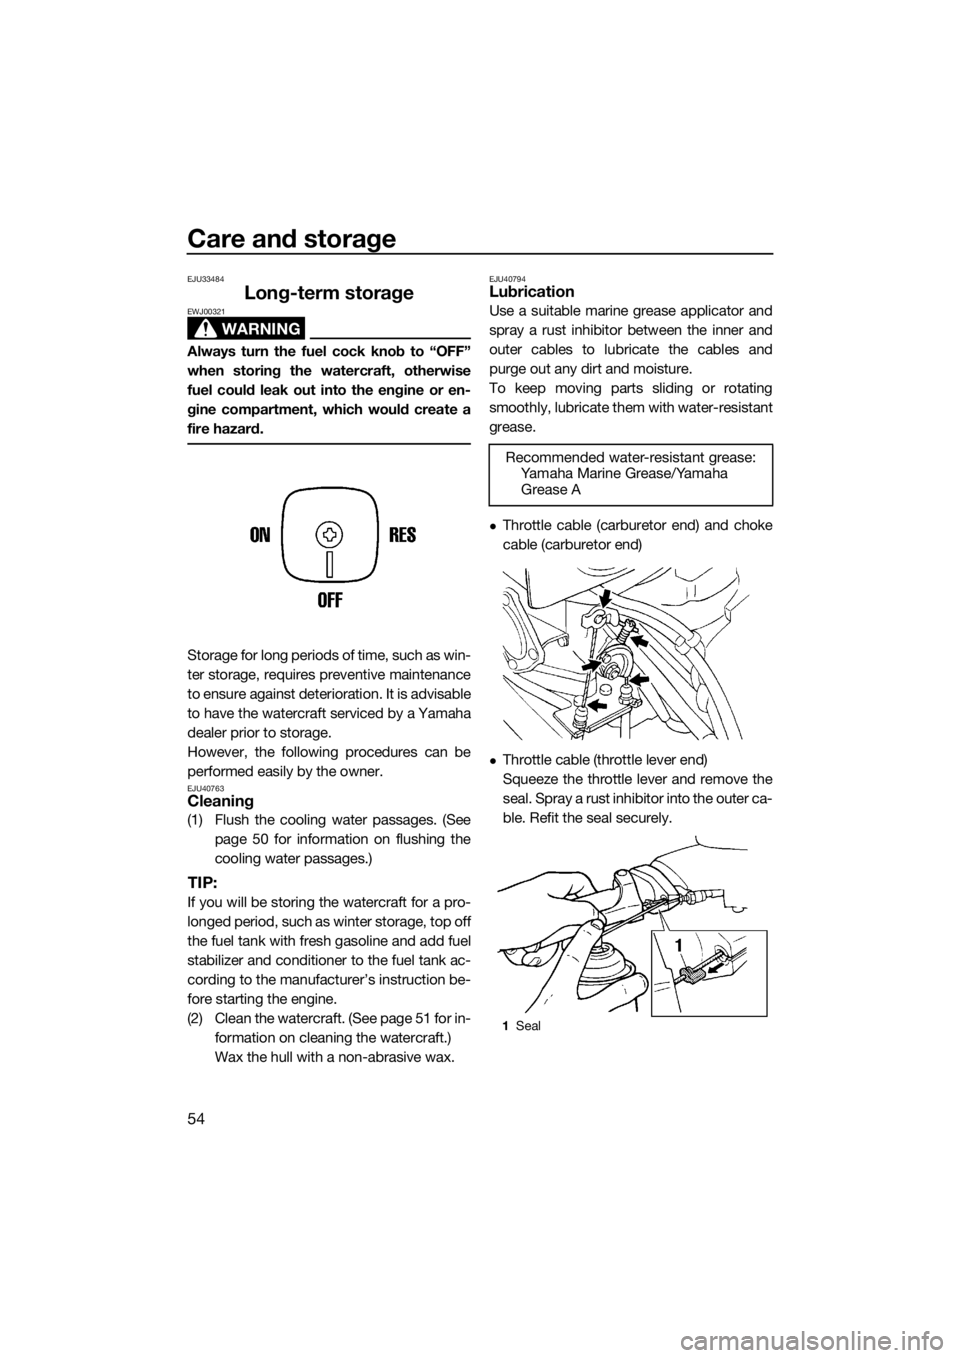
Throttle cable (carburetor end) and choke
cable (carburetor end)
Throttle cable (throttle lever end)
Squeeze the throttle lever and remove the
seal. Spray a rust inhibitor into the outer ca-
ble. Refit the seal securely.
Recommended water-resistant grease:Yamaha Marine Grease/Yamaha
Grease A
1 Seal
UF4D70E0.book Page 54 Wednesday, May 7, 2014 10:53 AM
Page 62 of 78
Maintenance
56
EJU33769
Maintenance
Periodic checks and lubrication will keep
your watercraft in the safest and most effi-
cient condition possible. Therefore, make
sure to carry out the periodic maintenance.
Safety is an obligation of the watercraft own-
er. Proper maintenance must be carried out
to keep the exhaust emission and sound lev-
els within the regulated limits. The most im-
portant points of watercraft inspection and
lubrication are explained on the following
pages.
See a Yamaha dealer for genuine Yamaha re-
placement parts and optional accessories
designed for your watercraft.
Remember, failures that are the result of the
installation of parts or accessories which are
not qualitatively equivalent to genuine
Yamaha parts are not covered by the limited warranty.
Maintenance, replacement, or repair of
the emission control devices and system
may be performed by any marine SI engine
repair establishment or individual. War-
ranty repair, however, must be performed
at an authorized Yamaha marine dealer-
ship.
WARNING
EWJ00312
Be sure to turn off the engine when you
perform maintenance unless otherwise
specified. If you are not familiar with ma-
chine servicing, this work should be done
by a Yamaha dealer or other qualified me-
chanic.
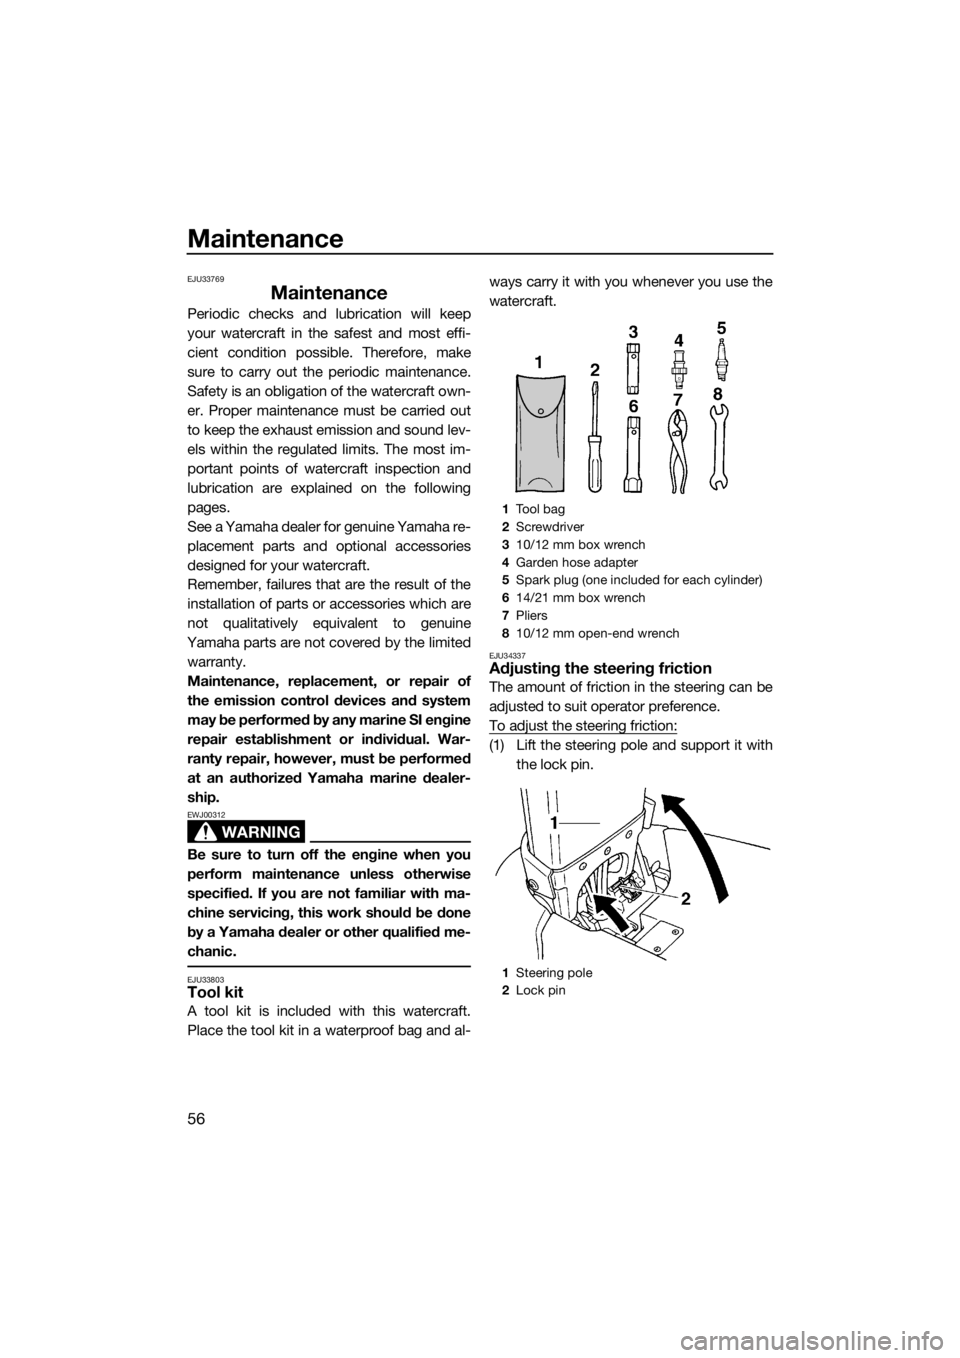
EJU33803Tool kit
A tool kit is included with this watercraft.
Place the tool kit in a waterproof bag and al- ways carry it with you whenever you use the
watercraft.
EJU34337Adjusting the steering friction
The amount of friction in the steering can be
adjusted to suit operator preference.
To adjust the steering friction:
(1) Lift the steering pole and support it with
the lock pin.
1Tool bag
2 Screwdriver
3 10/12 mm box wrench
4 Garden hose adapter
5 Spark plug (one included for each cylinder)
6 14/21 mm box wrench
7 Pliers
8 10/12 mm open-end wrench
1 Steering pole
2 Lock pin
UF4D70E0.book Page 56 Wednesday, May 7, 2014 10:53 AM
Page 63 of 78
Maintenance
57
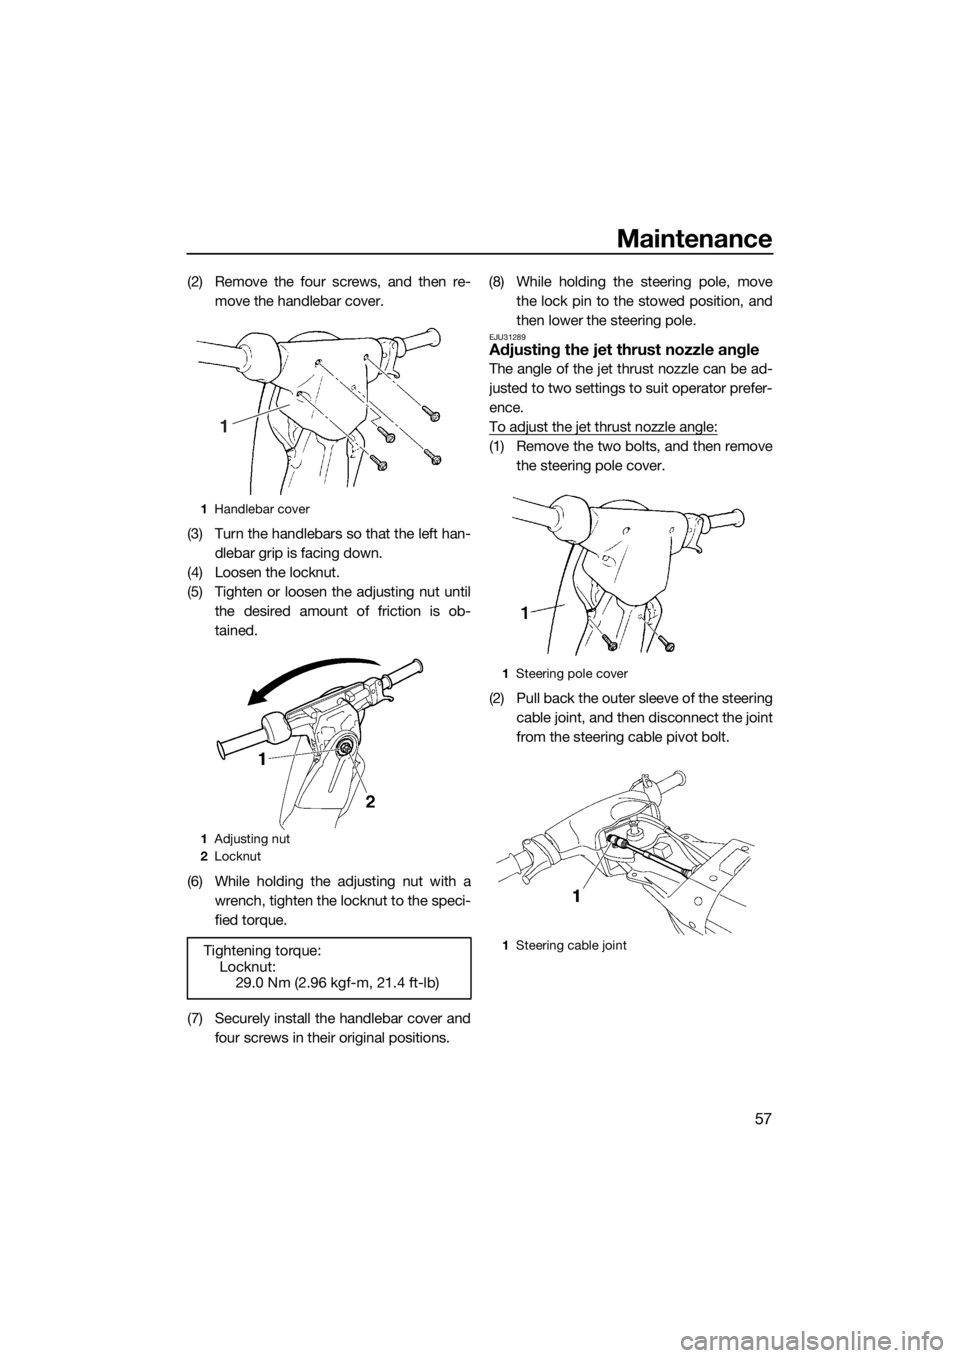
(2) Remove the four screws, and then re-move the handlebar cover.
(3) Turn the handlebars so that the left han- dlebar grip is facing down.
(4) Loosen the locknut.
(5) Tighten or loosen the adjusting nut until the desired amount of friction is ob-
tained.
(6) While holding the adjusting nut with a wrench, tighten the locknut to the speci-
fied torque.
(7) Securely install the handlebar cover and four screws in their original positions. (8) While holding the steering pole, move
the lock pin to the stowed position, and
then lower the steering pole.
EJU31289Adjusting the jet thrust nozzle angle
The angle of the jet thrust nozzle can be ad-
justed to two settings to suit operator prefer-
ence.
To adjust the jet thrust nozzle angle:
(1) Remove the two bolts, and then removethe steering pole cover.
(2) Pull back the outer sleeve of the steering cable joint, and then disconnect the joint
from the steering cable pivot bolt.
1Handlebar cover
1 Adjusting nut
2 Locknut
Tightening torque:
Locknut:29.0 Nm (2.96 kgf-m, 21.4 ft-lb)
1
1Steering pole cover
1 Steering cable joint
UF4D70E0.book Page 57 Wednesday, May 7, 2014 10:53 AM
Page 64 of 78
Maintenance
58
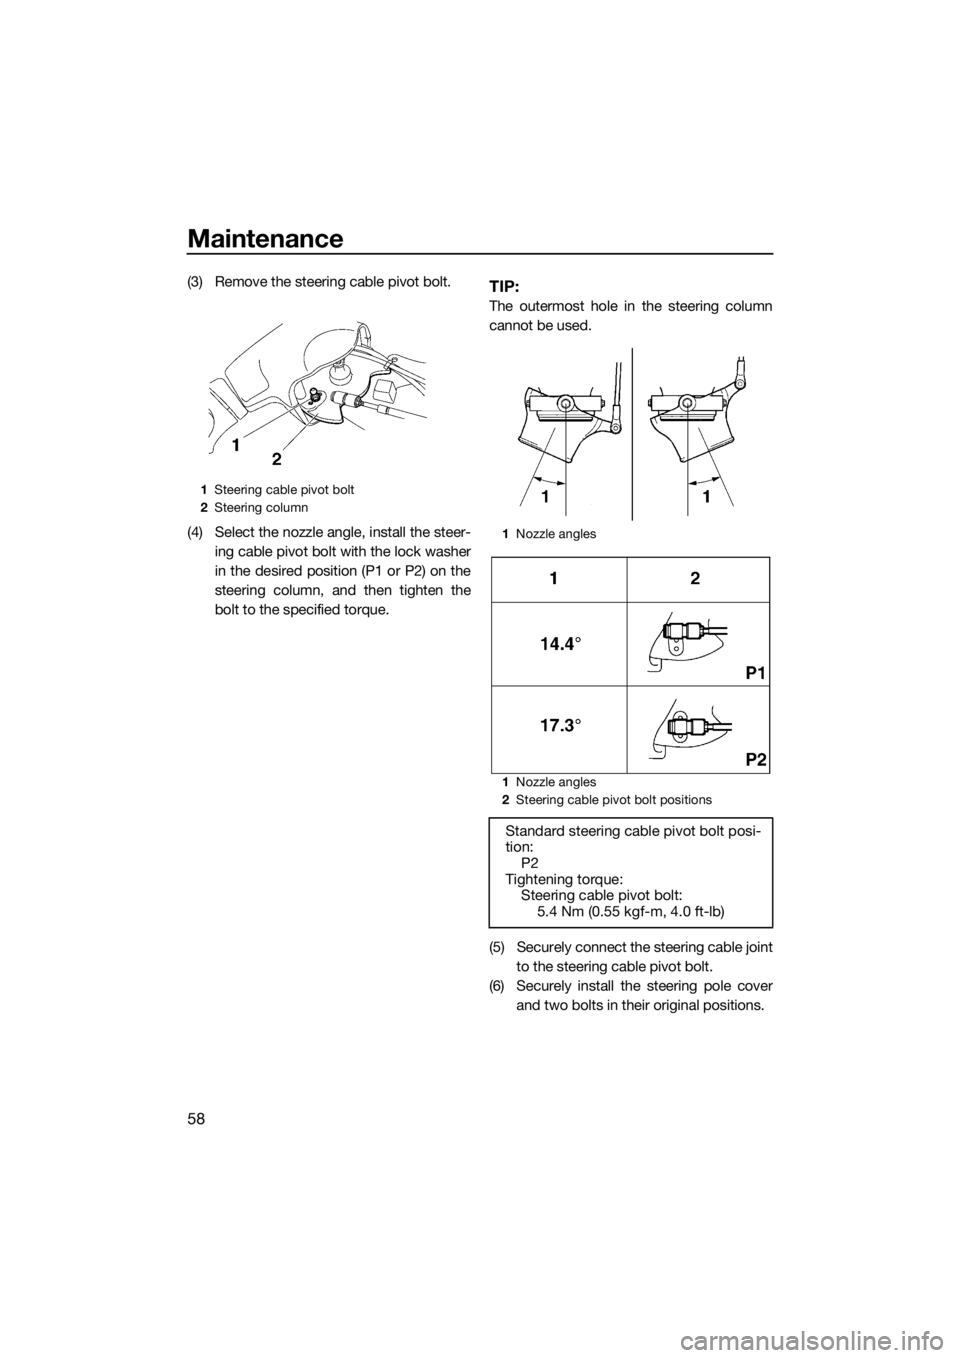
(3) Remove the steering cable pivot bolt.
(4) Select the nozzle angle, install the steer-ing cable pivot bolt with the lock washer
in the desired position (P1 or P2) on the
steering column, and then tighten the
bolt to the specified torque.TIP:
The outermost hole in the steering column
cannot be used.
(5) Securely connect the steering cable jointto the steering cable pivot bolt.
(6) Securely install the steering pole cover and two bolts in their original positions.
1Steering cable pivot bolt
2 Steering column
1Nozzle angles
1 Nozzle angles
2 Steering cable pivot bolt positions
Standard steering cable pivot bolt posi-
tion:
P2
Tightening torque: Steering cable pivot bolt: 5.4 Nm (0.55 kgf-m, 4.0 ft-lb)
UF4D70E0.book Page 58 Wednesday, May 7, 2014 10:53 AM
Page 65 of 78

Maintenance
59
EJU40831Periodic maintenance chart
The periodic maintenance chart gives general guidelines for periodic maintenance. Have a
Yamaha dealer perform the checks in the following chart. However, maintenance may need to be performed more frequently depending on your operating conditions. If you have any
questions, consult a Yamaha dealer.
This “ ” mark indicates maintenance that you may do yourself.
This “ ” mark indicates items to be checked and serviced by a Yamaha dealer.
Item OperationInitial
Thereafter every
Page
10
hours 50 hours
100
hours 200
hours
6
months 12
months 12
months 24
months
Spark plugs Check, clean, replace 60
Lubrication points Lubricate 54
Intermediate
housing Lubricate
61
Fuel system Check —
Fuel filter Check
61
Check, replace —
Fuel tank Check, clean —
Carburetor Check, adjust —
Engine idling
speed Check, adjust
62
Carburetor throttle
shaft Check
—
Bilge strainer Clean —
Impeller Check —
Jet thrust nozzle
angle Check, adjust
—
Handlebar pivot
shaft Check, adjust
—
Steering friction Check, adjust —
Throttle cable Check, adjust —
Choke cable Check, adjust 61
Battery Check, charge —
Rubber coupling Check —
Engine mount Check —
Nuts and bolts Check —
UF4D70E0.book Page 59 Wednesday, May 7, 2014 10:53 AM
Page 66 of 78
Maintenance
60
EJU34379Checking the spark plugs
WARNING
EWJ00351
Be careful not to damage the insulator
when removing or installing a spark plug.
A damaged insulator could allow sparks to
escape, which could result in a fire or ex-
plosion.
Remove and check the condition of the spark
plugs.
The condition of a spark plug can indicate
something about the condition of the engine.
For example, if the center electrode portion is
very white, this could indicate an intake air
leak or carburetion problem in that cylinder.
Do not attempt to diagnose any problems
yourself. Have a Yamaha dealer service the
watercraft.
To remove a spark plug:
(1) Remove the hood. (See page 24 for hoodremoval and installation procedures.)
(2) Remove the spark plug cap.
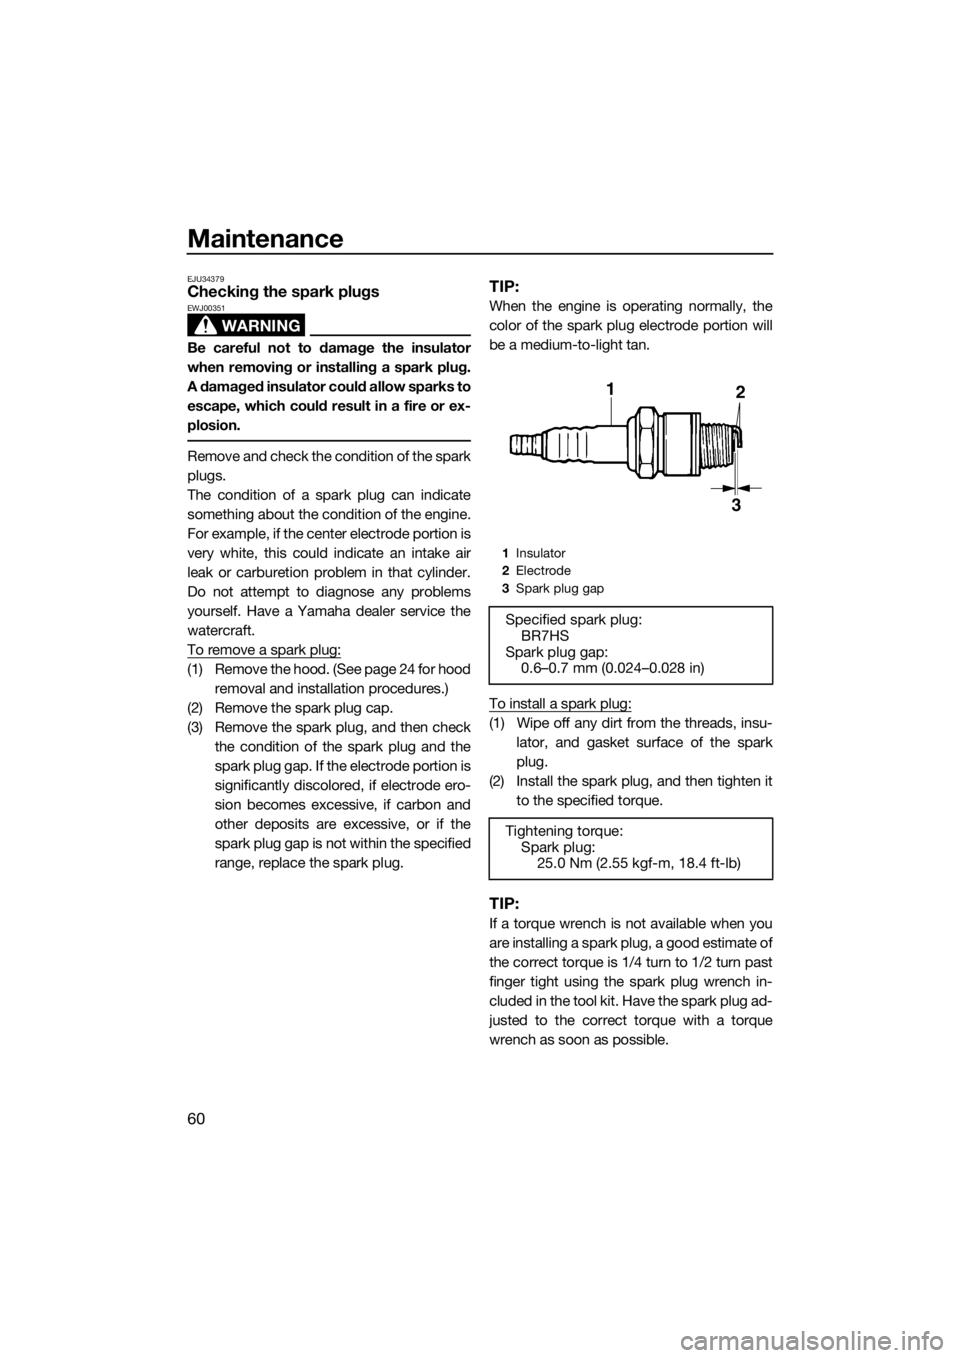
(3) Remove the spark plug, and then check the condition of the spark plug and the
spark plug gap. If the electrode portion is
significantly discolored, if electrode ero-
sion becomes excessive, if carbon and
other deposits are excessive, or if the
spark plug gap is not within the specified
range, replace the spark plug.
TIP:
When the engine is operating normally, the
color of the spark plug electrode portion will
be a medium-to-light tan.
To install a spark plug:
(1) Wipe off any dirt from the threads, insu-lator, and gasket surface of the spark
plug.
(2) Install the spark plug, and then tighten it to the specified torque.
TIP:
If a torque wrench is not available when you
are installing a spark plug, a good estimate of
the correct torque is 1/4 turn to 1/2 turn past
finger tight using the spark plug wrench in-
cluded in the tool kit. Have the spark plug ad-
justed to the correct torque with a torque
wrench as soon as possible.
1Insulator
2 Electrode
3 Spark plug gap
Specified spark plug:
BR7HS
Spark plug gap: 0.6–0.7 mm (0.024–0.028 in)
Tightening torque: Spark plug: 25.0 Nm (2.55 kgf-m, 18.4 ft-lb)
UF4D70E0.book Page 60 Wednesday, May 7, 2014 10:53 AM
Page 67 of 78
Maintenance
61
(3) Wipe off any water or dirt inside thespark plug cap.
(4) Install the spark plug cap by pushing it down until it is securely installed in its
original position.
(5) Securely install the hood in its original position.
EJU41181Lubrication points
Lubricate moving parts with water-resistant
grease. (See page 54 for information on the
main lubrication points.)
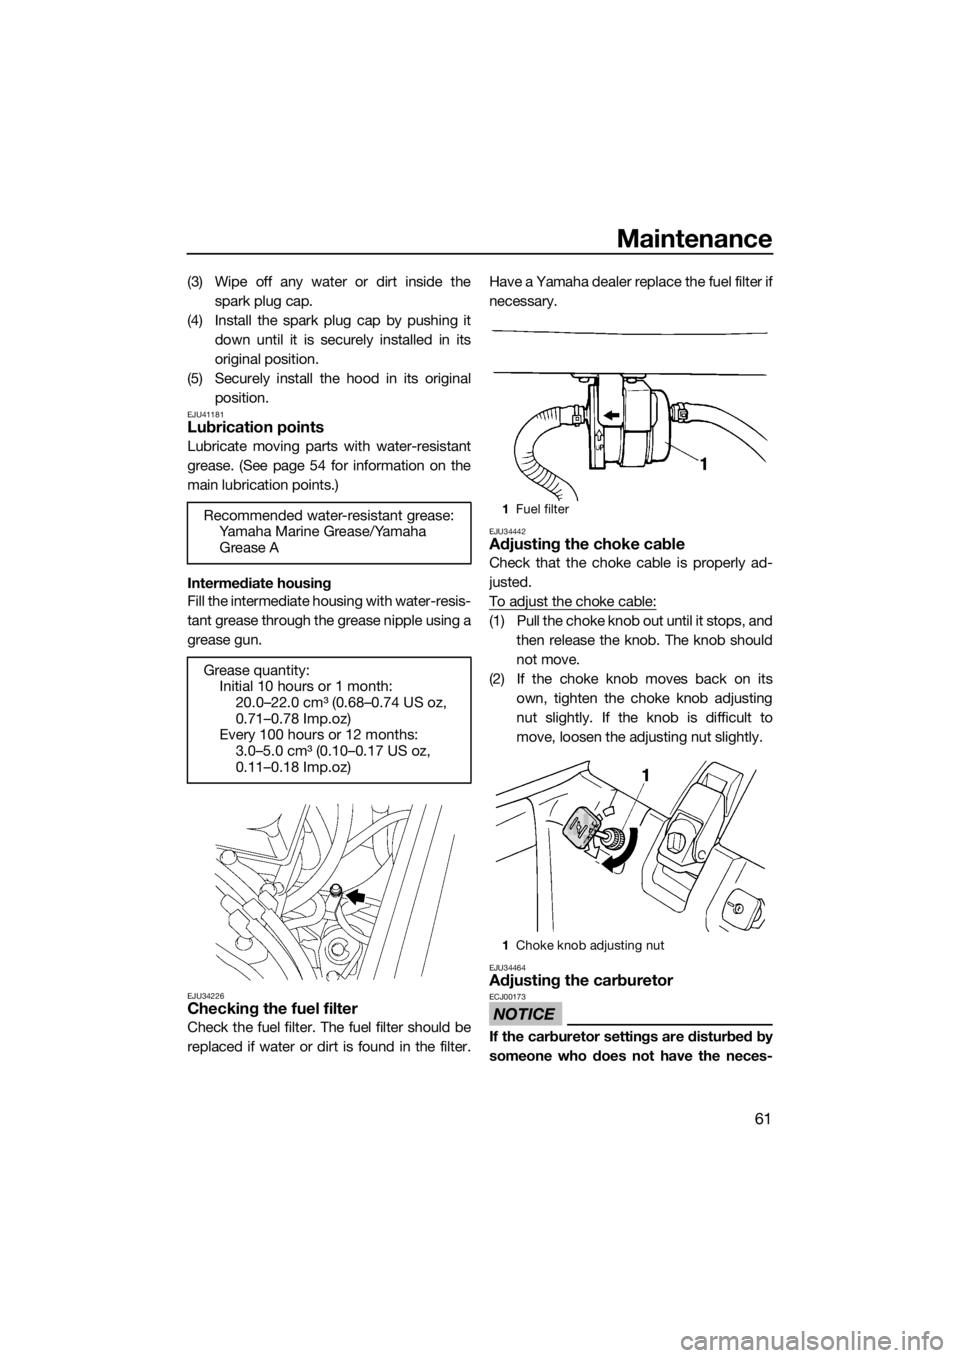
Intermediate housing
Fill the intermediate housing with water-resis-
tant grease through the grease nipple using a
grease gun.
EJU34226Checking the fuel filter
Check the fuel filter. The fuel filter should be
replaced if water or dirt is found in the filter. Have a Yamaha dealer replace the fuel filter if
necessary.
EJU34442Adjusting the choke cable
Check that the choke cable is properly ad-
justed.
To adjust the choke cable:
(1) Pull the choke knob out until it stops, and
then release the knob. The knob should
not move.
(2) If the choke knob moves back on its own, tighten the choke knob adjusting
nut slightly. If the knob is difficult to
move, loosen the adjusting nut slightly.
EJU34464Adjusting the carburetor
NOTICE
ECJ00173
If the carburetor settings are disturbed by
someone who does not have the neces-
Recommended water-resistant grease:
Yamaha Marine Grease/Yamaha
Grease A
Grease quantity: Initial 10 hours or 1 month:
20.0–22.0 cm³ (0.68–0.74 US oz,
0.71–0.78 Imp.oz)
Every 100 hours or 12 months:
3.0–5.0 cm³ (0.10–0.17 US oz,
0.11–0.18 Imp.oz)
1Fuel filter
1 Choke knob adjusting nut
UF4D70E0.book Page 61 Wednesday, May 7, 2014 10:53 AM