check engine YAMAHA SUPERJET 2017 User Guide
[x] Cancel search | Manufacturer: YAMAHA, Model Year: 2017, Model line: SUPERJET, Model: YAMAHA SUPERJET 2017Pages: 78, PDF Size: 2.66 MB
Page 44 of 78
Pre-operation checks
38
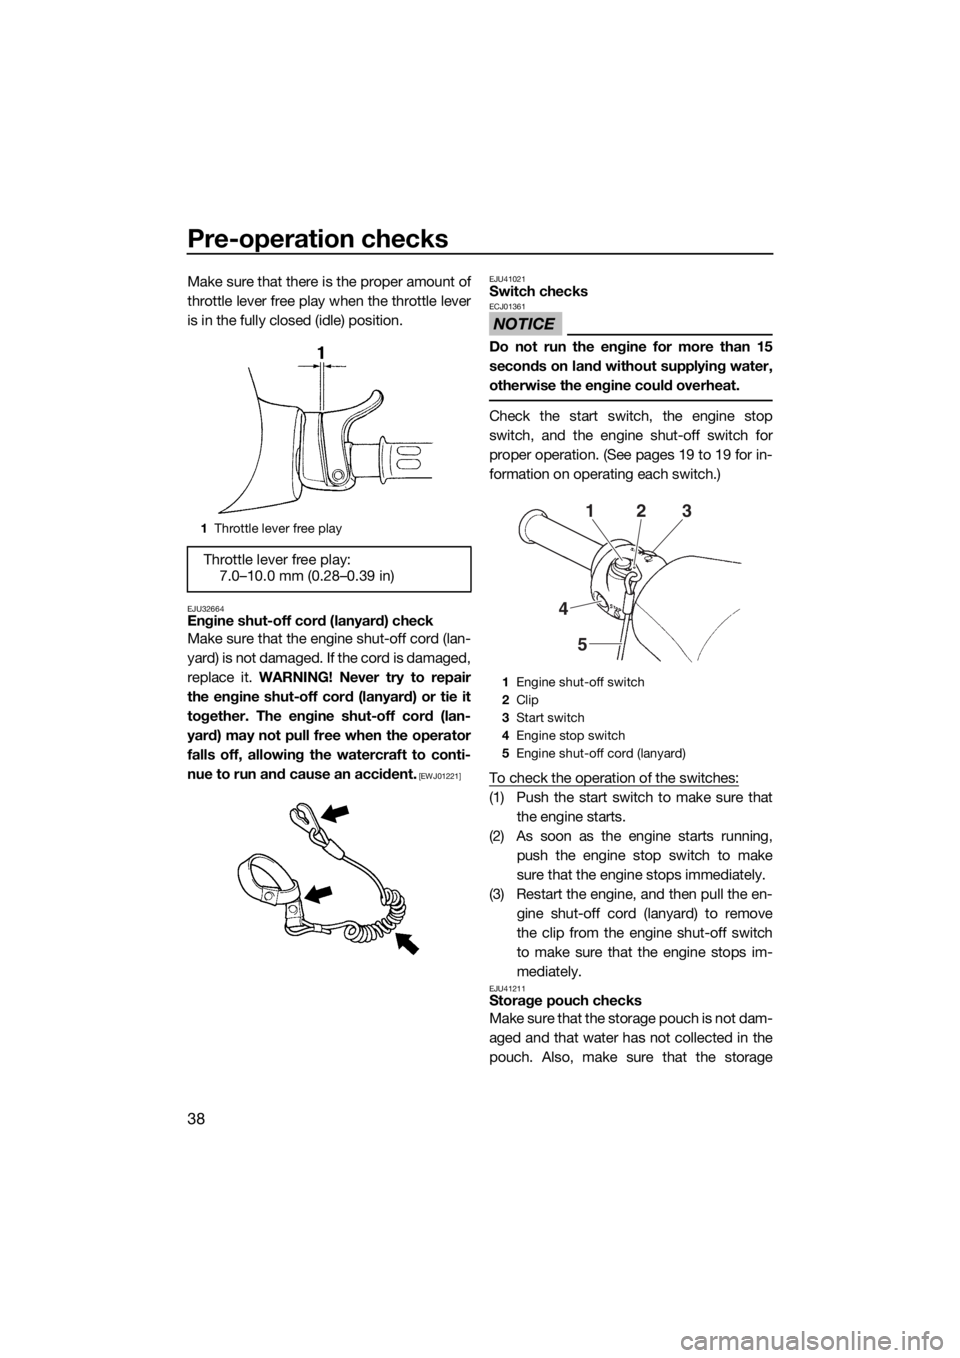
Make sure that there is the proper amount of
throttle lever free play when the throttle lever
is in the fully closed (idle) position.
EJU32664Engine shut-off cord (lanyard) check
Make sure that the engine shut-off cord (lan-
yard) is not damaged. If the cord is damaged,
replace it. WARNING! Never try to repair
the engine shut-off cord (lanyard) or tie it
together. The engine shut-off cord (lan-
yard) may not pull free when the operator
falls off, allowing the watercraft to conti-
nue to run and cause an accident.
[EWJ01221]EJU41021
Switch checks
NOTICE
ECJ01361
Do not run the engine for more than 15
seconds on land without supplying water,
otherwise the engine could overheat.
Check the start switch, the engine stop
switch, and the engine shut-off switch for
proper operation. (See pages 19 to 19 for in-
formation on operating each switch.)
To check the operation of the switches:
(1) Push the start switch to make sure that
the engine starts.
(2) As soon as the engine starts running,
push the engine stop switch to make
sure that the engine stops immediately.
(3) Restart the engine, and then pull the en-
gine shut-off cord (lanyard) to remove
the clip from the engine shut-off switch
to make sure that the engine stops im-
mediately.
EJU41211Storage pouch checks
Make sure that the storage pouch is not dam-
aged and that water has not collected in the
pouch. Also, make sure that the storage
1Throttle lever free play
Throttle lever free play:
7.0–10.0 mm (0.28–0.39 in)
1Engine shut-off switch
2Clip
3Start switch
4Engine stop switch
5Engine shut-off cord (lanyard)
123
4
5
UF4D73E0.book Page 38 Wednesday, March 23, 2016 11:40 AM
Page 45 of 78

Pre-operation checks
39
pouch is securely installed. (See page 25 for
information on the storage pouch.)
EJU41072Fire extinguisher container checks
Make sure that the fire extinguisher container
is not damaged and is securely held in place.
(See page 26 for information on the fire extin-
guisher container.)
EJU32504Fire extinguisher check
Check that there is a full fire extinguisher on
board.
To check the fire extinguisher, see the in-
structions supplied by the fire extinguisher
manufacturer. Always keep the fire extin-
guisher in the fire extinguisher container.
Always carry a fire extinguisher on board. A
fire extinguisher is not standard equipment
with this watercraft. If you do not have one,
contact a Yamaha dealer or a fire extinguish-
er dealer to obtain one meeting the proper
specifications.
EJU40122Safety equipment check
Check that safety equipment meeting the ap-
plicable regulations is on board.
EJU32353Hull and deck check
Check the hull and deck for damage or other
problem.
EJU32657Jet intake checks
Make sure that the jet intake is not damaged
or clogged with weeds or debris. If the jet in-take is clogged, clean it. (See page 66 for in-
formation on the jet intake.)
EJU40703Hood check
Make sure that the hood is securely closed.
(See page 24 for information on the hood.)
EJU40146Post-launch checks
Perform the post-launch checks in the pre-
operation checklist while the watercraft is in
the water and the engine is running.
To perform the post-launch checks:
(1) Launch the watercraft. (See page 41 for
information on launching the watercraft.)
(2) Perform the checks and make sure that
there are no malfunctioning items or oth-
er problems.
EJU40553Cooling water pilot outlet check
Make sure that water is discharged from the
cooling water pilot outlet while the engine is
running. (See page 21 for information on the
cooling water pilot outlet.)
UF4D73E0.book Page 39 Wednesday, March 23, 2016 11:40 AM
Page 48 of 78
Operation
42
(2) Turn the fuel cock knob to “ON”.
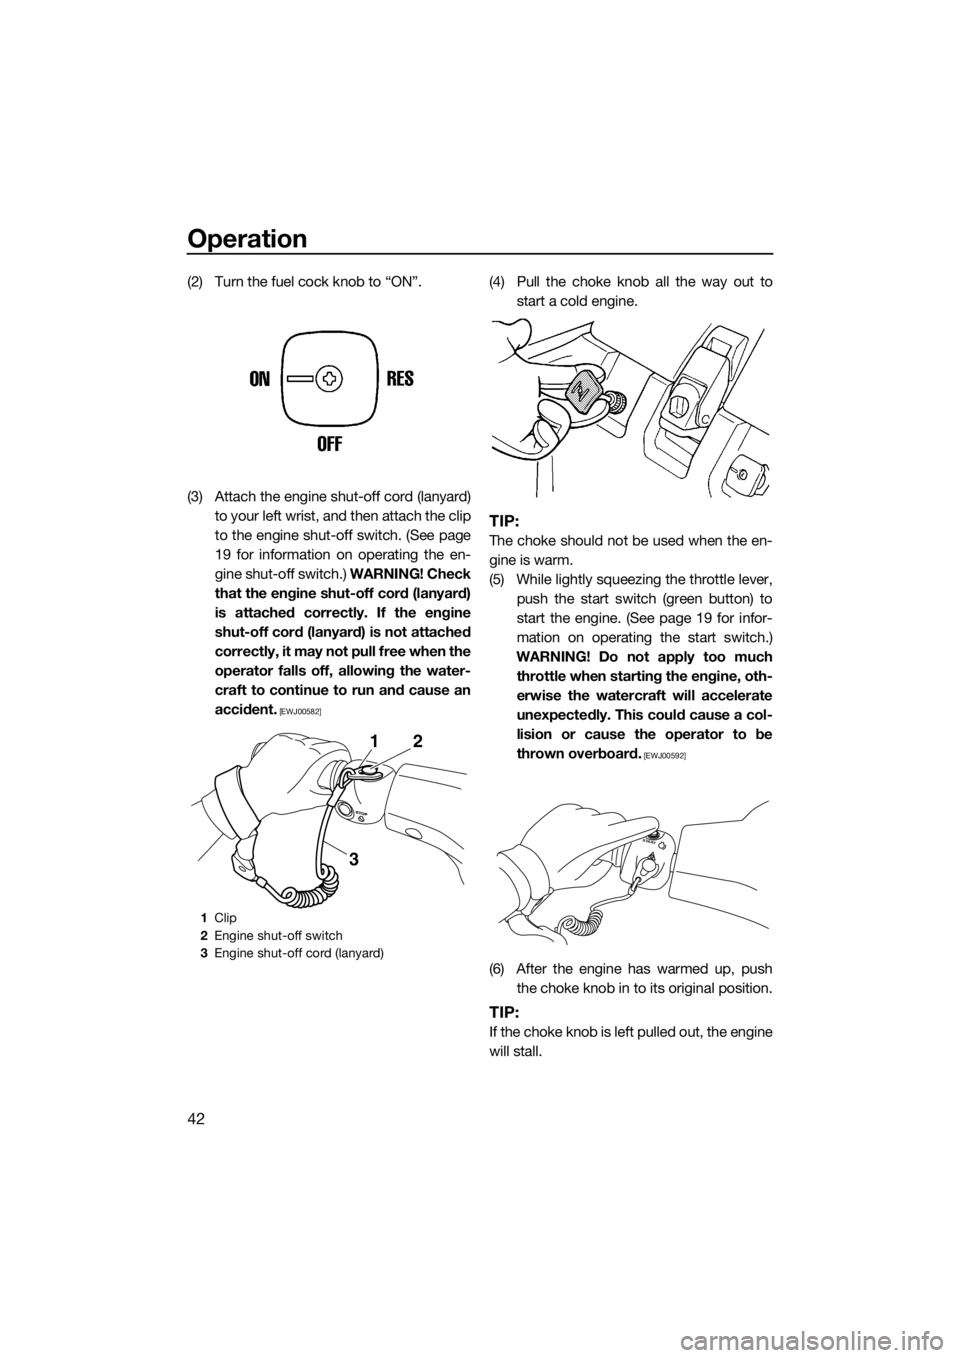
(3) Attach the engine shut-off cord (lanyard)
to your left wrist, and then attach the clip
to the engine shut-off switch. (See page
19 for information on operating the en-
gine shut-off switch.) WARNING! Check
that the engine shut-off cord (lanyard)
is attached correctly. If the engine
shut-off cord (lanyard) is not attached
correctly, it may not pull free when the
operator falls off, allowing the water-
craft to continue to run and cause an
accident.
[EWJ00582]
(4) Pull the choke knob all the way out to
start a cold engine.
TIP:
The choke should not be used when the en-
gine is warm.
(5) While lightly squeezing the throttle lever,
push the start switch (green button) to
start the engine. (See page 19 for infor-
mation on operating the start switch.)
WARNING! Do not apply too much
throttle when starting the engine, oth-
erwise the watercraft will accelerate
unexpectedly. This could cause a col-
lision or cause the operator to be
thrown overboard.
[EWJ00592]
(6) After the engine has warmed up, push
the choke knob in to its original position.
TIP:
If the choke knob is left pulled out, the engine
will stall.
1Clip
2Engine shut-off switch
3Engine shut-off cord (lanyard)
12
3
START
UF4D73E0.book Page 42 Wednesday, March 23, 2016 11:40 AM
Page 57 of 78
Care and storage
51
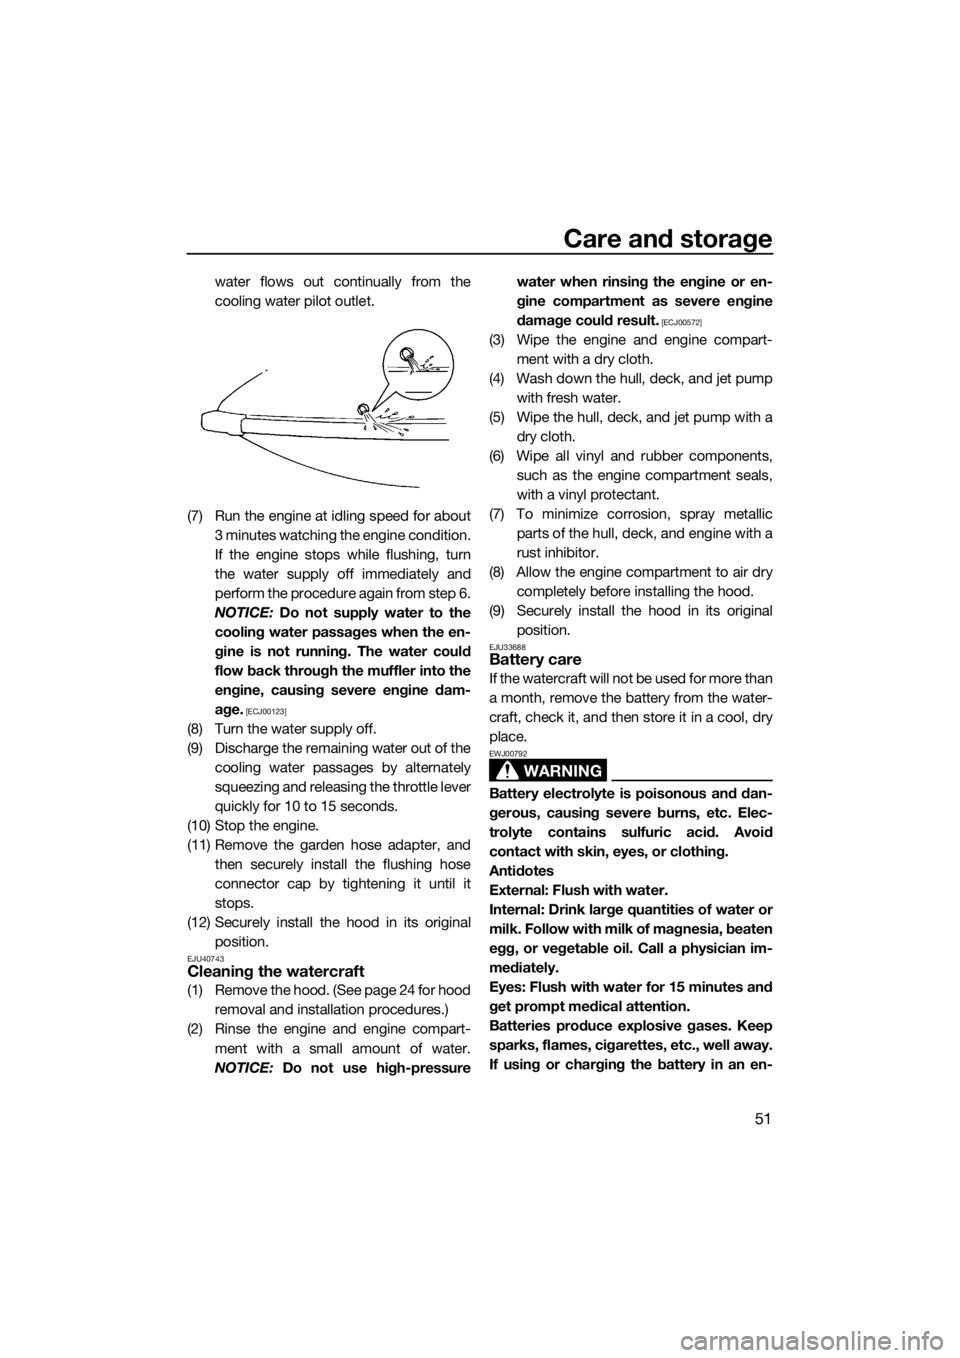
water flows out continually from the
cooling water pilot outlet.
(7) Run the engine at idling speed for about
3 minutes watching the engine condition.
If the engine stops while flushing, turn
the water supply off immediately and
perform the procedure again from step 6.
NOTICE: Do not supply water to the
cooling water passages when the en-
gine is not running. The water could
flow back through the muffler into the
engine, causing severe engine dam-
age.
[ECJ00123]
(8) Turn the water supply off.
(9) Discharge the remaining water out of the
cooling water passages by alternately
squeezing and releasing the throttle lever
quickly for 10 to 15 seconds.
(10) Stop the engine.
(11) Remove the garden hose adapter, and
then securely install the flushing hose
connector cap by tightening it until it
stops.
(12) Securely install the hood in its original
position.
EJU40743Cleaning the watercraft
(1) Remove the hood. (See page 24 for hood
removal and installation procedures.)
(2) Rinse the engine and engine compart-
ment with a small amount of water.
NOTICE: Do not use high-pressurewater when rinsing the engine or en-
gine compartment as severe engine
damage could result.
[ECJ00572]
(3) Wipe the engine and engine compart-
ment with a dry cloth.
(4) Wash down the hull, deck, and jet pump
with fresh water.
(5) Wipe the hull, deck, and jet pump with a
dry cloth.
(6) Wipe all vinyl and rubber components,
such as the engine compartment seals,
with a vinyl protectant.
(7) To minimize corrosion, spray metallic
parts of the hull, deck, and engine with a
rust inhibitor.
(8) Allow the engine compartment to air dry
completely before installing the hood.
(9) Securely install the hood in its original
position.
EJU33688Battery care
If the watercraft will not be used for more than
a month, remove the battery from the water-
craft, check it, and then store it in a cool, dry
place.
WARNING
EWJ00792
Battery electrolyte is poisonous and dan-
gerous, causing severe burns, etc. Elec-
trolyte contains sulfuric acid. Avoid
contact with skin, eyes, or clothing.
Antidotes
External: Flush with water.
Internal: Drink large quantities of water or
milk. Follow with milk of magnesia, beaten
egg, or vegetable oil. Call a physician im-
mediately.
Eyes: Flush with water for 15 minutes and
get prompt medical attention.
Batteries produce explosive gases. Keep
sparks, flames, cigarettes, etc., well away.
If using or charging the battery in an en-
UF4D73E0.book Page 51 Wednesday, March 23, 2016 11:40 AM
Page 62 of 78
Maintenance
56
EJU33769
Maintenance
Periodic checks and lubrication will keep
your watercraft in the safest and most effi-
cient condition possible. Therefore, make
sure to carry out the periodic maintenance.
Safety is an obligation of the watercraft own-
er. Proper maintenance must be carried out
to keep the exhaust emission and sound lev-
els within the regulated limits. The most im-
portant points of watercraft inspection and
lubrication are explained on the following pa-
ges.
See a Yamaha dealer for genuine Yamaha re-
placement parts and optional accessories
designed for your watercraft.
Remember, failures that are the result of the
installation of parts or accessories which are
not qualitatively equivalent to genuine
Yamaha parts are not covered by the limited
warranty.
Maintenance, replacement, or repair of
the emission control devices and system
may be performed by any marine SI engine
repair establishment or individual. War-
ranty repair, however, must be performed
at an authorized Yamaha marine dealer-
ship.
WARNING
EWJ00312
Be sure to turn off the engine when you
perform maintenance unless otherwise
specified. If you are not familiar with ma-
chine servicing, this work should be done
by a Yamaha dealer or other qualified me-
chanic.
EJU33803Tool kit
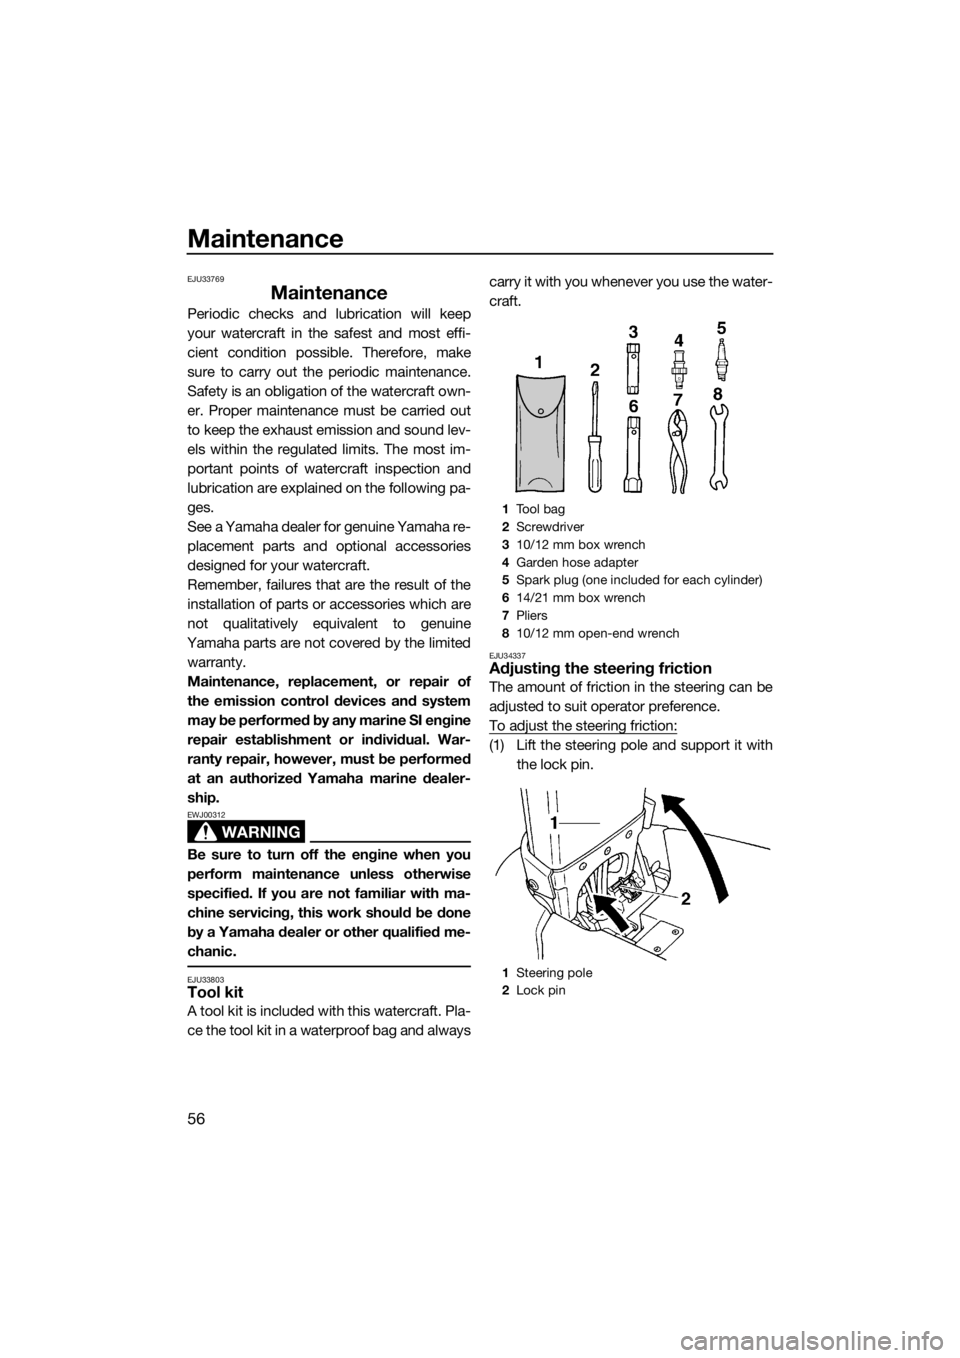
A tool kit is included with this watercraft. Pla-
ce the tool kit in a waterproof bag and alwayscarry it with you whenever you use the water-
craft.
EJU34337Adjusting the steering friction
The amount of friction in the steering can be
adjusted to suit operator preference.
To adjust the steering friction:
(1) Lift the steering pole and support it with
the lock pin.
1Tool bag
2Screwdriver
310/12 mm box wrench
4Garden hose adapter
5Spark plug (one included for each cylinder)
614/21 mm box wrench
7Pliers
810/12 mm open-end wrench
1Steering pole
2Lock pin
UF4D73E0.book Page 56 Wednesday, March 23, 2016 11:40 AM
Page 65 of 78

Maintenance
59
EJU40831Periodic maintenance chart
The periodic maintenance chart gives general guidelines for periodic maintenance. Have a
Yamaha dealer perform the checks in the following chart. However, maintenance may need
to be performed more frequently depending on your operating conditions. If you have any
questions, consult a Yamaha dealer.
This “ ” mark indicates maintenance that you may do yourself.
This “ ” mark indicates items to be checked and serviced by a Yamaha dealer.
Item OperationInitial Thereafter every
Page 10
hours50 hours100
hours200
hours
6
months12
months12
months24
months
Spark plugsCheck, clean, replace 60
Lubrication pointsLubricate 54
Intermediate
housingLubricate 61
Fuel systemCheck —
Fuel filterCheck 61
Check, replace —
Fuel tankCheck, clean —
CarburetorCheck, adjust —
Engine idling
speedCheck, adjust 62
Carburetor throttle
shaftCheck —
Bilge strainerClean —
ImpellerCheck —
Jet thrust nozzle
angleCheck, adjust —
Handlebar pivot
shaftCheck, adjust —
Steering frictionCheck, adjust —
Steering masterCheck, adjust —
Throttle cableCheck, adjust —
Choke cableCheck, adjust 61
BatteryCheck, charge —
Rubber couplingCheck —
Engine mountCheck —
Nuts and boltsCheck —
UF4D73E0.book Page 59 Wednesday, March 23, 2016 11:40 AM
Page 66 of 78
Maintenance
60
EJU3437AChecking the spark plugs
WARNING
EWJ00351
Be careful not to damage the insulator
when removing or installing a spark plug.
A damaged insulator could allow sparks to
escape, which could result in a fire or ex-
plosion.
Remove and check the condition of the spark
plugs.
The condition of a spark plug can indicate
something about the condition of the engine.
For example, if the center electrode portion is
very white, this could indicate an intake air
leak or carburetion problem in that cylinder.
Do not attempt to diagnose any problems
yourself. Have a Yamaha dealer service the
watercraft.
To remove a spark plug:
(1) Remove the hood. (See page 24 for hood
removal and installation procedures.)
(2) Remove the spark plug cap.
(3) Remove the spark plug, and then check
the condition of the spark plug and the
spark plug gap. If the electrode portion is
significantly discolored, if electrode ero-
sion becomes excessive, if carbon and
other deposits are excessive, or if the
spark plug gap is not within the specified
range, replace the spark plug.
TIP:
When the engine is operating normally, the
color of the spark plug electrode portion will
be a medium-to-light tan.
To install a spark plug:
(1) Wipe off any dirt from the threads, insu-
lator, and gasket surface of the spark
plug.
(2) Install the spark plug, and then tighten it
to the specified torque.
TIP:
If a torque-wrench is not available when you
are reinstalling a spark plug, a good estimate
of the correct torque is 1/12 turn past finger-
tight. When you are installing a new spark
plug, a good estimate of the correct torque is
1/2 to 2/3 turn past finger-tight.
(3) Wipe off any water or dirt inside the
spark plug cap.
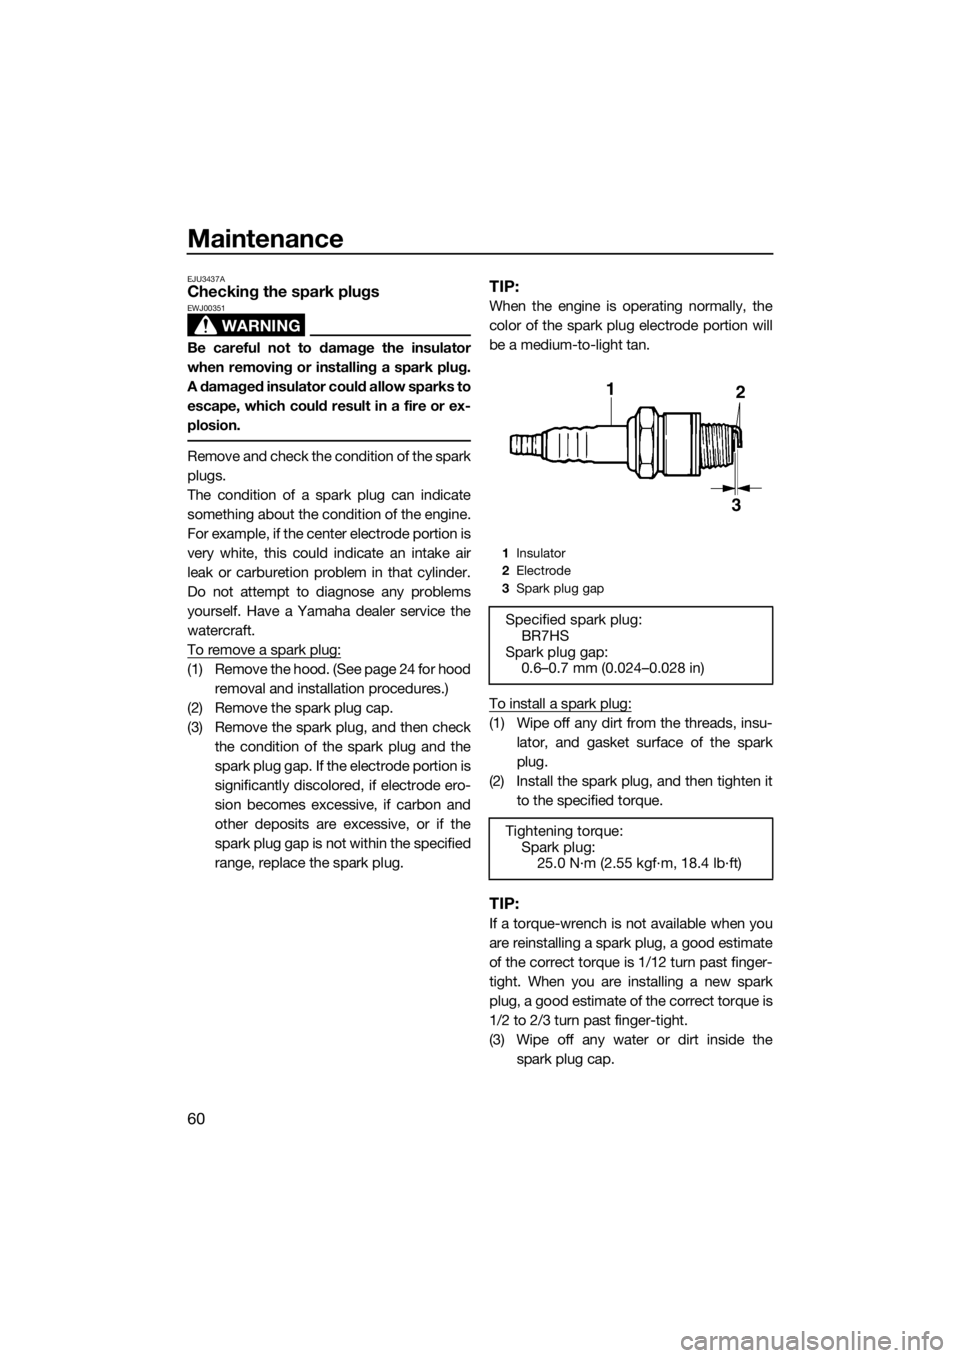
1Insulator
2Electrode
3Spark plug gap
Specified spark plug:
BR7HS
Spark plug gap:
0.6–0.7 mm (0.024–0.028 in)
Tightening torque:
Spark plug:
25.0 N·m (2.55 kgf·m, 18.4 lb·ft)
UF4D73E0.book Page 60 Wednesday, March 23, 2016 11:40 AM
Page 70 of 78

Trouble recovery
64
EJU34562
Troubleshooting
If you have any trouble with your watercraft, use the troubleshooting chart to check for the
possible cause.
If you cannot find the cause, consult a Yamaha dealer.
EJU34576Troubleshooting chart
TROUBLE POSSIBLE CAUSE REMEDY PAGE
Engine does not
start (Starter motor
does not turn over)Engine shut-
off switchClip not in place Install clip
19
Fuse Burned out Replace fuse and
check wiring67
Battery Run down Recharge 51
Poor terminal con-
nectionsTighten as required
51
Terminal corroded Clean or replace 51
Starter motor Faulty Have serviced by
Yamaha dealer—
Engine does not
start (Starter motor
turns over)Fuel cock Turned to “OFF” Turn fuel cock knob
to “ON”21
Fuel Empty Refill as soon as pos-
sible29
Stale or contaminat-
edHave serviced by
Yamaha dealer—
Fuel tank Water or dirt present Have serviced by
Yamaha dealer—
Spark plug Fouled or defective Replace 60
Spark plug
capNot connected or
looseConnect properly
60
Crankcase Filled with water Have serviced by
Yamaha dealer69
Fuel filter Clogged or water
pooledHave serviced by
Yamaha dealer61
Choke Knob moves back on
its ownTighten choke knob
adjusting nut61
UF4D73E0.book Page 64 Wednesday, March 23, 2016 11:40 AM
Page 72 of 78
Trouble recovery
66
EJU34625
Emergency proceduresEJU34635Cleaning the jet intake and impeller
WARNING
EWJ00783
Before attempting to remove weeds or de-
bris from the jet intake or impeller area,
shut the engine off and remove the clip
from the engine shut-off switch. Severe in-
jury or death could result from coming in
contact with the rotating parts of the jet
pump.
If weeds or debris gets caught in the jet intake
or impeller, cavitation can occur, causing jet
thrust to decrease even though engine speed
rises. If this condition is allowed to continue,
the engine will overheat and may seize.
NOTICE: If weeds or debris gets caught in
the jet intake, do not operate the water-
craft above trolling speed until they have
been removed.
[ECJ00654]
If there is any sign that the jet intake or impel-
ler is clogged with weeds or debris, return to
shore and check the intake and impeller. Al-ways stop the engine before beaching the
watercraft.
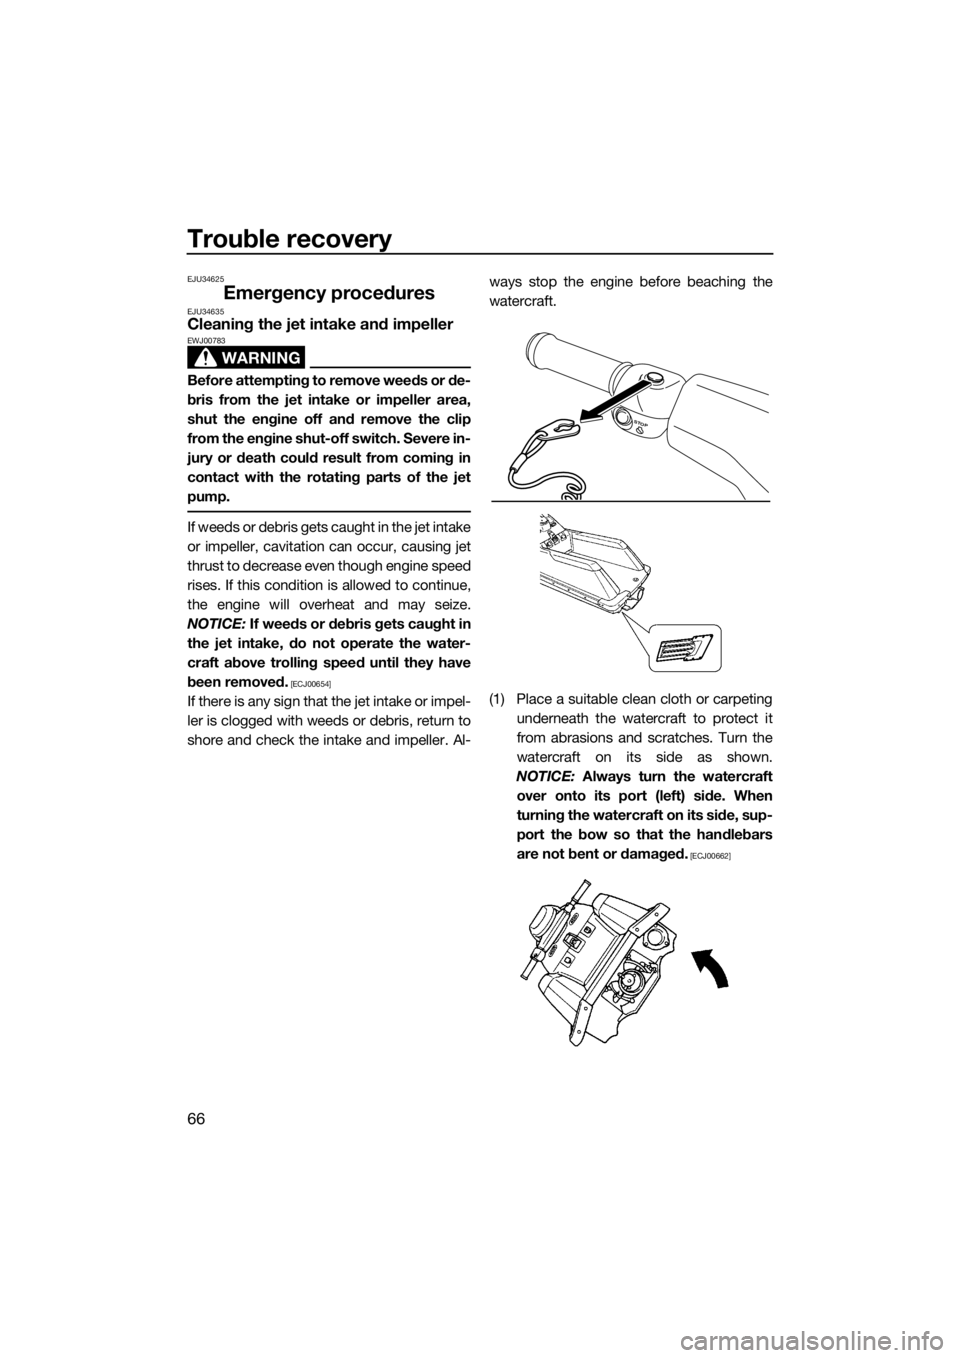
(1) Place a suitable clean cloth or carpeting
underneath the watercraft to protect it
from abrasions and scratches. Turn the
watercraft on its side as shown.
NOTICE: Always turn the watercraft
over onto its port (left) side. When
turning the watercraft on its side, sup-
port the bow so that the handlebars
are not bent or damaged.
[ECJ00662]
STOP
UF4D73E0.book Page 66 Wednesday, March 23, 2016 11:40 AM
Page 76 of 78

70
Index
2-stroke engine oil ................................... 28
A
After removing the watercraft from the
water ..................................................... 49
B
Battery care.............................................. 51
Battery checks ......................................... 36
Battery, jumping ....................................... 67
Beaching the watercraft ........................... 49
Bilge water check..................................... 36
Bilge water, draining ................................ 30
Bilge water, draining on water ................. 30
Boarding and starting in deep water........ 47
Boarding and starting in shallow water.... 46
Bow rope hole .......................................... 25
C
Capsized watercraft ................................. 48
Carburetor, adjusting ............................... 61
Choke cable, adjusting ............................ 61
Choke knob.............................................. 21
Cleaning ................................................... 54
Cleaning the watercraft ............................ 51
Cooling water pilot outlet ......................... 21
Cooling water pilot outlet check .............. 39
Craft Identification Number (CIN)............... 1
Cruising limitations..................................... 9
E
Emergency procedures ............................ 66
Engine break-in ........................................ 32
Engine compartment check ..................... 35
Engine idling speed, adjusting ................. 62
Engine overheat warning system ............. 22
Engine serial number ................................. 1
Engine shut-off cord (lanyard) check ....... 38
Engine shut-off switch ............................. 19
Engine stop switch................................... 19
Engine unit check..................................... 36
Enjoy your watercraft responsibly............ 15
Equipment ................................................ 24
F
Fire extinguisher check ............................ 39
Fire extinguisher container....................... 26
Fire extinguisher container checks .......... 39
Flushing the cooling water passages....... 50
Fuel .......................................................... 28Fuel and engine oil requirements ............. 28
Fuel cock knob......................................... 21
Fuel filter, checking .................................. 61
Fuel level check........................................ 35
Fuel system checks ................................. 35
Fuel tank, filling ........................................ 29
Fuse, replacing ......................................... 67
G
Getting to know your watercraft .............. 40
Glossary, watercraft ................................. 16
H
Hazard information................................... 13
Hood ........................................................ 24
Hood check .............................................. 39
Hull and deck check ................................ 39
I
Identification numbers ............................... 1
J
Jet intake and impeller, cleaning.............. 66
Jet intake checks ..................................... 39
Jet thrust nozzle angle, adjusting ............ 57
Jumper cables, connecting ...................... 67
L
Labels, important ....................................... 3
Labels, other .............................................. 7
Labels, warning .......................................... 4
Launching the watercraft ......................... 41
Learning to operate your watercraft......... 40
Leaving the watercraft.............................. 43
Limitations on who may operate the
watercraft ................................................ 8
Long-term storage ................................... 54
Lubrication ............................................... 54
Lubrication points .................................... 61
M
Main components, location of ................. 17
Maintenance............................................. 56
Manufactured date label ............................ 2
Mixing fuel and oil .................................... 28
O
Operating in weeded areas ...................... 49
Operating positions .................................. 40
Operating the watercraft .......................... 43
Operating your watercraft ........................ 40
Operation requirements ........................... 10
UF4D73E0.book Page 70 Wednesday, March 23, 2016 11:40 AM