tires YAMAHA TENERE 700 2020 Owners Manual
[x] Cancel search | Manufacturer: YAMAHA, Model Year: 2020, Model line: TENERE 700, Model: YAMAHA TENERE 700 2020Pages: 102, PDF Size: 10.31 MB
Page 6 of 102

Table of contentsSafety information............................ 1-1
Description....................................... 2-1
Left view ......................................... 2-1
Right view ....................................... 2-2
Controls and instruments ............... 2-3
Instrument and control functions... 3-1
Immobilizer system......................... 3-1
Main switch/steering lock............... 3-2
Indicator lights and warning
lights............................................ 3-3
Multi-function meter unit ................ 3-5
Handlebar switches ...................... 3-12
Clutch lever .................................. 3-14
Shift pedal .................................... 3-14
Brake lever.................................... 3-15
Brake pedal .................................. 3-15
ABS .............................................. 3-15
Fuel tank cap ................................ 3-16
Fuel ............................................... 3-17
Fuel tank overflow hose ............... 3-19
Catalytic converter ....................... 3-19
Seats ............................................ 3-19
Adjusting the headlight beams ..... 3-21
Adjusting the front fork ................. 3-21
Front fork bleeding ....................... 3-23
Adjusting the shock absorber
assembly ................................... 3-23
Luggage strap holders ................. 3-25
Front fender ................................. 3-26DC power outlets .......................... 3-26
Sidestand ...................................... 3-27
Ignition circuit cut-off system ....... 3-28
For your safety – pre-operation
checks............................................... 4-1
Operation and important riding
points................................................. 5-1
Engine break-in ............................... 5-1
Starting the engine .......................... 5-2
Shifting ............................................ 5-3
Tips for reducing fuel
consumption ................................ 5-4
Parking ............................................ 5-4
Periodic maintenance and
adjustment........................................ 6-1
Tool kit ............................................ 6-2
Periodic maintenance charts .......... 6-3
Periodic maintenance chart for the
emission control system .............. 6-3
General maintenance and
lubrication chart ........................... 6-5
Removing and installing cowlings... 6-9
Checking the spark plugs ............... 6-9
Canister ......................................... 6-10
Engine oil and oil filter cartridge.... 6-11
Why Yamalube .............................. 6-14
Coolant.......................................... 6-14Replacing the air filter element
and cleaning the check hose .... 6-15
Checking the throttle grip free
play ............................................ 6-17
Valve clearance............................. 6-17
Tires .............................................. 6-17
Spoke wheels ............................... 6-19
Adjusting the clutch lever free
play ............................................ 6-19
Checking the brake lever free
play ............................................ 6-20
Brake light switches ..................... 6-21
Checking the front and rear brake
pads .......................................... 6-21
Checking the brake fluid level ...... 6-22
Changing the brake fluid .............. 6-23
Drive chain slack........................... 6-23
Cleaning and lubricating the drive
chain.......................................... 6-25
Checking and lubricating the
cables ........................................ 6-26
Checking and lubricating the
throttle grip and cable ............... 6-26
Checking and lubricating the
brake and shift pedals............... 6-26
Checking and lubricating the
brake and clutch levers ............. 6-27
Checking and lubricating the
sidestand................................... 6-28
Lubricating the rear suspension ... 6-28UBW3E0E0.book Page 1 Friday, May 24, 2019 11:01 AM
Page 10 of 102

Safety information
1-3
1Carbon Monoxide is a colorless, odor-
less, tasteless gas which may be pres-
ent even if you do not see or smell any
engine exhaust. Deadly levels of car-
bon monoxide can collect rapidly and
you can quickly be overcome and un-
able to save yourself. Also, deadly lev-
els of carbon monoxide can linger for
hours or days in enclosed or poorly
ventilated areas. If you experience any
symptoms of carbon monoxide poi-
soning, leave the area immediately, get
fresh air, and SEEK MEDICAL TREAT-
MENT.
Do not run engine indoors. Even if
you try to ventilate engine exhaust
with fans or open windows and
doors, carbon monoxide can rap-
idly reach dangerous levels.
Do not run engine in poorly venti-
lated or partially enclosed areas
such as barns, garages, or car-
ports.
Do not run engine outdoors where
engine exhaust can be drawn into
a building through openings such
as windows and doors.Loading
Adding accessories or cargo to your
motorcycle can adversely affect stabil-
ity and handling if the weight distribu-
tion of the motorcycle is changed. To
avoid the possibility of an accident, use
extreme caution when adding cargo or
accessories to your motorcycle. Use
extra care when riding a motorcycle
that has added cargo or accessories.
Here, along with the information about
accessories below, are some general
guidelines to follow if loading cargo to
your motorcycle:
The total weight of the operator, pas-
senger, accessories and cargo must
not exceed the maximum load limit.
Operation of an overloaded vehicle
could cause an accident.
When loading within this weight limit,
keep the following in mind:
Cargo and accessory weight
should be kept as low and close to
the motorcycle as possible. Se-
curely pack your heaviest items asclose to the center of the vehicle
as possible and make sure to dis-
tribute the weight as evenly as
possible on both sides of the mo-
torcycle to minimize imbalance or
instability.
Shifting weights can create a sud-
den imbalance. Make sure that
accessories and cargo are se-
curely attached to the motorcycle
before riding. Check accessory
mounts and cargo restraints fre-
quently.
• Properly adjust the suspension
for your load (suspension-ad-
justable models only), and
check the condition and pres-
sure of your tires.
• Never attach any large or heavy
items to the handlebar, front
fork, or front fender. These
items, including such cargo as
sleeping bags, duffel bags, or
tents, can create unstable han-
dling or a slow steering re-
sponse.
This vehicle is not designed to
pull a trailer or to be attached to
a sidecar.
Maximum load:
190 kg (419 lb)
UBW3E0E0.book Page 3 Friday, May 24, 2019 11:01 AM
Page 12 of 102

Safety information
1-5
1Aftermarket Tires and Rims
The tires and rims that came with your
motorcycle were designed to match
the performance capabilities and to
provide the best combination of han-
dling, braking, and comfort. Other
tires, rims, sizes, and combinations
may not be appropriate. Refer to page
6-17 for tire specifications and more in-
formation on replacing your tires.
Transporting the Motorcycle
Be sure to observe following instruc-
tions before transporting the motorcy-
cle in another vehicle.
Remove all loose items from the
motorcycle.
Check that the fuel cock (if
equipped) is in the “OFF” position
and that there are no fuel leaks.
Point the front wheel straight
ahead on the trailer or in the truck
bed, and choke it in a rail to pre-
vent movement.
Shift the transmission in gear (for
models with a manual transmis-
sion).Secure the motorcycle with tie-
downs or suitable straps that are
attached to solid parts of the mo-
torcycle, such as the frame or up-
per front fork triple clamp (and not,
for example, to rubber-mounted
handlebars or turn signals, or
parts that could break). Choose
the location for the straps carefully
so the straps will not rub against
painted surfaces during transport.
The suspension should be com-
pressed somewhat by the tie-
downs, if possible, so that the mo-
torcycle will not bounce exces-
sively during transport.
UBW3E0E0.book Page 5 Friday, May 24, 2019 11:01 AM
Page 46 of 102

For your safety – pre-operation checks
4-2
4
Rear brake• Check operation.
• If soft or spongy, have Yamaha dealer bleed hydraulic system.
• Check brake pads for wear.
• Replace if necessary.
• Check fluid level in reservoir.
• If necessary, add specified brake fluid to specified level.
• Check hydraulic system for leakage.6-21, 6-22
Clutch• Check operation.
• Lubricate cable if necessary.
• Check lever free play.
• Adjust if necessary.6-19
Throttle grip• Make sure that operation is smooth.
• Check throttle grip free play.
• If necessary, have Yamaha dealer adjust throttle grip free play and lubricate ca-
ble and grip housing.6-17, 6-26
Control cables• Make sure that operation is smooth.
• Lubricate if necessary.6-26
Drive chain• Check chain slack.
• Adjust if necessary.
• Check chain condition.
• Lubricate if necessary.6-23, 6-25
Wheels and tires•Check for damage.
• Check tire condition and tread depth.
• Check air pressure.
• Correct if necessary.6-17, 6-19
Brake and shift pedals• Make sure that operation is smooth.
• Lubricate pedal pivoting points if necessary.6-26
Brake and clutch levers• Make sure that operation is smooth.
• Lubricate lever pivoting points if necessary.6-27
Sidestand• Make sure that operation is smooth.
• Lubricate pivot if necessary.6-28 ITEM CHECKS PAGE
UBW3E0E0.book Page 2 Friday, May 24, 2019 11:01 AM
Page 56 of 102

Periodic maintenance and adjustment
6-5
6
EAU71352
General maintenance and lubrication chartNO. ITEM CHECK OR MAINTENANCE JOBODOMETER READING
ANNUAL
CHECK 1000 km
(600 mi)10000 km
(6000 mi)20000 km
(12000 mi)30000 km
(18000 mi)40000 km
(24000 mi)
1*Diagnostic system
check• Perform dynamic inspection us-
ing Yamaha diagnostic tool.
• Check the error codes.√√√√√√
2*Air filter element• Replace.√√
3Air filter case check
hose• Clean.√√√√√
4Clutch• Check operation.
•Adjust.√√√√√
5*Front brake• Check operation, fluid level, and
for fluid leakage.
• Replace brake pads if necessary.√√√√√√
6*Rear brake• Check operation, fluid level, and
for fluid leakage.
• Replace brake pads if necessary.√√√√√√
7*Brake hoses• Check for cracks or damage.√√√√√
• Replace. Every 4 years
8*Brake fluid• Change. Every 2 years
9*Wheels• Check runout, spoke tightness
and for damage.
• Tighten spokes if necessary.√√√√√
10*Tires• Check tread depth and for dam-
age.
• Replace if necessary.
• Check air pressure.
• Correct if necessary.√√√√√
UBW3E0E0.book Page 5 Friday, May 24, 2019 11:01 AM
Page 68 of 102
Periodic maintenance and adjustment
6-17
6
EAU21386
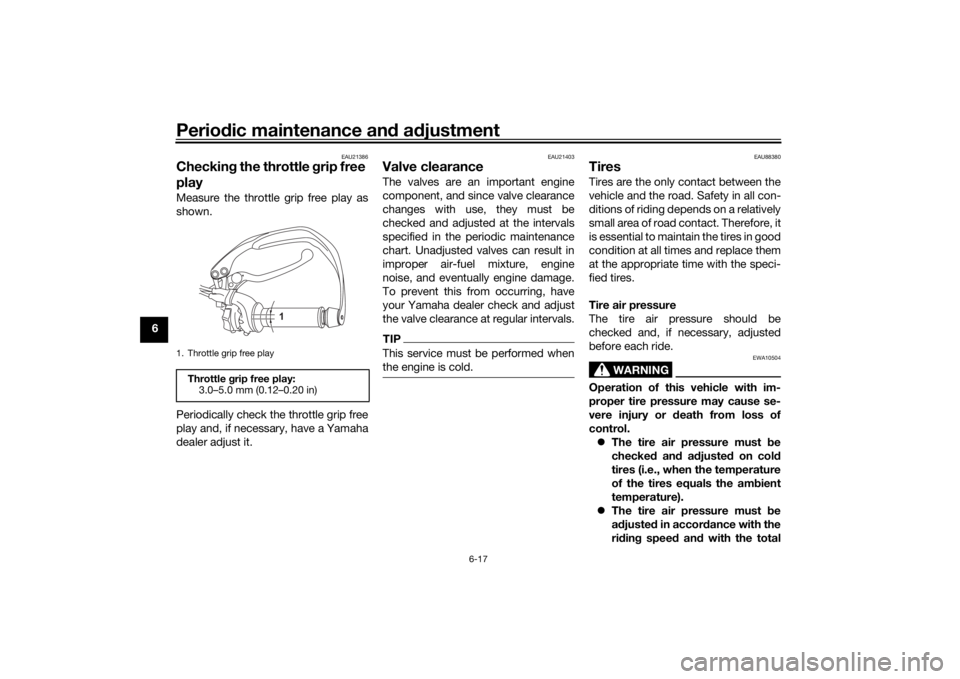
Checking the throttle grip free
playMeasure the throttle grip free play as
shown.
Periodically check the throttle grip free
play and, if necessary, have a Yamaha
dealer adjust it.
EAU21403
Valve clearanceThe valves are an important engine
component, and since valve clearance
changes with use, they must be
checked and adjusted at the intervals
specified in the periodic maintenance
chart. Unadjusted valves can result in
improper air-fuel mixture, engine
noise, and eventually engine damage.
To prevent this from occurring, have
your Yamaha dealer check and adjust
the valve clearance at regular intervals.TIPThis service must be performed when
the engine is cold.
EAU88380
TiresTires are the only contact between the
vehicle and the road. Safety in all con-
ditions of riding depends on a relatively
small area of road contact. Therefore, it
is essential to maintain the tires in good
condition at all times and replace them
at the appropriate time with the speci-
fied tires.
Tire air pressure
The tire air pressure should be
checked and, if necessary, adjusted
before each ride.
WARNING
EWA10504
Operation of this vehicle with im-
proper tire pressure may cause se-
vere injury or death from loss of
control.
The tire air pressure must be
checked and adjusted on cold
tires (i.e., when the temperature
of the tires equals the ambient
temperature).
The tire air pressure must be
adjusted in accordance with the
riding speed and with the total
1. Throttle grip free playThrottle grip free play:
3.0–5.0 mm (0.12–0.20 in)
1
UBW3E0E0.book Page 17 Friday, May 24, 2019 11:01 AM
Page 69 of 102
Periodic maintenance and adjustment
6-18
6 weight of rider, passenger, car-
go, and accessories approved
for this model.
WARNING
EWA10512
Never overload your vehicle. Opera-
tion of an overloaded vehicle could
cause an accident.
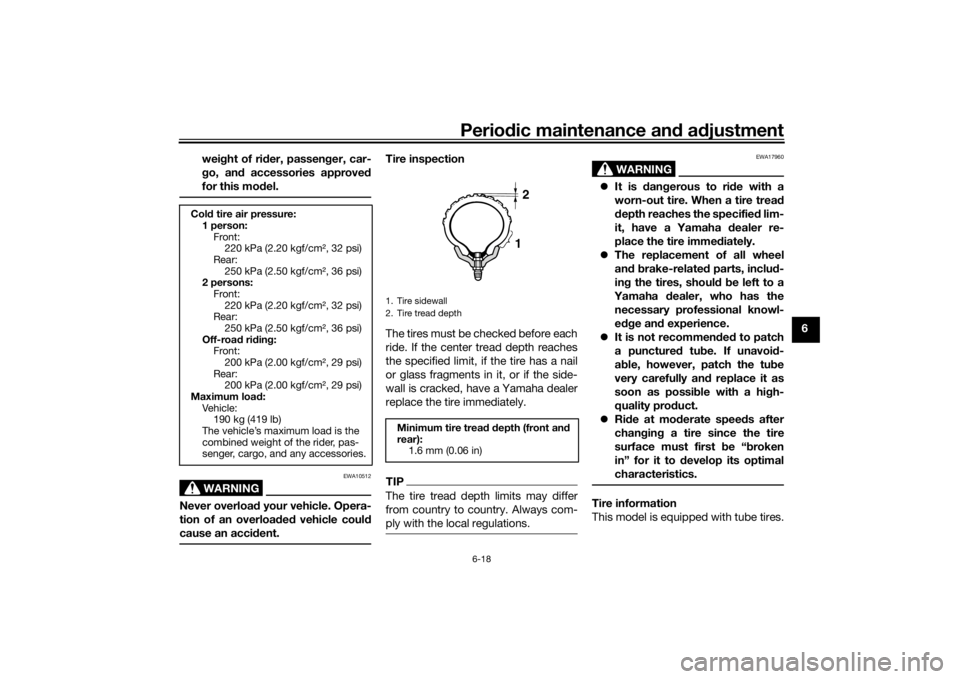
Tire inspection
The tires must be checked before each
ride. If the center tread depth reaches
the specified limit, if the tire has a nail
or glass fragments in it, or if the side-
wall is cracked, have a Yamaha dealer
replace the tire immediately.TIPThe tire tread depth limits may differ
from country to country. Always com-
ply with the local regulations.
WARNING
EWA17960
It is dangerous to ride with a
worn-out tire. When a tire tread
depth reaches the specified lim-
it, have a Yamaha dealer re-
place the tire immediately.
The replacement of all wheel
and brake-related parts, includ-
ing the tires, should be left to a
Yamaha dealer, who has the
necessary professional knowl-
edge and experience.
It is not recommended to patch
a punctured tube. If unavoid-
able, however, patch the tube
very carefully and replace it as
soon as possible with a high-
quality product.
Ride at moderate speeds after
changing a tire since the tire
surface must first be “broken
in” for it to develop its optimal
characteristics.Tire information
This model is equipped with tube tires.
Cold tire air pressure:
1 person:
Front:
220 kPa (2.20 kgf/cm², 32 psi)
Rear:
250 kPa (2.50 kgf/cm², 36 psi)
2 persons:
Front:
220 kPa (2.20 kgf/cm², 32 psi)
Rear:
250 kPa (2.50 kgf/cm², 36 psi)
Off-road riding:
Front:
200 kPa (2.00 kgf/cm², 29 psi)
Rear:
200 kPa (2.00 kgf/cm², 29 psi)
Maximum load:
Veh ic le:
190 kg (419 lb)
The vehicle’s maximum load is the
combined weight of the rider, pas-
senger, cargo, and any accessories.
1. Tire sidewall
2. Tire tread depth
Minimum tire tread depth (front and
rear):
1.6 mm (0.06 in)
12
UBW3E0E0.book Page 18 Friday, May 24, 2019 11:01 AM
Page 70 of 102
Periodic maintenance and adjustment
6-19
6Tires age, even if they have not been
used or have only been used occasion-
ally. Cracking of the tread and sidewall
rubber, sometimes accompanied by
carcass deformation, is an evidence of
ageing. Old and aged tires shall be
checked by tire specialists to ascertain
their suitability for further use.
WARNING
EWA10462
The front and rear tires should be of
the same make and design, other-
wise the handling characteristics of
the vehicle may be different, which
could lead to an accident.After extensive tests, only the tires list-
ed below have been approved for this
model by Yamaha.
EAU21945
Spoke wheelsTo maximize the performance, durabil-
ity, and safe operation of the vehicle,
note the following points.
Check each wheel for cracks, de-
formation and other damage. If
any damage is found, have the
wheel inspected by your Yamaha
dealer. Do not attempt to repair or
straighten a bent or damaged
wheel.
Check the spokes for looseness. If
any loose spokes are found, have
the wheel adjusted by your
Yamaha dealer. Improperly tight-
ened spokes can cause wheel
misalignment.
Have the wheel balanced whenev-
er the tire or tube has been re-
placed. An unbalanced wheel can
result in adverse handling charac-
teristics and shortened tire life.
WARNING
EWA10611
The wheels on this model are not
designed for use with tubeless tires.
Do not attempt to use tubeless tires
on this model.
EAU33893
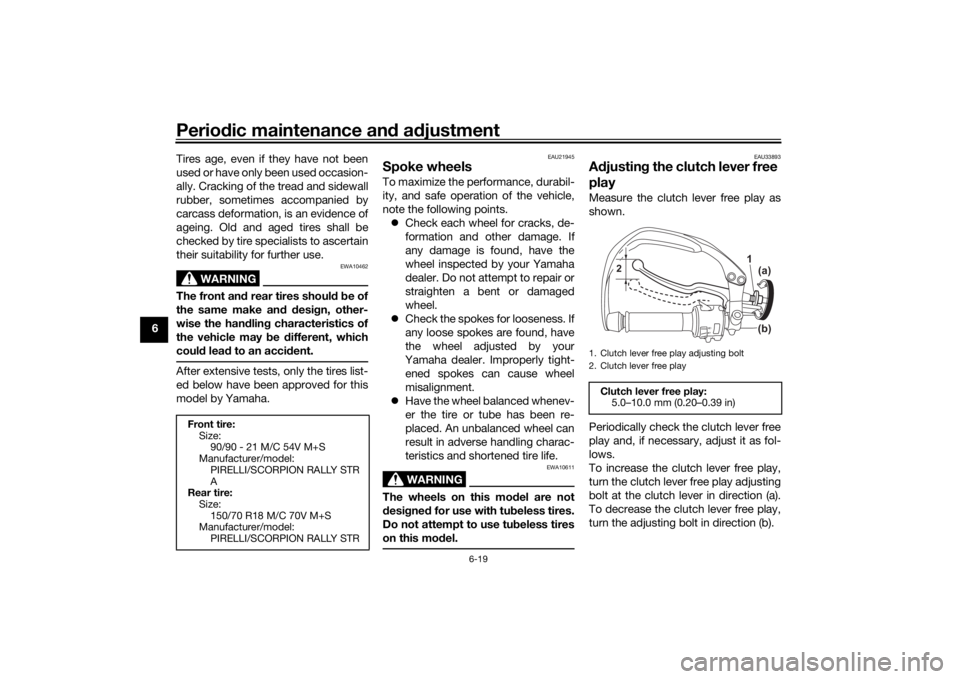
Adjusting the clutch lever free
playMeasure the clutch lever free play as
shown.
Periodically check the clutch lever free
play and, if necessary, adjust it as fol-
lows.
To increase the clutch lever free play,
turn the clutch lever free play adjusting
bolt at the clutch lever in direction (a).
To decrease the clutch lever free play,
turn the adjusting bolt in direction (b).
Front tire:
Size:
90/90 - 21 M/C 54V M+S
Manufacturer/model:
PIRELLI/SCORPION RALLY STR
A
Rear tire:
Size:
150/70 R18 M/C 70V M+S
Manufacturer/model:
PIRELLI/SCORPION RALLY STR
1. Clutch lever free play adjusting bolt
2. Clutch lever free playClutch lever free play:
5.0–10.0 mm (0.20–0.39 in)
1
(a)
(b)
2
UBW3E0E0.book Page 19 Friday, May 24, 2019 11:01 AM
Page 91 of 102
![YAMAHA TENERE 700 2020 Owners Manual Motorcycle care and storage
7-3
7 will become slippery, which
could cause loss of control.
Thoroughly clean the surfaces
of these parts before operating
the vehicle.
[EWA20650]
5. Treat rubber, vinyl](/img/51/51774/w960_51774-90.png "YAMAHA TENERE 700 2020 Owners Manual Motorcycle care and storage
7-3
7 will become slippery, which
could cause loss of control.
Thoroughly clean the surfaces
of these parts before operating
the vehicle.
[EWA20650]
5. Treat rubber, vinyl")
Motorcycle care and storage
7-3
7 will become slippery, which
could cause loss of control.
Thoroughly clean the surfaces
of these parts before operating
the vehicle.
[EWA20650]
5. Treat rubber, vinyl, and unpainted
plastic parts with a suitable care
product.
6. Touch up minor paint damage
caused by stones, etc.
7. Wax all painted surfaces using a
non-abrasive wax or use a detail
spray for motorcycles.
8. When finished cleaning, start the
engine and let it idle for several
minutes to help dry any remaining
moisture.
9. If the headlight lens has fogged
up, start the engine and turn on
the headlight to help remove the
moisture.
10. Let the vehicle dry completely be-
fore storing or covering it.NOTICE
ECA26320
Do not apply wax to rubber or
unpainted plastic parts.Do not use abrasive polishing
compounds as they will wear
away the paint.
Apply sprays and wax sparingly.
Wipe off excess afterwards.
WARNING
EWA20660
Contaminants left on the brakes or
tires can cause loss of control.
Make sure there is no lubricant
or wax on the brakes or tires.
If necessary, wash the tires with
warm water and a mild deter-
gent.
If necessary, clean the brake
discs and pads with brake
cleaner or acetone.
Before riding at higher speeds,
test the vehicle’s braking per-
formance and cornering behav-
ior.
EAU83472
StorageAlways store the vehicle in a cool, dry
place. If necessary, protect it against
dust with a porous cover. Be sure the
engine and the exhaust system are
cool before covering the vehicle. If the
vehicle often sits for weeks at a time
between uses, the use of a quality fuel
stabilizer is recommended after each
fill-up.NOTICE
ECA21170
Storing the vehicle in a poorly
ventilated room or covering it
with a tarp, while it is still wet,
will allow water and humidity to
seep in and cause rust.
To prevent corrosion, avoid
damp cellars, stables (because
of the presence of ammonia)
and areas where strong chemi-
cals are stored.Long term storage
Before storing the vehicle long term (60
days or more):
UBW3E0E0.book Page 3 Friday, May 24, 2019 11:01 AM
Page 92 of 102
Motorcycle care and storage
7-4
71. Make all necessary repairs and
perform any outstanding mainte-
nance.
2. Follow all instructions in the Care
section of this chapter.
3. Fill up the fuel tank, adding fuel
stabilizer according to product in-
structions. Run the engine for 5
minutes to distribute treated fuel
through the fuel system.
4. For vehicles equipped with a fuel
cock: Turn the fuel cock lever to
the off position.
5. For vehicles with a carburetor: To
prevent fuel deposits from build-
ing up, drain the fuel in the carbu-
retor float chamber into a clean
container. Retighten the drain bolt
and pour the fuel back into the fuel
tank.
6. Use a quality engine fogging oil
according to product instructions
to protect internal engine compo-
nents from corrosion. If engine
fogging oil is not available, per-
form the following steps for each
cylinder:
a. Remove the spark plug cap
and spark plug.b. Pour a teaspoonful of engine
oil into the spark plug bore.
c. Install the spark plug cap onto
the spark plug, and then place
the spark plug on the cylinder
head so that the electrodes are
grounded. (This will limit spark-
ing during the next step.)
d. Turn the engine over several
times with the starter. (This will
coat the cylinder wall with oil.)
WARNING! To prevent dam-
age or injury from sparking,
make sure to ground the
spark plug electrodes while
turning the engine over.
[EWA10952]
e. Remove the spark plug cap
from the spark plug, and then
install the spark plug and the
spark plug cap.
7. Lubricate all control cables, piv-
ots, levers and pedals, as well as
the sidestand and centerstand (if
equipped).
8. Check and correct the tire air
pressure, and then lift the vehicle
so that all wheels are off the
ground. Otherwise, turn thewheels a little once a month in or-
der to prevent the tires from be-
coming degraded in one spot.
9. Cover the muffler outlet with a
plastic bag to prevent moisture
from entering it.
10. Remove the battery and fully
charge it, or attach a maintenance
charger to keep the battery opti-
mally charged. NOTICE: Confirm
that the battery and its charger
are compatible. Do not charge a
VRLA battery with a convention-
al charger.
[ECA26330]
TIPIf the battery will be removed,
charge it once a month and store
it in a temperate location between
0-30 °C (32-90 °F).
See page 6-30 for more informa-
tion on charging and storing the
battery.
UBW3E0E0.book Page 4 Friday, May 24, 2019 11:01 AM