fuel YAMAHA TRACER 900 2020 User Guide
[x] Cancel search | Manufacturer: YAMAHA, Model Year: 2020, Model line: TRACER 900, Model: YAMAHA TRACER 900 2020Pages: 110, PDF Size: 7.67 MB
Page 29 of 110
Instrument and control functions
3-14
3
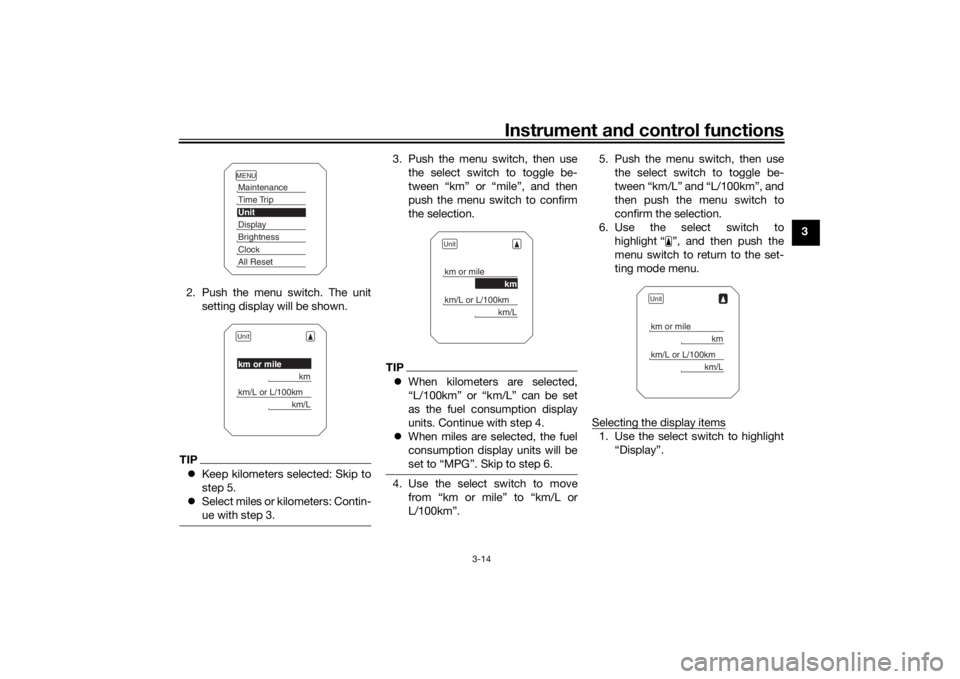
2. Push the menu switch. The unit setting display will be shown.
TIPKeep kilometers selected: Skip to
step 5.
Select miles or kilometers: Contin-
ue with step 3.
3. Push the menu switch, then use
the select switch to toggle be-
tween “km” or “mile”, and then
push the menu switch to confirm
the selection.TIPWhen kilometers are selected,
“L/100km” or “km/L” can be set
as the fuel consumption display
units. Continue with step 4.
When miles are selected, the fuel
consumption display units will be
set to “MPG”. Skip to step 6.4. Use the select switch to move
from “km or mile” to “km/L or
L/100km”. 5. Push the menu switch, then use
the select switch to toggle be-
tween “km/L” and “L/100km”, and
then push the menu switch to
confirm the selection.
6. Use the select switch to highlight “ ”, and then push the
menu switch to return to the set-
ting mode menu.
Selecting the display items
1. Use the select switch to highlight “Display”.
MENUMaintenanceTime TripUnitDisplayBrightnessClockAll ResetUnitkm or mile
km
km/L or L/100km
km/L
Unitkm or mile
km
km/L or L/100km
km/L
Unitkm or mile
km
km/L or L/100km
km/L
UB5CE1E0.book Page 14 Monday, August 6, 2018 1:13 PM
Page 39 of 110
Instrument and control functions
3-24
3
TIPIf the “ ” indicator light remains on af-
ter resetting, the vehicle may still be
ridden; however, have a Yamaha deal-
er check the vehicle as soon as possi-
ble.4. Have a Yamaha dealer check the
vehicle and turn off the “ ”
warning light.
EAU13076
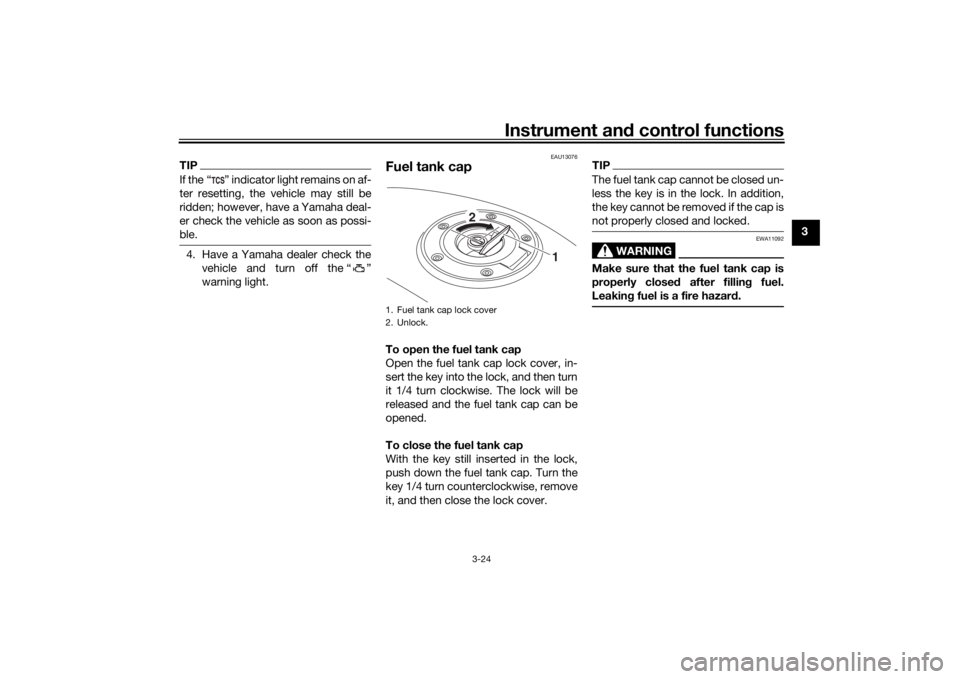
Fuel tank capTo open the fuel tank cap
Open the fuel tank cap lock cover, in-
sert the key into the lock, and then turn
it 1/4 turn clockwise. The lock will be
released and the fuel tank cap can be
opened.
To close the fuel tank cap
With the key still inserted in the lock,
push down the fuel tank cap. Turn the
key 1/4 turn counterclockwise, remove
it, and then close the lock cover.
TIPThe fuel tank cap cannot be closed un-
less the key is in the lock. In addition,
the key cannot be removed if the cap is
not properly closed and locked.
WARNING
EWA11092
Make sure that the fuel tank cap is
properly close d after fillin g fuel.
Leakin g fuel is a fire hazar d.
1. Fuel tank cap lock cover
2. Unlock.
1
2
UB5CE1E0.book Page 24 Monday, August 6, 2018 1:13 PM
Page 40 of 110
Instrument and control functions
3-25
3
EAU13222
FuelMake sure there is sufficient gasoline in
the tank.
WARNING
EWA10882
Gasoline an d g asoline vapors are
extremely flamma ble. To avoi d fires
an d explosions an d to re duce the
risk of injury when refuelin g, follow
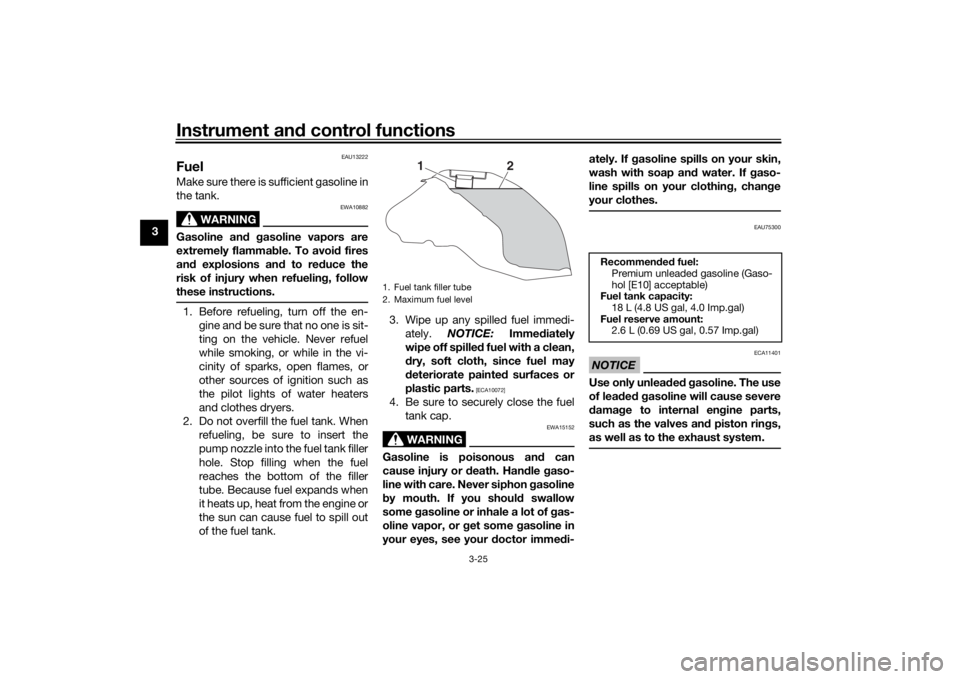
these instructions.1. Before refueling, turn off the en- gine and be sure that no one is sit-
ting on the vehicle. Never refuel
while smoking, or while in the vi-
cinity of sparks, open flames, or
other sources of ignition such as
the pilot lights of water heaters
and clothes dryers.
2. Do not overfill the fuel tank. When refueling, be sure to insert the
pump nozzle into the fuel tank filler
hole. Stop filling when the fuel
reaches the bottom of the filler
tube. Because fuel expands when
it heats up, heat from the engine or
the sun can cause fuel to spill out
of the fuel tank. 3. Wipe up any spilled fuel immedi-
ately. NOTICE: Immediately
wipe off spille d fuel with a clean,
d ry, soft cloth, since fuel may
d eteriorate painted surfaces or
plastic parts.
[ECA10072]
4. Be sure to securely close the fuel tank cap.
WARNING
EWA15152
Gasoline is poisonous an d can
cause injury or death. Han dle gaso-
line with care. Never siphon gasoline
b y mouth. If you shoul d swallow
some gasoline or inhale a lot of gas-
oline vapor, or g et some gasoline in
your eyes, see your doctor imme di- ately. If g
asoline spills on your skin,
wash with soap an d water. If gaso-
line spills on your clothin g, chan ge
your clothes.
EAU75300
NOTICE
ECA11401
Use only unlea ded g asoline. The use
of lea ded g asoline will cause severe
d amag e to internal en gine parts,
such as the valves an d piston rin gs,
as well as to the exhaust system.
1. Fuel tank filler tube
2. Maximum fuel level
1
2
Recommen ded fuel:
Premium unleaded gasoline (Gaso-
hol [E10] acceptable)
Fuel tank capacity:
18 L (4.8 US gal, 4.0 Imp.gal)
Fuel reserve amount: 2.6 L (0.69 US gal, 0.57 Imp.gal)
UB5CE1E0.book Page 25 Monday, August 6, 2018 1:13 PM
Page 41 of 110
Instrument and control functions
3-26
3
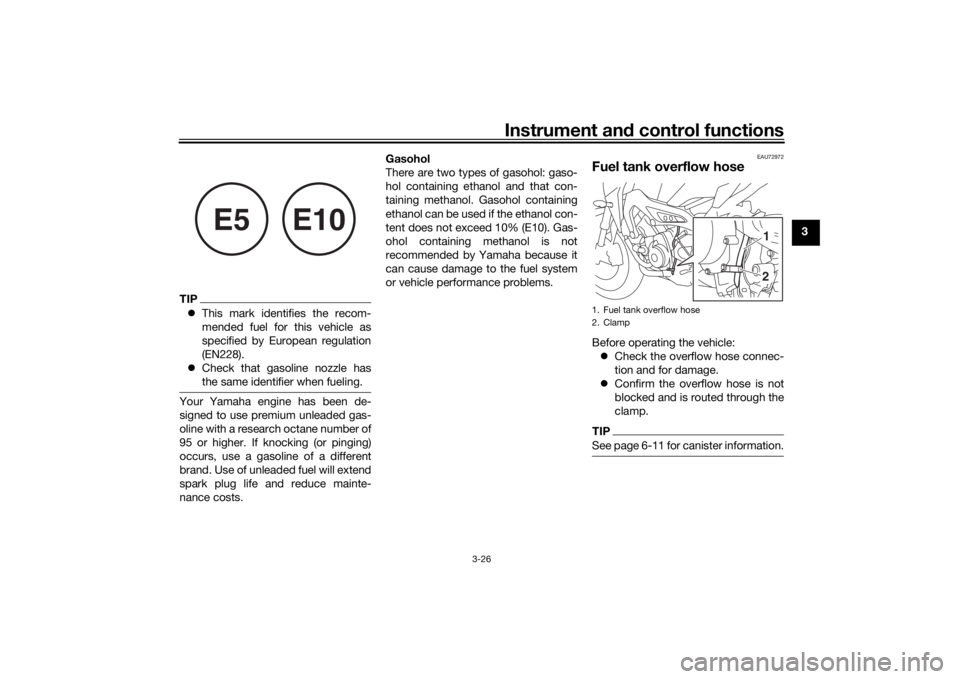
TIP This mark identifies the recom-
mended fuel for this vehicle as
specified by European regulation
(EN228).
Check that gasoline nozzle has
the same identifier when fueling.Your Yamaha engine has been de-
signed to use premium unleaded gas-
oline with a research octane number of
95 or higher. If knocking (or pinging)
occurs, use a gasoline of a different
brand. Use of unleaded fuel will extend
spark plug life and reduce mainte-
nance costs. Gasohol
There are two types of gasohol: gaso-
hol containing ethanol and that con-
taining methanol. Gasohol containing
ethanol can be used if the ethanol con-
tent does not exceed 10% (E10). Gas-
ohol containing methanol is not
recommended by Yamaha because it
can cause damage to the fuel system
or vehicle performance problems.
EAU72972
Fuel tank overflow hoseBefore operating the vehicle:
Check the overflow hose connec-
tion and for damage.
Confirm the overflow hose is not
blocked and is routed through the
clamp.TIPSee page 6-11 for canister information.
E5
E10
1. Fuel tank overflow hose
2. Clamp
21
UB5CE1E0.book Page 26 Monday, August 6, 2018 1:13 PM
Page 54 of 110

For your safety – pre-operation checks
4-1
4
EAU15599
Inspect your vehicle each time you use it to make sure the vehicle is in safe operating condition. Always follow the inspection
and maintenance procedures and schedules described in the Owner’s Manual.
WARNING
EWA11152
Failure to inspect or maintain the vehicle properly increases the possibility of an acci dent or equipment damag e.
Do not operate the vehicle if you fin d any pro blem. If a pro blem cannot be corrected b y the proce dures provi ded in
this manual, have the vehicle inspecte d b y a Yamaha dealer.Before using this vehicle, check the following points:
ITEM CHECKS PAGE
Fuel • Check fuel level in fuel tank.
• Refuel if necessary.
• Check fuel line for leakage.
• Check fuel tank overflow hose for obstructions, cracks or damage, and check
hose connection. 3-25, 3-26
En gine oil • Check oil level in engine.
• If necessary, add recommended oil to specified level.
• Check vehicle for oil leakage. 6-11
Coolant • Check coolant level in reservoir.
• If necessary, add recommended coolant to specified level.
• Check cooling system for leakage. 6-14
Front brake • Check operation.
• If soft or spongy, have Yamaha dealer bleed hydraulic system.
• Check brake pads for wear.
• Replace if necessary.
• Check fluid level in reservoir.
• If necessary, add specified brake fluid to specified level.
• Check hydraulic system for leakage. 6-21, 6-21
UB5CE1E0.book Page 1 Monday, August 6, 2018 1:13 PM
Page 59 of 110

Operation and important ri din g points
5-3
5
4. After starting out, close the throt-
tle, and at the same time, quickly
pull the clutch lever in.
5. Shift the transmission into second gear. (Make sure not to shift the
transmission into the neutral posi-
tion.)
6. Open the throttle part way and gradually release the clutch lever.
7. Follow the same procedure when shifting to the next higher gear.
EAU85380
To decelerate
1. Release the throttle and apply both the front and the rear brakes
smoothly to slow the motorcycle.
2. As the vehicle decelerates, shift to a lower gear.
3. When the engine is about to stall or runs roughly, pull the clutch le-
ver in, use the brakes to slow the
motorcycle, and continue to
downshift as necessary.
4. Once the motorcycle has stopped, the transmission can be
shifted into the neutral position. The neutral indicator light should
come on and then the clutch lever
can be released.
WARNING
EWA17380
Improper brakin g can cause
loss of control or traction. Al-
ways use b oth brakes an d apply
them smoothly.
Make sure that the motorcycle
and the en gine have sufficiently
slowe d b efore shiftin g to a low-
er gear. En gag in g a lower gear
when the vehicle or en gine
spee d is too hi gh coul d make
the rear wheel lose traction or
the en gine to over-rev. This
coul d cause loss of control, an
acci dent an d injury. It coul d also
cause en gine or d rive train dam-
a g e.
EAU16811
Tips for re ducin g fuel con-
sumptionFuel consumption depends largely on
your riding style. Consider the follow-
ing tips to reduce fuel consumption:
Shift up swiftly, and avoid high en-
gine speeds during acceleration.
Do not rev the engine while shift-
ing down, and avoid high engine
speeds with no load on the en-
gine.
Turn the engine off instead of let-
ting it idle for an extended length
of time (e.g., in traffic jams, at traf-
fic lights or at railroad crossings).
UB5CE1E0.book Page 3 Monday, August 6, 2018 1:13 PM
Page 60 of 110

Operation and important rid ing points
5-4
5
EAU16842
En gine break-inThere is never a more important period
in the life of your engine than the period
between 0 and 1600 km (1000 mi). For
this reason, you should read the fol-
lowing material carefully.
Since the engine is brand new, do not
put an excessive load on it for the first
1600 km (1000 mi). The various parts in
the engine wear and polish themselves
to the correct operating clearances.
During this period, prolonged full-throt-
tle operation or any condition that
might result in engine overheating
must be avoided.
EAU69230
0–1000 km (0–600 mi)
Avoid prolonged operation above 5600
r/min. NOTICE: After 1000 km (600
mi) of operation, the en gine oil must
b e chan ged an d the oil filter car-
tri dg e or element replace d.
[ECA10303]
1000–1600 km (600–1000 mi)
Avoid prolonged operation above 6800
r/min. 1600 km (1000 mi) an
d b eyon d
The vehicle can now be operated nor-
mally.
NOTICE
ECA23060
Keep the en gine spee d out of
the tachometer hi gh-r/min
zone.
If any en gine trou ble shoul d oc-
cur during the en gine break-in
period , imme diately have a
Yamaha dealer check the vehi-
cle.
EAU17214
Parkin gWhen parking, stop the engine, and
then remove the key from the main
switch.
WARNING
EWA10312
Since the en gine an d exhaust
system can become very hot,
park in a place where pe destri-
ans or chil dren are not likely to
touch them an d b e burne d.
Do not park on a slope or on soft
groun d, otherwise the vehicle
may overturn, increasin g the
risk of a fuel leak an d fire.
Do not park near grass or other
flammab le materials which
mi ght catch fire.
UB5CE1E0.book Page 4 Monday, August 6, 2018 1:13 PM
Page 63 of 110
Periodic maintenance an d a djustment
6-3
6
EAU71033
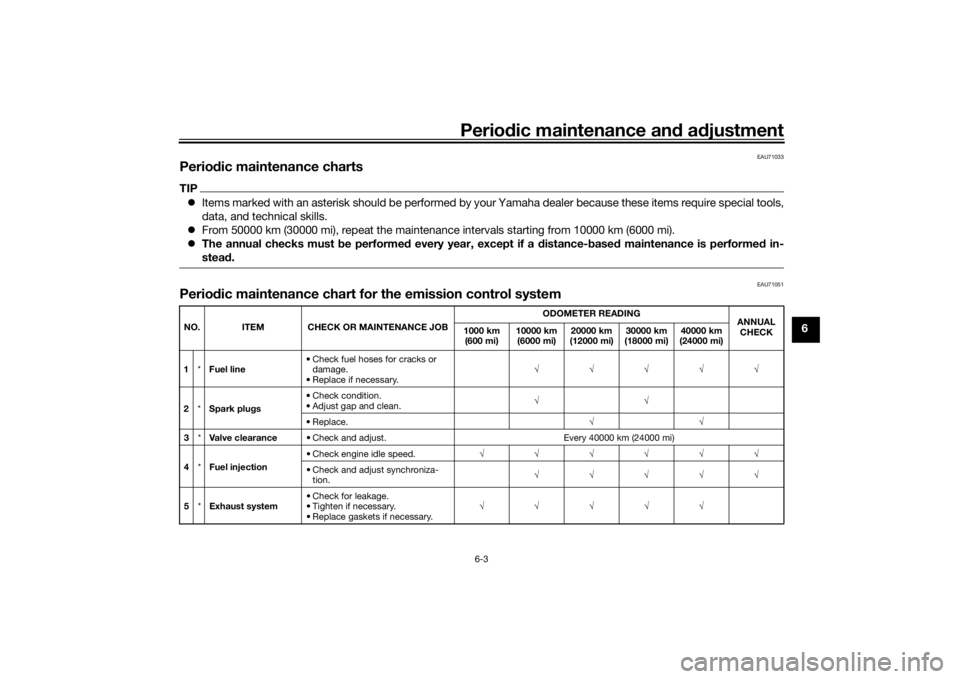
Perio dic maintenance chartsTIP Items marked with an asterisk should be performed by your Yamaha dealer because these items require special tools,
data, and technical skills.
From 50000 km (30000 mi), repeat the maintenance intervals starting from 10000 km (6000 mi).
The annual checks must be performe d every year, except if a distance- based maintenance is performe d in-
stea d.
EAU71051
Perio dic maintenance chart for the emission control systemNO. ITEM CHECK OR MAINTENANCE JOB ODOMETER READING
ANNUAL
CHECK
1000 km
(600 mi) 10000 km
(6000 mi) 20000 km
(12000 mi) 30000 km
(18000 mi) 40000 km
(24000 mi)
1 *Fuel line • Check fuel hoses for cracks or
damage.
• Replace if necessary. √√√√√
2 *Spark plu gs • Check condition.
• Adjust gap and clean.
√√
•Replace. √√
3 *Valve clearance • Check and adjust. Every 40000 km (24000 mi)
4 *Fuel injection • Check engine idle speed.
√√√√√√
• Check and adjust synchroniza- tion. √√√√√
5 *Exhaust system • Check for leakage.
• Tighten if necessary.
• Replace gaskets if necessary. √√√√√
UB5CE1E0.book Page 3 Monday, August 6, 2018 1:13 PM
Page 71 of 110
Periodic maintenance an d a djustment
6-11
6
EAU36112
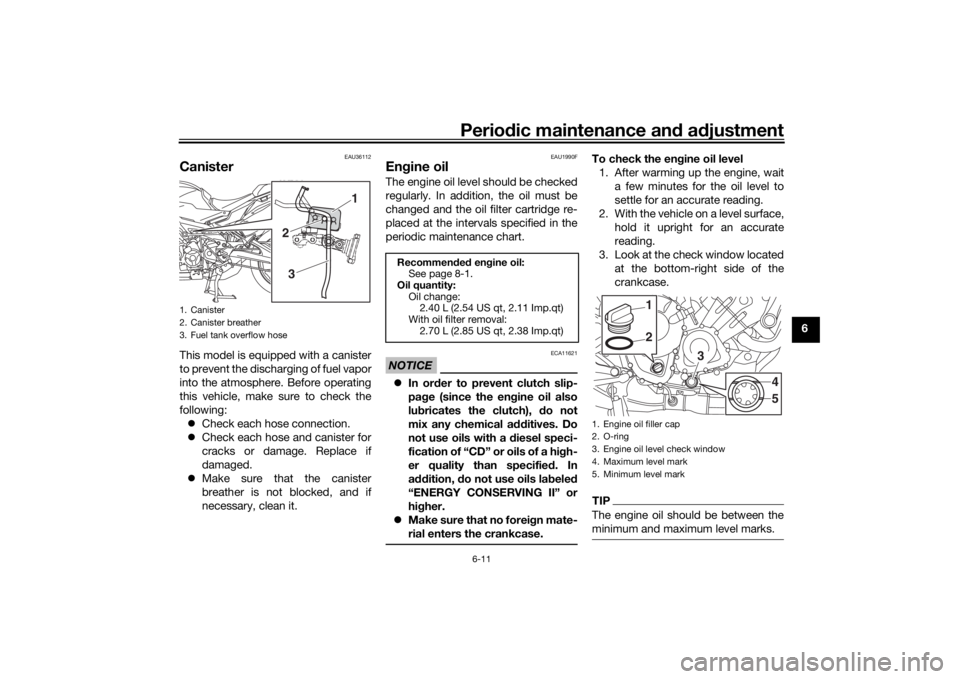
CanisterThis model is equipped with a canister
to prevent the discharging of fuel vapor
into the atmosphere. Before operating
this vehicle, make sure to check the
following:
Check each hose connection.
Check each hose and canister for
cracks or damage. Replace if
damaged.
Make sure that the canister
breather is not blocked, and if
necessary, clean it.
EAU1990F
Engine oilThe engine oil level should be checked
regularly. In addition, the oil must be
changed and the oil filter cartridge re-
placed at the intervals specified in the
periodic maintenance chart.NOTICE
ECA11621
In or der to prevent clutch slip-
pa ge (since the en gine oil also
lu bricates the clutch), do not
mix any chemical add itives. Do
not use oils with a diesel speci-
fication of “CD” or oils of a hi gh-
er quality than specified . In
a dd ition, do not use oils lab eled
“ENERGY CONSERVING II” or
hi gher.
Make sure that no forei gn mate-
rial enters the crankcase.
To check the en gine oil level
1. After warming up the engine, wait a few minutes for the oil level to
settle for an accurate reading.
2. With the vehicle on a level surface, hold it upright for an accurate
reading.
3. Look at the check window located at the bottom-right side of the
crankcase.TIPThe engine oil should be between the
minimum and maximum level marks.
1. Canister
2. Canister breather
3. Fuel tank overflow hose
1
2
3
Recommen ded en gine oil:
See page 8-1.
Oil quantity: Oil change:2.40 L (2.54 US qt, 2.11 Imp.qt)
With oil filter removal: 2.70 L (2.85 US qt, 2.38 Imp.qt)
1. Engine oil filler cap
2. O-ring
3. Engine oil level check window
4. Maximum level mark
5. Minimum level mark
21
3
45
UB5CE1E0.book Page 11 Monday, August 6, 2018 1:13 PM
Page 76 of 110

Periodic maintenance an d a djustment
6-16
6
EAU21386
Checkin g the throttle grip free
playMeasure the throttle grip free play as
shown.
Periodically check the throttle grip free
play and, if necessary, have a Yamaha
dealer adjust it.
EAU21403
Valve clearanceThe valves are an important engine
component, and since valve clearance
changes with use, they must be
checked and adjusted at the intervals
specified in the periodic maintenance
chart. Unadjusted valves can result in
improper air-fuel mixture, engine
noise, and eventually engine damage.
To prevent this from occurring, have
your Yamaha dealer check and adjust
the valve clearance at regular intervals.TIPThis service must be performed when
the engine is cold.
EAU64412
TiresTires are the only contact between the
vehicle and the road. Safety in all con-
ditions of riding depends on a relatively
small area of road contact. Therefore, it
is essential to maintain the tires in good
condition at all times and replace them
at the appropriate time with the speci-
fied tires.
Tire air pressure
The tire air pressure should be
checked and, if necessary, adjusted
before each ride.
WARNING
EWA10504
Operation of this vehicle with im-
proper tire pressure may cause se-
vere injury or death from loss of
control. The tire air pressure must be
checked and a djuste d on col d
tires (i.e., when the temperature
of the tires equals the am bient
temperature).
The tire air pressure must be
a d juste d in accor dance with the
ri din g speed and with the total
1. Throttle grip free playThrottle g rip free play:
3.0–5.0 mm (0.12–0.20 in)
1
UB5CE1E0.book Page 16 Monday, August 6, 2018 1:13 PM