change wheel YAMAHA TRACER 900 GT 2020 Owners Manual
[x] Cancel search | Manufacturer: YAMAHA, Model Year: 2020, Model line: TRACER 900 GT, Model: YAMAHA TRACER 900 GT 2020Pages: 120, PDF Size: 9.78 MB
Page 20 of 120
Instrument and control functions
3-5
3
EAU84271
Wheel switch “ ”
When the display is set to the main
screen, use the wheel switch to scroll
and reset the information display items
and to set the grip warmers.
When the display has been changed to
the MENU screen, use the wheel
switch to navigate the setting modules
and make setting changes.
Operate the wheel switch as follows.
Rotate up - rotate the wheel upward to
scroll up or increase a setting value.
Rotate down - rotate the wheel down-
ward to scroll down or decrease a set-
ting value.
Short push - briefly press the switch
inward to make and confirm selec-
tions.
Lon g push - press the switch inward
for one second to reset an information
display item or to access and exit the
MENU screen.TIP The MENU screen can be ac-
cessed by long pushing the wheel
switch except when the grip warmer display is selected or the
fuel tripmeter (F-TRIP) is dis-
played.
See page 3-11 for more informa-
tion on the main screen and its
functions.
See page 3-15 for more informa-
tion on the MENU screen and how
to make setting changes.
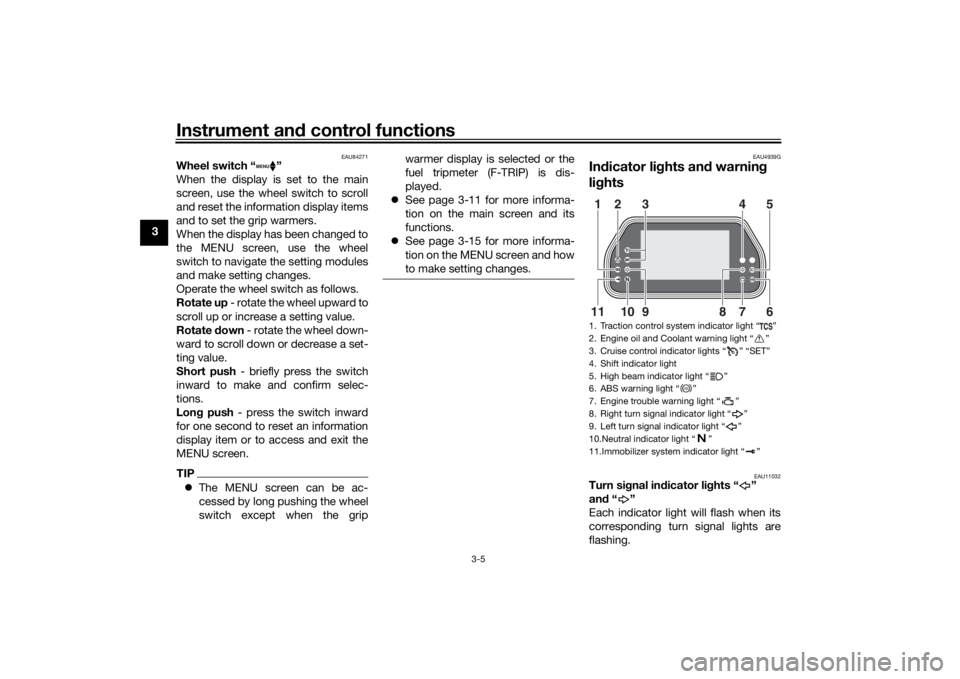
EAU4939G
Indicator li ghts an d warnin g
li g hts
EAU11032
Turn si gnal in dicator li ghts “ ”
an d“”
Each indicator light will flash when its
corresponding turn signal lights are
flashing.1. Traction control system indicator light “ ”
2. Engine oil and Coolant warning light “ ”
3. Cruise control indicator lights “ ” “SET”
4. Shift indicator light
5. High beam indicator light “ ”
6. ABS warning light “ ”
7. Engine trouble warning light “ ”
8. Right turn signal indicator light “ ”
9. Left turn signal indicator light “ ”
10.Neutral indicator light “ ”
11.Immobilizer system indicator light “ ”
98
10 7 6
11 13 45
2
ABS
UB1JE1E0.book Page 5 Thursday, October 11, 2018 10:43 AM
Page 29 of 120
Instrument and control functions
3-14
3
Air temperature
display
This display indicates the air tempera-
ture from –9 °C to 50 °C in 1 °C incre-
ments.
TIP –9 °C will be displayed even if the
air temperature falls below –9 °C.
50 °C will be displayed even if the
ambient temperature climbs
above 50 °C.
The temperature displayed may
vary from the actual ambient tem-
perature.Grip warmer d isplay
The grip warmers can be used when
the engine is running. There are 4 grip
warmer settings.
To change the grip warmer setting1. Select the grip warmer display. 2. Short push the wheel switch, and
then rotate the wheel switch up or
down to change the setting while
the display is flashing. Short push
the wheel switch to confirm the
setting.
TIPEach grip warmer setting can be fine
tuned in “Grip Warmer Setting” (see
page 3-23).NOTICE
ECA17932
Be sure to wear g loves when
using the grip warmers.
Do not use the grip warmers in
warm weather.
If the han dle bar grip or throttle
g rip becomes worn or d am-
a g ed , stop usin g the g rip warm-
ers an d replace the grips.
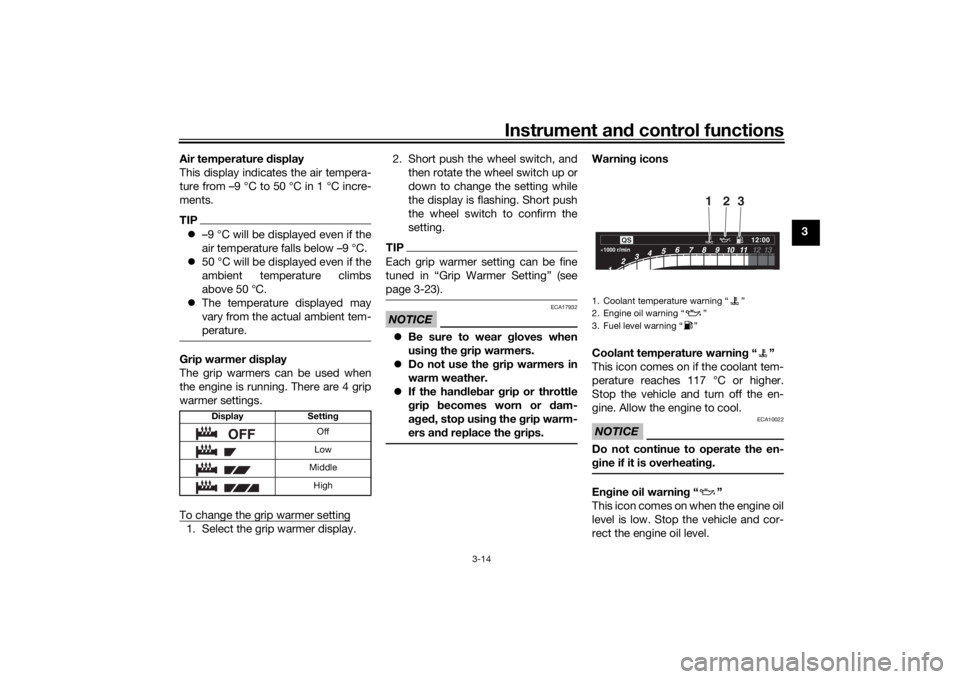
Warnin g icons
Coolant temperature warnin g“”
This icon comes on if the coolant tem-
perature reaches 117 °C or higher.
Stop the vehicle and turn off the en-
gine. Allow the engine to cool.NOTICE
ECA10022
Do not continue to operate the en-
g ine if it is overheatin g.En gine oil warnin g“”
This icon comes on when the engine oil
level is low. Stop the vehicle and cor-
rect the engine oil level.
Display Setting
Off
Low
Middle High
1. Coolant temperature warning “ ”
2. Engine oil warning “ ”
3. Fuel level warning “ ”1000 r/min
QS
12 :
00
2
3
1
UB1JE1E0.book Page 14 Thursday, October 11, 2018 10:43 AM
Page 30 of 120
Instrument and control functions
3-15
3 When the vehicle is turned on, this icon
will come on for a few seconds, and
then go off.
If a malfunction is detected, the oil level
warning icon will flash repeatedly.
Have a Yamaha dealer check the vehi-
cle.
NOTICE
ECA26400
Do not continue to operate the en-
g
ine if the oil level is low.Fuel level warnin g“”
This icon comes on when approxi-
mately 2.6 L (0.69 US gal, 0.57 Imp.gal)
of fuel remains in the tank.
If a malfunction is detected, the fuel
level warning icon will flash repeatedly.
Have a Yamaha dealer check the vehi-
cle.
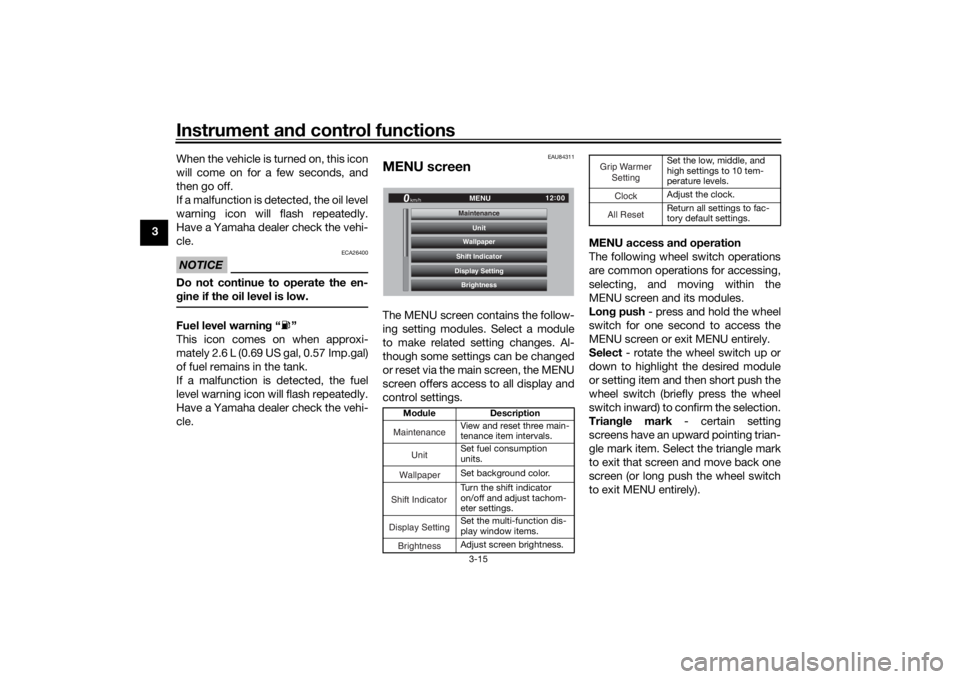
EAU84311
MENU screenThe MENU screen contains the follow-
ing setting modules. Select a module
to make related setting changes. Al-
though some settings can be changed
or reset via the main screen, the MENU
screen offers access to all display and
control settings. MENU access an
d operation
The following wheel switch operations
are common operations for accessing,
selecting, and moving within the
MENU screen and its modules.
Lon g push - press and hold the wheel
switch for one second to access the
MENU screen or exit MENU entirely.
Select - rotate the wheel switch up or
down to highlight the desired module
or setting item and then short push the
wheel switch (briefly press the wheel
switch inward) to confirm the selection.
Trian gle mark - certain setting
screens have an upward pointing trian-
gle mark item. Select the triangle mark
to exit that screen and move back one
screen (or long push the wheel switch
to exit MENU entirely).
Mo dule Description
View and reset three main-
tenance item intervals.
Set fuel consumption
units.
Set background color.
Turn the shift indicator
on/off and adjust tachom-
eter settings.
Set the multi-function dis-
play window items.
Adjust screen brightness.
12:
00
MENU
km/h
BrightnessDisplay SettingShift IndicatorWallpaperUnit
MaintenanceMaintenance
Maintenance
Unit
WallpaperShift IndicatorDisplay SettingBrightness
Set the low, middle, and
high settings to 10 tem-
perature levels.
Adjust the clock.
Return all settings to fac-
tory default settings.
Grip Warmer
Setting
ClockAll Reset
UB1JE1E0.book Page 15 Thursday, October 11, 2018 10:43 AM
Page 31 of 120
Instrument and control functions
3-16
3
TIP The MENU screen can be ac-
cessed by long pushing the wheel
switch, except when the grip
warmer display is selected or the
fuel tripmeter (F-TRIP) is dis-
played.
Should vehicle motion be detect-
ed, the screen will automatically
exit MENU and change to the
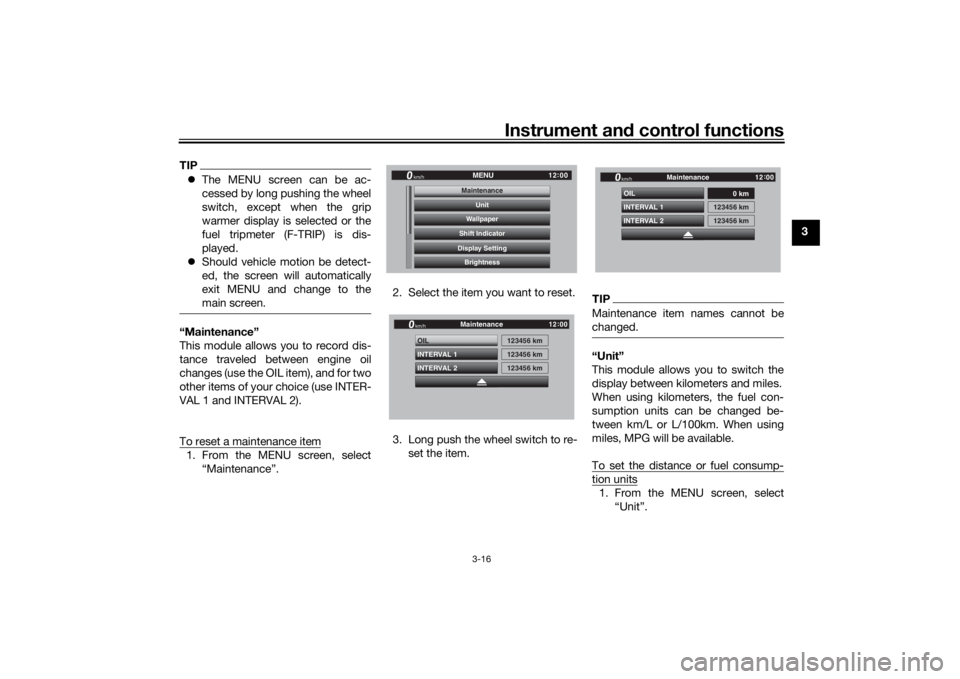
main screen.“Maintenance”
This module allows you to record dis-
tance traveled between engine oil
changes (use the OIL item), and for two
other items of your choice (use INTER-
VAL 1 and INTERVAL 2).
To reset a maintenance item1. From the MENU screen, select
“Maintenance”. 2. Select the item you want to reset.
3. Long push the wheel switch to re-
set the item.
TIPMaintenance item names cannot be
changed.“Unit”
This module allows you to switch the
display between kilometers and miles.
When using kilometers, the fuel con-
sumption units can be changed be-
tween km/L or L/100km. When using
miles, MPG will be available.
To set the distance or fuel consump-tion units1. From the MENU screen, select“Unit”.
12:
00
MENU
km/h
BrightnessDisplay SettingShift IndicatorWallpaperUnit
MaintenanceMaintenance
INTERVAL 2 OIL
INTERVAL 1
123456 km123456 km
123456 km
Maintenance
km/h
GPS
12 :
00
INTERVAL 2 OIL
INTERVAL 1
0 km
123456 km
123456 km
Maintenance
km/h
GPS
12 :
00
UB1JE1E0.book Page 16 Thursday, October 11, 2018 10:43 AM
Page 43 of 120
Instrument and control functions
3-28
3
EAU84342
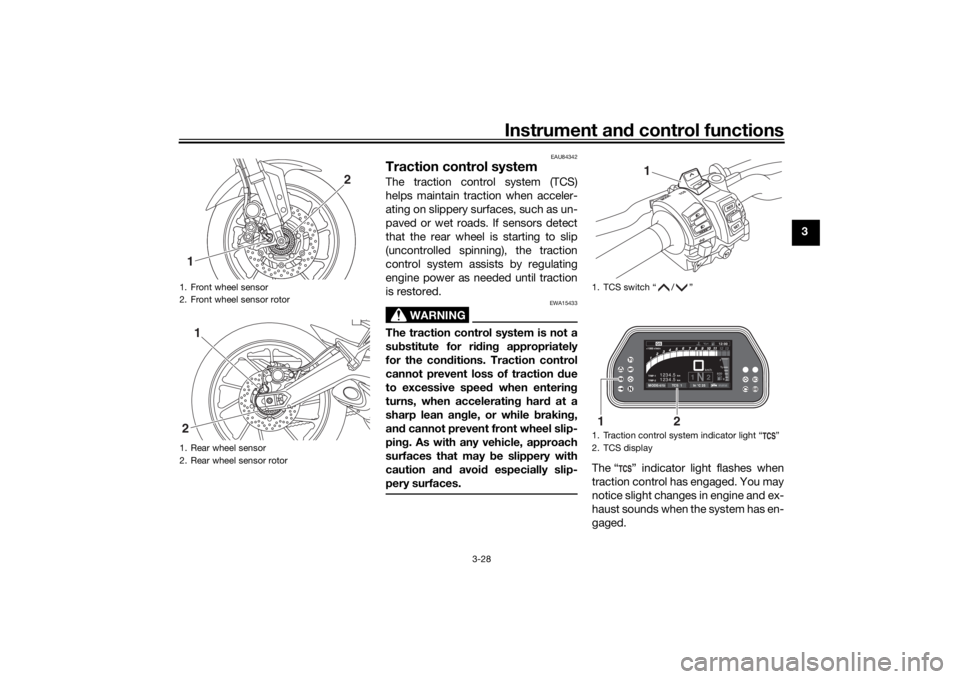
Traction control systemThe traction control system (TCS)
helps maintain traction when acceler-
ating on slippery surfaces, such as un-
paved or wet roads. If sensors detect
that the rear wheel is starting to slip
(uncontrolled spinning), the traction
control system assists by regulating
engine power as needed until traction
is restored.
WARNING
EWA15433
The traction control system is not a
su bstitute for ri din g appropriately
for the con ditions. Traction control
cannot prevent loss of traction d ue
to excessive spee d when enterin g
turns, when acceleratin g har d at a
sharp lean an gle, or while brakin g,
an d cannot prevent front wheel slip-
pin g. As with any vehicle, approach
surfaces that may be slippery with
caution an d avoi d especially slip-
pery surfaces.
The “ ” indicator light flashes when
traction control has engaged. You may
notice slight changes in engine and ex-
haust sounds when the system has en-
gaged.
1. Front wheel sensor
2. Front wheel sensor rotor
1. Rear wheel sensor
2. Rear wheel sensor rotor1
2
1
2
1. TCS switch “ / ”
1. Traction control system indicator light “ ”
2. TCS display
1
km
TRIP-2 TRIP-1
1234.5 1234.5
km
1N2km/h
1000 r/minQS
12 :
00 EECOF2/1
MODE-STD
TCS 1
In °C 25
1
2
UB1JE1E0.book Page 28 Thursday, October 11, 2018 10:43 AM
Page 44 of 120
Instrument and control functions
3-29
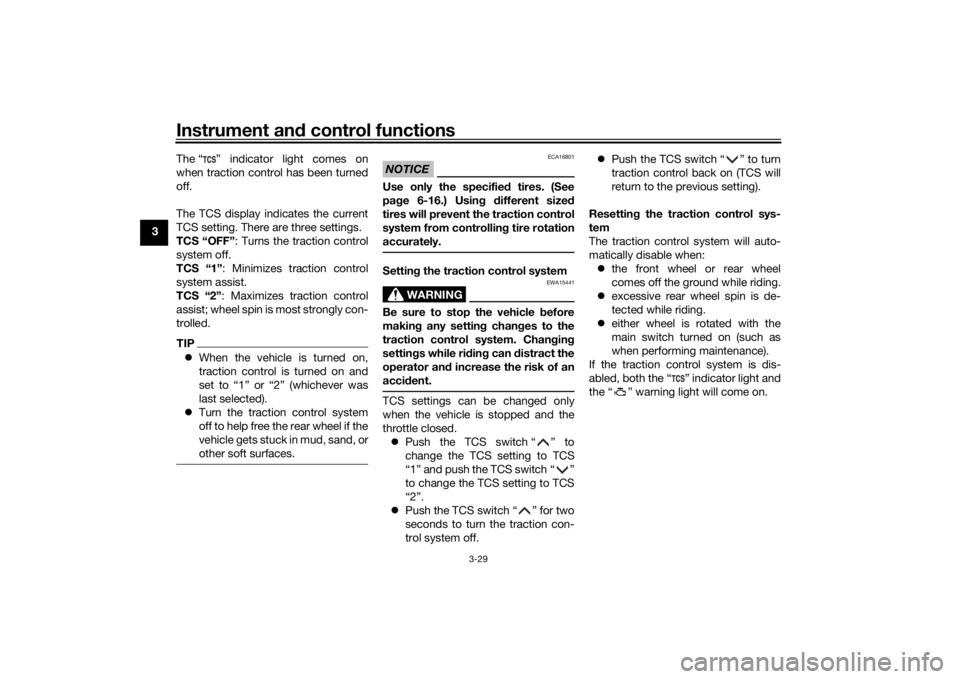
3 The “ ” indicator light comes on
when traction control has been turned
off.
The TCS display indicates the current
TCS setting. There are three settings.
TCS “OFF”
: Turns the traction control
system off.
TCS “1” : Minimizes traction control
system assist.
TCS “2” : Maximizes traction control
assist; wheel spin is most strongly con-
trolled.
TIP When the vehicle is turned on,
traction control is turned on and
set to “1” or “2” (whichever was
last selected).
Turn the traction control system
off to help free the rear wheel if the
vehicle gets stuck in mud, sand, or
other soft surfaces.
NOTICE
ECA16801
Use only the specifie d tires. (See
pa ge 6-16.) Usin g different size d
tires will prevent the traction control
system from controllin g tire rotation
accurately.Setting the traction control system
WARNING
EWA15441
Be sure to stop the vehicle before
makin g any settin g chan ges to the
traction control system. Chan gin g
settin gs while ri din g can d istract the
operator an d increase the risk of an
acci dent.TCS settings can be changed only
when the vehicle is stopped and the
throttle closed.
Push the TCS switch “ ” to
change the TCS setting to TCS
“1” and push the TCS switch “ ”
to change the TCS setting to TCS
“2”.
Push the TCS switch “ ” for two
seconds to turn the traction con-
trol system off.
Push the TCS switch “ ” to turn
traction control back on (TCS will
return to the previous setting).
Resettin g the traction control sys-
tem
The traction control system will auto-
matically disable when: the front wheel or rear wheel
comes off the ground while riding.
excessive rear wheel spin is de-
tected while riding.
either wheel is rotated with the
main switch turned on (such as
when performing maintenance).
If the traction control system is dis-
abled, both the “ ” indicator light and
the “ ” warning light will come on.
UB1JE1E0.book Page 29 Thursday, October 11, 2018 10:43 AM
Page 74 of 120

Periodic maintenance an d a djustment
6-5
6
EAU71352
General maintenance an d lu brication chartNO. ITEM CHECK OR MAINTENANCE JOB ODOMETER READING
ANNUAL
CHECK
1000 km
(600 mi) 10000 km
(6000 mi) 20000 km
(12000 mi) 30000 km
(18000 mi) 40000 km
(24000 mi)
1 *Dia
gnostic system
check • Perform dynamic inspection us-
ing Yamaha diagnostic tool.
• Check the error codes. √√√√√√
2 *Air filter element • Replace. Every 40000 km (24000 mi)
3Clutch • Check operation.
•Adjust. √√√√√
4 *Front brake • Check operation, fluid level, and
for fluid leakage.
• Replace brake pads if necessary. √√√√√√
5 *Rear brake • Check operation, fluid level, and
for fluid leakage.
• Replace brake pads if necessary. √√√√√√
6 *Brake hoses • Check for cracks or damage.
√√√√√
• Replace. Every 4 years
7 *Brake flui d • Change. Every 2 years
8 *Wheels • Check runout and for damage.
• Replace if necessary. √√√√
9 *Tires • Check tread depth and for dam-
age.
• Replace if necessary.
• Check air pressure.
• Correct if necessary. √√√√√
10 *Wheel bearin gs • Check bearing for looseness or
damage. √√√√
UB1JE1E0.book Page 5 Thursday, October 11, 2018 10:43 AM
Page 88 of 120

Periodic maintenance an d a djustment
6-19
6
EAU21963
Cast wheelsTo maximize the performance, durabil-
ity, and safe operation of your vehicle,
note the following points regarding the
specified wheels.
The wheel rims should be
checked for cracks, bends, warp-
age or other damage before each
ride. If any damage is found, have
a Yamaha dealer replace the
wheel. Do not attempt even the
smallest repair to the wheel. A de-
formed or cracked wheel must be
replaced.
The wheel should be balanced
whenever either the tire or wheel
has been changed or replaced. An
unbalanced wheel can result in
poor performance, adverse han-
dling characteristics, and a short-
ened tire life.
EAU22083
Adjustin g the clutch lever free
playMeasure the clutch lever free play as
shown.
Periodically check the clutch lever free
play and, if necessary, adjust it as fol-
lows.
To increase the clutch lever free play,
turn the clutch lever free play adjusting
bolt in direction (a). To decrease the
clutch lever free play, turn the adjusting
bolt in direction (b).
TIPIf the specified free play cannot be ob-
tained as described above or if the
clutch does not operate correctly, have
a Yamaha dealer check the internal
clutch mechanism.
1. Clutch lever free play adjusting bolt
2. Clutch lever free playClutch lever free play: 5.0–10.0 mm (0.20–0.39 in)
2 1
(b)(a)
UB1JE1E0.book Page 19 Thursday, October 11, 2018 10:43 AM
Page 111 of 120
Specifications
8-1
8
Dimensions:Overall length:2160 mm (85.0 in)
Overall width:
850 mm (33.5 in)
Overall height: 1375/1430 mm (54.1/56.3 in)
Seat height: 850/865 mm (33.5/34.1 in)
Wheelbase:
1500 mm (59.1 in)
Ground clearance: 135 mm (5.31 in)
Minimum turning radius: 3.0 m (9.84 ft)Wei ght:Curb weight:
215 kg (474 lb)Engine:Combustion cycle:
4-stroke
Cooling system: Liquid cooled
Valve train: DOHC
Cylinder arrangement:
Inline
Number of cylinders: 3-cylinder
Displacement: 847 cm³
Bore × stroke:
78.0 × 59.1 mm (3.07 × 2.33 in) Starting system:
Electric starter
Engine oil:Recommended brand:
SAE viscosity grades:
10W-40
Recommended engine oil grade:
API service SG type or higher, JASO
standard MA
Engine oil quantity:
Oil change:2.40 L (2.54 US qt, 2.11 Imp.qt)
With oil filter removal:
2.70 L (2.85 US qt, 2.38 Imp.qt)Coolant quantity:Coolant reservoir (up to the maximum level
mark):0.25 L (0.26 US qt, 0.22 Imp.qt)
Radiator (including all routes): 1.93 L (2.04 US qt, 1.70 Imp.qt)Fuel:Recommended fuel:Premium unleaded gasoline (Gasohol [E10]
acceptable)
Fuel tank capacity: 18 L (4.8 US gal, 4.0 Imp.gal)
Fuel reserve amount: 2.6 L (0.69 US gal, 0.57 Imp.gal)
Fuel injection:Throttle body:ID mark:B1J1 00Drivetrain:Gear ratio:
1st: 2.667 (40/15)
2nd:
2.000 (38/19)
3rd: 1.619 (34/21)
4th: 1.381 (29/21)
5th:
1.190 (25/21)
6th: 1.037 (28/27)Front tire:Type:
Tubeless
Size: 120/70ZR17 M/C (58W)
Manufacturer/model: DUNLOP/D222FRear tire:Type: Tubeless
Size: 180/55ZR17 M/C (73W)
Manufacturer/model:
DUNLOP/D222
UB1JE1E0.book Page 1 Thursday, October 11, 2018 10:43 AM