air filter YAMAHA TTR90 2006 Betriebsanleitungen (in German)
[x] Cancel search | Manufacturer: YAMAHA, Model Year: 2006, Model line: TTR90, Model: YAMAHA TTR90 2006Pages: 390, PDF-Größe: 9.12 MB
Page 27 of 390
GEN
INFO
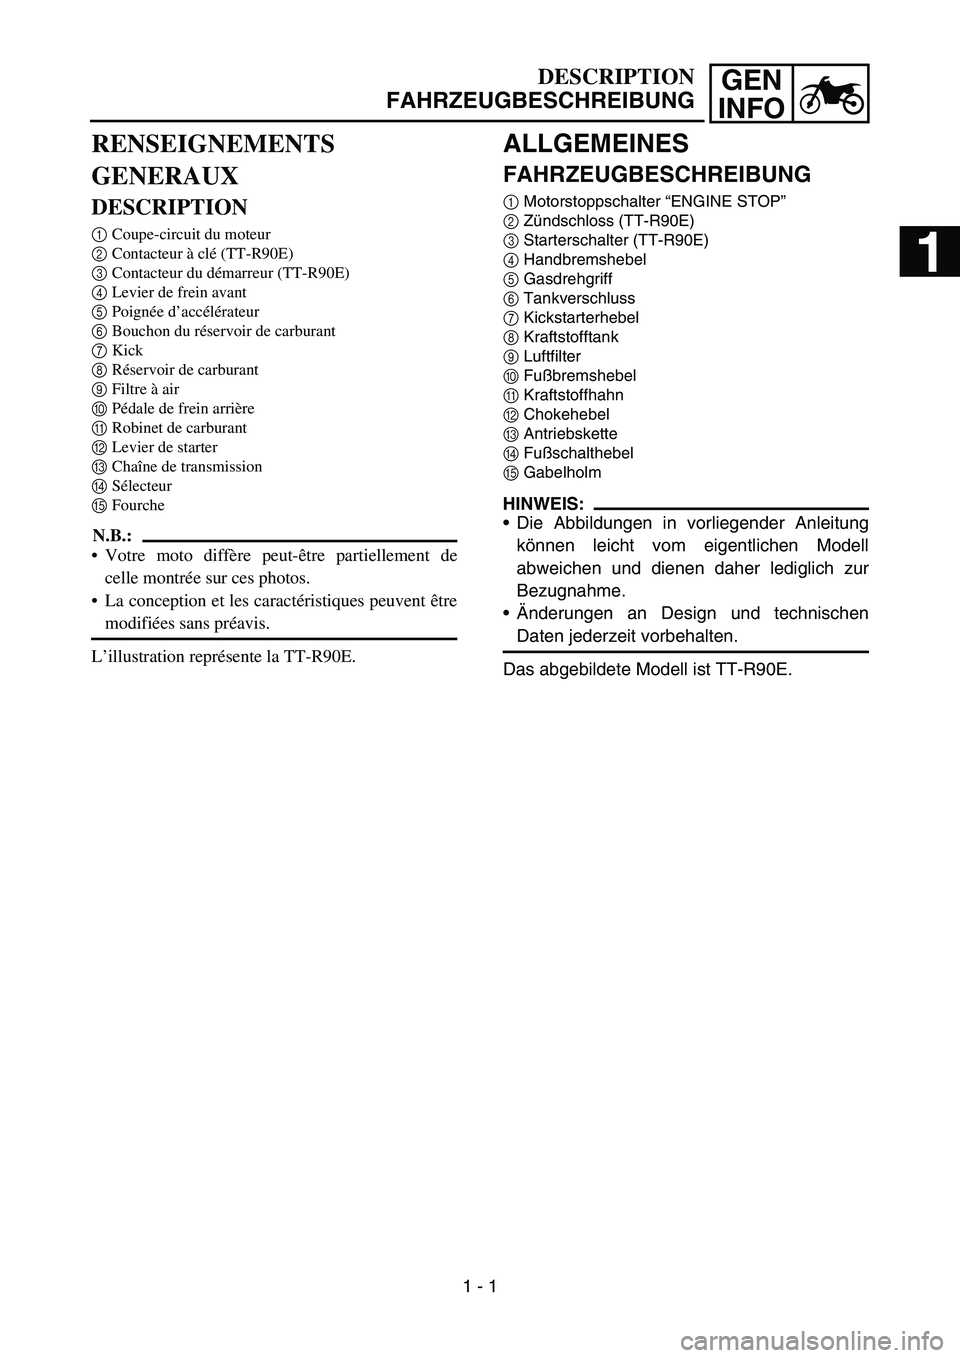
ALLGEMEINES
FAHRZEUGBESCHREIBUNG
1Motorstoppschalter “ENGINE STOP”
2Zündschloss (TT-R90E)
3Starterschalter (TT-R90E)
4Handbremshebel
5Gasdrehgriff
6Tankverschluss
7Kickstarterhebel
8Kraftstofftank
9Luftfilter
0Fußbremshebel
AKraftstoffhahn
BChokehebel
CAntriebskette
DFußschalthebel
EGabelholm
HINWEIS:
Die Abbildungen in vorliegender Anleitung
können leicht vom eigentlichen Modell
abweichen und dienen daher lediglich zur
Bezugnahme.
Änderungen an Design und technischen
Daten jederzeit vorbehalten.
Das abgebildete Modell ist TT-R90E.
DESCRIPTION
FAHRZEUGBESCHREIBUNG
RENSEIGNEMENTS
GENERAUX
DESCRIPTION
1Coupe-circuit du moteur
2Contacteur à clé (TT-R90E)
3Contacteur du démarreur (TT-R90E)
4Levier de frein avant
5Poignée d’accélérateur
6Bouchon du réservoir de carburant
7Kick
8Réservoir de carburant
9Filtre à air
0Pédale de frein arrière
ARobinet de carburant
BLevier de starter
CChaîne de transmission
DSélecteur
EFourche
N.B.:
Votre moto diffère peut-être partiellement de
celle montrée sur ces photos.
La conception et les caractéristiques peuvent être
modifiées sans préavis.
L’illustration représente la TT-R90E.
1 - 1
1
Page 50 of 390
1 - 11
GEN
INFO
CONTROL FUNCTIONS
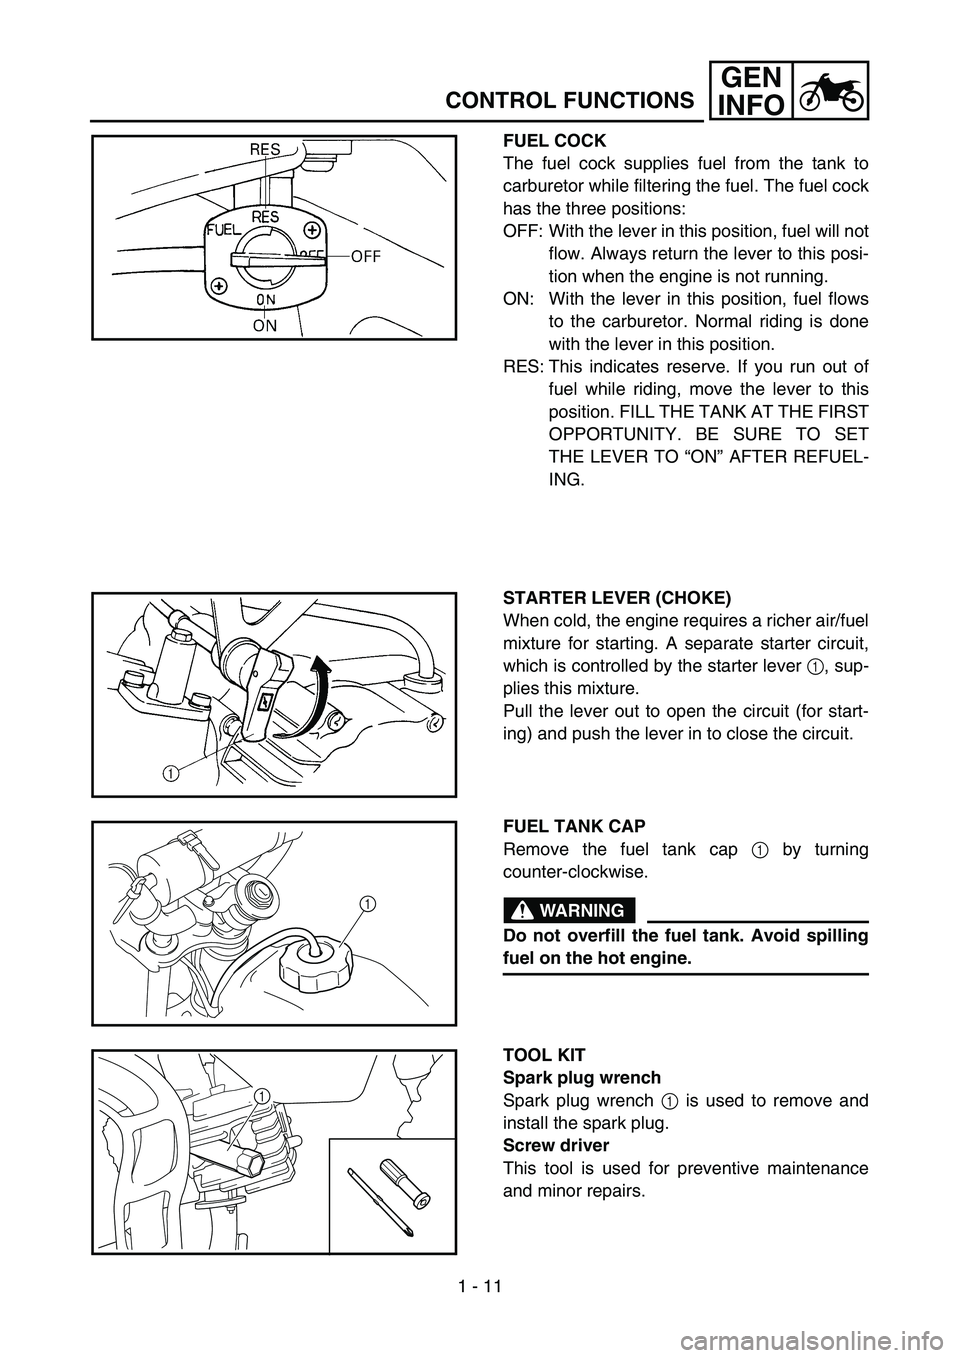
FUEL COCK
The fuel cock supplies fuel from the tank to
carburetor while filtering the fuel. The fuel cock
has the three positions:
OFF: With the lever in this position, fuel will not
flow. Always return the lever to this posi-
tion when the engine is not running.
ON: With the lever in this position, fuel flows
to the carburetor. Normal riding is done
with the lever in this position.
RES: This indicates reserve. If you run out of
fuel while riding, move the lever to this
position. FILL THE TANK AT THE FIRST
OPPORTUNITY. BE SURE TO SET
THE LEVER TO “ON” AFTER REFUEL-
ING.
STARTER LEVER (CHOKE)
When cold, the engine requires a richer air/fuel
mixture for starting. A separate starter circuit,
which is controlled by the starter lever 1, sup-
plies this mixture.
Pull the lever out to open the circuit (for start-
ing) and push the lever in to close the circuit.
FUEL TANK CAP
Remove the fuel tank cap 1 by turning
counter-clockwise.
WARNING
Do not overfill the fuel tank. Avoid spilling
fuel on the hot engine.
1
TOOL KIT
Spark plug wrench
Spark plug wrench 1 is used to remove and
install the spark plug.
Screw driver
This tool is used for preventive maintenance
and minor repairs.
1
Page 51 of 390
GEN
INFO
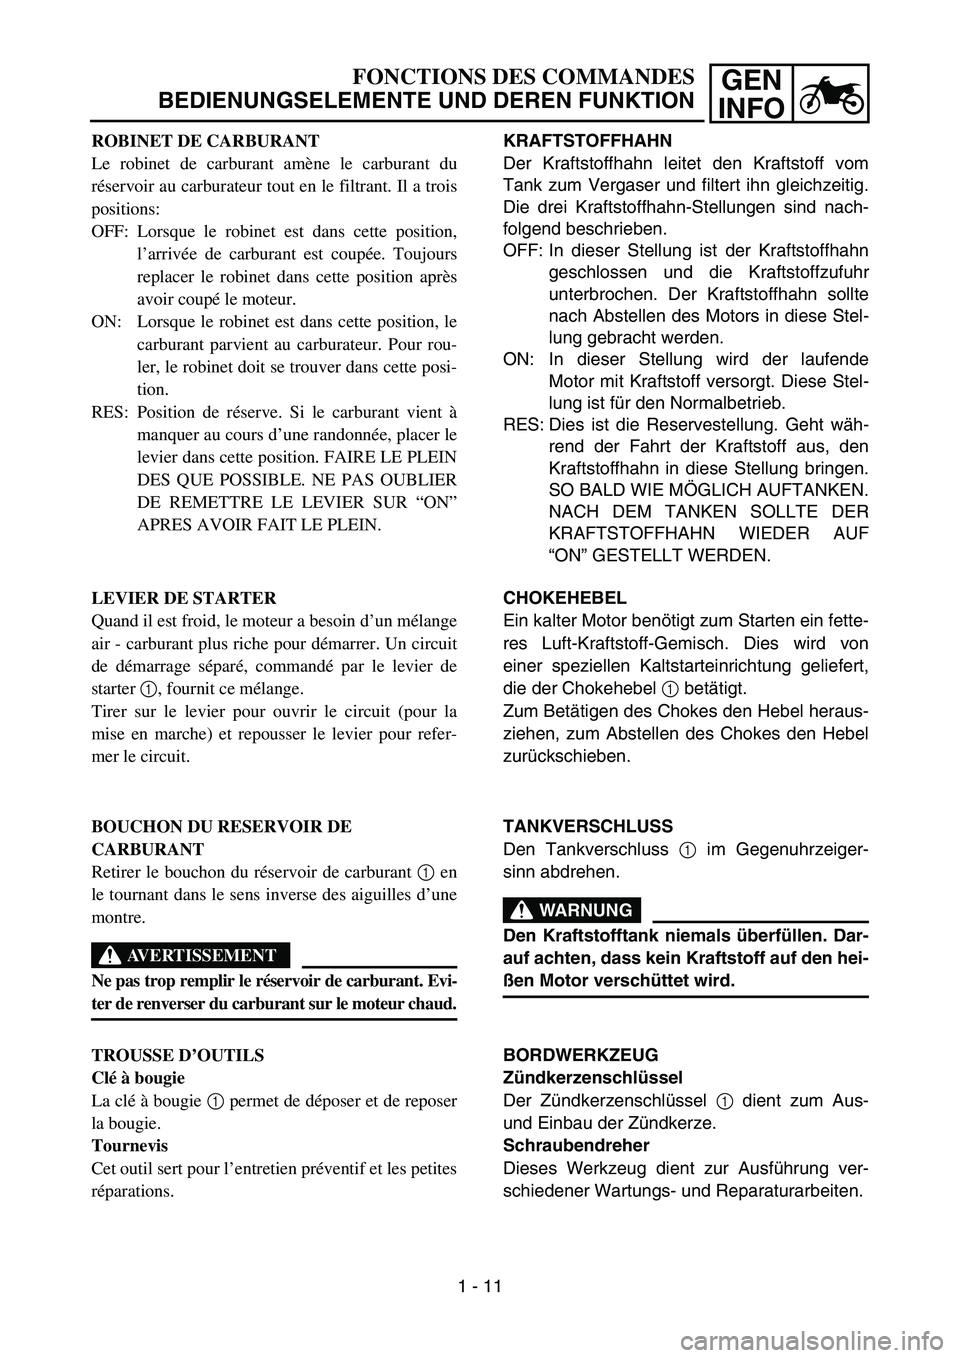
KRAFTSTOFFHAHN
Der Kraftstoffhahn leitet den Kraftstoff vom
Tank zum Vergaser und filtert ihn gleichzeitig.
Die drei Kraftstoffhahn-Stellungen sind nach-
folgend beschrieben.
OFF: In dieser Stellung ist der Kraftstoffhahn
geschlossen und die Kraftstoffzufuhr
unterbrochen. Der Kraftstoffhahn sollte
nach Abstellen des Motors in diese Stel-
lung gebracht werden.
ON: In dieser Stellung wird der laufende
Motor mit Kraftstoff versorgt. Diese Stel-
lung ist für den Normalbetrieb.
RES: Dies ist die Reservestellung. Geht wäh-
rend der Fahrt der Kraftstoff aus, den
Kraftstoffhahn in diese Stellung bringen.
SO BALD WIE MÖGLICH AUFTANKEN.
NACH DEM TANKEN SOLLTE DER
KRAFTSTOFFHAHN WIEDER AUF
“ON” GESTELLT WERDEN.
CHOKEHEBEL
Ein kalter Motor benötigt zum Starten ein fette-
res Luft-Kraftstoff-Gemisch. Dies wird von
einer speziellen Kaltstarteinrichtung geliefert,
die der Chokehebel 1 betätigt.
Zum Betätigen des Chokes den Hebel heraus-
ziehen, zum Abstellen des Chokes den Hebel
zurückschieben.
TANKVERSCHLUSS
Den Tankverschluss 1 im Gegenuhrzeiger-
sinn abdrehen.
WARNUNG
Den Kraftstofftank niemals überfüllen. Dar-
auf achten, dass kein Kraftstoff auf den hei-
ßen Motor verschüttet wird.
BORDWERKZEUG
Zündkerzenschlüssel
Der Zündkerzenschlüssel 1 dient zum Aus-
und Einbau der Zündkerze.
Schraubendreher
Dieses Werkzeug dient zur Ausführung ver-
schiedener Wartungs- und Reparaturarbeiten.
FONCTIONS DES COMMANDES
BEDIENUNGSELEMENTE UND DEREN FUNKTION
ROBINET DE CARBURANT
Le robinet de carburant amène le carburant du
réservoir au carburateur tout en le filtrant. Il a trois
positions:
OFF: Lorsque le robinet est dans cette position,
l’arrivée de carburant est coupée. Toujours
replacer le robinet dans cette position après
avoir coupé le moteur.
ON: Lorsque le robinet est dans cette position, le
carburant parvient au carburateur. Pour rou-
ler, le robinet doit se trouver dans cette posi-
tion.
RES: Position de réserve. Si le carburant vient à
manquer au cours d’une randonnée, placer le
levier dans cette position. FAIRE LE PLEIN
DES QUE POSSIBLE. NE PAS OUBLIER
DE REMETTRE LE LEVIER SUR “ON”
APRES AVOIR FAIT LE PLEIN.
LEVIER DE STARTER
Quand il est froid, le moteur a besoin d’un mélange
air - carburant plus riche pour démarrer. Un circuit
de démarrage séparé, commandé par le levier de
starter 1, fournit ce mélange.
Tirer sur le levier pour ouvrir le circuit (pour la
mise en marche) et repousser le levier pour refer-
mer le circuit.
BOUCHON DU RESERVOIR DE
CARBURANT
Retirer le bouchon du réservoir de carburant 1 en
le tournant dans le sens inverse des aiguilles d’une
montre.
AVERTISSEMENT
Ne pas trop remplir le réservoir de carburant. Evi-
ter de renverser du carburant sur le moteur chaud.
TROUSSE D’OUTILS
Clé à bougie
La clé à bougie 1 permet de déposer et de reposer
la bougie.
Tournevis
Cet outil sert pour l’entretien préventif et les petites
réparations.
1 - 11
Page 61 of 390
SPEC
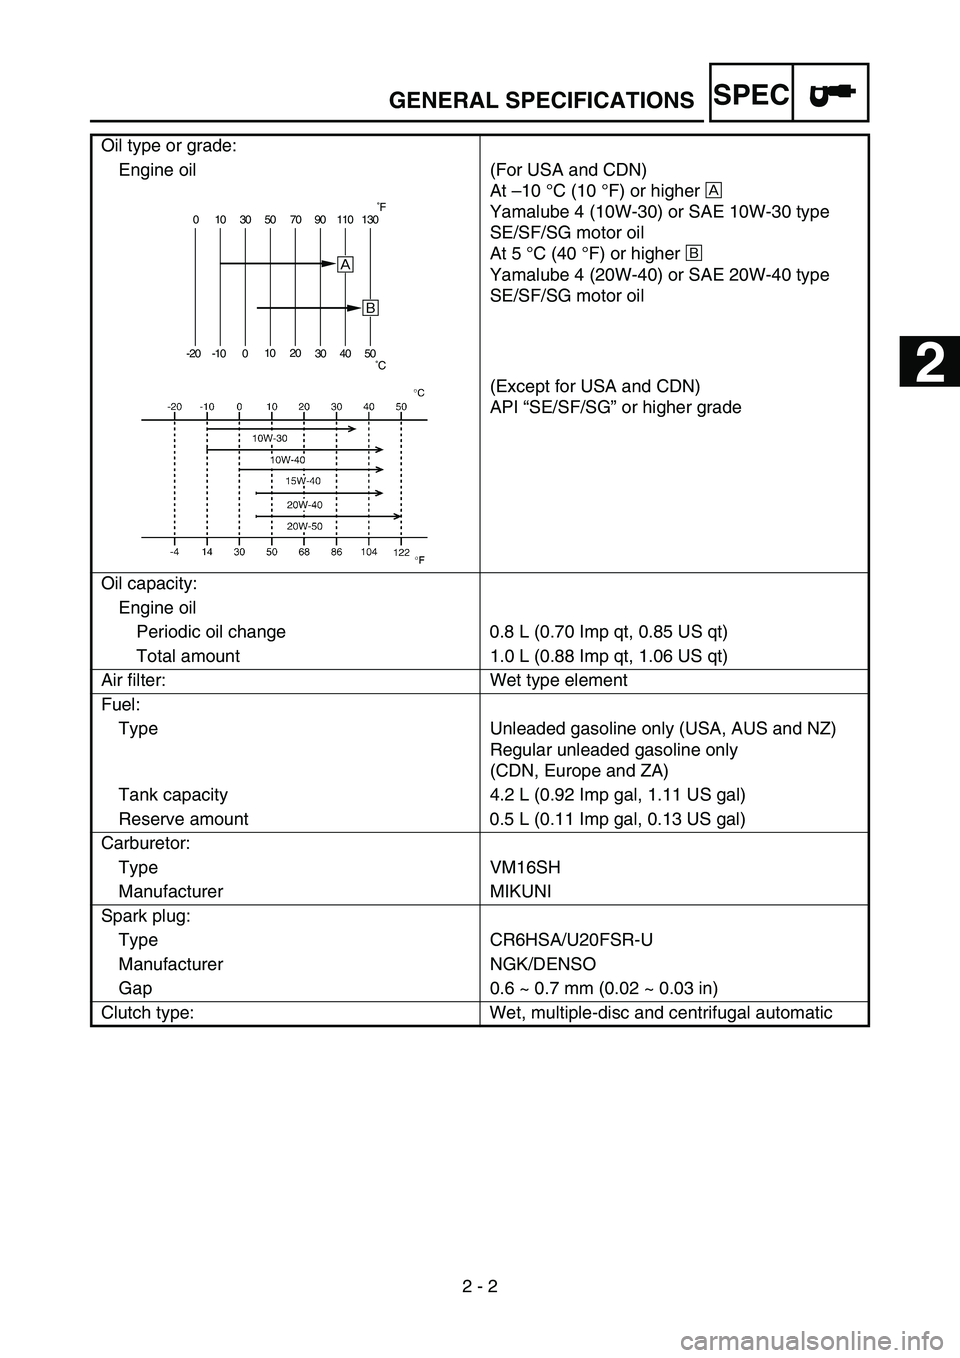
2 - 2 Oil type or grade:
Engine oil
(For USA and CDN)
At –10 °C (10 °F) or higher È
Yamalube 4 (10W-30) or SAE 10W-30 type
SE/SF/SG motor oil
At 5 °C (40 °F) or higher É
Yamalube 4 (20W-40) or SAE 20W-40 type
SE/SF/SG motor oil
(Except for USA and CDN)
API “SE/SF/SG” or higher grade
Oil capacity:
Engine oil
Periodic oil change 0.8 L (0.70 Imp qt, 0.85 US qt)
Total amount 1.0 L (0.88 Imp qt, 1.06 US qt)
Air filter: Wet type element
Fuel:
Type Unleaded gasoline only (USA, AUS and NZ)
Regular unleaded gasoline only
(CDN, Europe and ZA)
Tank capacity 4.2 L (0.92 Imp gal, 1.11 US gal)
Reserve amount 0.5 L (0.11 Imp gal, 0.13 US gal)
Carburetor:
Type VM16SH
Manufacturer MIKUNI
Spark plug:
Type CR6HSA/U20FSR-U
Manufacturer NGK/DENSO
Gap 0.6 ~ 0.7 mm (0.02 ~ 0.03 in)
Clutch type: Wet, multiple-disc and centrifugal automatic
0 10 30 50 70 90 110 130
-20 -10 01020
30 40 50
È
É
˚F
˚C
GENERAL SPECIFICATIONS
1
2
Page 69 of 390
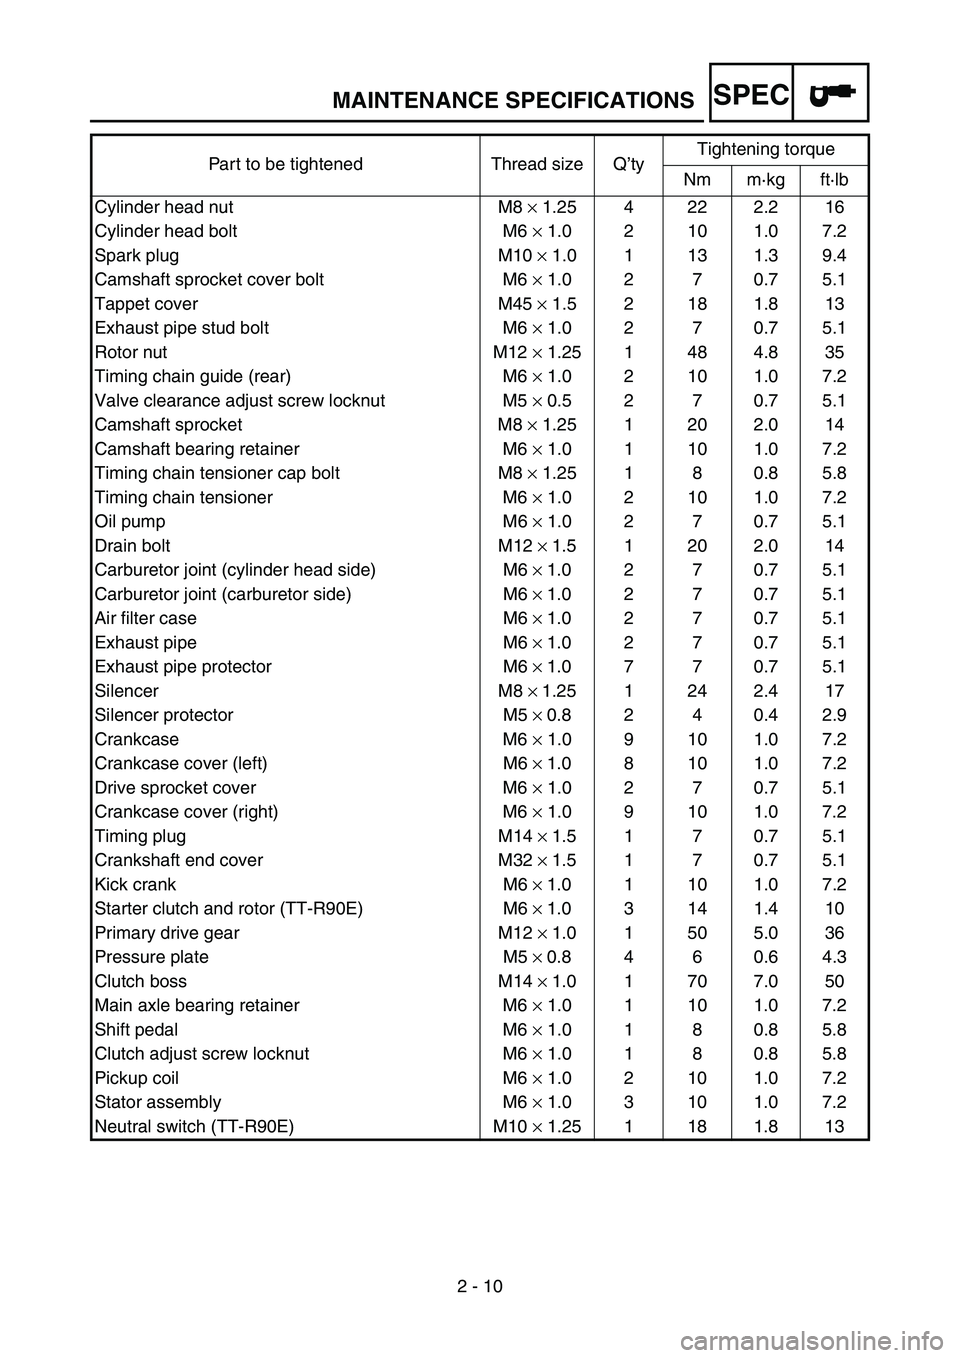
SPEC
2 - 10 Part to be tightened Thread size Q’tyTightening torque
Nm m·kg ft·lb
Cylinder head nut M8 × 1.25 4 22 2.2 16
Cylinder head bolt M6 × 1.0 2 10 1.0 7.2
Spark plug M10 × 1.0 1 13 1.3 9.4
Camshaft sprocket cover bolt M6 × 1.0 2 7 0.7 5.1
Tappet cover M45 × 1.5 2 18 1.8 13
Exhaust pipe stud bolt M6 × 1.0 2 7 0.7 5.1
Rotor nut M12 × 1.25 1 48 4.8 35
Timing chain guide (rear) M6 × 1.0 2 10 1.0 7.2
Valve clearance adjust screw locknut M5 × 0.5 2 7 0.7 5.1
Camshaft sprocket M8 × 1.25 1 20 2.0 14
Camshaft bearing retainer M6 × 1.0 1 10 1.0 7.2
Timing chain tensioner cap bolt M8 × 1.25 1 8 0.8 5.8
Timing chain tensioner M6 × 1.0 2 10 1.0 7.2
Oil pump M6 × 1.0 2 7 0.7 5.1
Drain bolt M12 ×
1.5 1 20 2.0 14
Carburetor joint (cylinder head side) M6 ×
1.0 2 7 0.7 5.1
Carburetor joint (carburetor side) M6 ×
1.0 2 7 0.7 5.1
Air filter case M6 ×
1.0 2 7 0.7 5.1
Exhaust pipe M6 ×
1.0 2 7 0.7 5.1
Exhaust pipe protector M6 ×
1.0 7 7 0.7 5.1
Silencer M8 ×
1.25 1 24 2.4 17
Silencer protector M5 ×
0.8 2 4 0.4 2.9
Crankcase M6 × 1.0 9 10 1.0 7.2
Crankcase cover (left) M6 ×
1.0 8 10 1.0 7.2
Drive sprocket cover M6 × 1.0 2 7 0.7 5.1
Crankcase cover (right) M6 × 1.0 9 10 1.0 7.2
Timing plug M14 ×
1.5 1 7 0.7 5.1
Crankshaft end cover M32 ×
1.5 1 7 0.7 5.1
Kick crank M6 ×
1.0 1 10 1.0 7.2
Starter clutch and rotor (TT-R90E) M6 ×
1.0 3 14 1.4 10
Primary drive gear M12 ×
1.0 1 50 5.0 36
Pressure plate M5 ×
0.8 4 6 0.6 4.3
Clutch boss M14 ×
1.0 1 70 7.0 50
Main axle bearing retainer M6 × 1.0 1 10 1.0 7.2
Shift pedal M6 × 1.0 1 8 0.8 5.8
Clutch adjust screw locknut M6 × 1.0 1 8 0.8 5.8
Pickup coil M6 × 1.0 2 10 1.0 7.2
Stator assembly M6 × 1.0 3 10 1.0 7.2
Neutral switch (TT-R90E) M10 × 1.25 1 18 1.8 13
MAINTENANCE SPECIFICATIONS
Page 128 of 390
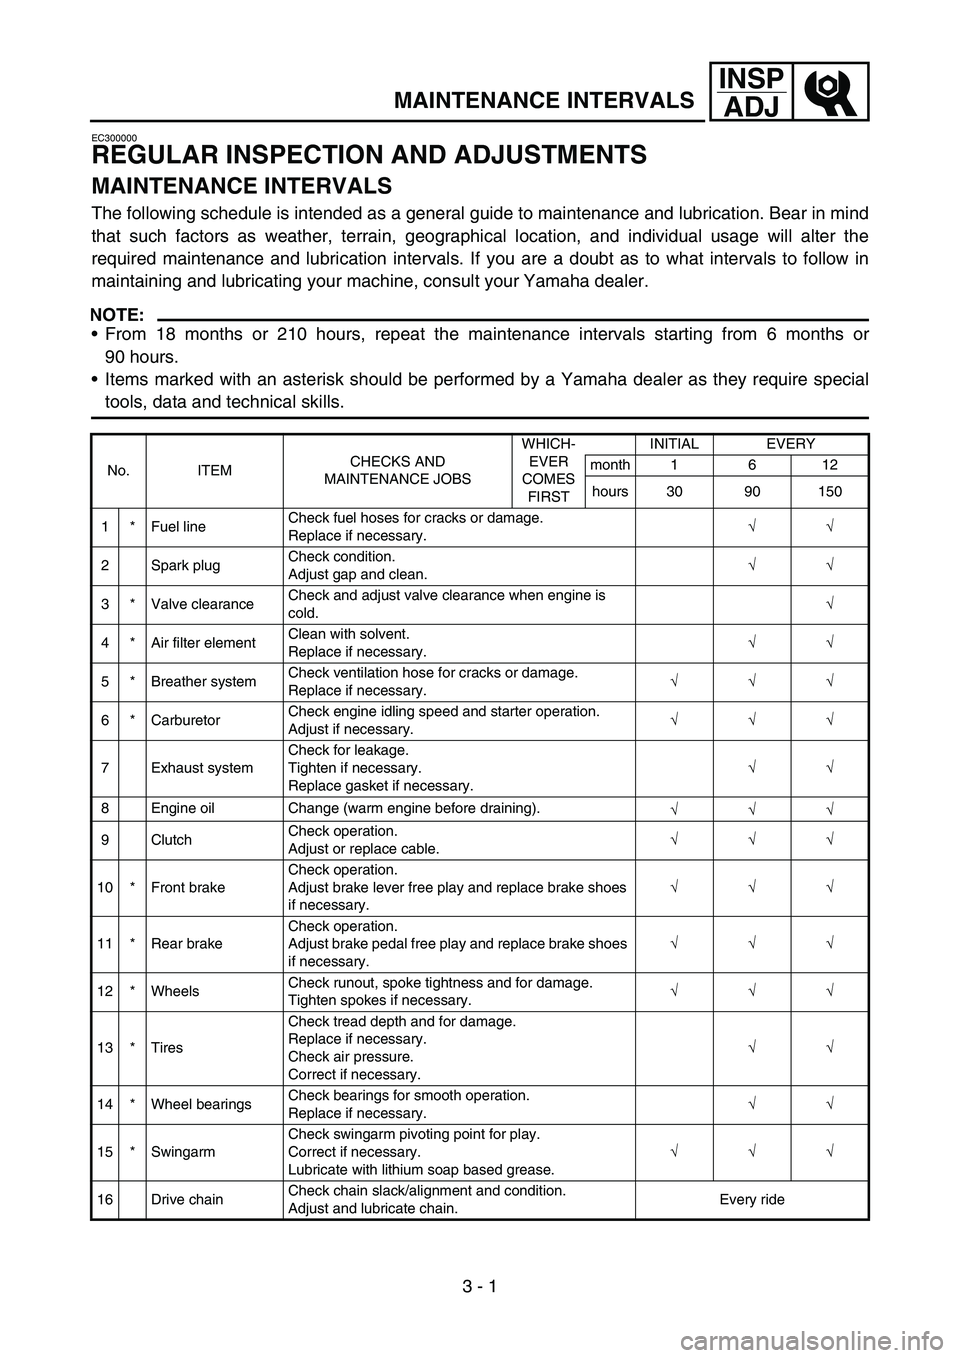
3 - 1
INSP
ADJ
MAINTENANCE INTERVALS
EC300000
REGULAR INSPECTION AND ADJUSTMENTS
MAINTENANCE INTERVALS
The following schedule is intended as a general guide to maintenance and lubrication. Bear in mind
that such factors as weather, terrain, geographical location, and individual usage will alter the
required maintenance and lubrication intervals. If you are a doubt as to what intervals to follow in
maintaining and lubricating your machine, consult your Yamaha dealer.
NOTE:
From 18 months or 210 hours, repeat the maintenance intervals starting from 6 months or
90 hours.
Items marked with an asterisk should be performed by a Yamaha dealer as they require special
tools, data and technical skills.
No. ITEMCHECKS AND
MAINTENANCE JOBSWHICH-
EVER
COMES
FIRSTINITIAL EVERY
month 1 6 12
hours 30 90 150
1 * Fuel lineCheck fuel hoses for cracks or damage.
Replace if necessary.√
√
2 Spark plugCheck condition.
Adjust gap and clean.√
√
3 * Valve clearanceCheck and adjust valve clearance when engine is
cold.√
4 * Air filter elementClean with solvent.
Replace if necessary.√
√
5 * Breather systemCheck ventilation hose for cracks or damage.
Replace if necessary.√
√
√
6 * CarburetorCheck engine idling speed and starter operation.
Adjust if necessary.√
√
√
7 Exhaust systemCheck for leakage.
Tighten if necessary.
Replace gasket if necessary.√
√
8 Engine oil Change (warm engine before draining).
√
√
√
9 ClutchCheck operation.
Adjust or replace cable.√
√
√
10 * Front brakeCheck operation.
Adjust brake lever free play and replace brake shoes
if necessary.√
√
√
11 * Rear brakeCheck operation.
Adjust brake pedal free play and replace brake shoes
if necessary.√
√
√
12 * WheelsCheck runout, spoke tightness and for damage.
Tighten spokes if necessary.√
√
√
13 * TiresCheck tread depth and for damage.
Replace if necessary.
Check air pressure.
Correct if necessary.√
√
14 * Wheel bearingsCheck bearings for smooth operation.
Replace if necessary.√
√
15 * SwingarmCheck swingarm pivoting point for play.
Correct if necessary.
Lubricate with lithium soap based grease.√
√
√
16 Drive chainCheck chain slack/alignment and condition.
Adjust and lubricate chain.Every ride
3
Page 129 of 390

3 - 2
INSP
ADJ
MAINTENANCE INTERVALS
NOTE:
The air filter needs more frequent service if you are riding in unusually wet or dusty areas.
17 * Steering bearingsCheck bearing assemblies for looseness.
Lubricate with lithium soap based grease every or
120 hours or 12 months (whichever comes first).√
√
18Brake and clutch
lever pivot shaftsApply lithium soap based grease lightly.
√
√
√
19Brake pedal pivot
shaftApply lithium soap based grease lightly.
√
√
√
20 Sidestand pivotCheck operation.
Apply lithium soap based grease lightly.√
√
21 * Front forkCheck operation and for oil leakage.
Replace if necessary.√
√
22 *Shock absorber
assemblyCheck operation and for oil leakage.
Replace if necessary.√
√
23 * Control cablesApply Yamaha chain and cable lube or engine oil
10W-30 thoroughly.√
√
√
24 *Throttle grip hous-
ing and cableCheck operation and free play.
Adjust the throttle cable free play if necessary.
Lubricate the throttle grip housing and cable.√
√
√
25 * Chassis fastenersCheck all chassis fitting and fasteners.
Correct if necessary.√
√
√
26Battery (TT-R90E
only)Check terminal for looseness and corrosion.
√ No. ITEMCHECKS AND
MAINTENANCE JOBSWHICH-
EVER
COMES
FIRSTINITIAL EVERY
month 1 6 12
hours 30 90 150
3
Page 130 of 390
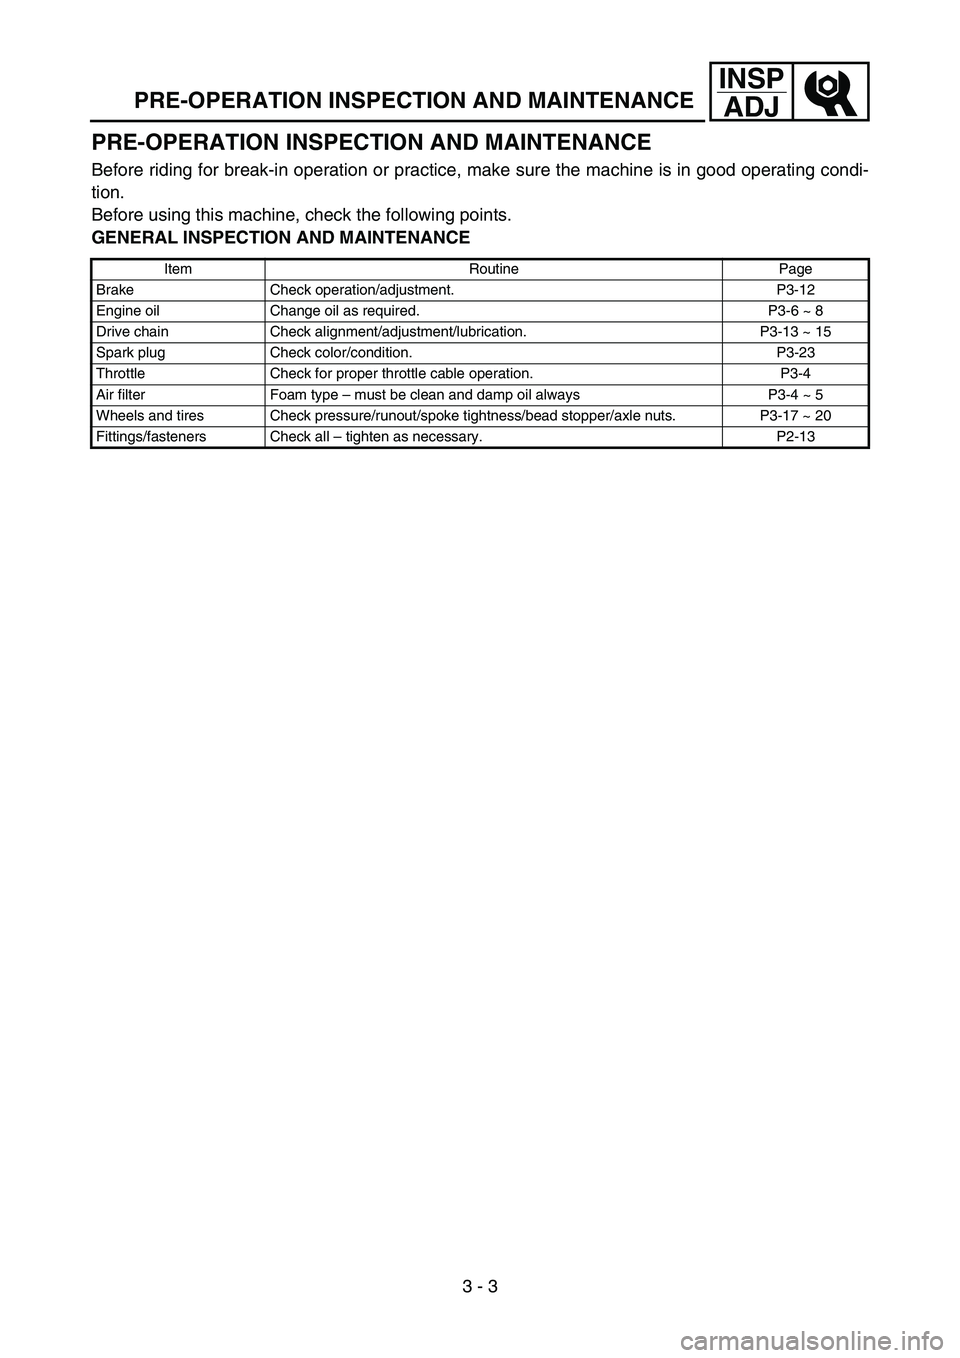
3 - 3
INSP
ADJ
PRE-OPERATION INSPECTION AND MAINTENANCE
PRE-OPERATION INSPECTION AND MAINTENANCE
Before riding for break-in operation or practice, make sure the machine is in good operating condi-
tion.
Before using this machine, check the following points.
GENERAL INSPECTION AND MAINTENANCE
Item Routine Page
Brake Check operation/adjustment. P3-12
Engine oil Change oil as required. P3-6 ~ 8
Drive chain Check alignment/adjustment/lubrication. P3-13 ~ 15
Spark plug Check color/condition. P3-23
Throttle Check for proper throttle cable operation. P3-4
Air filter Foam type – must be clean and damp oil always P3-4 ~ 5
Wheels and tires Check pressure/runout/spoke tightness/bead stopper/axle nuts. P3-17 ~ 20
Fittings/fasteners Check all – tighten as necessary. P2-13
Page 138 of 390
3 - 4
INSP
ADJENGINE/THROTTLE CABLE ADJUSTMENT/
AIR FILTER CLEANING
EC350000
ENGINE
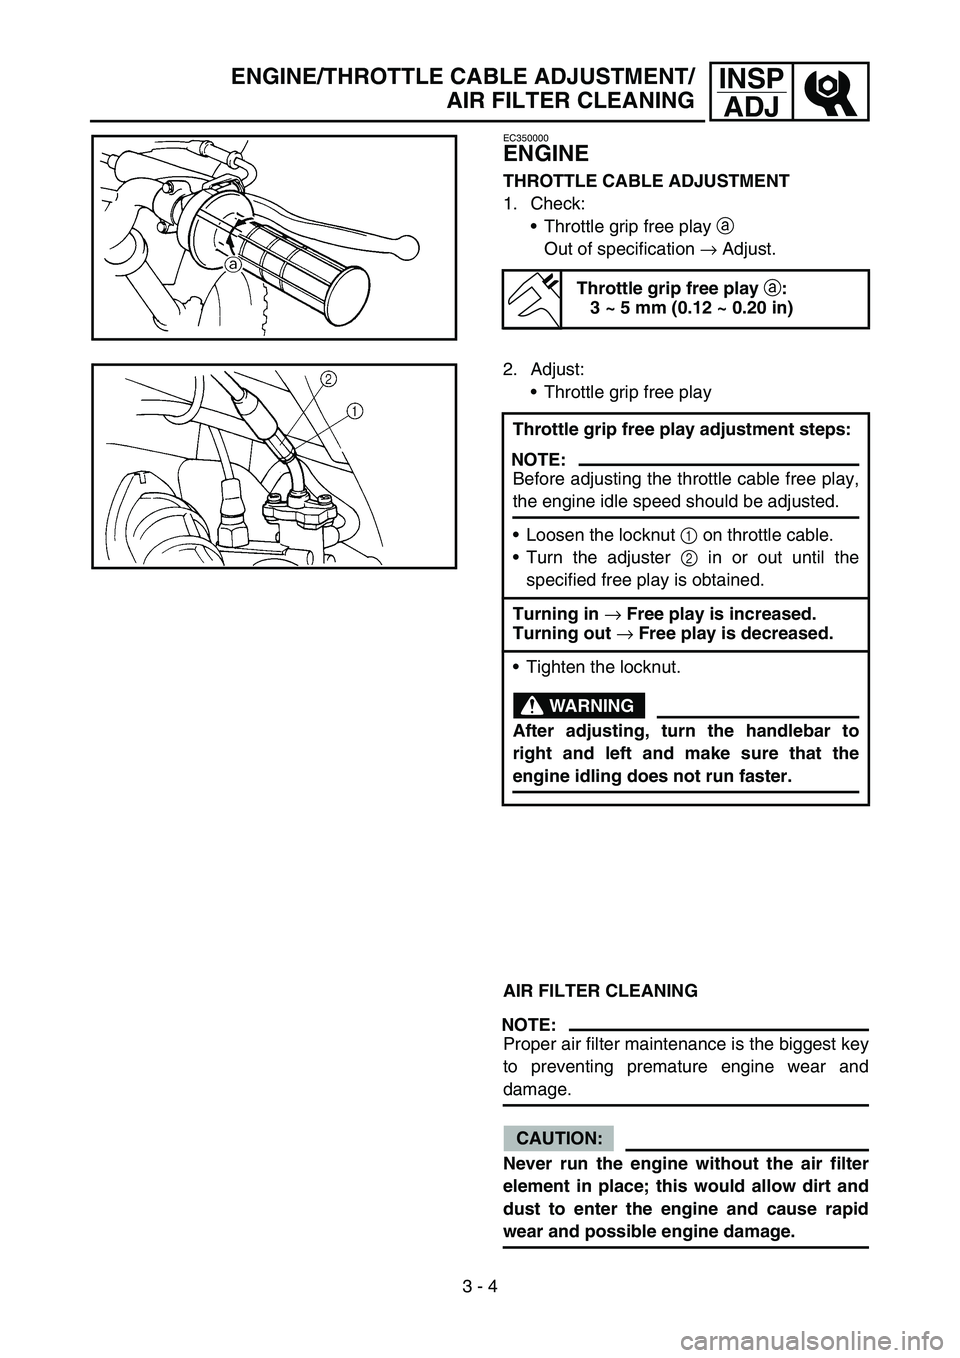
THROTTLE CABLE ADJUSTMENT
1. Check:
Throttle grip free play a
Out of specification → Adjust.
Throttle grip free play
a:
3 ~ 5 mm (0.12 ~ 0.20 in)
2. Adjust:
Throttle grip free play
AIR FILTER CLEANING
NOTE:
Proper air filter maintenance is the biggest key
to preventing premature engine wear and
damage.
CAUTION:
Never run the engine without the air filter
element in place; this would allow dirt and
dust to enter the engine and cause rapid
wear and possible engine damage.Throttle grip free play adjustment steps:
NOTE:
Before adjusting the throttle cable free play,
the engine idle speed should be adjusted.
Loosen the locknut 1 on throttle cable.
Turn the adjuster 2 in or out until the
specified free play is obtained.
Turning in
→ Free play is increased.
Turning out
→ Free play is decreased.
Tighten the locknut.
WARNING
After adjusting, turn the handlebar to
right and left and make sure that the
engine idling does not run faster.
Page 139 of 390
INSP
ADJ
MOTEUR/REGLAGE DU CABLE DES GAZ/
NETTOYAGE DU FILTRE A AIR
MOTOR/GASZUG EINSTELLEN/LUFTFILTER REINIGEN
MOTEUR
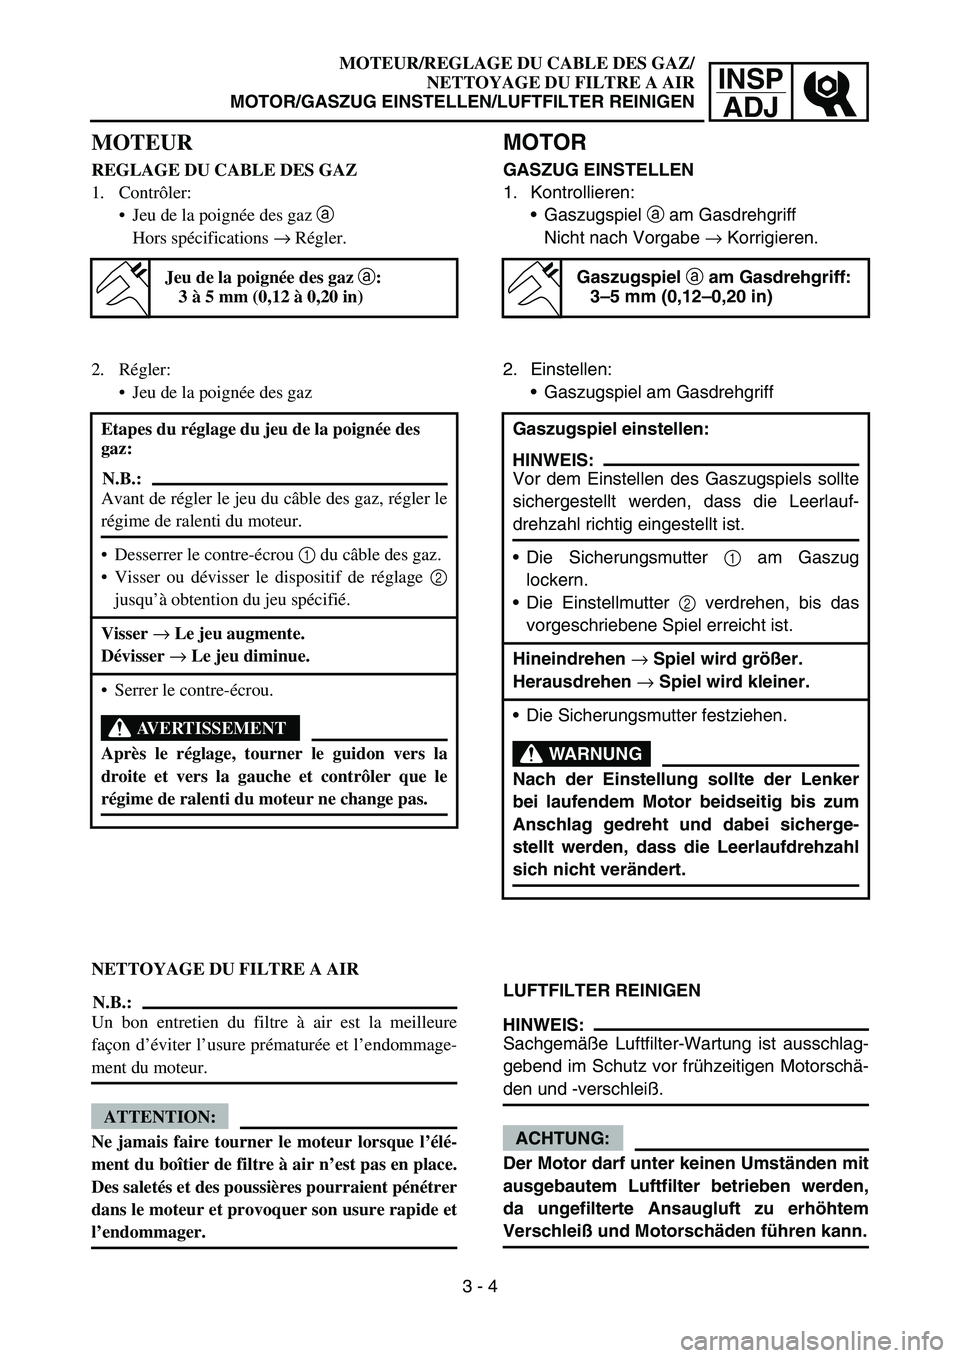
REGLAGE DU CABLE DES GAZ
1. Contrôler:
Jeu de la poignée des gaz a
Hors spécifications → Régler.
Jeu de la poignée des gaz a:
3 à 5 mm (0,12 à 0,20 in)
2. Régler:
Jeu de la poignée des gaz
NETTOYAGE DU FILTRE A AIR
N.B.:
Un bon entretien du filtre à air est la meilleure
façon d’éviter l’usure prématurée et l’endommage-
ment du moteur.
ATTENTION:
Ne jamais faire tourner le moteur lorsque l’élé-
ment du boîtier de filtre à air n’est pas en place.
Des saletés et des poussières pourraient pénétrer
dans le moteur et provoquer son usure rapide et
l’endommager. Etapes du réglage du jeu de la poignée des
gaz:
N.B.:
Avant de régler le jeu du câble des gaz, régler le
régime de ralenti du moteur.
Desserrer le contre-écrou 1 du câble des gaz.
Visser ou dévisser le dispositif de réglage 2
jusqu’à obtention du jeu spécifié.
Visser → Le jeu augmente.
Dévisser → Le jeu diminue.
Serrer le contre-écrou.
AVERTISSEMENT
Après le réglage, tourner le guidon vers la
droite et vers la gauche et contrôler que le
régime de ralenti du moteur ne change pas.
3 - 4
MOTOR
GASZUG EINSTELLEN
1. Kontrollieren:
Gaszugspiel a am Gasdrehgriff
Nicht nach Vorgabe → Korrigieren.
Gaszugspiel a am Gasdrehgriff:
3–5 mm (0,12–0,20 in)
2. Einstellen:
Gaszugspiel am Gasdrehgriff
LUFTFILTER REINIGEN
HINWEIS:
Sachgemäße Luftfilter-Wartung ist ausschlag-
gebend im Schutz vor frühzeitigen Motorschä-
den und -verschleiß.
ACHTUNG:
Der Motor darf unter keinen Umständen mit
ausgebautem Luftfilter betrieben werden,
da ungefilterte Ansaugluft zu erhöhtem
Verschleiß und Motorschäden führen kann. Gaszugspiel einstellen:
HINWEIS:
Vor dem Einstellen des Gaszugspiels sollte
sichergestellt werden, dass die Leerlauf-
drehzahl richtig eingestellt ist.
Die Sicherungsmutter 1 am Gaszug
lockern.
Die Einstellmutter 2 verdrehen, bis das
vorgeschriebene Spiel erreicht ist.
Hineindrehen → Spiel wird größer.
Herausdrehen → Spiel wird kleiner.
Die Sicherungsmutter festziehen.
WARNUNG
Nach der Einstellung sollte der Lenker
bei laufendem Motor beidseitig bis zum
Anschlag gedreht und dabei sicherge-
stellt werden, dass die Leerlaufdrehzahl
sich nicht verändert.