heater YAMAHA TTR90 2006 Notices Demploi (in French)
[x] Cancel search | Manufacturer: YAMAHA, Model Year: 2006, Model line: TTR90, Model: YAMAHA TTR90 2006Pages: 390, PDF Size: 9.12 MB
Page 120 of 390

2 - 22
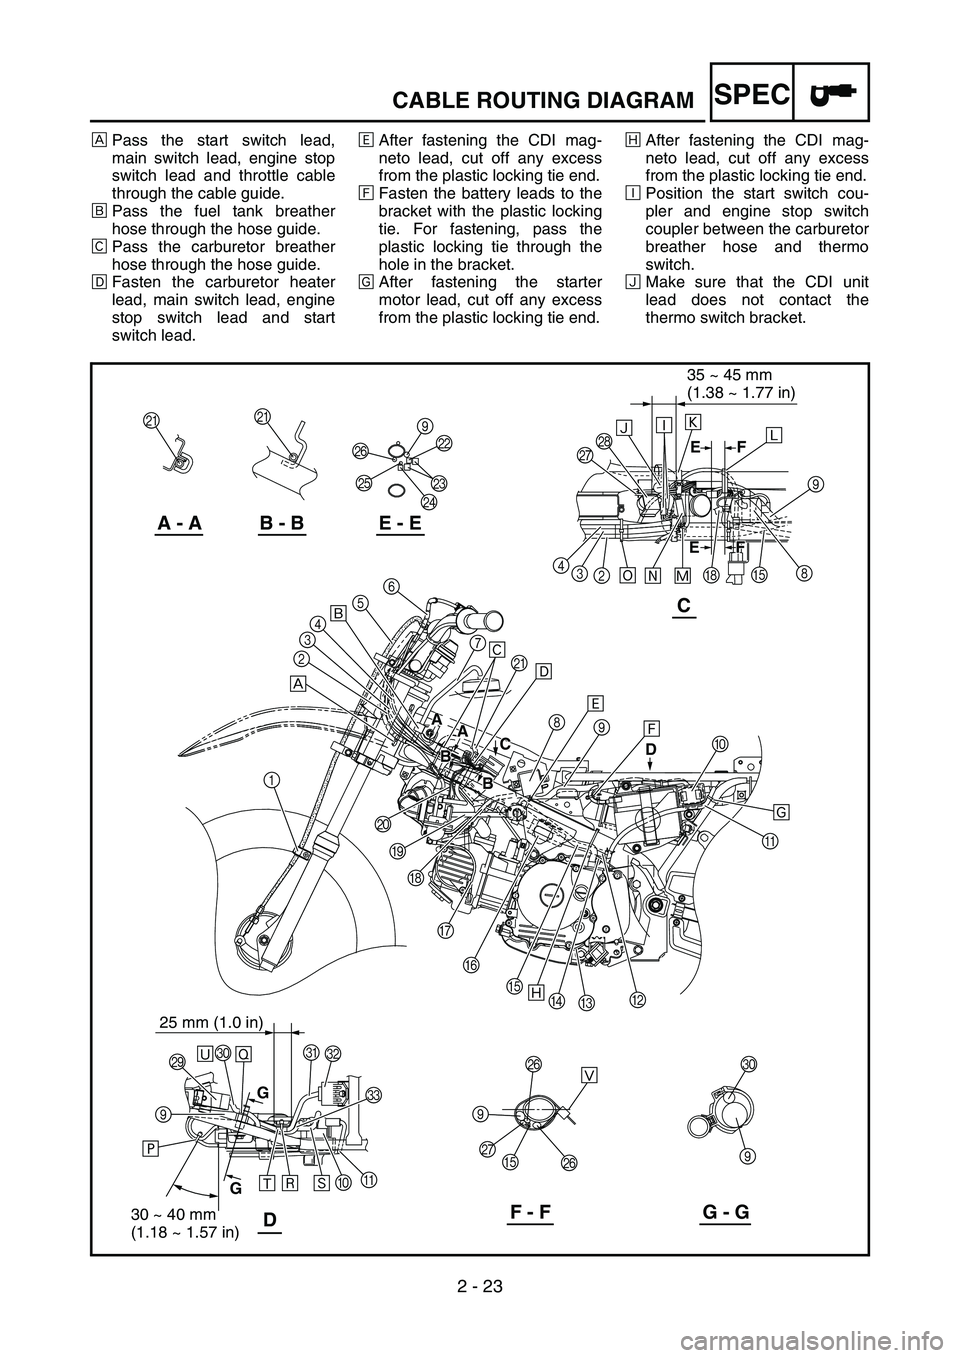
SPECCABLE ROUTING DIAGRAM
1Clamp
2Engine stop switch lead
3Main switch lead
4Start switch lead
5Brake cable
6Throttle cable
7Fuel tank breather hose
8Ignition coil
9Wire harness
0Starter relay
AStarter motor leadBCrankcase breather hose
CStarter motor lead
DNeutral switch lead
ECDI magneto lead
FCDI unit
GFuel overflow hose
HSpark plug lead
IFuel hose
JCarburetor heater lead
KCarburetor breather hose
LCarburetor heater couplerMCDI magneto coupler
NCDI unit coupler
OCDI unit connector
PCDI unit lead
QThermo switch lead
RThermo switch
SStarting circuit cut-off relay
TStarting circuit cut-off relay lead
URectifier/regulator lead
VRectifier/regulator
WStarter relay lead
A AA
C C
D
B
B B
BF FF
EE
D
A - AB - BE - E
C
F - FG - GD
KK
QRÑ
8
E
H
Ô 2 3 4
6
5
4
3
2
1
J
I
H
G
F
E
D
CBA 0 Í 9 8 Ë K 7
S
W U
V
A
0
Ú T
99
QP
PT
9 Ò
Ó
Õ Ö
Ê É
È
Ï
Ø
Ù
E
GGA
P
O
NML 9
Ð
9
Î
Û
Ý
25 mm (1.0 in)
×
Ì
35 ~ 45 mm
(1.38 ~ 1.77 in)
30 ~ 40 mm
(1.18 ~ 1.57 in)
Ü
Page 122 of 390
2 - 23
SPECCABLE ROUTING DIAGRAM
ÈPass the start switch lead,
main switch lead, engine stop
switch lead and throttle cable
through the cable guide.
ÉPass the fuel tank breather
hose through the hose guide.
ÊPass the carburetor breather
hose through the hose guide.
ËFasten the carburetor heater
lead, main switch lead, engine
stop switch lead and start
switch lead.ÌAfter fastening the CDI mag-
neto lead, cut off any excess
from the plastic locking tie end.
ÍFasten the battery leads to the
bracket with the plastic locking
tie. For fastening, pass the
plastic locking tie through the
hole in the bracket.
ÎAfter fastening the starter
motor lead, cut off any excess
from the plastic locking tie end.ÏAfter fastening the CDI mag-
neto lead, cut off any excess
from the plastic locking tie end.
ÐPosition the start switch cou-
pler and engine stop switch
coupler between the carburetor
breather hose and thermo
switch.
ÑMake sure that the CDI unit
lead does not contact the
thermo switch bracket.
A AA
C C
D
B
B B
BF FF
EE
D
A - AB - BE - E
C
F - FG - GD
KK
QRÑ
8
E
H
Ô 2 3 4
6
5
4
3
2
1
J
I
H
G
F
E
D
CBA 0 Í 9 8 Ë K 7
S
W U
V
A
0
Ú T
99
QP
PT
9 Ò
Ó
Õ Ö
Ê É
È
Ï
Ø
Ù
E
GGA
P
O
NML 9
Ð
9
Î
Û
Ý
25 mm (1.0 in)
×
Ì
35 ~ 45 mm
(1.38 ~ 1.77 in)
30 ~ 40 mm
(1.18 ~ 1.57 in)
Ü
Page 124 of 390

2 - 24
SPECCABLE ROUTING DIAGRAM
ÒFasten the starter cable,
thermo switch lead, CDI unit
lead, main switch lead, start
switch lead and engine stop
switch lead.
ÓFasten the wire harness, CDI
unit leads, thermo switch lead
and CDI magneto lead.
ÔPass the carburetor heater
lead between the carburetor
breather hose and air intake
duct.ÕPosition the main switch cou-
pler between the carburetor
breather hose and air intake
duct.
ÖFasten the start switch lead,
main switch lead and engine
stop switch lead at the tape
with the plastic locking tie.
×Fasten the battery leads.ØFasten the wire harness and
starting circuit cut-off relay lead
at the tape for the wire harness
with the plastic locking tie.
ÙFasten the rectifier/regulator
lead and starter relay leads.
For fastening, pass the plastic
locking tie through the hole in
the battery box.
A AA
C C
D
B
B B
BF FF
EE
D
A - AB - BE - E
C
F - FG - GD
KK
QRÑ
8
E
H
Ô 2 3 4
6
5
4
3
2
1
J
I
H
G
F
E
D
CBA 0 Í 9 8 Ë K 7
S
W U
V
A
0
Ú T
99
QP
PT
9 Ò
Ó
Õ Ö
Ê É
È
Ï
Ø
Ù
E
GGA
P
O
NML 9
Ð
9
Î
Û
Ý
25 mm (1.0 in)
×
Ì
35 ~ 45 mm
(1.38 ~ 1.77 in)
30 ~ 40 mm
(1.18 ~ 1.57 in)
Ü
Page 196 of 390

4 - 1
ENG
ENGINE
CARBURETOR
Extent of removal:
1 Carburetor removal
Extent of removal Order Part name Q’ty Remarks
CARBURETOR REMOVAL
Preparation for removal Fuel tank
1 Clamp (air filter joint) 1 Loosen the screw (air filter joint).
2 Carburetor heater lead 1
3 Air vent hose 1
4 Fuel hose 1
5Bolt 2
6 Carburetor assembly 1
7O-ring 2
8Spacer 1
9 Carburetor top 1
10 Starter plunger assembly 1
1
CARBURETOR
Page 200 of 390
4 - 3
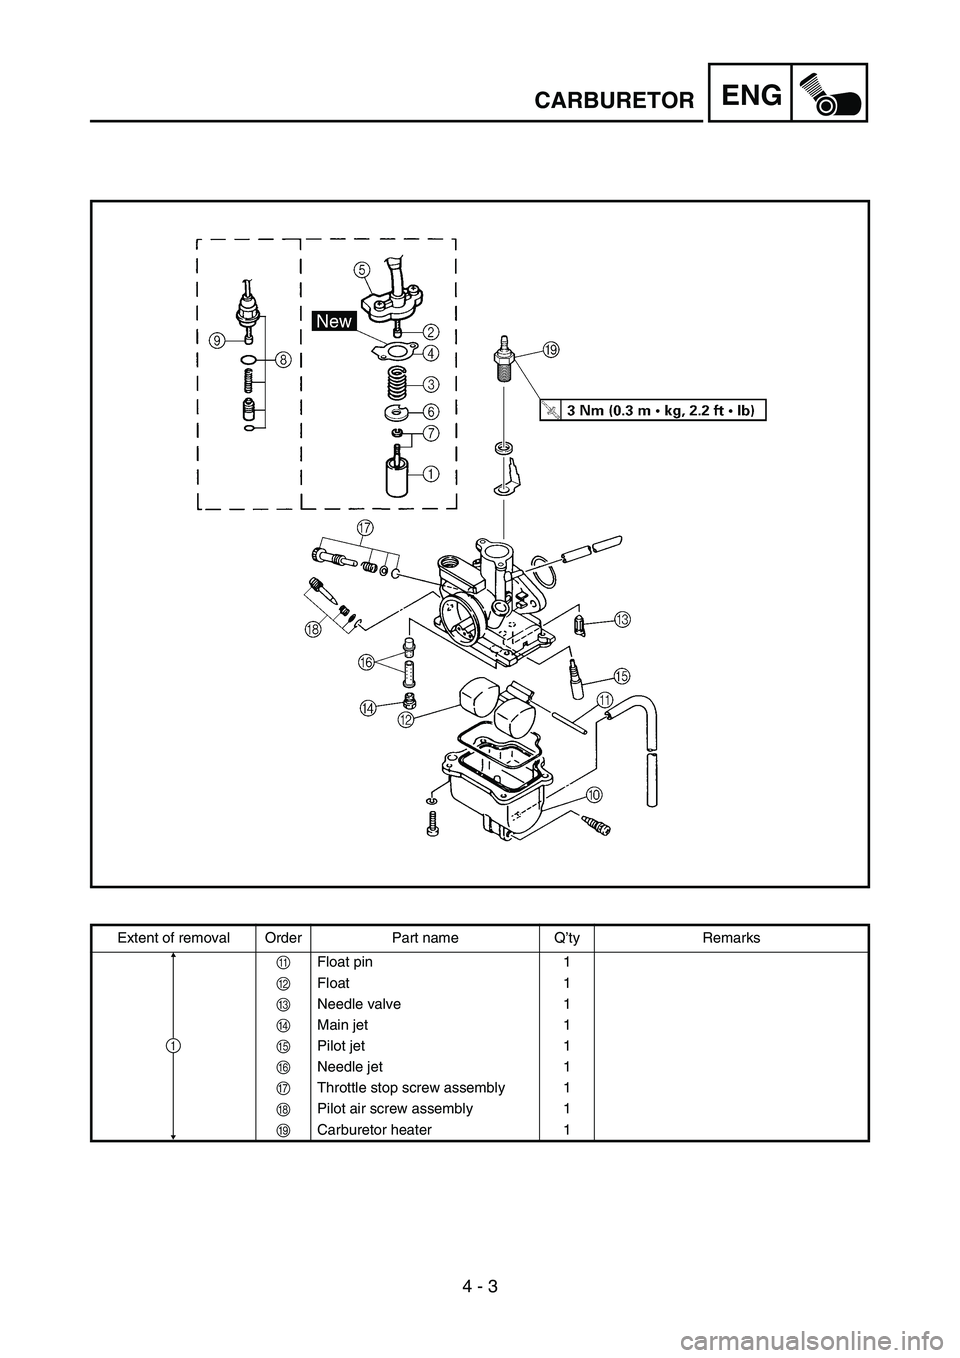
ENGCARBURETOR
Extent of removal Order Part name Q’ty Remarks
A Float pin 1
B Float 1
C Needle valve 1
D Main jet 1
E Pilot jet 1
F Needle jet 1
G Throttle stop screw assembly 1
H Pilot air screw assembly 1
I Carburetor heater 1
1
Page 338 of 390
6 - 1
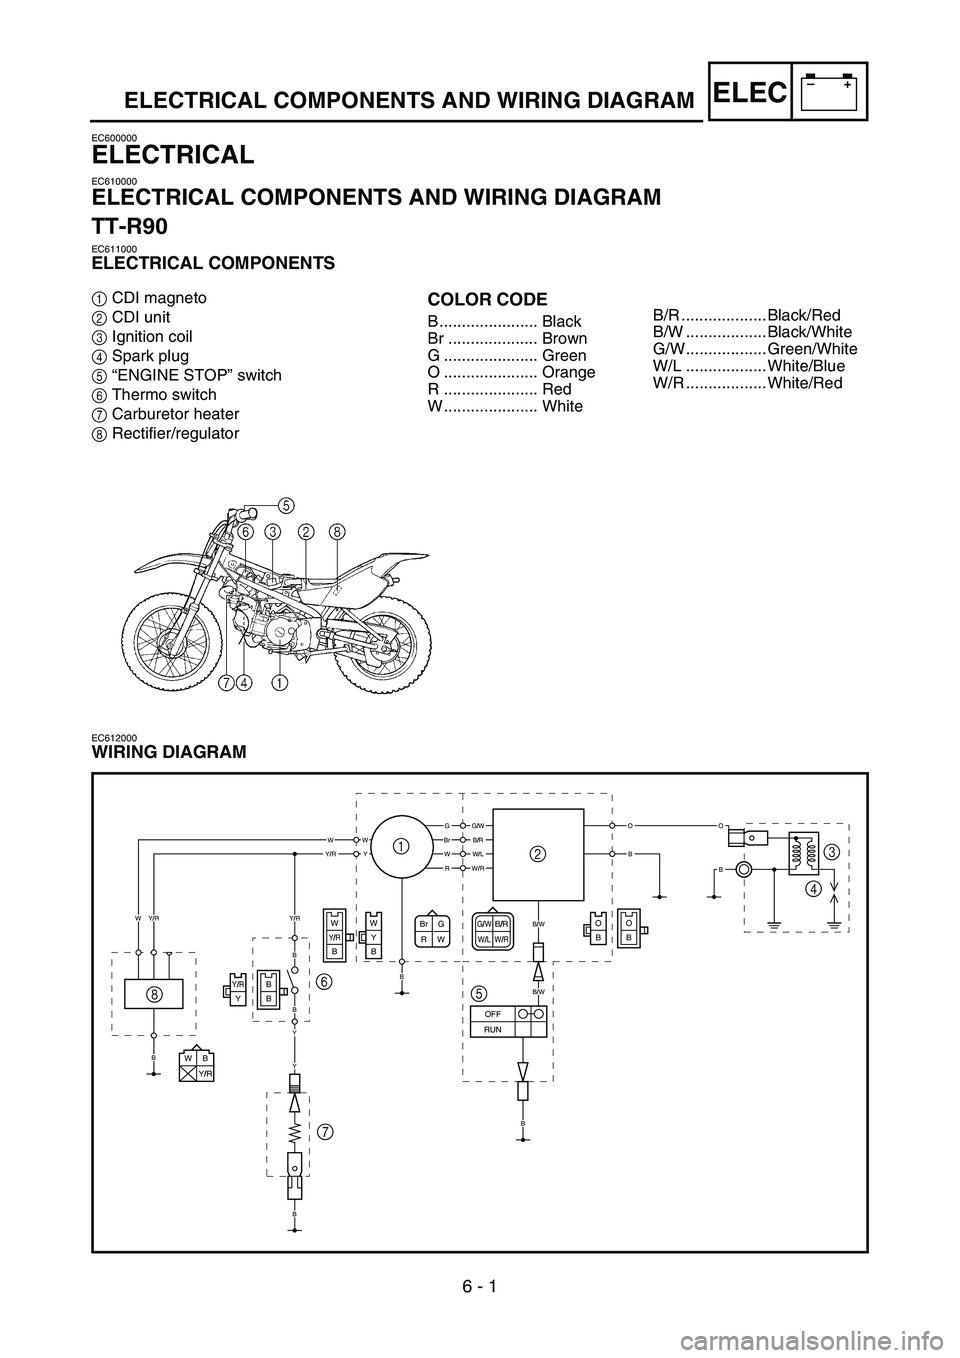
–+ELECELECTRICAL COMPONENTS AND WIRING DIAGRAM
EC600000
ELECTRICAL
EC610000
ELECTRICAL COMPONENTS AND WIRING DIAGRAM
TT-R90
EC611000
ELECTRICAL COMPONENTS
1CDI magneto
2CDI unit
3Ignition coil
4Spark plug
5“ENGINE STOP” switch
6Thermo switch
7Carburetor heater
8Rectifier/regulatorCOLOR CODE
B ...................... Black
Br .................... Brown
G ..................... Green
O ..................... Orange
R ..................... Red
W ..................... White
EC612000
WIRING DIAGRAM
G/WB/RW/LW/RBr G
RW
WB
Y/R
O
BO
B
B
BY/RY
WY/RB
W
Y
B
GG/W
B/W
B/W
BrB/RWWWY
OO
BBW/LY/RR
W
B
B
B
W/R
Y/R
OFF
RUN
B
Y/R
B
B
Y
Y
1
23
4
5 6
7 8
B/R ................... Black/Red
B/W .................. Black/White
G/W.................. Green/White
W/L .................. White/Blue
W/R .................. White/Red
Page 340 of 390
6 - 2
–+ELEC
12
3
456
7
0
98
A
B
F
EC
D
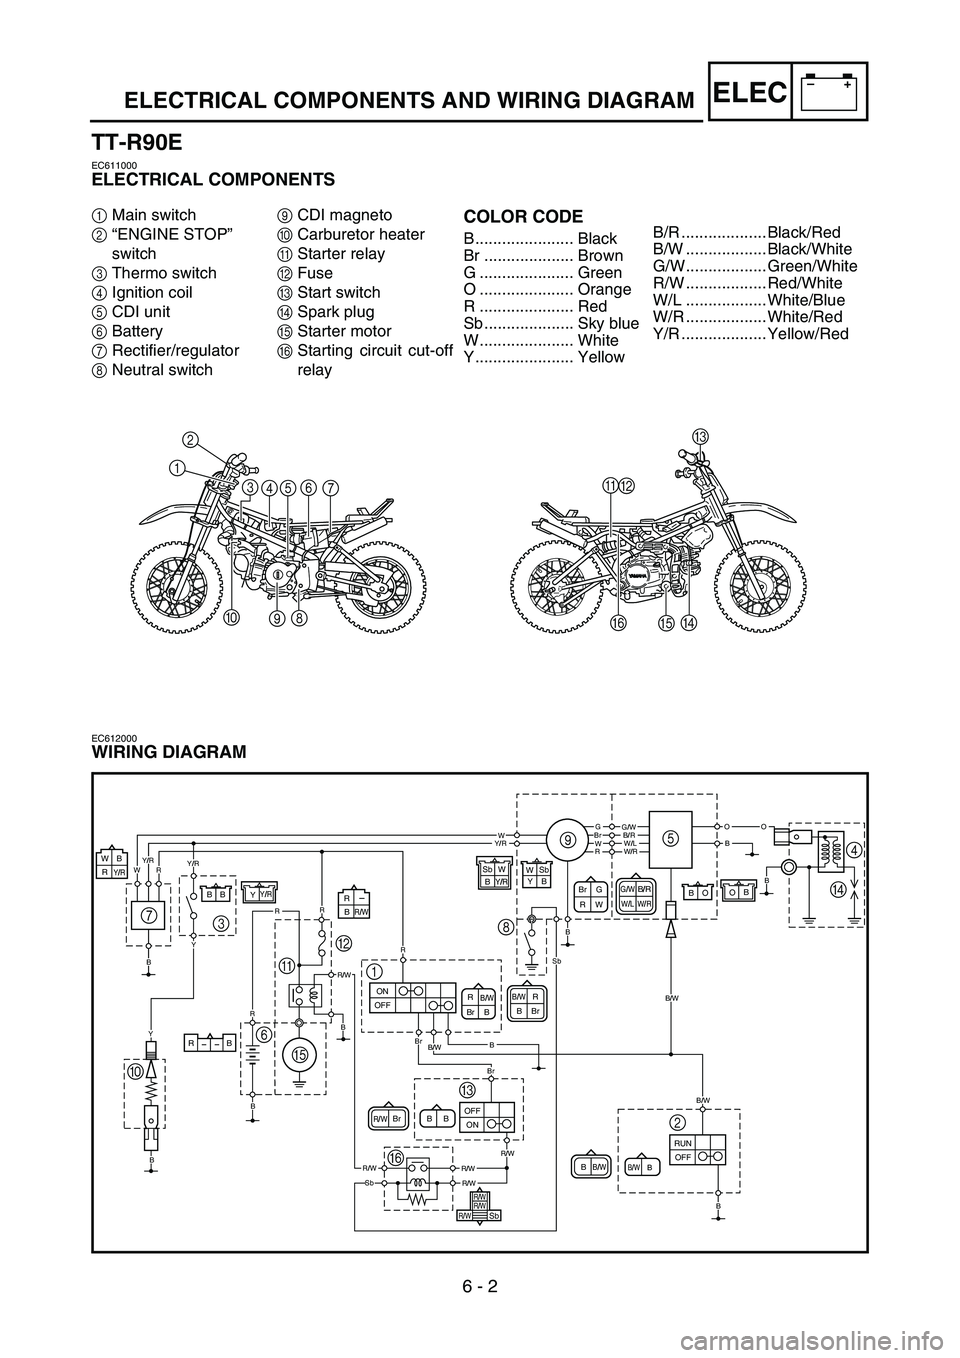
ELECTRICAL COMPONENTS AND WIRING DIAGRAM
TT-R90E
EC611000
ELECTRICAL COMPONENTS
1Main switch
2“ENGINE STOP”
switch
3Thermo switch
4Ignition coil
5CDI unit
6Battery
7Rectifier/regulator
8Neutral switch9CDI magneto
0Carburetor heater
AStarter relay
BFuse
CStart switch
DSpark plug
EStarter motor
FStarting circuit cut-off
relayCOLOR CODE
B ...................... Black
Br .................... Brown
G ..................... Green
O ..................... Orange
R ..................... Red
Sb .................... Sky blue
W ..................... White
Y ...................... Yellow
EC612000
WIRING DIAGRAM
G/WB/RW/LW/RBr G
RW
B/WBr BRB/WBBrR
B/WB/WBB
BR/WBr B
GG/W
B/W
B/W
BrB/RWWOO
B
BW/LY/RR
W
B
B
R
W/RY/R
OFF RUNB
Y/R
Y
Y
OBO BY/RYB B
Sb
W W
Sb
ON OFF
OFFON
Y
BBY/R
Br
Br
B
B
R
RR
R
B
R/WR/W
R/WR/W
R/W
Sb
Sb
RB
R/WB R
Y/RRB W
B/WB
R/W
R/W
R/W
Sb
9
8
1 B5
4
D
2 3
=A
E 6
C
F 7
B/R ................... Black/Red
B/W .................. Black/White
G/W.................. Green/White
R/W .................. Red/White
W/L .................. White/Blue
W/R .................. White/Red
Y/R ................... Yellow/Red
Page 376 of 390
–+ELEC
6 - 17
CARBURETOR HEATING SYSTEM
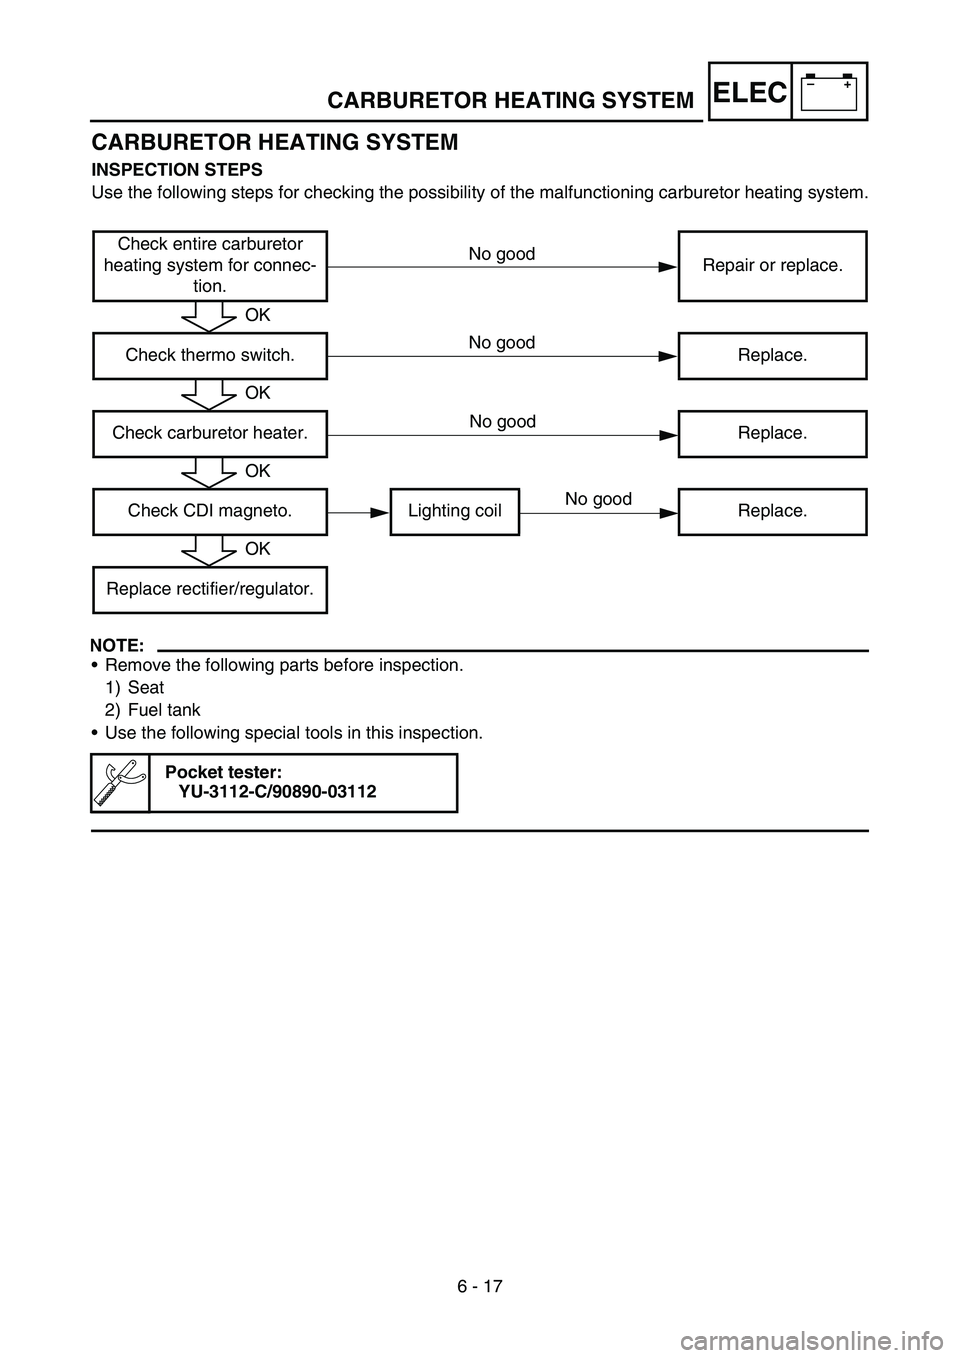
CARBURETOR HEATING SYSTEM
INSPECTION STEPS
Use the following steps for checking the possibility of the malfunctioning carburetor heating system.
NOTE:
Remove the following parts before inspection.
1) Seat
2) Fuel tank
Use the following special tools in this inspection.
Pocket tester:
YU-3112-C/90890-03112
Check entire carburetor
heating system for connec-
tion.Repair or replace.
Check thermo switch. Replace.
Check carburetor heater. Replace.
Check CDI magneto. Lighting coil Replace.
Replace rectifier/regulator.
OK
OK
OK
OK
No good
No good
No good
No good
Page 384 of 390
6 - 20
–+ELECCARBURETOR HEATING SYSTEM
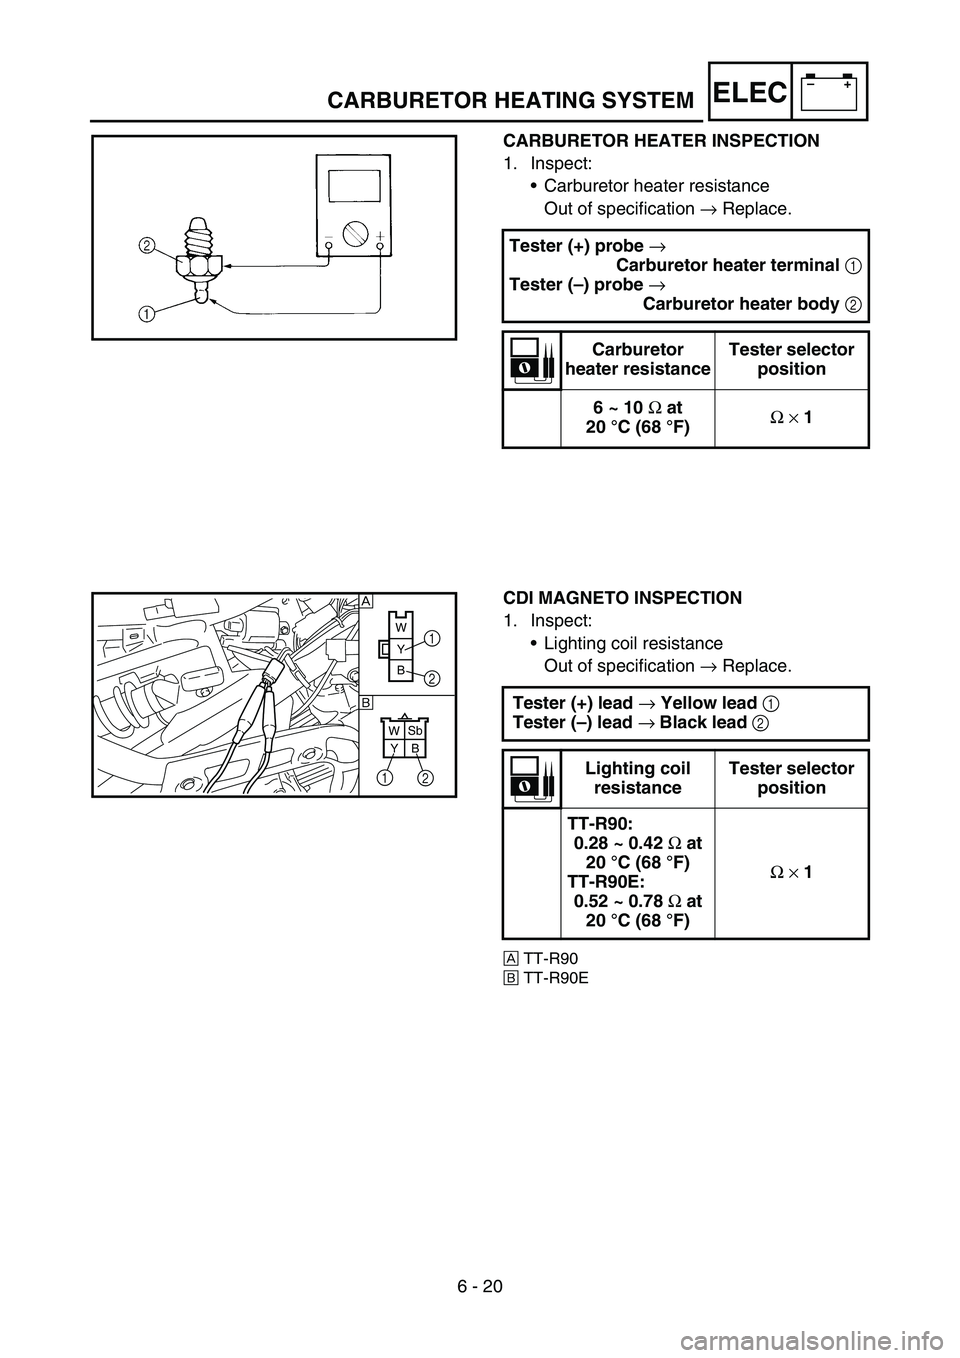
CARBURETOR HEATER INSPECTION
1. Inspect:
Carburetor heater resistance
Out of specification → Replace.
Tester (+) probe
→
Carburetor heater terminal
1
Tester (–) probe
→
Carburetor heater body
2
Carburetor
heater resistanceTester selector
position
6 ~ 10
Ω at
20 °C (68 °F)Ω
× 1
CDI MAGNETO INSPECTION
1. Inspect:
Lighting coil resistance
Out of specification → Replace.
ÈTT-R90
ÉTT-R90E
Tester (+) lead
→ Yellow lead
1
Tester (–) lead
→ Black lead
2
Lighting coil
resistanceTester selector
position
TT-R90:
0.28 ~ 0.42
Ω at
20 °C (68 °F)
TT-R90E:
0.52 ~ 0.78
Ω at
20 °C (68 °F)Ω
× 1
W
Y
B
WSb
YB
1
2
1
2
È
É