heating YAMAHA TTR90 2006 Owners Manual
[x] Cancel search | Manufacturer: YAMAHA, Model Year: 2006, Model line: TTR90, Model: YAMAHA TTR90 2006Pages: 390, PDF Size: 9.12 MB
Page 24 of 390
CHAPTER 4
ENGINE
CARBURETOR ..........................................4-1
CYLINDER HEAD ......................................4-8
CAMSHAFT AND ROCKER ARMS ........4-13
VALVES AND VALVE SPRINGS ............4-16
CYLINDER AND PISTON ........................4-21
CLUTCH ...................................................4-27
KICK AXLE ..............................................4-33
SHIFT SHAFT ..........................................4-34
OIL PUMP ................................................4-36
CDI MAGNETO (TT-R90) ........................4-39
CDI MAGNETO AND
STARTER CLUTCH (TT-R90E) ...............4-41
CRANKCASE AND CRANKSHAFT ........4-45
SHIFT FORK, SHIFT CAM AND
TRANSMISSION ......................................4-48
CHAPTER 5
CHASSIS
FRONT WHEEL AND REAR WHEEL .......5-1
FRONT FORK ..........................................5-10
HANDLEBAR ...........................................5-13
STEERING ...............................................5-18
SWINGARM .............................................5-20
CHAPTER 6
ELECTRICAL
ELECTRICAL COMPONENTS AND
WIRING DIAGRAM ....................................6-1
IGNITION SYSTEM ....................................6-3
ELECTRIC STARTING SYSTEM
(TT-R90E) ..................................................6-7
CHARGING SYSTEM (TT-R90E) ............6-15
CARBURETOR HEATING SYSTEM .......6-17
MAINTENANCE RECORD ......................6-21
Page 112 of 390
2 - 18
SPECCABLE ROUTING DIAGRAM
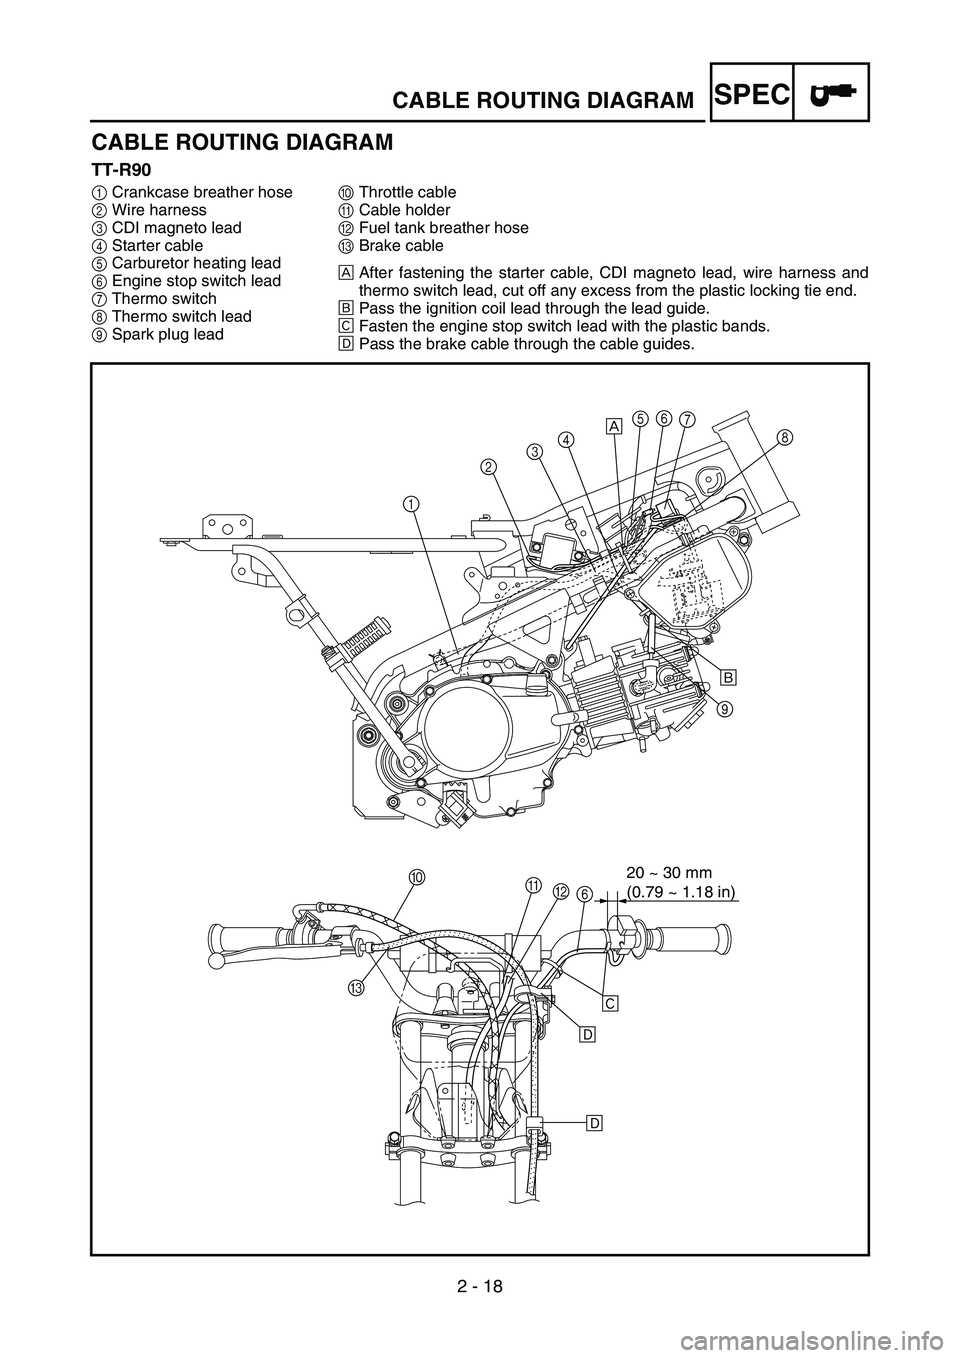
CABLE ROUTING DIAGRAM
TT-R90
1Crankcase breather hose
2Wire harness
3CDI magneto lead
4Starter cable
5Carburetor heating lead
6Engine stop switch lead
7Thermo switch
8Thermo switch lead
9Spark plug lead0Throttle cable
ACable holder
BFuel tank breather hose
CBrake cable
ÈAfter fastening the starter cable, CDI magneto lead, wire harness and
thermo switch lead, cut off any excess from the plastic locking tie end.
ÉPass the ignition coil lead through the lead guide.
ÊFasten the engine stop switch lead with the plastic bands.
ËPass the brake cable through the cable guides.
12345
9
0
B A
6
CÈ
É
Ê
Ë
Ë
67
8
20 ~ 30 mm
(0.79 ~ 1.18 in)
Page 182 of 390
3 - 26
INSP
ADJ
BATTERY INSPECTION AND CHARGING (TT-R90E)
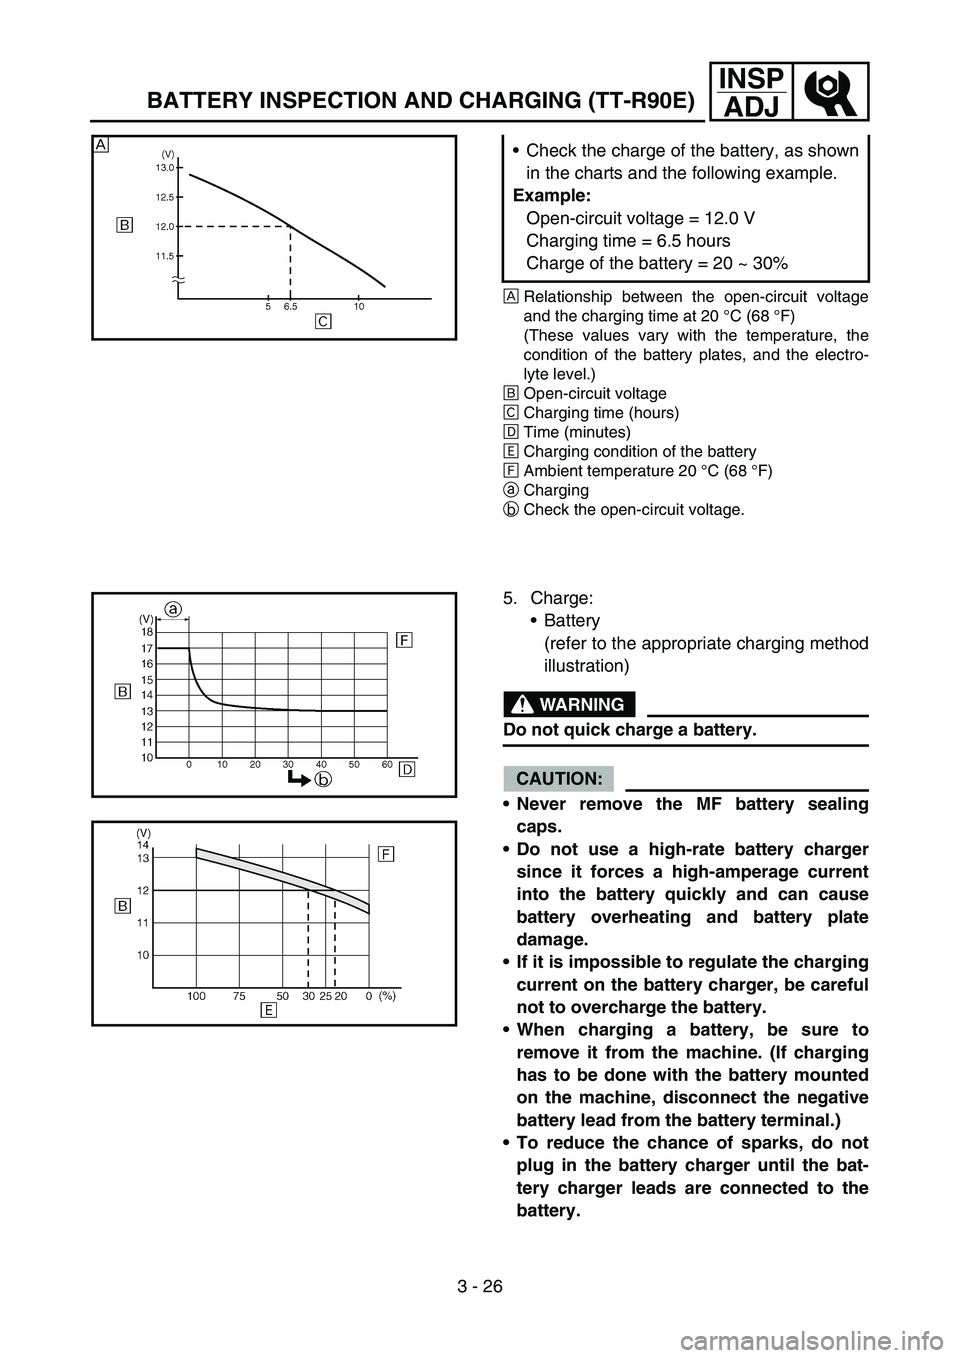
ÈRelationship between the open-circuit voltage
and the charging time at 20 °C (68 °F)
(These values vary with the temperature, the
condition of the battery plates, and the electro-
lyte level.)
ÉOpen-circuit voltage
ÊCharging time (hours)
ËTime (minutes)
ÌCharging condition of the battery
ÍAmbient temperature 20 °C (68 °F)
aCharging
bCheck the open-circuit voltage.
Check the charge of the battery, as shown
in the charts and the following example.
Example:
Open-circuit voltage = 12.0 V
Charging time = 6.5 hours
Charge of the battery = 20 ~ 30% È
5. Charge:
Battery
(refer to the appropriate charging method
illustration)
WARNING
Do not quick charge a battery.
CAUTION:
Never remove the MF battery sealing
caps.
Do not use a high-rate battery charger
since it forces a high-amperage current
into the battery quickly and can cause
battery overheating and battery plate
damage.
If it is impossible to regulate the charging
current on the battery charger, be careful
not to overcharge the battery.
When charging a battery, be sure to
remove it from the machine. (If charging
has to be done with the battery mounted
on the machine, disconnect the negative
battery lead from the battery terminal.)
To reduce the chance of sparks, do not
plug in the battery charger until the bat-
tery charger leads are connected to the
battery.
Page 376 of 390
–+ELEC
6 - 17
CARBURETOR HEATING SYSTEM
CARBURETOR HEATING SYSTEM
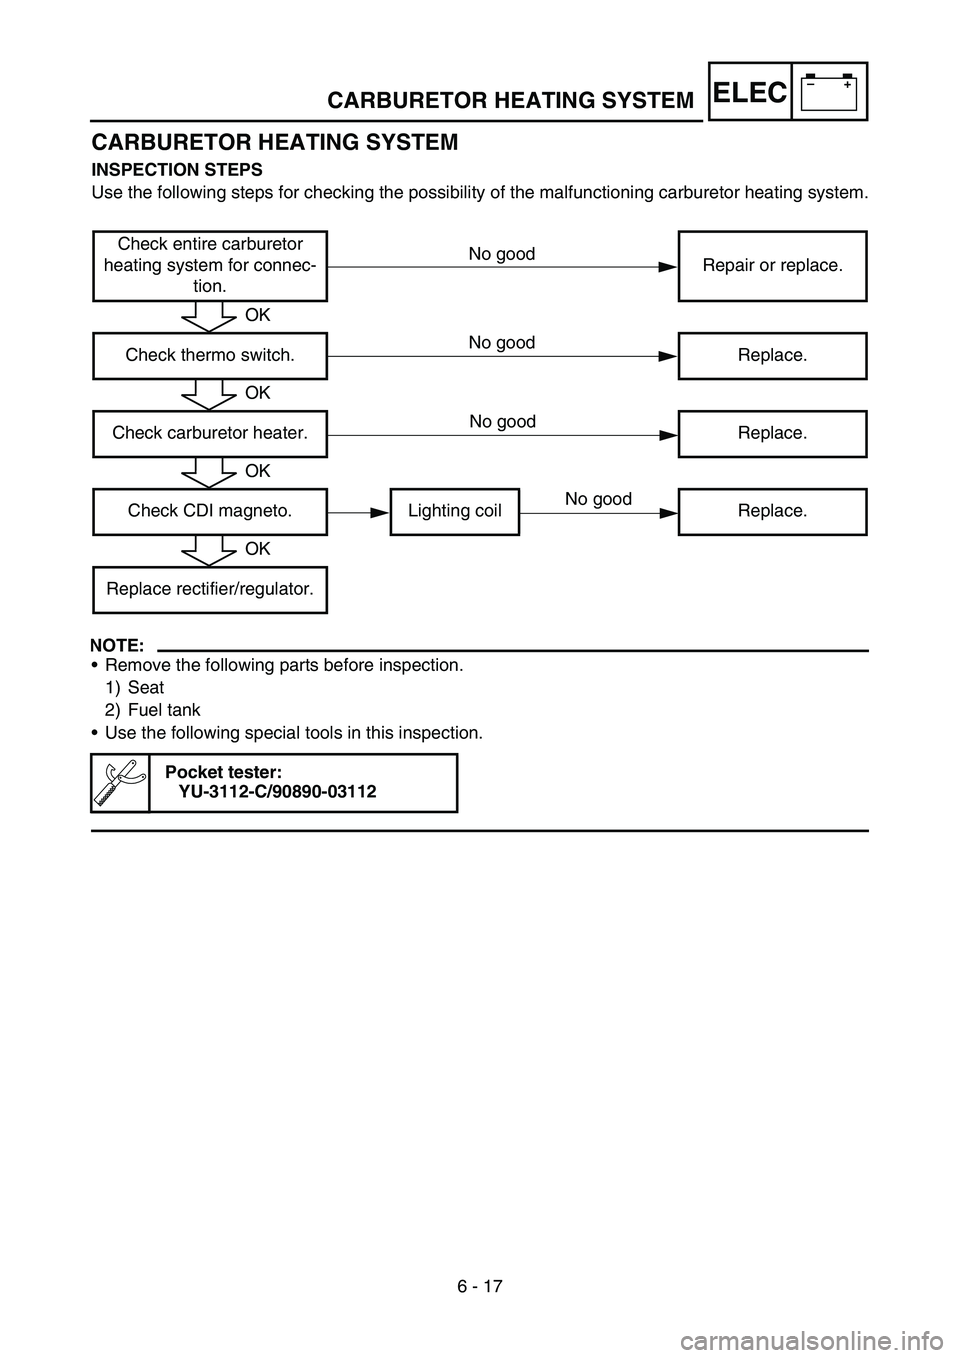
INSPECTION STEPS
Use the following steps for checking the possibility of the malfunctioning carburetor heating system.
NOTE:
Remove the following parts before inspection.
1) Seat
2) Fuel tank
Use the following special tools in this inspection.
Pocket tester:
YU-3112-C/90890-03112
Check entire carburetor
heating system for connec-
tion.Repair or replace.
Check thermo switch. Replace.
Check carburetor heater. Replace.
Check CDI magneto. Lighting coil Replace.
Replace rectifier/regulator.
OK
OK
OK
OK
No good
No good
No good
No good
Page 380 of 390
6 - 18
–+ELECCARBURETOR HEATING SYSTEM
EC624000
COUPLERS AND LEADS CONNECTION
INSPECTION
1. Check:
Couplers and leads connection
Rust/dust/looseness/short-circuit →
Repair or replace.
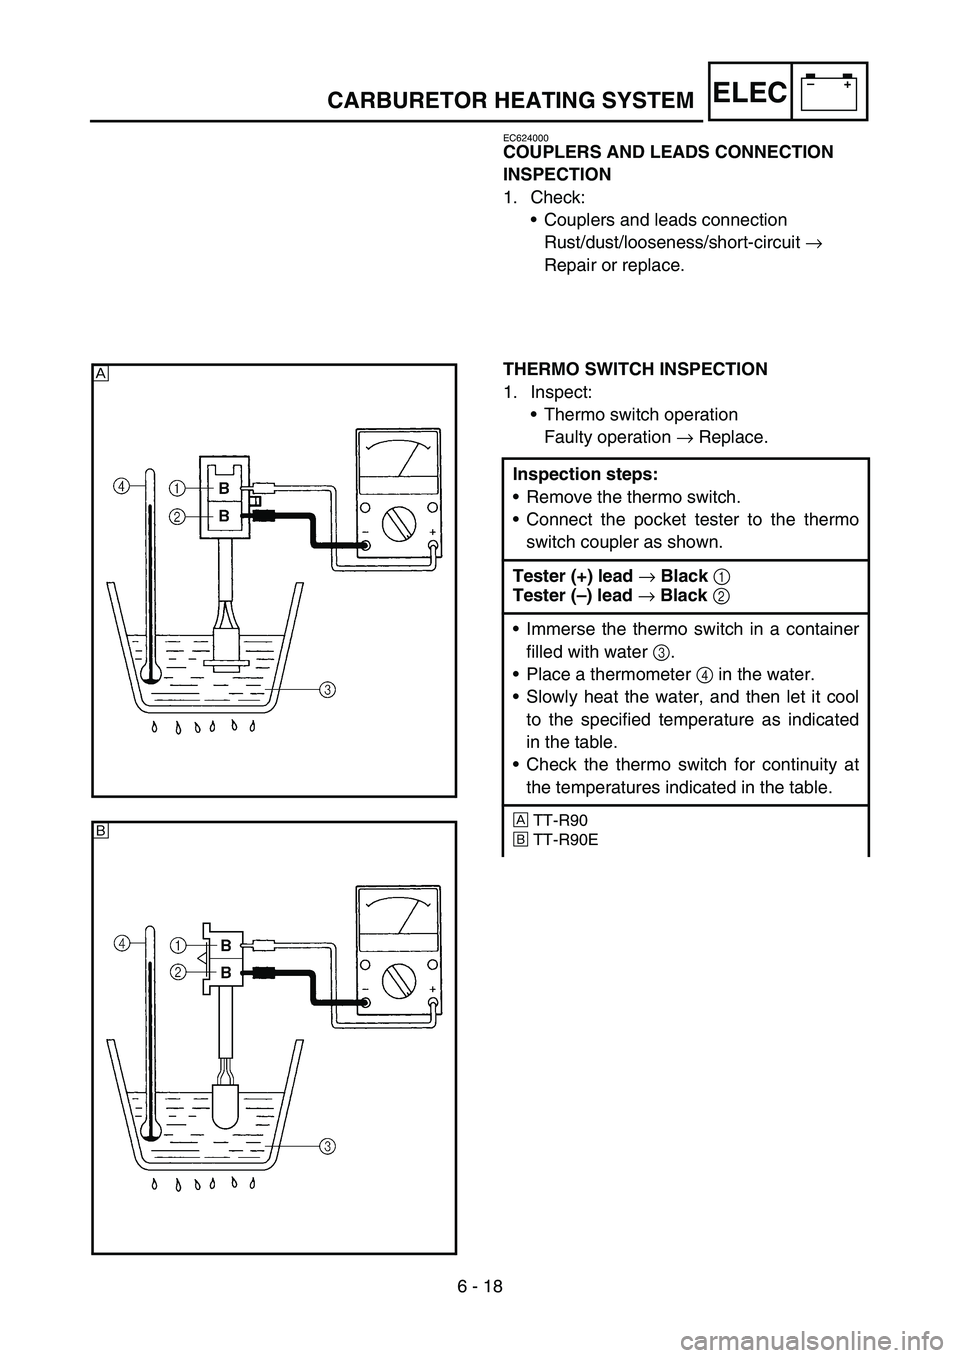
THERMO SWITCH INSPECTION
1. Inspect:
Thermo switch operation
Faulty operation → Replace.
Inspection steps:
Remove the thermo switch.
Connect the pocket tester to the thermo
switch coupler as shown.
Tester (+) lead
→ Black
1
Tester (–) lead
→ Black
2
Immerse the thermo switch in a container
filled with water 3.
Place a thermometer 4 in the water.
Slowly heat the water, and then let it cool
to the specified temperature as indicated
in the table.
Check the thermo switch for continuity at
the temperatures indicated in the table.
ÈTT-R90
ÉTT-R90E
È
É
Page 382 of 390
6 - 19
–+ELEC
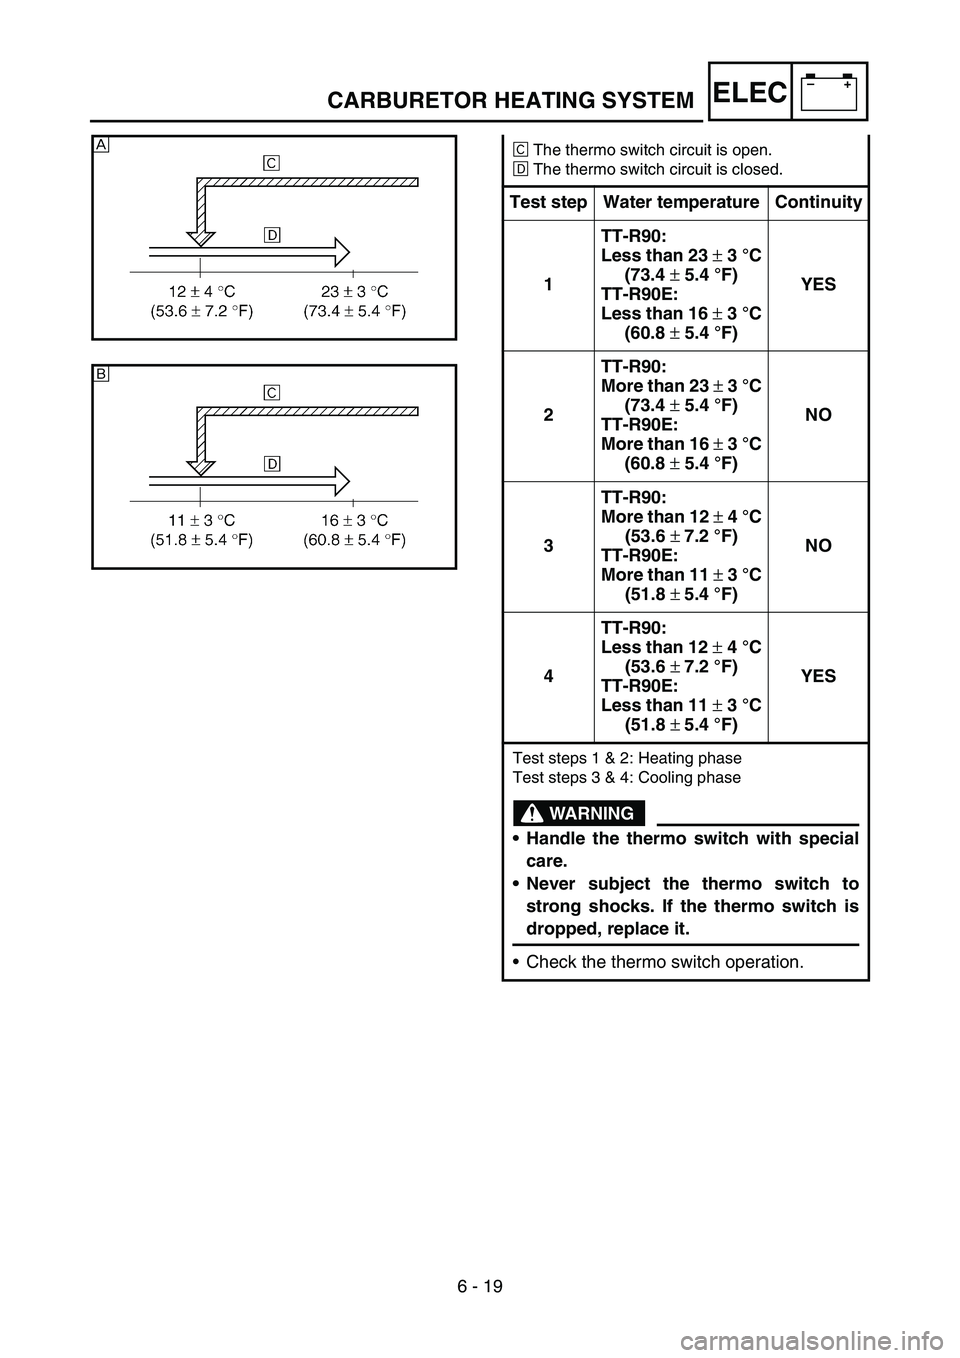
ÊThe thermo switch circuit is open.
ËThe thermo switch circuit is closed.
Test step Water temperature Continuity
1TT-R90:
Less than 23 ± 3 °C
(73.4 ± 5.4 °F)
TT-R90E:
Less than 16 ± 3 °C
(60.8 ± 5.4 °F)YES
2TT-R90:
More than 23 ± 3 °C
(73.4 ± 5.4 °F)
TT-R90E:
More than 16 ± 3 °C
(60.8 ± 5.4 °F)NO
3TT-R90:
More than 12 ± 4 °C
(53.6 ± 7.2 °F)
TT-R90E:
More than 11 ± 3 °C
(51.8 ± 5.4 °F)NO
4TT-R90:
Less than 12 ± 4 °C
(53.6 ± 7.2 °F)
TT-R90E:
Less than 11 ± 3 °C
(51.8 ± 5.4 °F)YES
Test steps 1 & 2: Heating phase
Test steps 3 & 4: Cooling phase
WARNING
Handle the thermo switch with special
care.
Never subject the thermo switch to
strong shocks. If the thermo switch is
dropped, replace it.
Check the thermo switch operation.
È
É
CARBURETOR HEATING SYSTEM
Page 384 of 390
6 - 20
–+ELECCARBURETOR HEATING SYSTEM
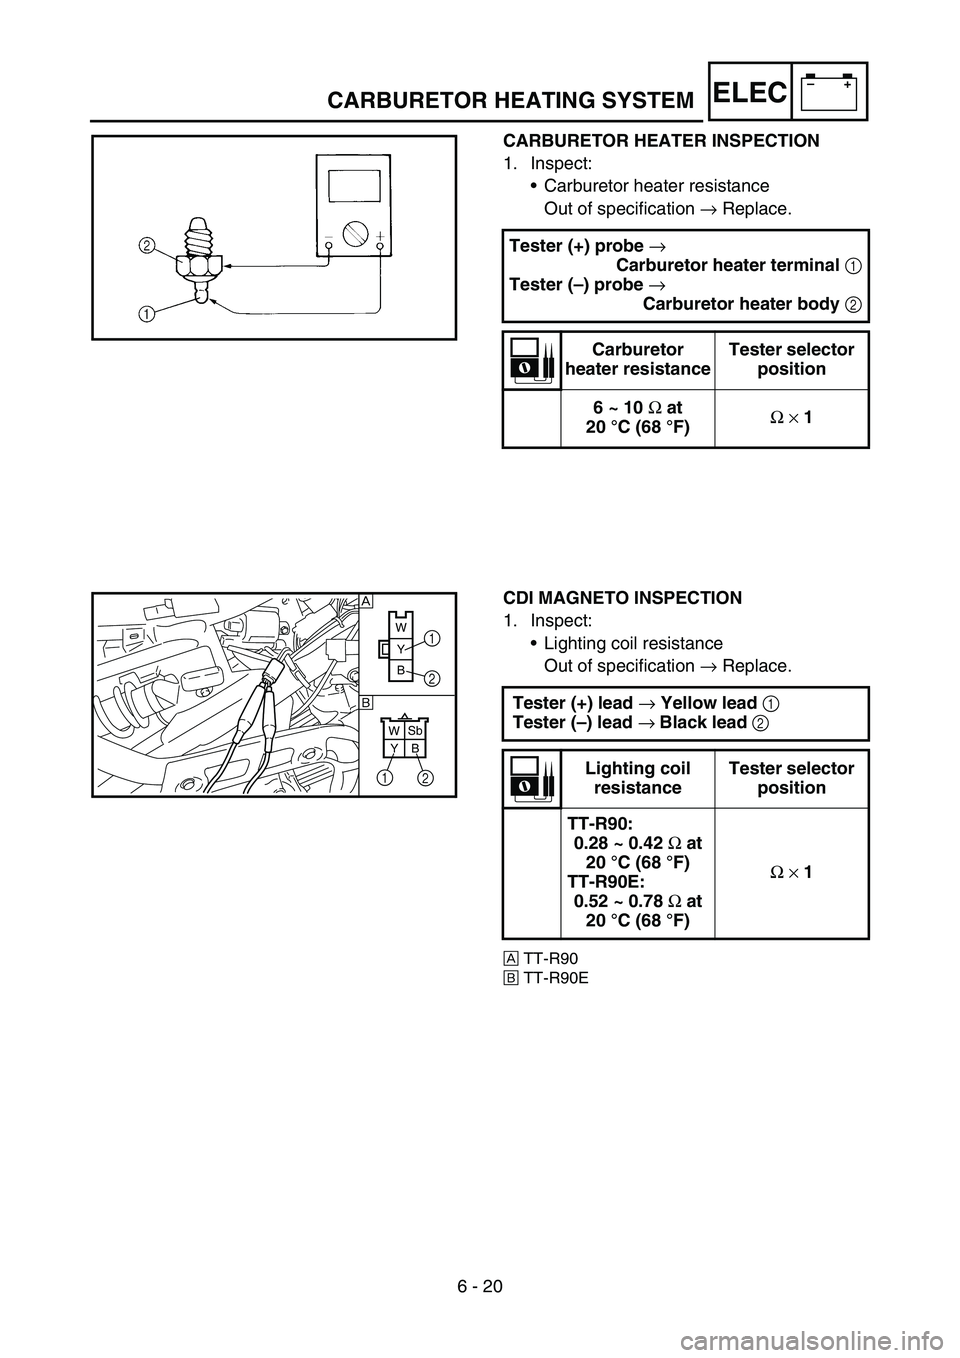
CARBURETOR HEATER INSPECTION
1. Inspect:
Carburetor heater resistance
Out of specification → Replace.
Tester (+) probe
→
Carburetor heater terminal
1
Tester (–) probe
→
Carburetor heater body
2
Carburetor
heater resistanceTester selector
position
6 ~ 10
Ω at
20 °C (68 °F)Ω
× 1
CDI MAGNETO INSPECTION
1. Inspect:
Lighting coil resistance
Out of specification → Replace.
ÈTT-R90
ÉTT-R90E
Tester (+) lead
→ Yellow lead
1
Tester (–) lead
→ Black lead
2
Lighting coil
resistanceTester selector
position
TT-R90:
0.28 ~ 0.42
Ω at
20 °C (68 °F)
TT-R90E:
0.52 ~ 0.78
Ω at
20 °C (68 °F)Ω
× 1
W
Y
B
WSb
YB
1
2
1
2
È
É