YAMAHA V1 2016 ΟΔΗΓΌΣ ΧΡΉΣΗΣ (in Greek)
Manufacturer: YAMAHA, Model Year: 2016, Model line: V1, Model: YAMAHA V1 2016Pages: 174, PDF Size: 3.15 MB
Page 11 of 174
–6–
Exercise 2: Starting and stopping engine
Objective:
This exercise teaches you about how the engine starts and stops and how the watercraft
behaves after starting and while idling.
Skills:
Identifying and performing engine starting and stopping controls and procedures.
Directions:
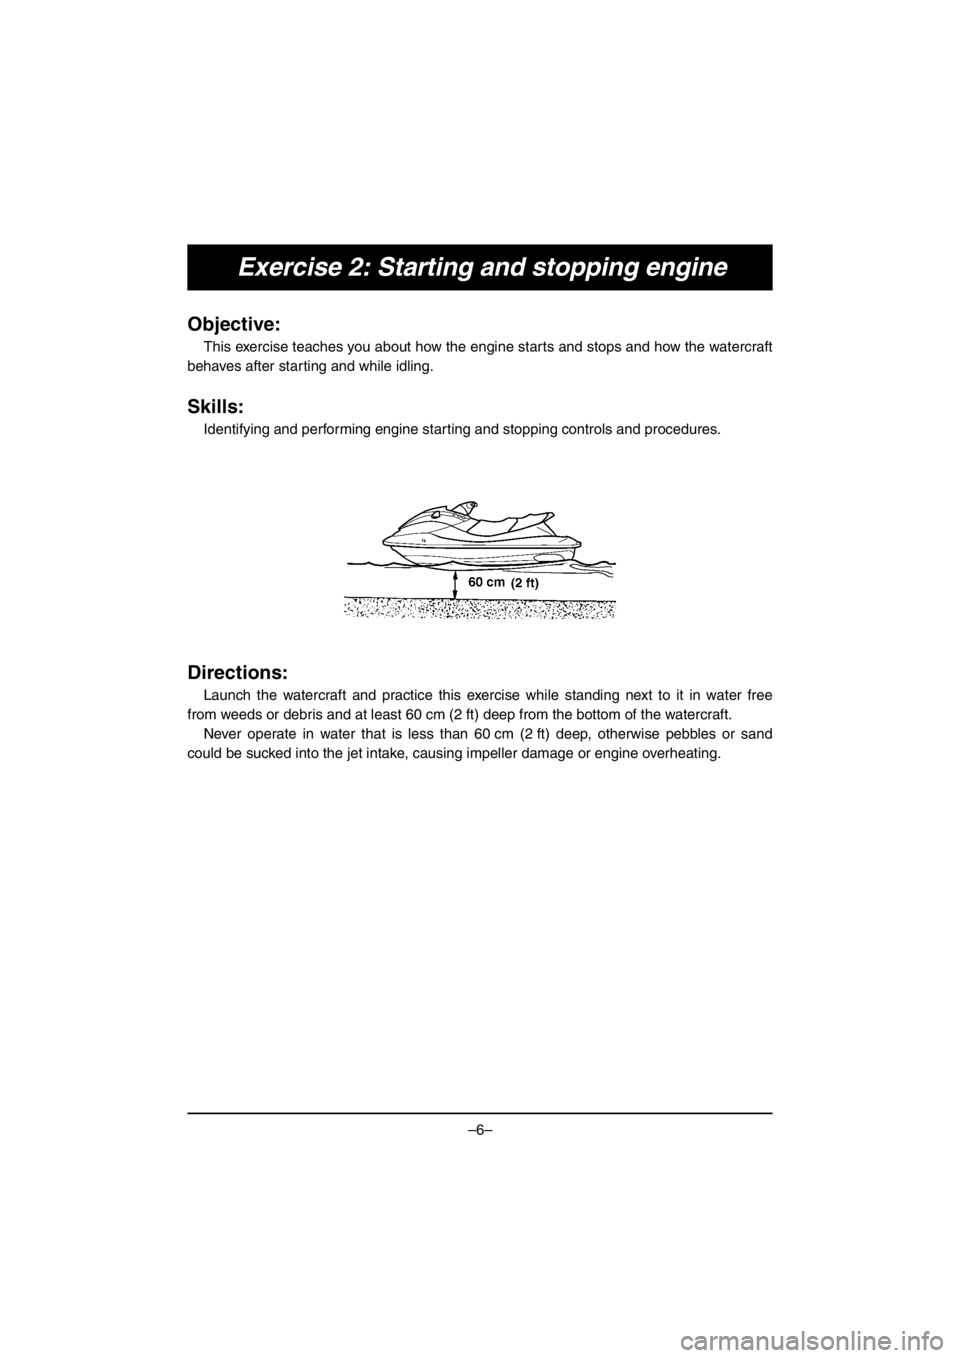
Launch the watercraft and practice this exercise while standing next to it in water free
from weeds or debris and at least 60 cm (2 ft) deep from the bottom of the watercraft.
Never operate in water that is less than 60 cm (2 ft) deep, otherwise pebbles or sand
could be sucked into the jet intake, causing impeller damage or engine overheating.
E_F4F-70-forPrint.book Page 6 Wednesday, November 4, 2015 4:58 PM
Page 12 of 174
–7–
Exercise 2: Starting and stopping engine
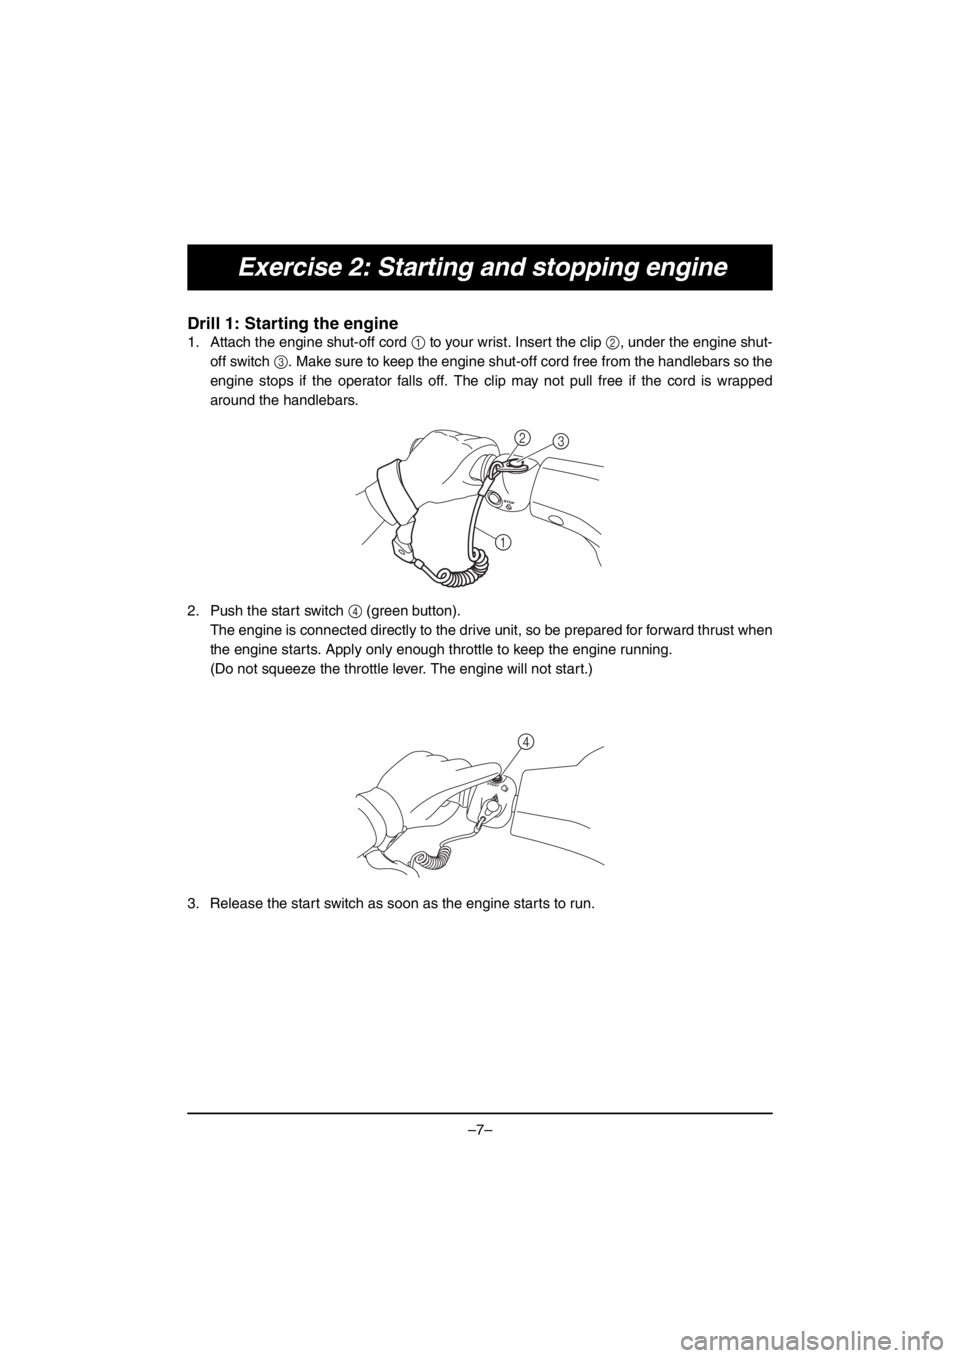
Drill 1: Starting the engine
1. Attach the engine shut-off cord 1 to your wrist. Insert the clip 2, under the engine shut-
off switch 3. Make sure to keep the engine shut-off cord free from the handlebars so the
engine stops if the operator falls off. The clip may not pull free if the cord is wrapped
around the handlebars.
2. Push the start switch 4 (green button).
The engine is connected directly to the drive unit, so be prepared for forward thrust when
the engine starts. Apply only enough throttle to keep the engine running.
(Do not squeeze the throttle lever. The engine will not start.)
3. Release the start switch as soon as the engine starts to run.
2
3
1
STAR
T
4
E_F4F-70-forPrint.book Page 7 Wednesday, November 4, 2015 4:58 PM
Page 13 of 174
–8–
Exercise 2: Starting and stopping engine
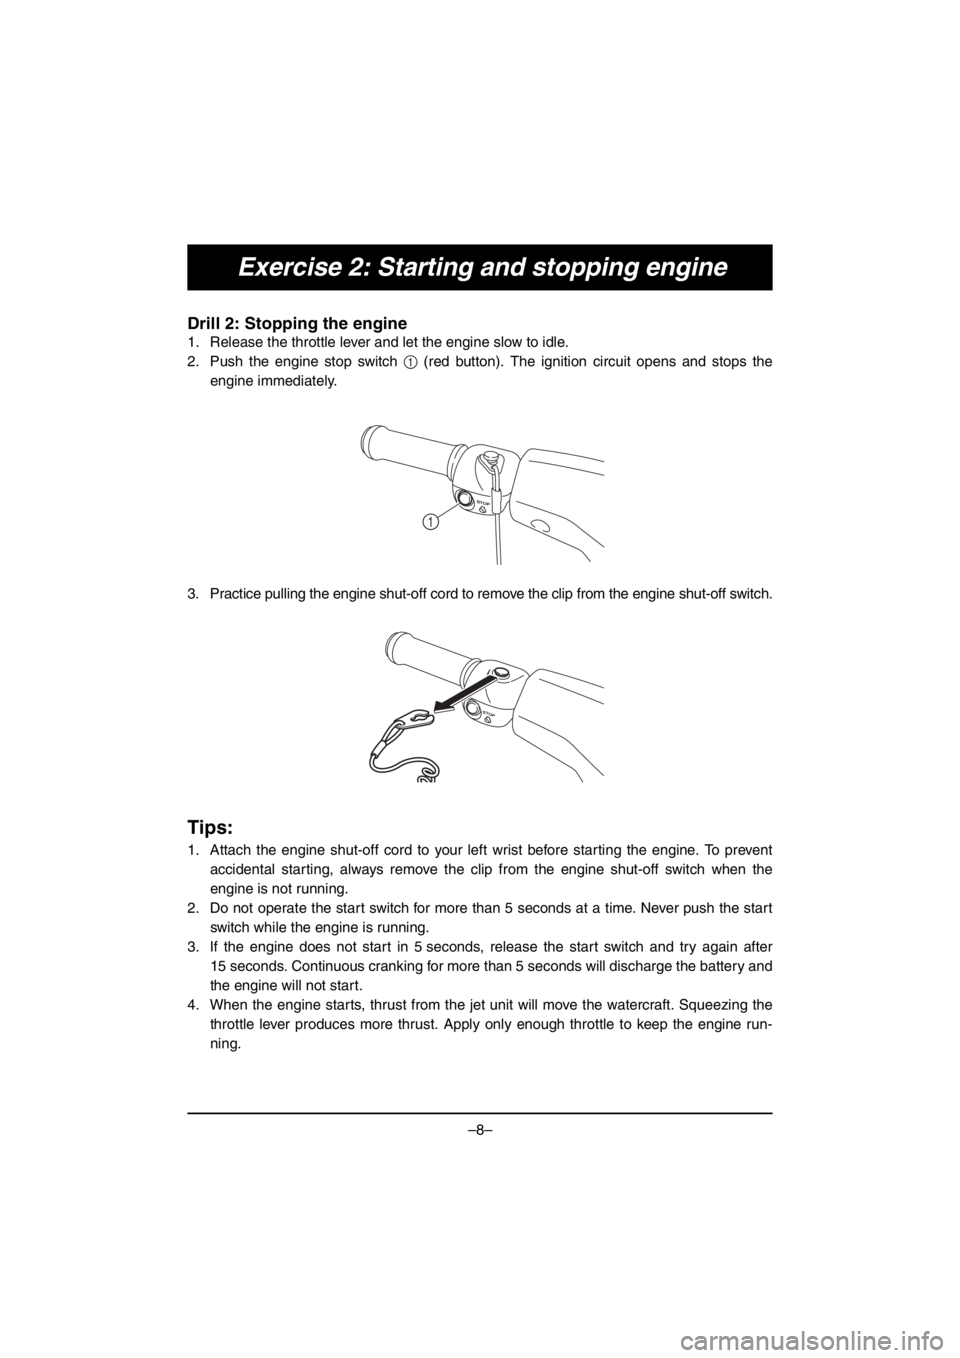
Drill 2: Stopping the engine
1. Release the throttle lever and let the engine slow to idle.
2. Push the engine stop switch 1 (red button). The ignition circuit opens and stops the
engine immediately.
3. Practice pulling the engine shut-off cord to remove the clip from the engine shut-off switch.
Tips:
1. Attach the engine shut-off cord to your left wrist before starting the engine. To prevent
accidental starting, always remove the clip from the engine shut-off switch when the
engine is not running.
2. Do not operate the start switch for more than 5 seconds at a time. Never push the start
switch while the engine is running.
3. If the engine does not start in 5 seconds, release the start switch and try again after
15 seconds. Continuous cranking for more than 5 seconds will discharge the battery and
the engine will not start.
4. When the engine starts, thrust from the jet unit will move the watercraft. Squeezing the
throttle lever produces more thrust. Apply only enough throttle to keep the engine run-
ning.
STOP
1
STOP
E_F4F-70-forPrint.book Page 8 Wednesday, November 4, 2015 4:58 PM
Page 14 of 174
–9–
Exercise 3: Boarding and balancing
Objective:
This exercise trains you to board the watercraft in deep water after falling off, and to upright
a capsized watercraft. Repeat these exercises until you can perform them without difficulty.
Skills:
Boarding in deep water and balancing at a standstill.
Directions:
Practice this exercise near shore before going out into open water.
The heavier the weight of an operator, the more difficult it will be to balance the watercraft.
These exercises should be done without starting the engine.
Attach the engine shut-off cord to your wrist and keep the watercraft afloat in water that is
at least chest deep.
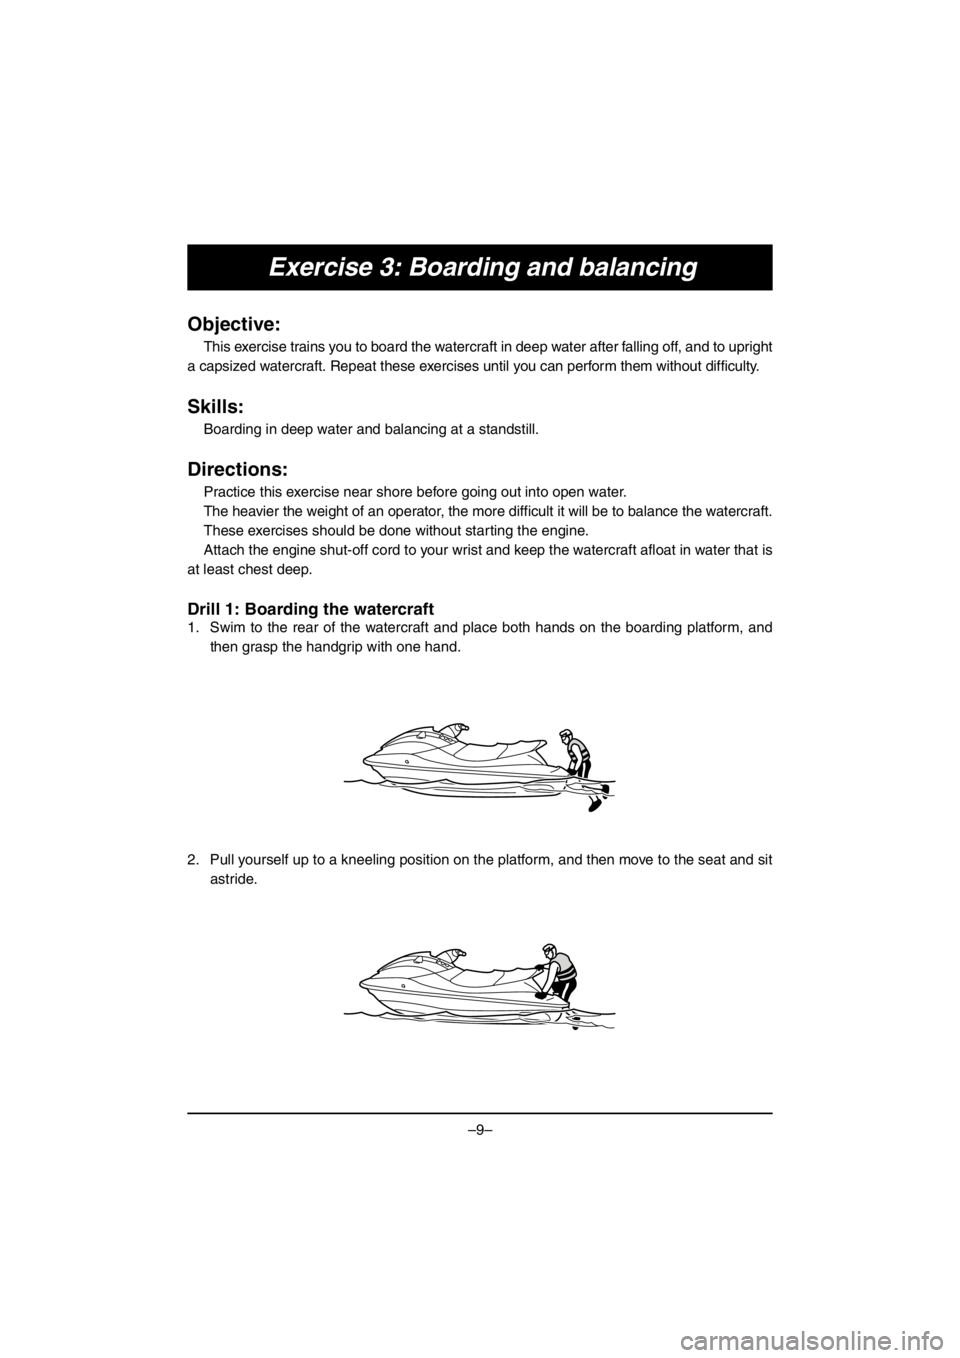
Drill 1: Boarding the watercraft
1. Swim to the rear of the watercraft and place both hands on the boarding platform, and
then grasp the handgrip with one hand.
2. Pull yourself up to a kneeling position on the platform, and then move to the seat and sit
astride.
E_F4F-70-forPrint.book Page 9 Wednesday, November 4, 2015 4:58 PM
Page 15 of 174
–10–
Exercise 3: Boarding and balancing
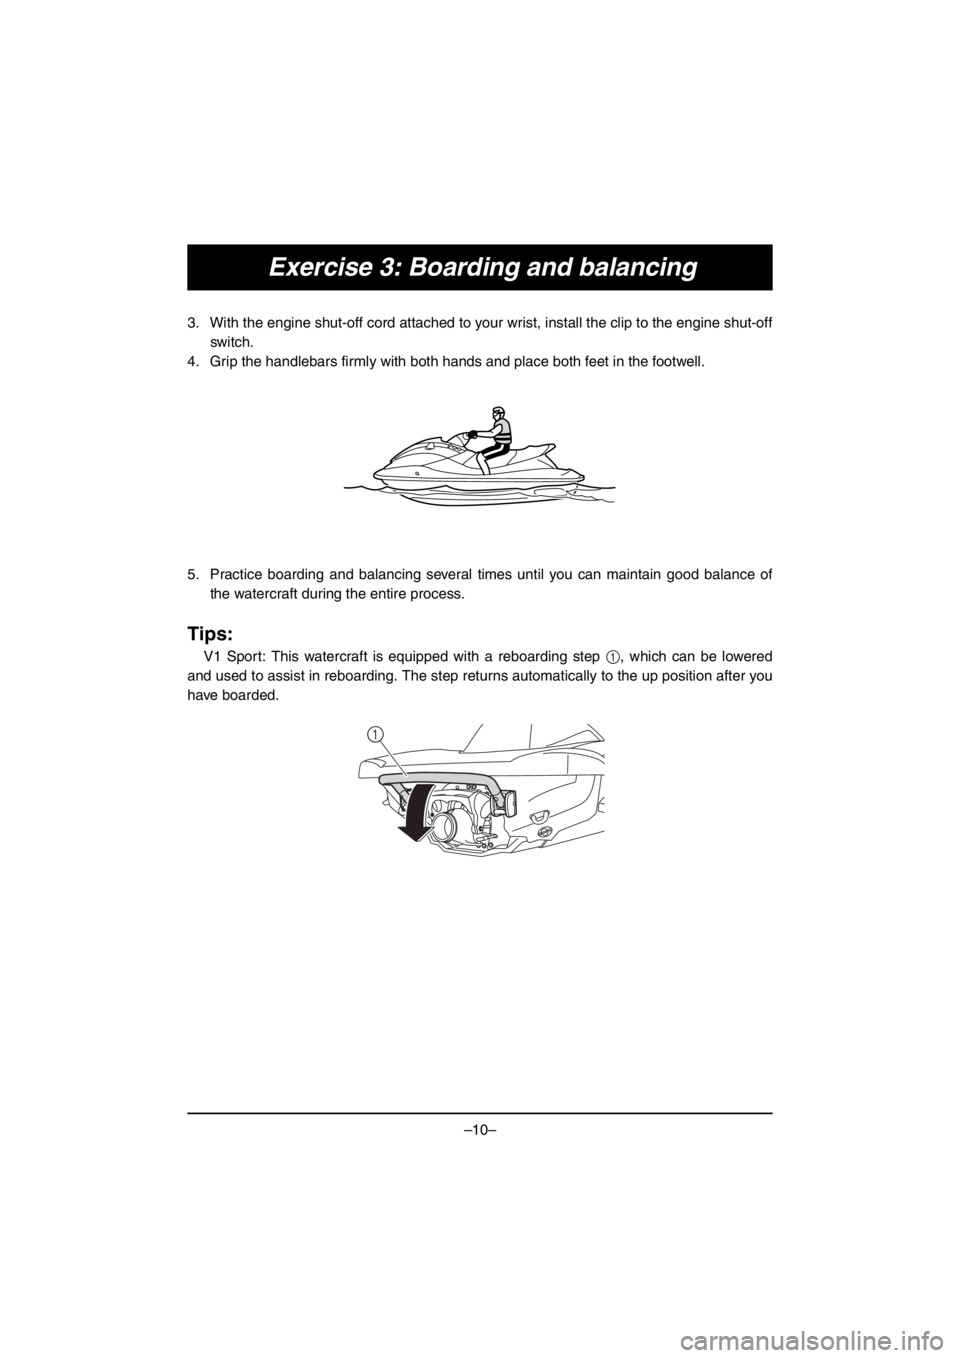
3. With the engine shut-off cord attached to your wrist, install the clip to the engine shut-off
switch.
4. Grip the handlebars firmly with both hands and place both feet in the footwell.
5. Practice boarding and balancing several times until you can maintain good balance of
the watercraft during the entire process.
Tips:
V1 Sport: This watercraft is equipped with a reboarding step 1, which can be lowered
and used to assist in reboarding. The step returns automatically to the up position after you
have boarded.
1
E_F4F-70-forPrint.book Page 10 Wednesday, November 4, 2015 4:58 PM
Page 16 of 174
–11–
Exercise 3: Boarding and balancing
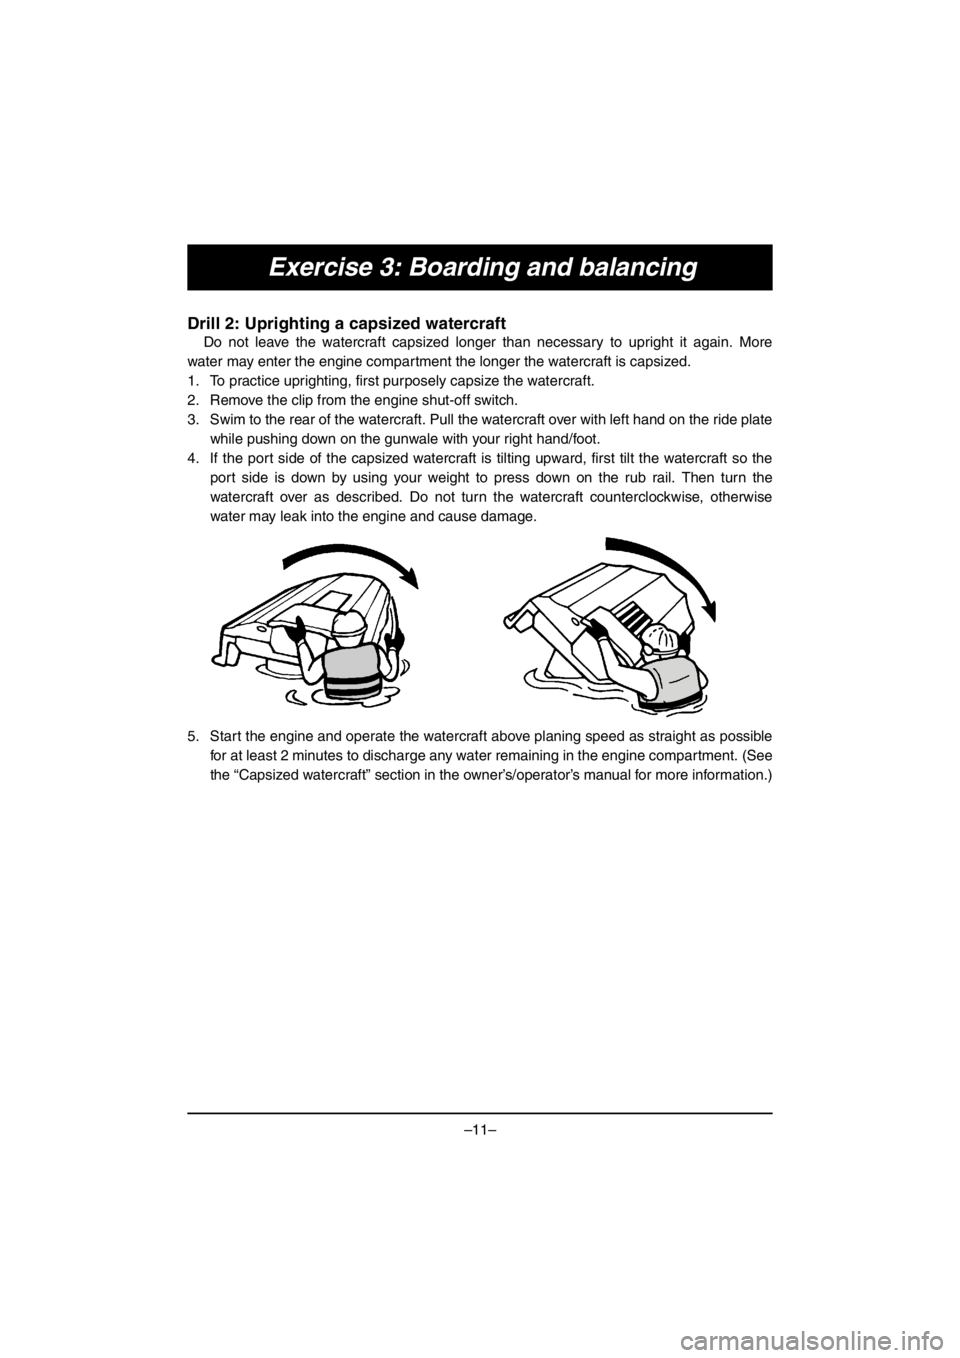
Drill 2: Uprighting a capsized watercraft
Do not leave the watercraft capsized longer than necessary to upright it again. More
water may enter the engine compartment the longer the watercraft is capsized.
1. To practice uprighting, first purposely capsize the watercraft.
2. Remove the clip from the engine shut-off switch.
3. Swim to the rear of the watercraft. Pull the watercraft over with left hand on the ride plate
while pushing down on the gunwale with your right hand/foot.
4. If the port side of the capsized watercraft is tilting upward, first tilt the watercraft so the
port side is down by using your weight to press down on the rub rail. Then turn the
watercraft over as described. Do not turn the watercraft counterclockwise, otherwise
water may leak into the engine and cause damage.
5. Start the engine and operate the watercraft above planing speed as straight as possible
for at least 2 minutes to discharge any water remaining in the engine compartment. (See
the “Capsized watercraft” section in the owner’s/operator’s manual for more information.)
E_F4F-70-forPrint.book Page 11 Wednesday, November 4, 2015 4:58 PM
Page 17 of 174
–12–
Exercise 4: Trolling speed maneuvering
Objective:
This exercise familiarizes you with the watercraft’s handling characteristics at trolling
speed. It teaches techniques you will use when beaching, docking, or approaching objects.
Skills:
Starting and turning at trolling speed.
Directions:
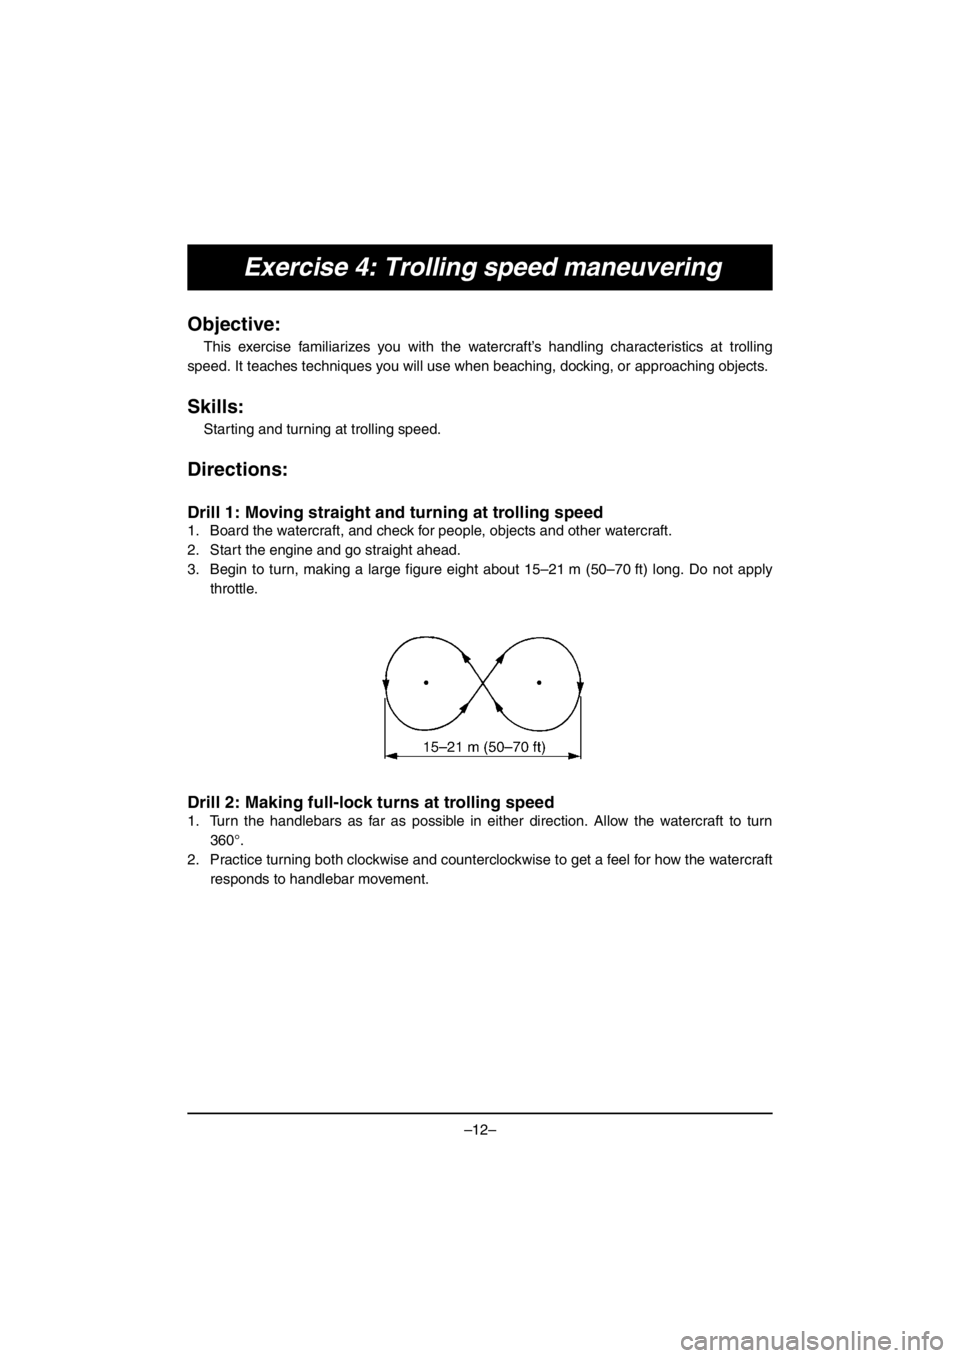
Drill 1: Moving straight and turning at trolling speed
1. Board the watercraft, and check for people, objects and other watercraft.
2. Start the engine and go straight ahead.
3. Begin to turn, making a large figure eight about 15–21 m (50–70 ft) long. Do not apply
throttle.
Drill 2: Making full-lock turns at trolling speed
1. Turn the handlebars as far as possible in either direction. Allow the watercraft to turn
360°.
2. Practice turning both clockwise and counterclockwise to get a feel for how the watercraft
responds to handlebar movement.
E_F4F-70-forPrint.book Page 12 Wednesday, November 4, 2015 4:58 PM
Page 18 of 174
–13–
Exercise 5: Sub-planing speed maneuvering
Objective:
This exercise shows you how to move ahead, turn in small circles, and combine the two
maneuvers to make a figure eight.
Skills:
Throttle control and slow to medium speed turning.
Directions:
Steering
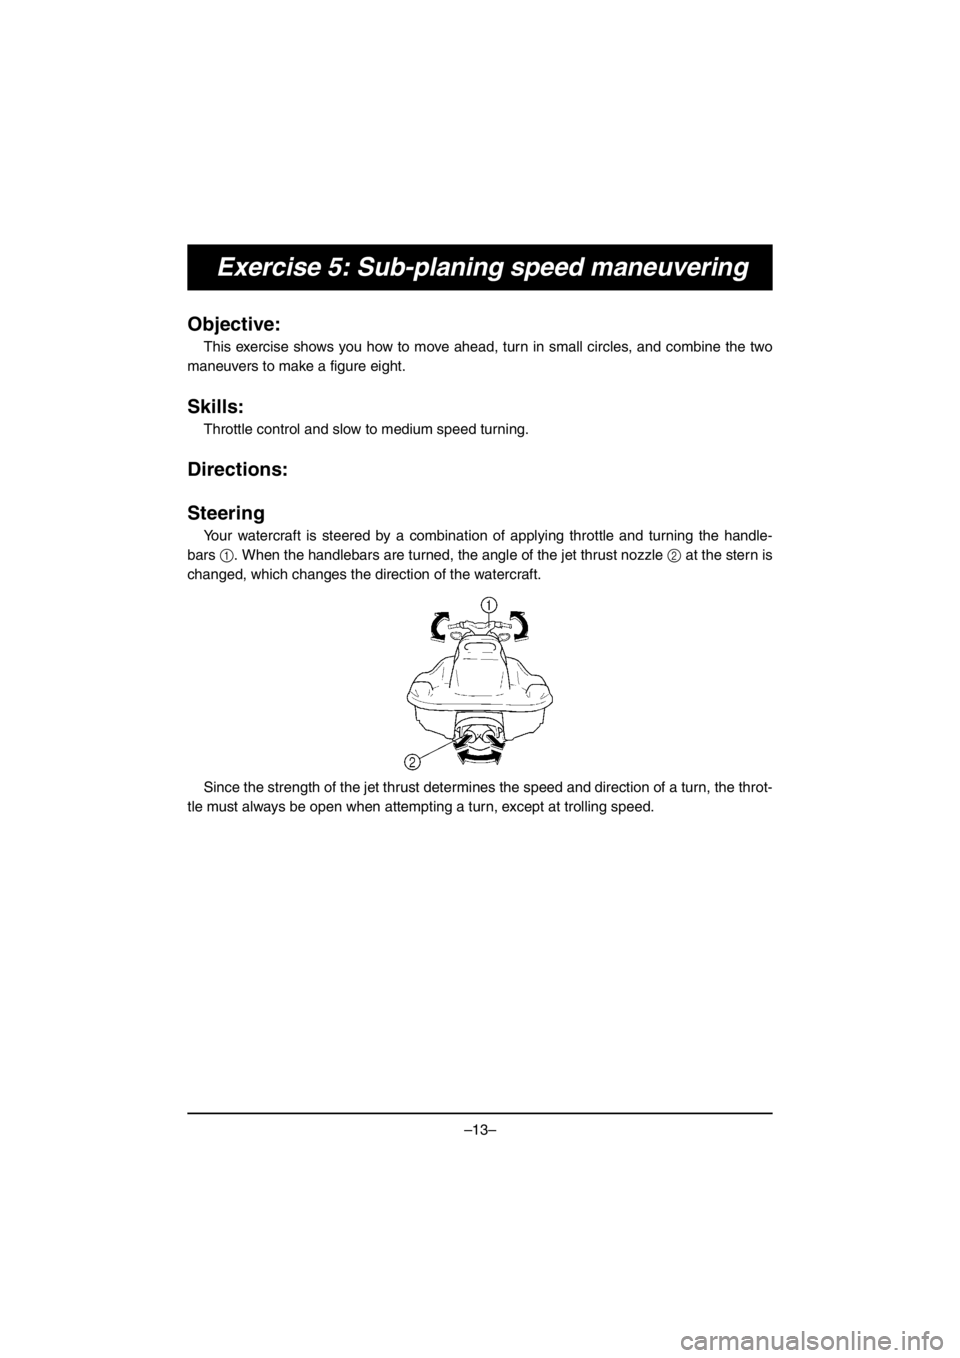
Your watercraft is steered by a combination of applying throttle and turning the handle-
bars 1. When the handlebars are turned, the angle of the jet thrust nozzle 2 at the stern is
changed, which changes the direction of the watercraft.
Since the strength of the jet thrust determines the speed and direction of a turn, the throt-
tle must always be open when attempting a turn, except at trolling speed.
E_F4F-70-forPrint.book Page 13 Wednesday, November 4, 2015 4:58 PM
Page 19 of 174
–14–
Exercise 5: Sub-planing speed maneuvering
Stopping
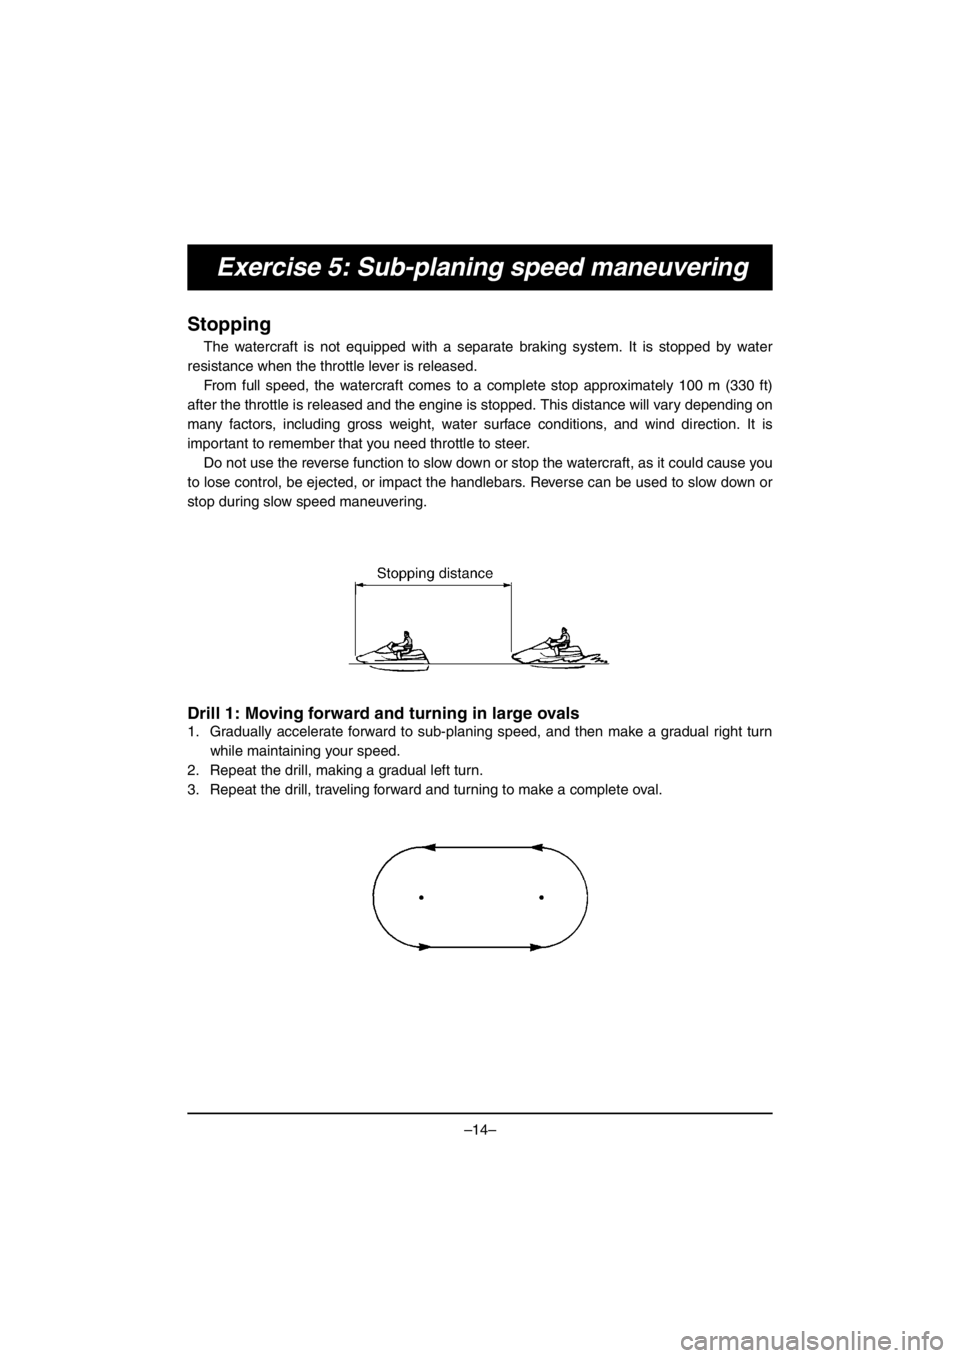
The watercraft is not equipped with a separate braking system. It is stopped by water
resistance when the throttle lever is released.
From full speed, the watercraft comes to a complete stop approximately 100 m (330 ft)
after the throttle is released and the engine is stopped. This distance will vary depending on
many factors, including gross weight, water surface conditions, and wind direction. It is
important to remember that you need throttle to steer.
Do not use the reverse function to slow down or stop the watercraft, as it could cause you
to lose control, be ejected, or impact the handlebars. Reverse can be used to slow down or
stop during slow speed maneuvering.
Drill 1: Moving forward and turning in large ovals
1. Gradually accelerate forward to sub-planing speed, and then make a gradual right turn
while maintaining your speed.
2. Repeat the drill, making a gradual left turn.
3. Repeat the drill, traveling forward and turning to make a complete oval.
E_F4F-70-forPrint.book Page 14 Wednesday, November 4, 2015 4:58 PM
Page 20 of 174
–15–
Exercise 5: Sub-planing speed maneuvering
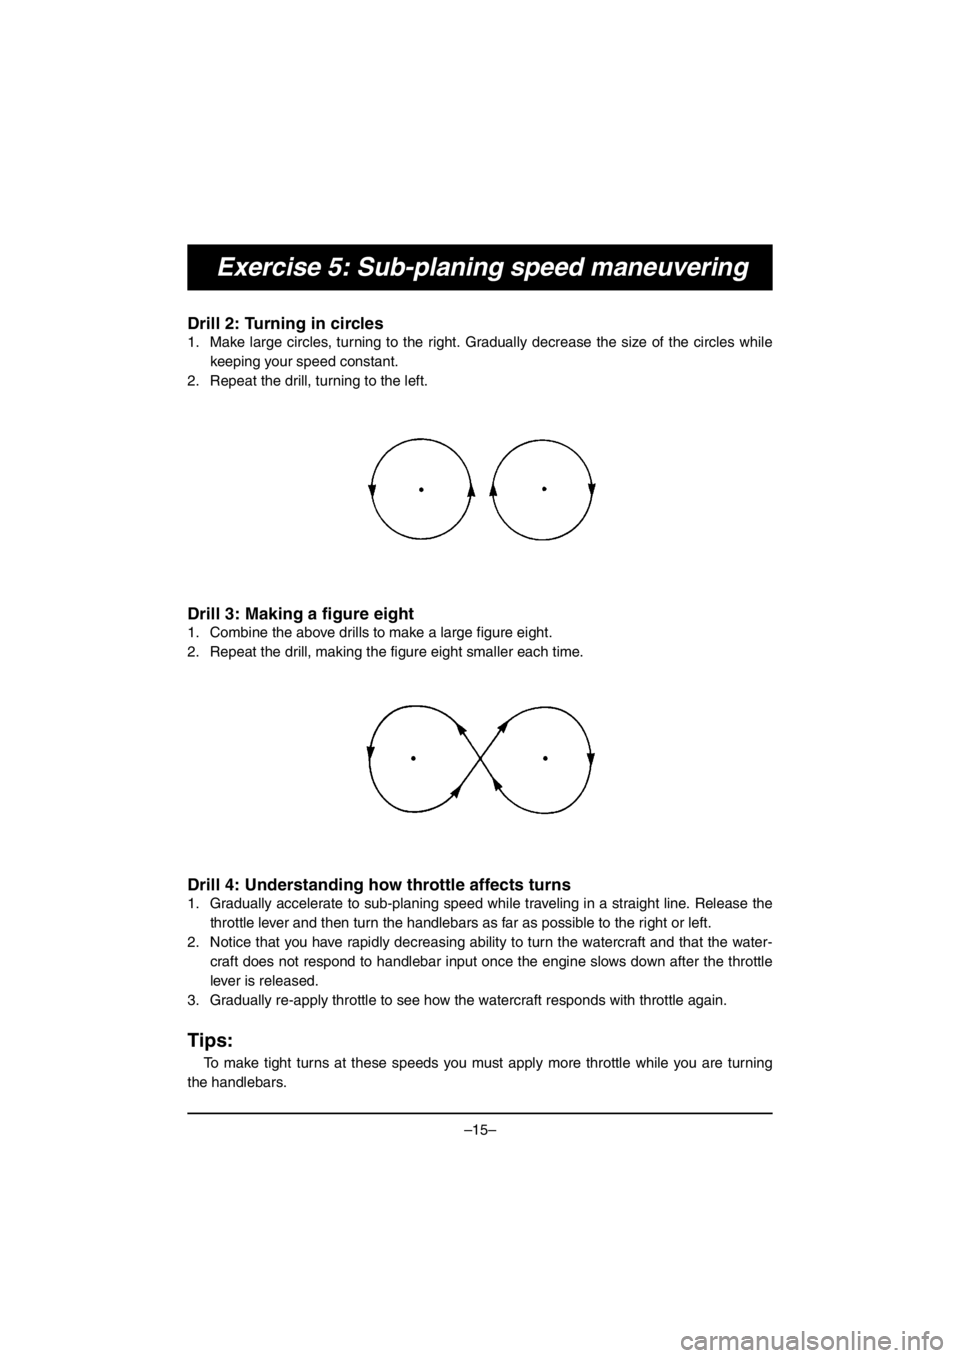
Drill 2: Turning in circles
1. Make large circles, turning to the right. Gradually decrease the size of the circles while
keeping your speed constant.
2. Repeat the drill, turning to the left.
Drill 3: Making a figure eight
1. Combine the above drills to make a large figure eight.
2. Repeat the drill, making the figure eight smaller each time.
Drill 4: Understanding how throttle affects turns
1. Gradually accelerate to sub-planing speed while traveling in a straight line. Release the
throttle lever and then turn the handlebars as far as possible to the right or left.
2. Notice that you have rapidly decreasing ability to turn the watercraft and that the water-
craft does not respond to handlebar input once the engine slows down after the throttle
lever is released.
3. Gradually re-apply throttle to see how the watercraft responds with throttle again.
Tips:
To make tight turns at these speeds you must apply more throttle while you are turning
the handlebars.
E_F4F-70-forPrint.book Page 15 Wednesday, November 4, 2015 4:58 PM