ignition YAMAHA VIKING 2014 Owners Manual
[x] Cancel search | Manufacturer: YAMAHA, Model Year: 2014, Model line: VIKING, Model: YAMAHA VIKING 2014Pages: 180, PDF Size: 3.78 MB
Page 66 of 180
5-4
5
6
7
8
9
10
11
12
13
14
EVU00400FuelMake sure there is sufficient fuel in the tank.
WARNING
Gasoline and gasoline vapors are ex-
tremely flammable. To avoid fires and ex-
plosions and to reduce the risk of injury
when refueling, follow these instructions.1. Before refueling, turn off the engine and be sure that no one is sitting in the vehi-
cle.
Never refuel while smoking, or while in
the vicinity of sparks, open flames, or oth-
er sources of ignition such as the pilot
lights of water heaters and clothes dry-
ers.
2. Do not overfill the fuel tank. Because fuel
expands when it heats up, heat from the
engine or the sun can cause fuel to spill
out of the fuel tank.
3. Wipe up any spilled fuel immediately. 4. Be sure the fuel tank cap is closed se-
curely.
WARNING
Gasoline is poisonous and can cause inju-
ry or death. Handle gasoline with care.
Never siphon gasoline by mouth. If you
should swallow some gasoline or inhale a
lot of gasoline vapor, or get some gasoline
in your eyes, see your doctor immediately.
If gasoline spills on your skin, wash with
soap and water. If gasoline spills on your
clothing, change your clothes.Your Yamaha engine has been designed to
use regular unleaded gasoline with a re-
search octane number of 91 or higher (95 or
higher for Europe). If knocking or pinging oc-
curs, use a different brand of gasoline or pre-
mium unleaded gasoline. Unleaded fuel will
give you longer spark plug life and reduced
maintenance cost.
1XP7B_EE.book Page 4 Tuesday, February 4, 2014 3:40 PM
Page 87 of 180
7-3
1
2
3
4
5
67
8
9
10
11
12
13
14
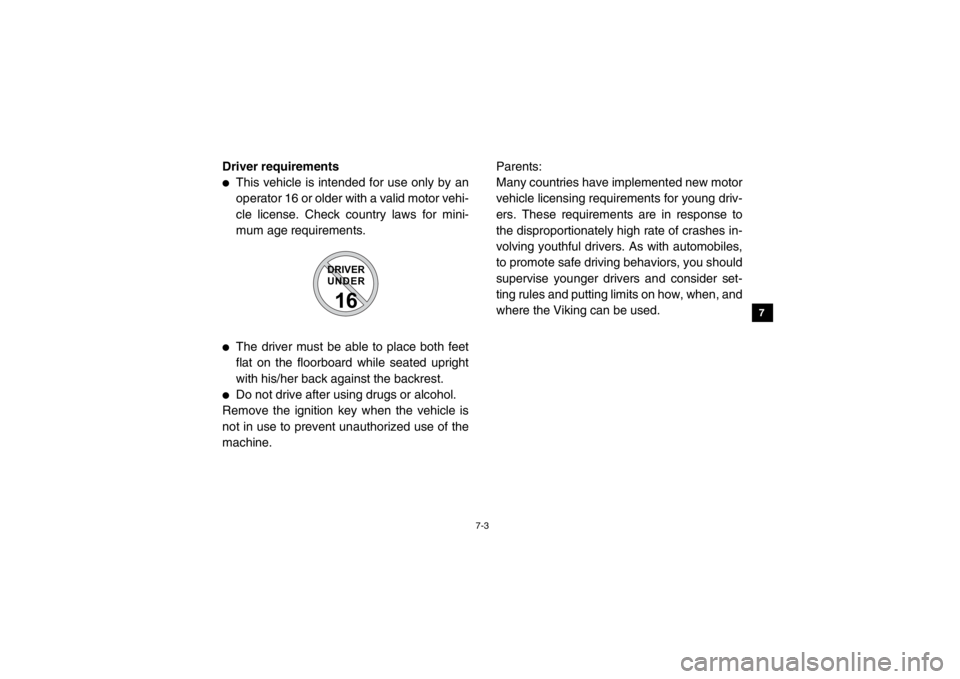
Driver requirements●
This vehicle is intended for use only by an
operator 16 or older with a valid motor vehi-
cle license. Check country laws for mini-
mum age requirements.
●
The driver must be able to place both feet
flat on the floorboard while seated upright
with his/her back against the backrest.
●
Do not drive after using drugs or alcohol.
Remove the ignition key when the vehicle is
not in use to prevent unauthorized use of the
machine. Parents:
Many countries have implemented new motor
vehicle licensing requirements for young driv-
ers. These requirements are in response to
the disproportionately high rate of crashes in-
volving youthful drivers. As with automobiles,
to promote safe driving behaviors, you should
supervise younger drivers and consider set-
ting rules and putting limits on how, when, and
where the Viking can be used.
DRIVER
UNDER16
1XP7B_EE.book Page 3 Tuesday, February 4, 2014 3:40 PM
Page 152 of 180
8-42
8
9
10
11
12
13
14
WARNING
Avoid battery contact with skin, eyes, or
clothing. Shield eyes when working near
batteries. Keep out of reach of children.
You could be poisoned or severely burned
by the sulfuric acid in battery electrolyte.
In case of accidental contact with battery
electrolyte:
EXTERNAL: Flush with water.
INTERNAL: Drink large quantities of water
or milk. Follow with milk of magnesia,
beaten egg, or vegetable oil. Get prompt
medical attention.
EYES: Flush with water for 15 minutes and
get prompt medical attention.
WARNING
Batteries may produce explosive gases.
Ventilate when charging or using in a
closed space. Keep batteries away from
sparks, flames, cigarettes, or other sourc-
es of ignition.
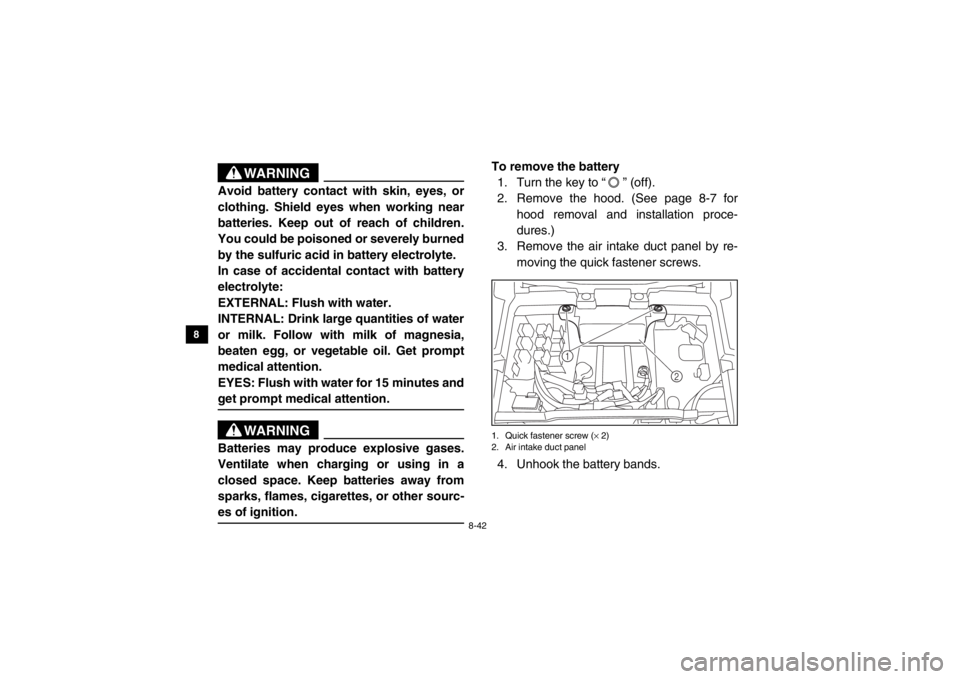
To remove the battery 1. Turn the key to “ ” (off).
2. Remove the hood. (See page 8-7 for hood removal and installation proce-
dures.)
3. Remove the air intake duct panel by re-
moving the quick fastener screws.1. Quick fastener screw ( × 2)
2. Air intake duct panel4. Unhook the battery bands.
2
1
1XP7B_EE.book Page 42 Tuesday, February 4, 2014 3:40 PM
Page 158 of 180
8-48
8
9
10
11
12
13
14
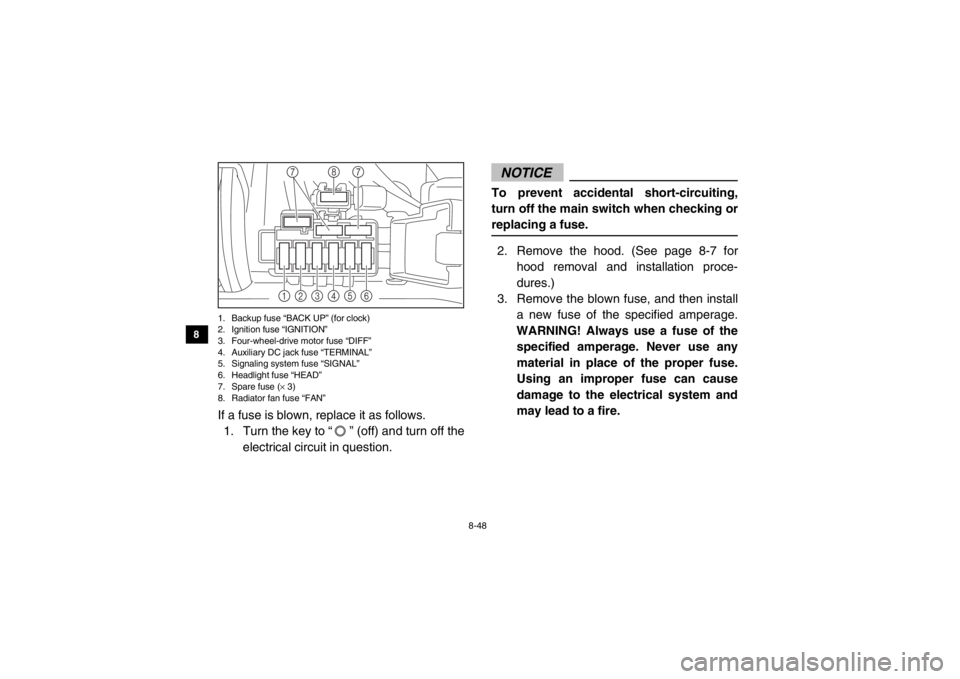
1. Backup fuse “BACK UP” (for clock)
2. Ignition fuse “IGNITION”
3. Four-wheel-drive motor fuse “DIFF”
4. Auxiliary DC jack fuse “TERMINAL”
5. Signaling system fuse “SIGNAL”
6. Headlight fuse “HEAD”
7. Spare fuse ( × 3)
8. Radiator fan fuse “FAN”If a fuse is blown, replace it as follows.
1. Turn the key to “ ” (off) and turn off the
electrical circuit in question.
NOTICETo prevent accidental short-circuiting,
turn off the main switch when checking or
replacing a fuse.2. Remove the hood. (See page 8-7 for hood removal and installation proce-
dures.)
3. Remove the blown fuse, and then install a new fuse of the specified amperage.
WARNING! Always use a fuse of the specified amperage. Never use any
material in place of the proper fuse.
Using an improper fuse can cause
damage to the electrical system and
may lead to a fire.
1
2
3
4
5
6
8
7
7
1XP7B_EE.book Page 48 Tuesday, February 4, 2014 3:40 PM
Page 159 of 180
8-49
1
2
3
4
5
6
78
9
10
11
12
13
14
4. Turn the key to “ ” (on) and turn on theelectrical circuit in question to check if the
device operates. If the fuse blows again
immediately, have a Yamaha dealer
check the electrical system.
5. Install the hood.
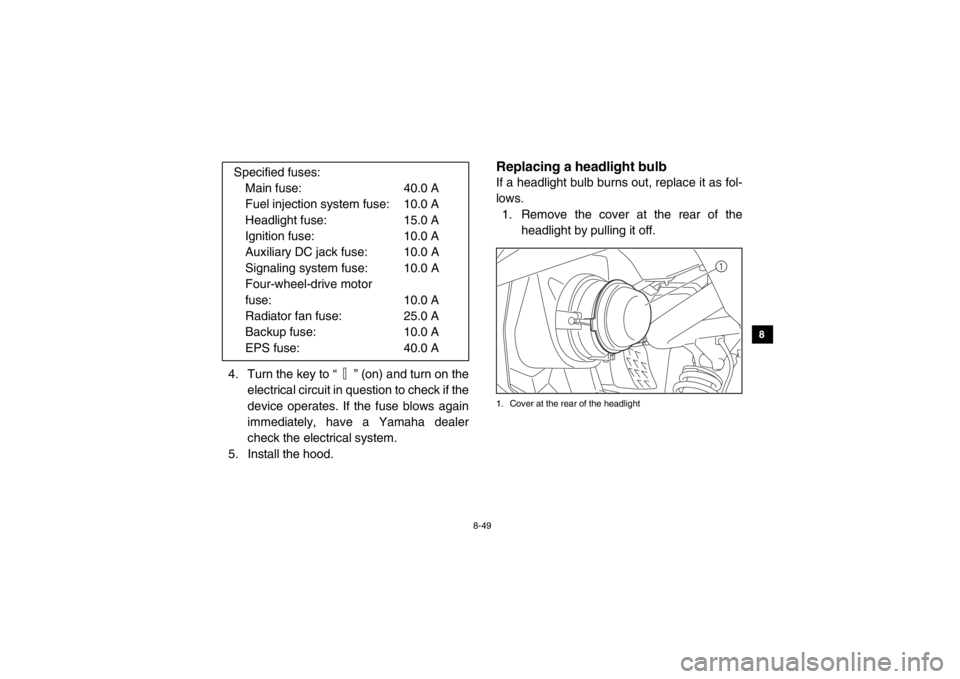
EVU01670Replacing a headlight bulbIf a headlight bulb burns out, replace it as fol-
lows. 1. Remove the cover at the rear of the headlight by pulling it off.1. Cover at the rear of the headlight
Specified fuses:Main fuse: 40.0 A
Fuel injection system fuse: 10.0 A
Headlight fuse: 15.0 A
Ignition fuse: 10.0 A
Auxiliary DC jack fuse: 10.0 A
Signaling system fuse: 10.0 A
Four-wheel-drive motor
fuse: 10.0 A
Radiator fan fuse: 25.0 A
Backup fuse: 10.0 A
EPS fuse: 40.0 A
1
1XP7B_EE.book Page 49 Tuesday, February 4, 2014 3:40 PM
Page 165 of 180
8-55
1
2
3
4
5
6
78
9
10
11
12
13
14
EVU01010TroubleshootingAlthough Yamaha vehicles receive an inspec-
tion before shipment from the factory, trouble
may occur during operation. Any problem in
the fuel, compression, or ignition systems can
cause poor starting and loss of power. The
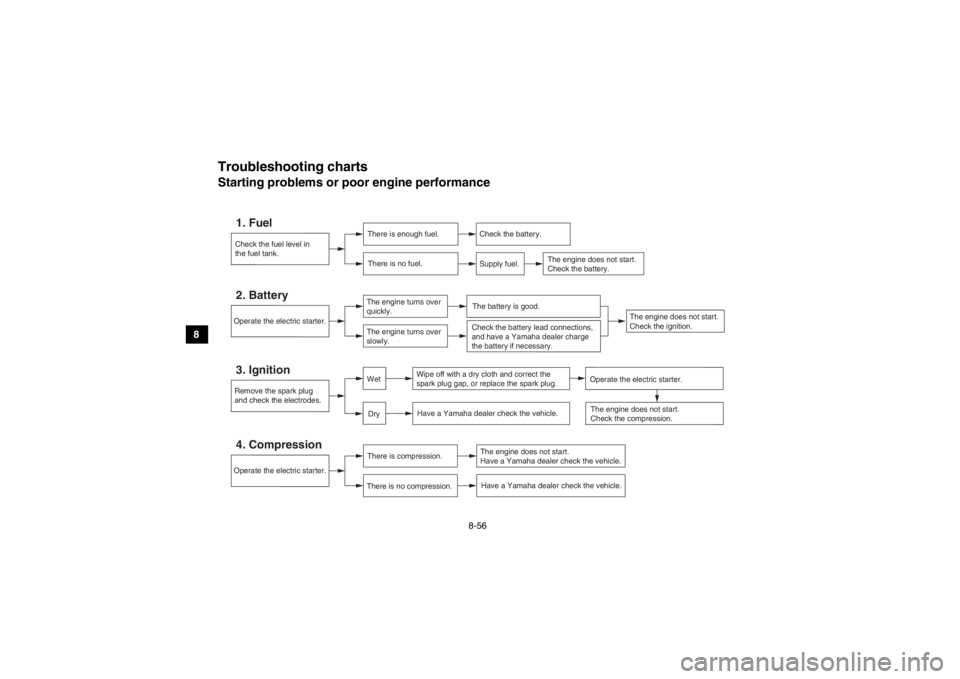
troubleshooting chart describes a quick, easy
procedure for making checks. If your vehicle
requires any repair, take it to a Yamaha deal-
er.
The skilled technicians at a Yamaha dealer-
ship have the tools, experience, and know-
how to properly service your vehicle. Use only
genuine Yamaha parts on your vehicle. Imita-
tion parts may look like Yamaha parts, but
they are often inferior. Consequently, they
have a shorter service life and can lead to ex-
pensive repair bills.
WARNING
When checking the fuel system, do not
smoke and make sure there are no open
flames or sparks in the area, including pi-
lot lights from water heaters or furnaces.
Gasoline or gasoline vapors can ignite or
explode, causing severe injury or property
damage.
1XP7B_EE.book Page 55 Tuesday, February 4, 2014 3:40 PM
Page 166 of 180
8-56
8
9
10
11
12
13
14
5B410024Troubleshooting chartsStarting problems or poor engine performance
Check the fuel level in
the fuel tank.1. Fuel
There is enough fuel.
There is no fuel.
Check the battery.
Supply fuel.
The engine does not start.
Check the battery.
Operate the electric starter.4. Compression
There is compression.
There is no compression.
The engine does not start.
Have a Yamaha dealer check the vehicle.Have a Yamaha dealer check the vehicle.
Remove the spark plug
and check the electrodes.3. Ignition
Wipe off with a dry cloth and correct the
spark plug gap, or replace the spark plug. Have a Yamaha dealer check the vehicle.
The engine does not start.
Check the compression.
Operate the electric starter.2. Battery
The engine turns over
quickly.
The engine turns over
slowly.
The battery is good.
DryWet
Operate the electric starter.
Check the battery lead connections,
and have a Yamaha dealer charge
the battery if necessary.
The engine does not start.
Check the ignition.
1XP7B_EE.book Page 56 Tuesday, February 4, 2014 3:40 PM
Page 174 of 180

10-4
10
11
12
13
14
Vehicle load: 300 kg – maximum (661 lb – maximum):
Front:70.0 kPa (0.700 kgf/cm
2, 10 psi)
Rear:
120.0 kPa (1.200 kgf/cm2, 17 psi)
Front wheel:Wheel type:Cast wheel
Rim size:
12 × 6.0ATRear wheel:Wheel type:
Cast wheel
Rim size:
12 × 7.5ATFront brake:Type:
Disc brake
Operation:
Unified brake
Recommended fluid: DOT 4Rear brake:Type:
Disc brake
Operation: Unified brake
Recommended fluid: DOT 4
Front suspension:Type:Double wishbone
Spring/shock absorber type:
Coil spring/gas-oil damper
Wheel travel: 205 mm (8.1 in)Rear suspension:Type:
Double wishbone
Spring/shock absorber type: Coil spring/gas-oil damper
Wheel travel: 205 mm (8.1 in)Electrical system:Ignition system:TCI
Charging system: AC magnetoBattery:Model:U1-H11L
Voltage, capacity: 12 V, 28.0 AhHeadlight:Bulb type:Halogen bulbBulb voltage, wattage
× quantity:
Headlight:
12 V, 35.0/35.0 W × 2
Tail/brake light: 12 V, 5.0/21.0 W × 2
1XP7B_EE.book Page 4 Tuesday, February 4, 2014 3:40 PM
Page 175 of 180

10-5
1
2
3
4
5
6
7
8
910
11
12
13
14
Neutral indicator light:LED
Reverse indicator light: LED
Coolant temperature warning light:
LED
Engine trouble warning light: LED
Parking brake indicator light: LED
On-Command four-wheel-drive/differential gear lock indica-
tor: LCD
High-range indicator light:
LED
Low-range indicator light: LED
Differential gear lock indicator light: LED
EPS warning light:
LED
Helmet/Seat belt indicator light: 14 V, 0.85 W × 2Fuses:Main fuse:
40.0 A
Fuel injection system fuse: 10.0 A
EPS fuse: 40.0 A
Headlight fuse:
15.0 A Signaling system fuse:
10.0 A
Ignition fuse: 10.0 A
Auxiliary DC jack fuse:
10.0 A
Backup fuse: 10.0 A
Four-wheel-drive motor fuse: 10.0 A
Radiator fan fuse:
25.0 A
For Europe only
The figures quoted are emission levels and
are not necessarily safe working levels. Whilst
there is a correlation between the emission
and exposure levels, this cannot be used reli-
ably to determine whether or not further pre-
cautions are required.
Factors that influence the actual level of expo-
sure of work-force include the characteristics
of the work room, the other sources of noise,
etc. i.e. the number of machines and other ad-
jacent processes, and the length of time for
which an operator is exposed to the noise.
Also the permissible exposure level can vary
1XP7B_EE.book Page 5 Tuesday, February 4, 2014 3:40 PM