light YAMAHA VIKING 2014 Owners Manual
[x] Cancel search | Manufacturer: YAMAHA, Model Year: 2014, Model line: VIKING, Model: YAMAHA VIKING 2014Pages: 180, PDF Size: 3.78 MB
Page 6 of 180

EVU00050
CONTENTS
LOCATION OF THE WARNING
AND SPECIFICATION LABELS ....... 1-1
SAFETY INFORMATION.................. 1-2
DESCRIPTION ................................. 3-1
INSTRUMENT AND CONTROL
FUNCTIONS ..................................... 4-1Main switch ...................................... 4-1
Indicator lights and warning lights ... 4-2
Multi-function meter unit .................. 4-6
Light switch .................................... 4-12
Horn switch .................................... 4-14
Accelerator pedal .......................... 4-15
Brake pedal ................................... 4-15
Parking brake lever ....................... 4-16
Drive select lever ........................... 4-16
Fuel tank cap ................................. 4-17
Doors ............................................. 4-17
Seats ............................................. 4-18
1234
Adjusting the driver seat position...4-19
Seat belts .......................................4-20
Glove compartment .......................4-21
Storage compartments ..................4-21
Cup holders....................................4-23
Cargo bed ......................................4-24
The front and rear shock absorber assemblies ...................................4-27
Trailer hitch bracket and receiver ........................................4-28
Auxiliary DC jack ............................4-28
FOR YOUR SAFETY –
PRE-OPERATION CHECKS ............5-1 Front and rear brakes ......................5-3
Fuel ..................................................5-4
Engine oil .........................................5-6
Coolant.............................................5-6
Final gear oil ....................................5-7
Differential gear oil ...........................5-7
Accelerator pedal .............................5-7
Seat belts .........................................5-7
Passenger handhold ........................5-8
5
1XP7B_EE.book Page 1 Tuesday, February 4, 2014 3:40 PM
Page 7 of 180

Steering ........................................... 5-8
Fittings and fasteners...................... 5-8
Instruments, lights and switches ..... 5-8
Control cables ................................. 5-8
Tires ................................................ 5-8
OPERATION..................................... 6-1 Engine break-in ............................... 6-1
Starting the engine .......................... 6-2
Drive select lever operation and reverse driving............................... 6-4
On-Command drive knob................ 6-6
Parking ............................................ 6-8
Loading ........................................... 6-8
BASIC GUIDE FOR SAFE USE....... 7-1 KNOW YOUR VEHICLE................. 7-1
Driver requirements ........................ 7-3
Passenger requirements................. 7-4
Occupant protection system ........... 7-4
Protective structure ......................... 7-5
Seat belts ........................................ 7-6
Doors............................................... 7-9 Passenger handhold ....................... 7-9
Seat and shoulder bolsters............ 7-12
Floorboard ..................................... 7-12
Steering wheel ............................... 7-13
LEARNING TO OPERATE YOUR
VEHICLE ..................................... 7-14
Personal protective equipment...... 7-14
Practice for new Yamaha Viking users ............................................ 7-15
Getting ready to ride ...................... 7-16
Turning........................................... 7-16
Accelerating ................................... 7-17
Braking........................................... 7-18
Engine braking............................... 7-18
Leaving the vehicle ........................ 7-19
Parking on a flat area .................... 7-19
Parking on a slope ......................... 7-19
Loading .......................................... 7-20
Operation on different surfaces and terrains.................................. 7-20
Hills ................................................ 7-21
Uphill .............................................. 7-22
Downhill ......................................... 7-23
67
1XP7B_EE.book Page 2 Tuesday, February 4, 2014 3:40 PM
Page 8 of 180

Rough terrain................................. 7-24
Pavement ...................................... 7-24
Water ............................................. 7-24
Loose terrain/slippery terrain......... 7-25
Brush or wooded areas ................. 7-26
Encountering obstacles ................. 7-26
PERIODIC MAINTENANCE AND
ADJUSTMENT .................................. 8-1 Owner’s manual and tool kit ............ 8-2
Periodic maintenance chart for the emission control system ................ 8-4
General maintenance and lubrication chart ............................. 8-5
Hood ................................................ 8-7
Engine oil and oil filter cartridge ...... 8-9
Final gear oil .................................. 8-15
Differential gear oil......................... 8-17
Coolant .......................................... 8-20
Axle boots ...................................... 8-21
Spark plug inspection .................... 8-22
Cleaning the air filter element ....... 8-25 Cleaning the air filter case/duct
check hose ...................................8-29
V-belt case drain plug ....................8-30
Cleaning the spark arrester ...........8-30
Valve clearance .............................8-31
Brakes ............................................8-32
Checking the front and rear brake pads .............................................8-32
Checking the parking brake pads .............................................8-33
Checking the brake fluid level........8-33
Brake fluid replacement .................8-34
Checking the brake pedal ..............8-35
Parking brake lever free play
adjustment ...................................8-35
Brake light switch adjustment ........8-36
Cable inspection and lubrication....8-37
Brake pedal and accelerator pedal lubrication.....................................8-37
Checking the stabilizer bushes ......8-38
Rear knuckle upper and lower
pivot lubrication (left and right).....8-38
Steering shaft lubrication ...............8-39
81XP7B_EE.book Page 3 Tuesday, February 4, 2014 3:40 PM
Page 9 of 180

Wheel removal .............................. 8-39
Tire replacement ........................... 8-40
Wheel installation .......................... 8-41
Battery ........................................... 8-41
Jump-starting ................................ 8-45
Fuse replacement ......................... 8-47
Replacing a headlight bulb ........... 8-49
Headlight beam adjustment .......... 8-52
Tail/brake light bulb replacement ................................ 8-53
Troubleshooting ............................ 8-55
Troubleshooting charts ................. 8-56
CLEANING AND STORAGE............ 9-1 Cleaning .......................................... 9-1
Storage............................................ 9-2
SPECIFICATIONS.......................... 10-1
CONSUMER INFORMATION ........ 11-1 Identification number records ....... 11-1
910111XP7B_EE.book Page 4 Tuesday, February 4, 2014 3:40 PM
Page 31 of 180
3-1
1
23
4
5
6
7
8
9
10
11
12
13
14
EVU00080
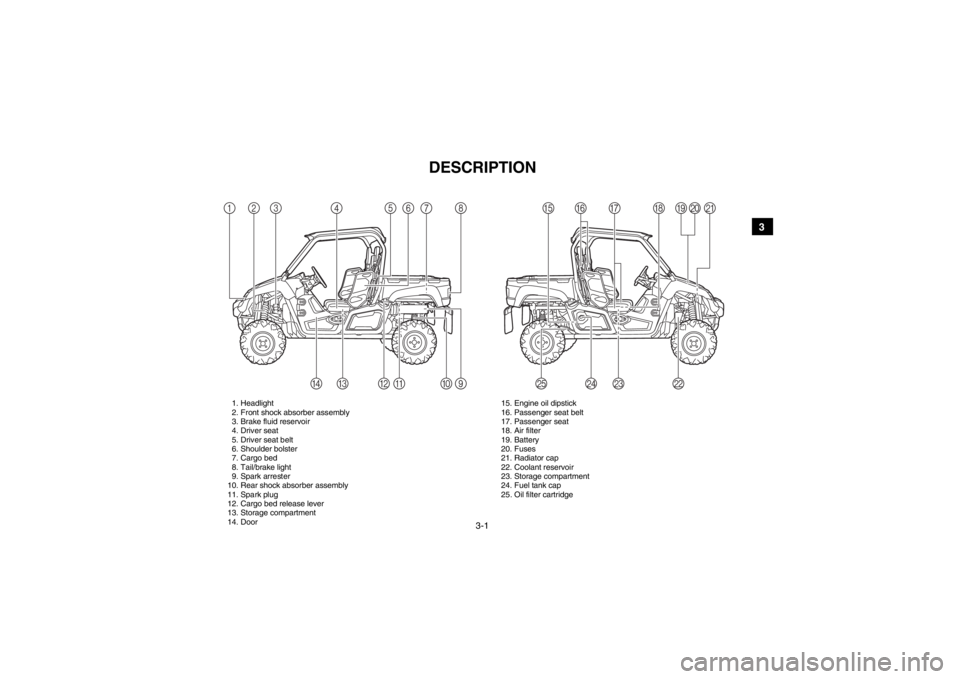
1-DESCRIPTION
1. Headlight
2. Front shock absorber assembly
3. Brake fluid reservoir
4. Driver seat
5. Driver seat belt
6. Shoulder bolster
7. Cargo bed
8. Tail/brake light
9. Spark arrester
10. Rear shock absorber assembly
11. Spark plug
12. Cargo bed release lever
13. Storage compartment
14. Door 15. Engine oil dipstick
16. Passenger seat belt
17. Passenger seat
18. Air filter
19. Battery
20. Fuses
21. Radiator cap
22. Coolant reservoir
23. Storage compartment
24. Fuel tank cap
25. Oil filter cartridge123
8
7
90AB
D
C 65
4
ON
ML IJ K
HGFE
1XP7B_EE.book Page 1 Tuesday, February 4, 2014 3:40 PM
Page 32 of 180
3-2
3
4
5
6
7
8
9
10
11
12
13
14
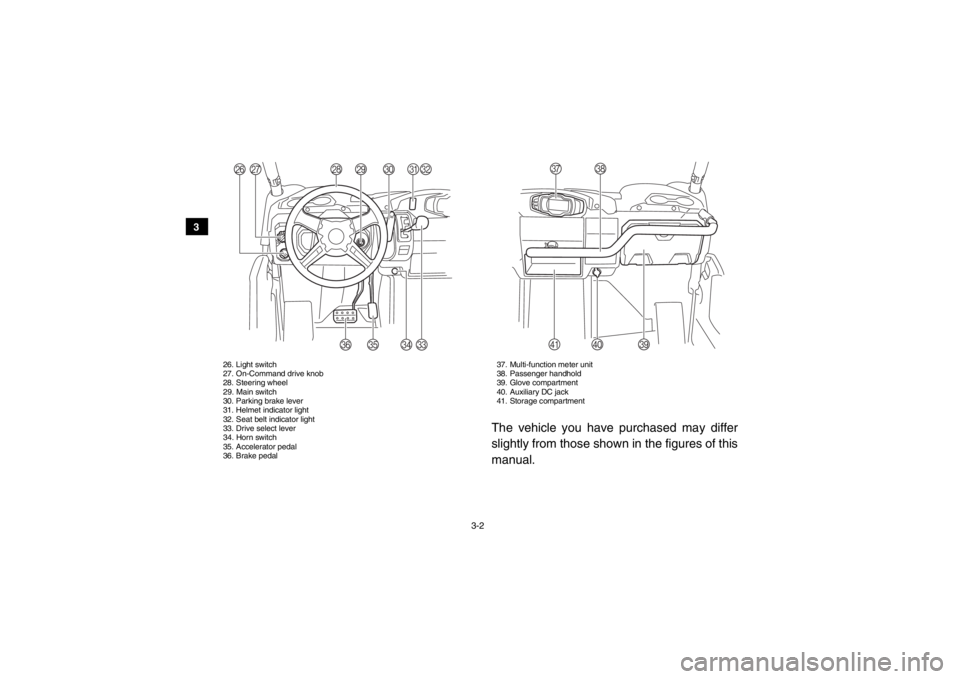
26. Light switch
27. On-Command drive knob
28. Steering wheel
29. Main switch
30. Parking brake lever
31. Helmet indicator light
32. Seat belt indicator light
33. Drive select lever
34. Horn switch
35. Accelerator pedal
36. Brake pedal 37. Multi-function meter unit
38. Passenger handhold
39. Glove compartment
40. Auxiliary DC jack
41. Storage compartment
The vehicle you have purchased may differ
slightly from those shown in the figures of this
manual.
Z
Y
Q
R
S
T
X
P
UVW
a
]
[
\^
1XP7B_EE.book Page 2 Tuesday, February 4, 2014 3:40 PM
Page 33 of 180
4-1
1
2
34
5
6
7
8
9
10
11
12
13
14
EVU00130
1-INSTRUMENT AND CONTROL FUNCTIONS
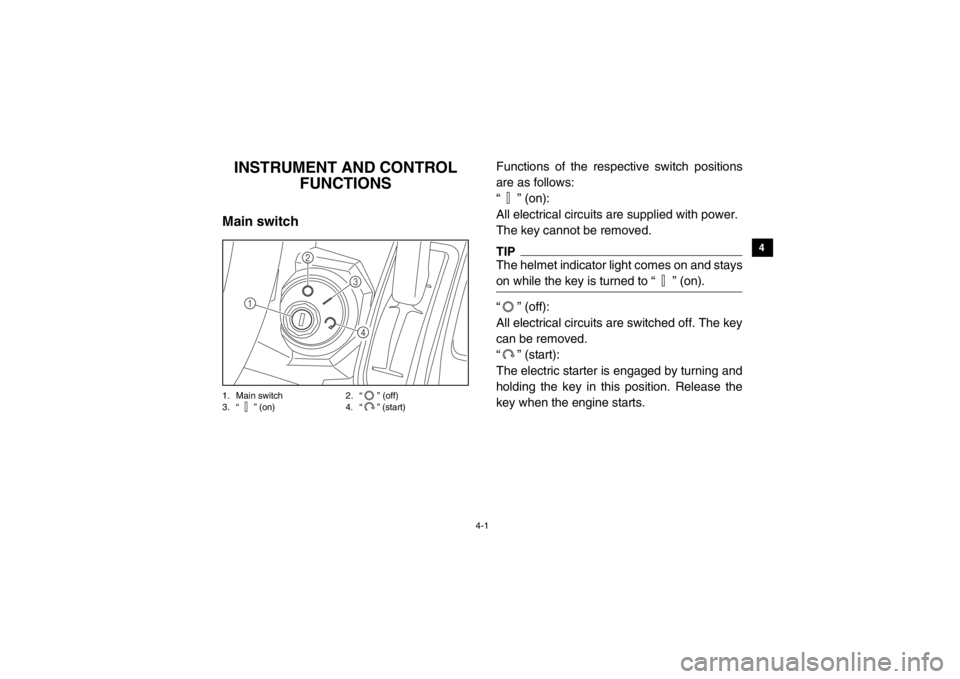
EVU00140Main switch1. Main switch 2. “ ” (off)
3. “ ” (on) 4. “ ” (start)
Functions of the respective switch positions
are as follows:
“ ” (on):
All electrical circuits are supplied with power.
The key cannot be removed.TIPThe helmet indicator light comes on and stays
on while the key is turned to “ ” (on).“ ” (off):
All electrical circuits are switched off. The key
can be removed.
“ ” (start):
The electric starter is engaged by turning and
holding the key in this position. Release the
key when the engine starts.
1
2
34
1XP7B_EE.book Page 1 Tuesday, February 4, 2014 3:40 PM
Page 34 of 180
4-2
4
5
6
7
8
9
10
11
12
13
14
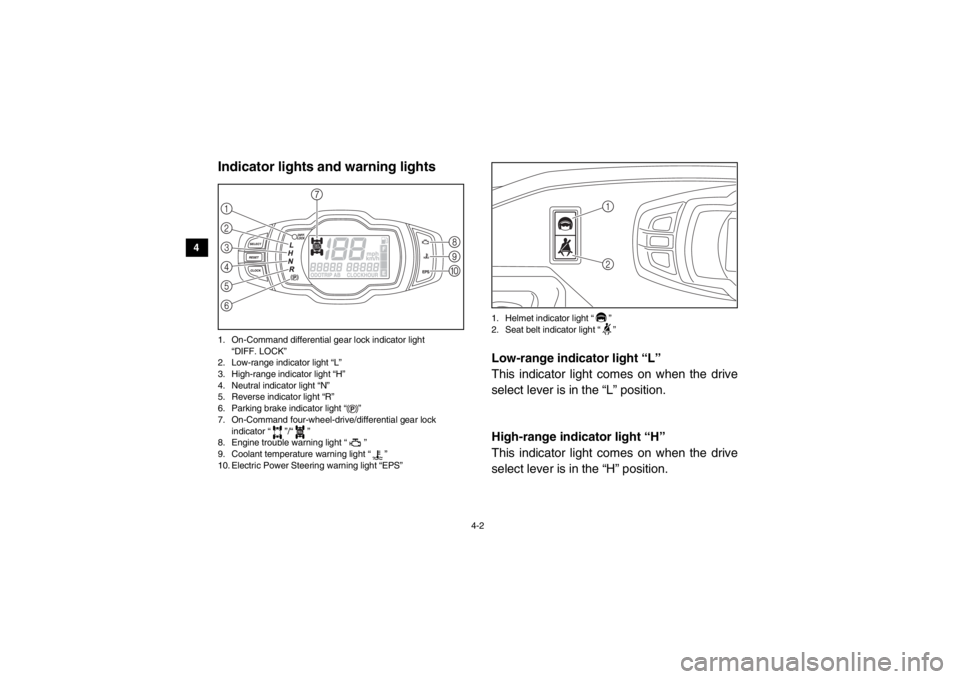
EVU00150Indicator lights and warning lights1. On-Command differential gear lock indicator light “DIFF. LOCK”
2. Low-range indicator light “L”
3. High-range indicator light “H”
4. Neutral indicator light “N”
5. Reverse indicator light “R”
6. Parking brake indicator light “ ”
7. On-Command four-wheel-drive/differential gear lock indicator “ ”/“ ”
8. Engine trouble warning light “ ”
9. Coolant temperature warning light “ ”
10. Electric Power Steering warning light “EPS” 1. Helmet indicator light “ ”
2. Seat belt indicator light “ ”
EVU01140Low-range indicator light “L”
This indicator light comes on when the drive
select lever is in the “L” position.EVU01150High-range indicator light “H”
This indicator light comes on when the drive
select lever is in the “H” position.
356421
7
809
DIFF.
LOCK
21
1XP7B_EE.book Page 2 Tuesday, February 4, 2014 3:40 PM
Page 35 of 180
4-3
1
2
34
5
6
7
8
9
10
11
12
13
14
EVU00170Neutral indicator light “N”
This indicator light comes on when the drive
select lever is in the “N” position.5B410001Reverse indicator light “R”
This indicator light comes on when the drive
select lever is in the “R” position.EVU00210Parking brake indicator light “ ”
This indicator light comes on when the park-
ing brake is applied.EBU29621On-Command four-wheel-drive indicator
“ ”, On-Command differential gear lock
indicator “ ” and indicator light “DIFF.
LOCK”
The On-Command four-wheel-drive indicator
“ ” comes on when the On-Command drive
knob “2WD/4WD/DIFF LOCK” is set to the
“4WD” position.The On-Command differential gear lock indi-
cator “ ” and the On-Command differential
gear lock indicator light “DIFF. LOCK” come
on when the On-Command drive knob “2WD/
4WD/DIFF LOCK” is set to the “DIFF LOCK”
position.
TIP●
Due to the synchronizing mechanism in
the differential gear case, the four-wheel-
drive indicator may not come on until the
vehicle starts moving.
●
When the On-Command drive knob
“2WD/4WD/DIFF LOCK” is set to
“DIFF LOCK” or “4WD”, the indicator
“ ” and the indicator light “DIFF. LOCK”
will flash until the differential gear is com-
pletely locked or unlocked. If the indicator
and the indicator light continue to flash,
the differential is not completely locked or
unlocked. In this case, start moving to al-
low time for the differential to lock or un-
lock.
DIFF.
LOCK
DIFF.
LOCKDIFF.
LOCK
1XP7B_EE.book Page 3 Tuesday, February 4, 2014 3:40 PM
Page 36 of 180
4-4
4
5
6
7
8
9
10
11
12
13
14
5B410002Coolant temperature warning light “ ”
If the coolant temperature reaches a specific
level, this light comes on to warn that the cool-
ant temperature is too hot. If the light comes
on during operation, stop the engine as soon
as it is safe to do so and allow the engine to
cool down for about 10 minutes.
(See page 8-57.)
The electrical circuit of the warning light can
be checked by turning the key to “ ” (on). If
the warning light does not come on initially
when the key is turned to “ ” (on), or if the
warning light remains on, have a Yamaha
dealer check the electrical circuit.
NOTICE●
The engine may overheat if the vehicle
is overloaded. If this happens, reduce
the load to specification.
●
After restarting, make sure that the
warning light is out. Continuous use
while this warning light is on may
cause damage to the engine.
1XP7B_EE.book Page 4 Tuesday, February 4, 2014 3:40 PM