transmission YAMAHA VMAX 2012 Owners Manual
[x] Cancel search | Manufacturer: YAMAHA, Model Year: 2012, Model line: VMAX, Model: YAMAHA VMAX 2012Pages: 110, PDF Size: 3.09 MB
Page 12 of 110

SAFETY INFORMATION
1-5
1
●
Check that the fuel cock (if
equipped) is in the “OFF” position
and that there are no fuel leaks.
●
Point the front wheel straight
ahead on the trailer or in the truck
bed, and choke it in a rail to pre-
vent movement.
●
Shift the transmission in gear (for
models with a manual transmis-
sion).
●
Secure the motorcycle with tie-
downs or suitable straps that are
attached to solid parts of the mo-
torcycle, such as the frame or up-
per front fork triple clamp (and not,
for example, to rubber-mounted
handlebars or turn signals, or parts
that could break). Choose the lo-
cation for the straps carefully so
the straps will not rub against
painted surfaces during transport.
●
The suspension should be com-
pressed somewhat by the tie-
downs, if possible, so that the mo-
torcycle will not bounce excessive-
ly during transport.
U2S3E3E0.book Page 5 Monday, September 19, 2011 8:42 AM
Page 19 of 110
INSTRUMENT AND CONTROL FUNCTIONS
3-4
3
EAU49391
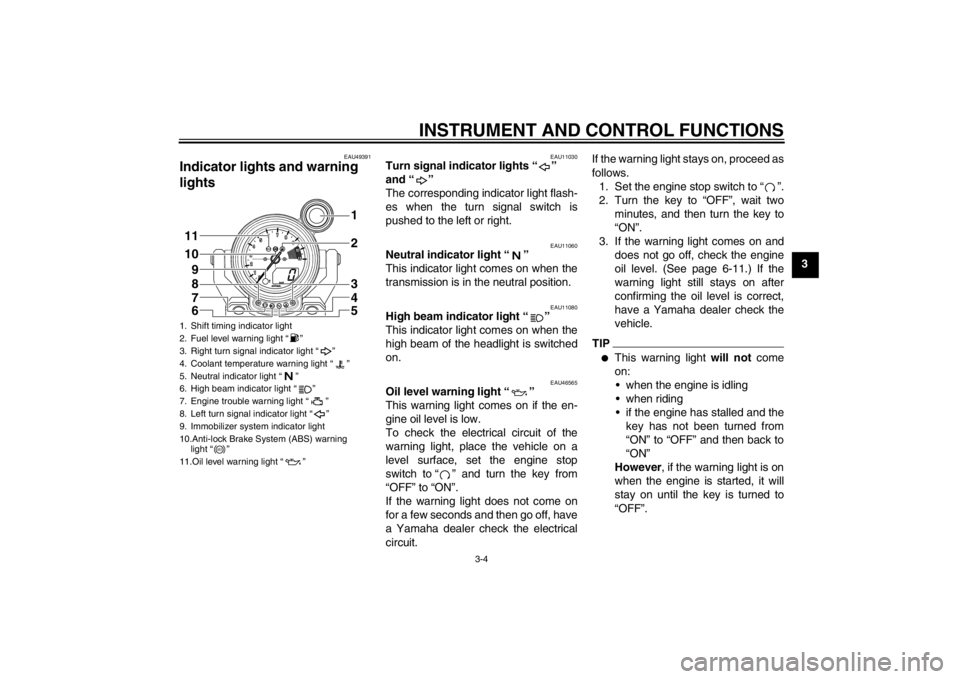
Indicator lights and warning
lights
EAU11030
Turn signal indicator lights “ ”
and “ ”
The corresponding indicator light flash-
es when the turn signal switch is
pushed to the left or right.
EAU11060
Neutral indicator light “ ”
This indicator light comes on when the
transmission is in the neutral position.
EAU11080
High beam indicator light “ ”
This indicator light comes on when the
high beam of the headlight is switched
on.
EAU46565
Oil level warning light “ ”
This warning light comes on if the en-
gine oil level is low.
To check the electrical circuit of the
warning light, place the vehicle on a
level surface, set the engine stop
switch to “ ” and turn the key from
“OFF” to “ON”.
If the warning light does not come on
for a few seconds and then go off, have
a Yamaha dealer check the electrical
circuit.If the warning light stays on, proceed as
follows.
1. Set the engine stop switch to “ ”.
2. Turn the key to “OFF”, wait two minutes, and then turn the key to
“ON”.
3. If the warning light comes on and does not go off, check the engine
oil level. (See page 6-11.) If the
warning light still stays on after
confirming the oil level is correct,
have a Yamaha dealer check the
vehicle.
TIP●
This warning light will not come
on: when the engine is idling
when riding
if the engine has stalled and the key has not been turned from
“ON” to “OFF” and then back to
“ON”
However , if the warning light is on
when the engine is started, it will
stay on until the key is turned to
“OFF”.
1. Shift timing indicator light
2. Fuel level warning light “ ”
3. Right turn signal indicator light “ ”
4. Coolant temperature warning light “ ”
5. Neutral indicator light “ ”
6. High beam indicator light “ ”
7. Engine trouble warning light “ ”
8. Left turn signal indicator light “ ”
9. Immobilizer system indicator light
10.Anti-lock Brake System (ABS) warning light “ ”
11.Oil level warning light “ ”11
10 2
1
9
3
4
5
8
7
6
ABS
U2S3E3E0.book Page 4 Monday, September 19, 2011 8:42 AM
Page 24 of 110
INSTRUMENT AND CONTROL FUNCTIONS
3-9
3
●
a transmission gear indicator
●
a coolant temperature meter
●
a self-diagnosis device
TIPFor the U.K. only:
The speedometer and odometer/trip-
meter displays can be switched be-
tween kilometers and miles. To switch
the speedometer and odometer/tripme-
ter displays, press “SELECT” for at
least two seconds.
TripmetersTurn the key to “ON”. Push “SELECT”
to switch the display between the trip-
meters “TRIP-1” and “TRIP-2” in the fol-
lowing order:
TRIP-1 → TRIP-2 → TRIP-1
When the fuel amount in the fuel tank
decreases to 3.9 L (1.03 US gal,
0.86 Imp.gal), the fuel level warning
light comes on, and the tripmeter auto-
matically changes to the fuel reserve
tripmeter “TRIP-F” and starts counting
the distance traveled from that point. In
that case, push “SELECT” to switch the
display between the various tripmeters
in the following order:
TRIP-F → TRIP-1 → TRIP-2 → TRIP-F
If you continue to ride the vehicle after
the fuel reserve tripmeter “TRIP-F” ap-
pears, the fuel meter and fuel level
warning indicator “ ” start flashing.
To reset a tripmeter, select it by push-
ing “SELECT”, and then push “RESET”
for at least one second. If you do not re-
set the fuel reserve tripmeter manually,
it resets itself automatically and the dis-
play returns to the prior meter after re-
fueling and traveling 5 km (3 mi). Fuel meter
The fuel meter indicates the amount of
fuel in the fuel tank. The fuel level dis-
played decreases towards “E” (Empty)
as the fuel tank level decreases. When
the fuel amount in the fuel tank de-
creases to 3.9 L (1.03 US gal,
0.86 Imp.gal), the fuel level warning
light comes on. If this occurs, refuel as
soon as possible.
If you continue to ride the vehicle after
the fuel reserve tripmeter “TRIP-F” ap-
pears, the fuel meter and fuel level
warning indicator “ ” start flashing.
Transmission gear indicatorThis indicator shows the selected gear.
The neutral position is indicated by “ ”
and by the neutral indicator light.
Coolant temperature meterWith the key in the “ON” position, the
coolant temperature meter indicates
the temperature of the coolant. The
coolant temperature varies with chang-
es in the weather and engine load. If
the coolant temperature warning light
comes on, and the top segment and the
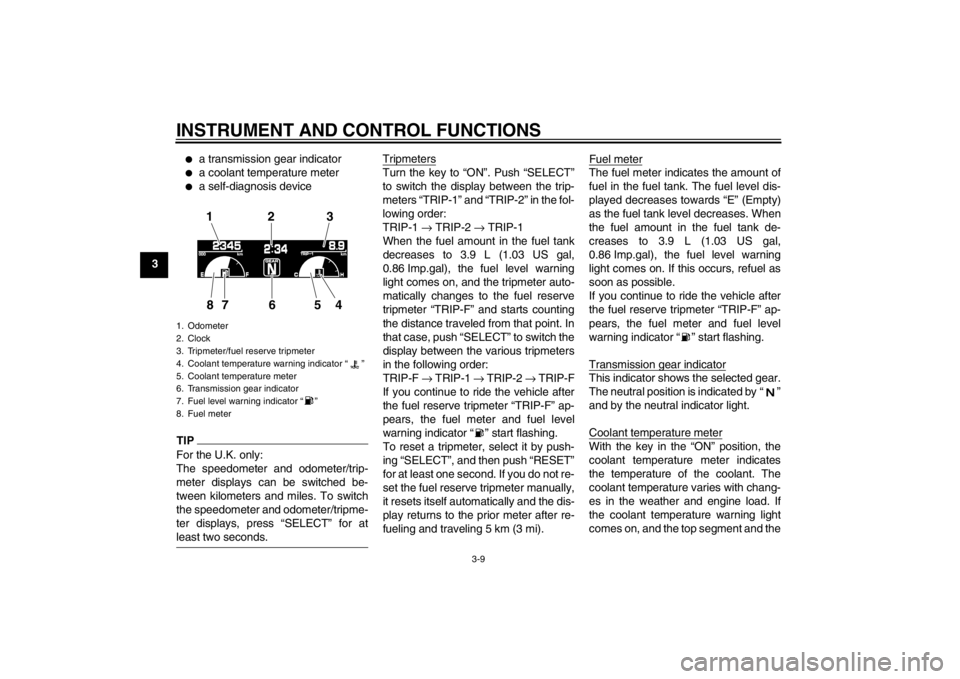
1. Odometer
2. Clock
3. Tripmeter/fuel reserve tripmeter
4. Coolant temperature warning indicator “ ”
5. Coolant temperature meter
6. Transmission gear indicator
7. Fuel level warning indicator “ ”
8. Fuel meter
123
865
7
4
U2S3E3E0.book Page 9 Monday, September 19, 2011 8:42 AM
Page 25 of 110
INSTRUMENT AND CONTROL FUNCTIONS
3-10
3
coolant temperature warning indicator
flash, stop the vehicle and let the en-
gine cool. (See page 6-42.)
NOTICE
ECA10021
Do not continue to operate the en-
gine if it is overheating.Select mode
The various functions of this multi-func-
tion display are adjusted in the Select
mode.TIP●
The transmission must be in neu-
tral to change settings in this
mode.
●
Shifting the transmission into gear
saves all settings made, then can-
cels the Select mode and displays
the Normal mode in all screens.
●
Depending on the screen, pushing
“RESET” saves settings or can-
cels the Select mode to display the
Normal mode.
Push and hold “SELECT” and “RESET”
for at least three seconds to enter the
Select mode. The following items can be set/adjusted
in this mode:
●
brightness
●
shift timing indicator light
●
clock
●
stopwatch
●
countdown clock
●
system status
●
maintenance counters
TIPTo return to the Normal mode, push
“SELECT” to scroll to “ ”, then push
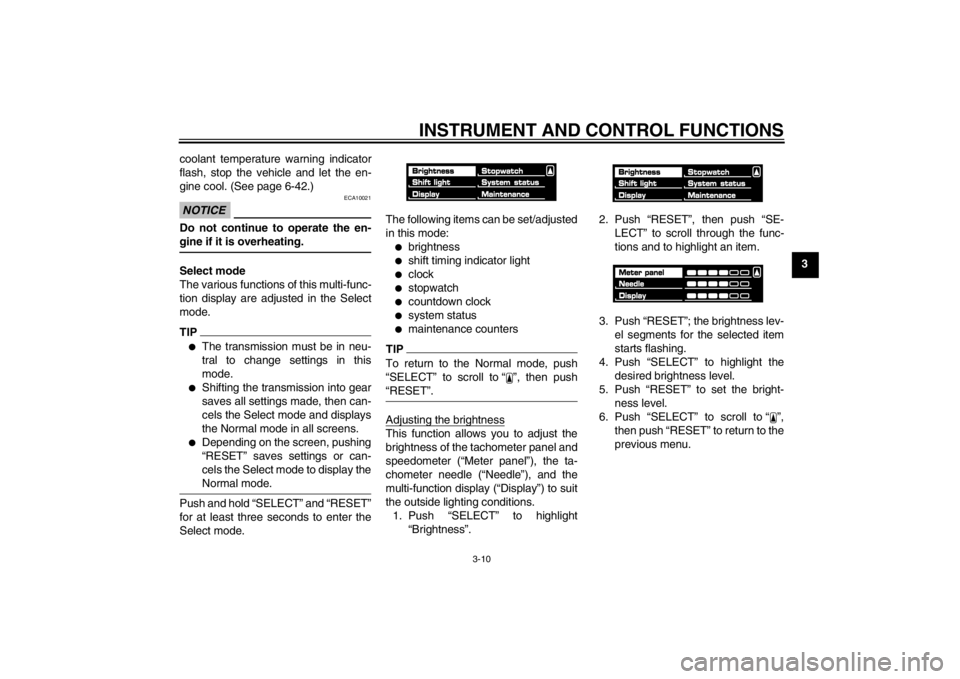
“RESET”.Adjusting the brightnessThis function allows you to adjust the
brightness of the tachometer panel and
speedometer (“Meter panel”), the ta-
chometer needle (“Needle”), and the
multi-function display (“Display”) to suit
the outside lighting conditions.
1. Push “SELECT” to highlight “Brightness”. 2. Push “RESET”, then push “SE-
LECT” to scroll through the func-
tions and to highlight an item.
3. Push “RESET”; the brightness lev- el segments for the selected item
starts flashing.
4. Push “SELECT” to highlight the desired brightness level.
5. Push “RESET” to set the bright- ness level.
6. Push “SELECT” to scroll to “ ”, then push “RESET” to return to the
previous menu.
U2S3E3E0.book Page 10 Monday, September 19, 2011 8:42 AM
Page 30 of 110
INSTRUMENT AND CONTROL FUNCTIONS
3-15
3Select mode again by pushing and
holding “SELECT” and “RESET” for at
least three seconds.
Checking and resetting the system sta-tusThe status/readings of the following
items are displayed, and the tripmeters
can be reset.●
tripmeters and odometer
●
fuel consumption
●
air intake temperature
●
throttle opening position
TIP●
The “System status” menu cannot
be entered if the fuel level warning
light or coolant temperature warn-
ing light is on.
●
If, when the engine is running
while the system status menu is
displayed, the fuel level warning
light or coolant temperature warn-
ing light comes on, the Normal
mode is automatically displayed.
1. Push “SELECT” to highlight “Sys-
tem status”, then push “RESET”. 2. Push “SELECT” to highlight “Yes”,
then push “RESET”. (Highlighting
“No” and pushing “RESET” returns
to the previous menu.)
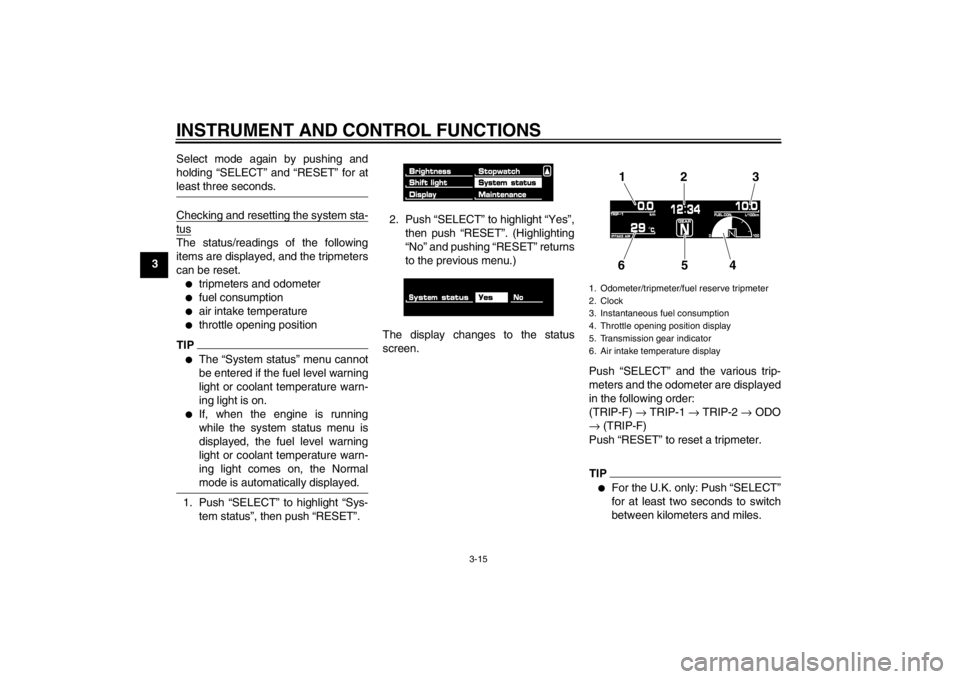
The display changes to the status
screen. Push “SELECT” and the various trip-
meters and the odometer are displayed
in the following order:
(TRIP-F) → TRIP-1 → TRIP-2 → ODO
→ (TRIP-F)
Push “RESET” to reset a tripmeter.
TIP●
For the U.K. only: Push “SELECT”
for at least two seconds to switch
between kilometers and miles.
1. Odometer/tripmeter/fuel reserve tripmeter
2. Clock
3. Instantaneous fuel consumption
4. Throttle opening position display
5. Transmission gear indicator
6. Air intake temperature display
12 3
654
U2S3E3E0.book Page 15 Monday, September 19, 2011 8:42 AM
Page 35 of 110
INSTRUMENT AND CONTROL FUNCTIONS
3-20
3
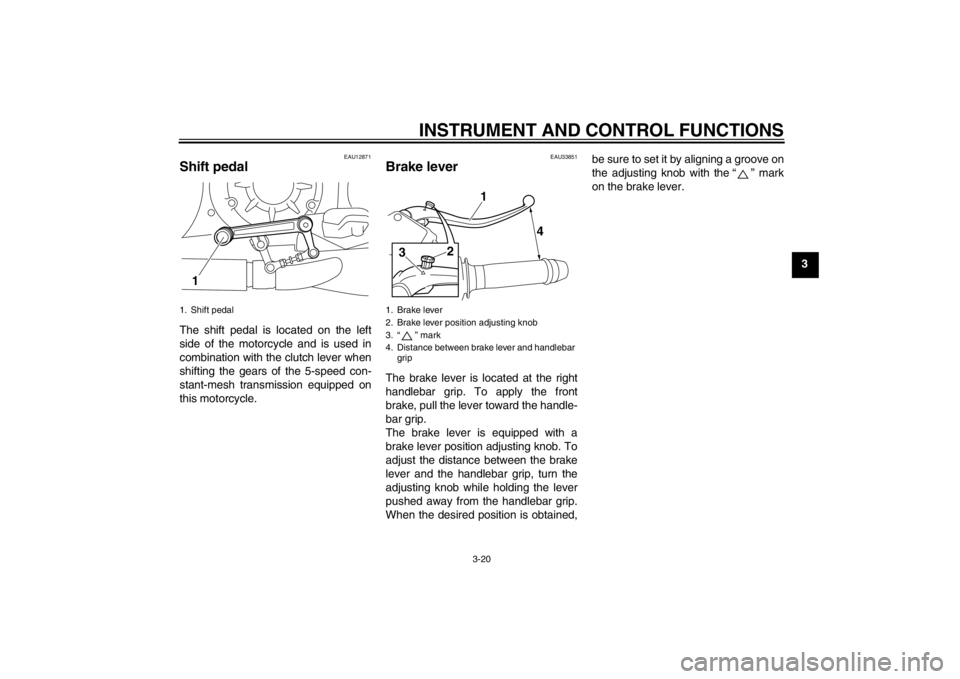
EAU12871
Shift pedal The shift pedal is located on the left
side of the motorcycle and is used in
combination with the clutch lever when
shifting the gears of the 5-speed con-
stant-mesh transmission equipped on
this motorcycle.
EAU33851
Brake lever The brake lever is located at the right
handlebar grip. To apply the front
brake, pull the lever toward the handle-
bar grip.
The brake lever is equipped with a
brake lever position adjusting knob. To
adjust the distance between the brake
lever and the handlebar grip, turn the
adjusting knob while holding the lever
pushed away from the handlebar grip.
When the desired position is obtained,be sure to set it by aligning a groove on
the adjusting knob with the “ ” mark
on the brake lever.
1. Shift pedal
1
1. Brake lever
2. Brake lever position adjusting knob
3. “ ” mark
4. Distance between brake lever and handlebar
grip
1
4
2
3
U2S3E3E0.book Page 20 Monday, September 19, 2011 8:42 AM
Page 47 of 110

INSTRUMENT AND CONTROL FUNCTIONS
3-32
3
this system regularly and have a
Yamaha dealer repair it if it does not function properly.
EAU44892
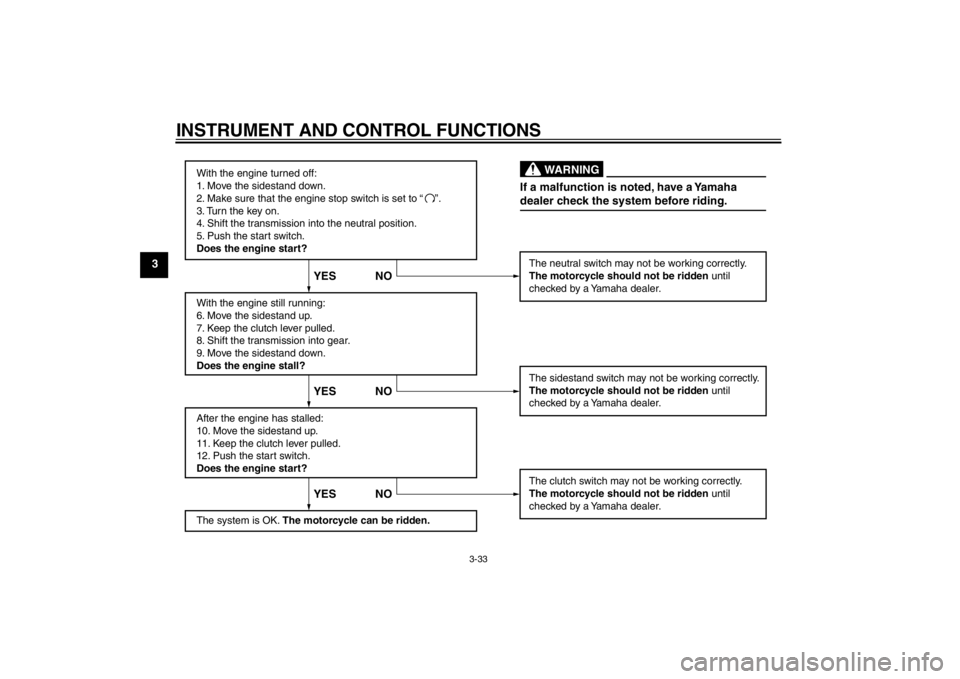
Ignition circuit cut-off system The ignition circuit cut-off system (com-
prising the sidestand switch, clutch
switch and neutral switch) has the fol-
lowing functions.●
It prevents starting when the trans-
mission is in gear and the side-
stand is up, but the clutch lever is not pulled.
●
It prevents starting when the trans-
mission is in gear and the clutch le-
ver is pulled, but the sidestand is
still down.
●
It cuts the running engine when the
transmission is in gear and the
sidestand is moved down.
Periodically check the operation of the
ignition circuit cut-off system according
to the following procedure.
U2S3E3E0.book Page 32 Monday, September 19, 2011 8:42 AM
Page 48 of 110
INSTRUMENT AND CONTROL FUNCTIONS
3-33
3
With the engine turned off:
1. Move the sidestand down.
2. Make sure that the engine stop switch is set to “
3. Turn the key on.
4. Shift the transmission into the neutral position.
5. Push the start switch.
Does the engine start?
With the engine still running:
6. Move the sidestand up.
7. Keep the clutch lever pulled.
8. Shift the transmission into gear.
9. Move the sidestand down.
Does the engine stall?
After the engine has stalled:
10. Move the sidestand up.
11. Keep the clutch lever pulled.
12. Push the start switch.
Does the engine start?
The system is OK. The motorcycle can be ridden. The neutral switch may not be working correctly.
The motorcycle should not be ridden
until
checked by a Yamaha dealer.
The sidestand switch may not be working correctly.
The motorcycle should not be ridden until
checked by a Yamaha dealer.
The clutch switch may not be working correctly.
The motorcycle should not be ridden until
checked by a Yamaha dealer.
YES NO YES NO YES NO
If a malfunction is noted, have a Yamaha
dealer check the system before riding.
WARNING
”.
U2S3E3E0.book Page 33 Monday, September 19, 2011 8:42 AM
Page 52 of 110

OPERATION AND IMPORTANT RIDING POINTS
5-1
5
EAU15951
Read the Owner’s Manual carefully to
become familiar with all controls. If
there is a control or function you do not
understand, ask your Yamaha dealer.
WARNING
EWA10271
Failure to familiarize yourself with
the controls can lead to loss of con-
trol, which could cause an accident
or injury.
EAU48710
TIPThis model is equipped with:●
a lean angle sensor to stop the en-
gine in case of a turnover. In this
case, the multi-function display in-
dicates error code 30, but this is
not a malfunction. Turn the key to
“OFF” and then to “ON” to clear the
error code. Failing to do so will pre-
vent the engine from starting even
though the engine will crank when
pushing the start switch.
●
an engine auto-stop system. The
engine stops automatically if left
idling for 20 minutes. If the engine
stops, simply push the start switch
to restart the engine.
EAU51690
Starting the engine In order for the ignition circuit cut-off
system to enable starting, one of the
following conditions must be met:●
The transmission is in the neutral
position.
●
The transmission is in gear with
the clutch lever pulled and the
sidestand up.
See page 3-32 for more informa-
tion.
1. Turn the key to “ON” and make sure that the engine stop switch is
set to “ ”.
The following warning lights and
indicator lights should come on for
a few seconds, then go off.●
Oil level warning light
●
Fuel level warning light
●
Coolant temperature warning
light
●
Engine trouble warning light
●
Shift timing indicator light
●
Immobilizer system indicator
light
U2S3E3E0.book Page 1 Monday, September 19, 2011 8:42 AM
Page 53 of 110

OPERATION AND IMPORTANT RIDING POINTS
5-2
5
NOTICE
ECA17670
If the above warning lights or indica-
tor light do not come on initially
when the key is turned to “ON”, or if
a warning or indicator light remains
on, see page 3-4 for the correspond-
ing warning and indicator light cir-
cuit check.
The ABS warning light should
come on when the main switch is
turned to “ON” and then go off after
traveling at a speed of 10 km/h (6
mi/h) or higher.
NOTICE
ECA17680
If the ABS warning light does not
come on and then go off as ex-
plained above, see page 3-4 for the
indicator light circuit check.2. Shift the transmission into the neu-tral position. The neutral indicator
light should come on. If not, ask a
Yamaha dealer to check the elec- trical circuit.
3. Start the engine by pushing the start switch. If the engine fails to start, release
the start switch, wait a few sec-
onds, and then try again. Each
starting attempt should be as short
as possible to preserve the bat-
tery. Do not crank the engine more
than 10 seconds on any one at-
tempt.
NOTICE
ECA11042
For maximum engine life, never ac-
celerate hard when the engine is
cold!
EAU16671
Shifting Shifting gears lets you control the
amount of engine power available for
starting off, accelerating, climbing hills,
etc.
The gear positions are shown in the il-
lustration.TIPTo shift the transmission into the neu-
tral position, press the shift pedal down
repeatedly until it reaches the end of its
travel, and then slightly raise it.1. Shift pedal
2. Neutral position
1
2
2 3
4 5N1
U2S3E3E0.book Page 2 Monday, September 19, 2011 8:42 AM