light YAMAHA VX110 2005 User Guide
[x] Cancel search | Manufacturer: YAMAHA, Model Year: 2005, Model line: VX110, Model: YAMAHA VX110 2005Pages: 347, PDF Size: 14.17 MB
Page 238 of 347

7-11
E
–+ELECELECTRICAL ANALYSIS
Peak voltage adapter
NOTE:
Throughout this chapter the part numbers of
the specified peak voltage adapters have
been omitted. Refer to the following part
numbers.
The peak voltage adapter should be used
with a digital tester.
When measuring the peak voltage, connect
the peak voltage adapter to the digital circuit
tester and switch the selector to the DC volt-
age mode.
NOTE:
Make sure that the adapter leads are prop-
erly installed in the digital circuit tester.
Make sure that the positive pin (the “+” mark
facing up as shown) on the adapter is
installed into the positive terminal of the
tester.
The test harness is needed for the following
tests.
È Voltage measurement
É Peak voltage measurement
Test harness
NOTE:
If the lighting coil and pickup coil(s) are mea-
sured unloaded, disconnect the test harness
on the output side coupler.
Peak voltage adapter:
YU-39991
Peak voltage adapter B:
90890-03172
Checking steps:
Disconnect the coupler connections.
Connect the test harness between the
couplers.
Connect the tester terminals to the termi-
nals which are being checked.
Run the engine and observe the mea-
surement.È
É
ProCarManuals.com
Page 239 of 347

7-12
E
–+ELECIGNITION SYSTEM
IGNITION SYSTEM
WIRING DIAGRAM
10A
10A
3A
30A20A
WBrBRFREE
PUSHBWFREE
PUSH
Br BrFREE
PUSH
BW
W
BrBrBrBrR
W
B/W
B/O
B/O
B/O
B/R
P/R
P/R
W/B
P/W
P/W
B/O
L/B
B/WB/R
B/OP/W
P/R
W
W
WLR
Y
G
O
O
W
GG
BW
GG
O
OLG
W
Y
W
G/O
W/BR/Y
Y/G
BL
PBWP/W
B/GB/Y
Y/WL/RB/RB/W
B
B
BBP
P
P
BBP
RR
BBR
R/Y
B/OL/BB/OL/B
B/G
G/OB/OG/O
P/W
B/OB/YB/YR/Y
R/Y
R/Y
R/YB/YR/Y
R/Y
B/O
B/RR/Y
R/Y
R/YY/W
Y/GL/R
Y
P
P
O
O R
R
R
BB
BrRB/O
BBr
B/W
Y BrL R B
R
GB
R/YBBr
4
0 98
B
B B
B
H
I JK LM NOQ
PR
3
5
67 2 1
A
A A
A
C
D
E
F
G
1Battery
2Fuse (30 A)
3Fuse (20 A)
4Fuse (3 A)
5Fuse (10 A)
6Fuse (10 A)
7Starter relay
8Main and fuel pump
relay9Electronic control
throttle valve relay
0Slant detection switch
AIgnition coil
BSpark plug
CCam position sensor
DEngine temperature
sensor
EThermoswitch
(engine)FThermoswitch
(exhaust)
GOil pressure switch
HRemote control unit
(Deluxe model only)
IAntenna
(Deluxe model only)
JECM
KRectifier/regulatorLThrottle body assem-
bly
MAccelerator position
sensor
NPickup coil
OLighting coil
PStart switch
QEngine stop switch
REngine shut-off switch
ProCarManuals.com
Page 243 of 347

7-16
E
–+ELECIGNITION SYSTEM
2. Measure:
Pickup coil output peak voltage
Below specification →
Replace the
pickup coil.
Above specification →
Replace the
ECM.
NOTE:
To crank the engine, connect the engine shut-
off cord (lanyard) to the engine shut-off switch,
and then press the start switch and engine
stop switch simultaneously.
Test harness (3 pins):
New: YB-06877
Current: YB-06777
Test harness HM090-3 (3 pins):
New: 90890-06877
Current: 90890-06777
Pickup coil output peak voltage:
White/black (W/B) –
Black/orange (B/O)
r/minUnloaded Loaded
Cranking 2,000 3,500
V 8.0 6.9 19.4 25.1
3. Measure:
Lighting coil output peak voltage
Below specification →
Replace the light-
ing coil.
Test harness (3 pins):
New: YB-06870
Current: YB-06770
Test harness SMT250-3 (3 pins):
New: 90890-06870
Current: 90890-06770
Lighting coil output peak voltage:
Green (G) – Green (G)
r/minUnloaded
Cranking 2,000 3,500
V 7.8 24.5 41.6
ProCarManuals.com
Page 270 of 347

7-43
E
–+ELECCHARGING SYSTEM
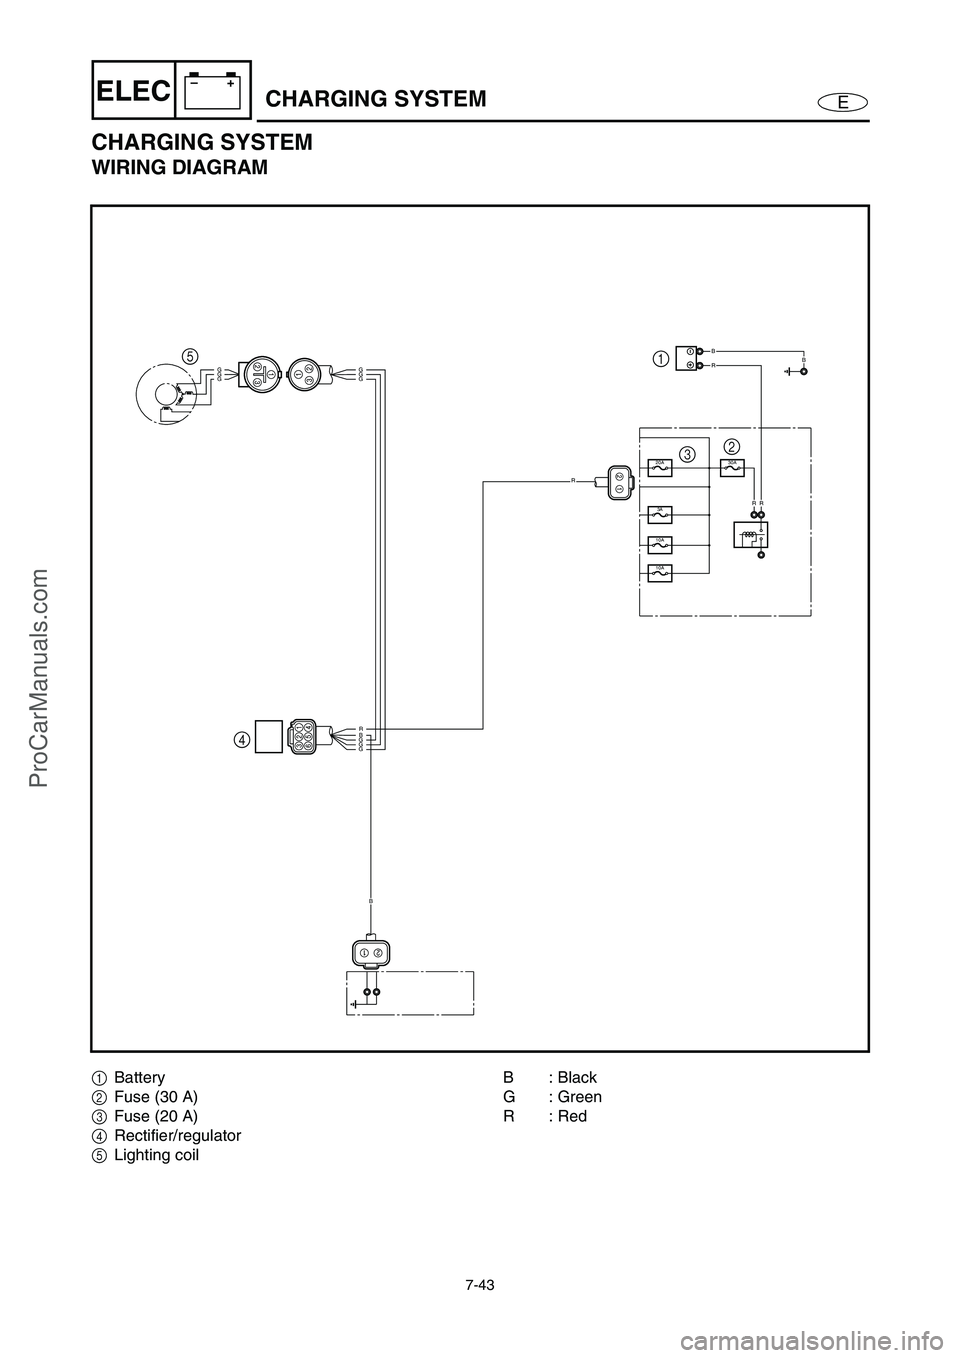
CHARGING SYSTEM
WIRING DIAGRAM
10A
10A
3A
30A20A
RR
BBRGGGGGG
RGGGB
R
B
4 5
32 1
1Battery
2Fuse (30 A)
3Fuse (20 A)
4Rectifier/regulator
5Lighting coilB: Black
G : Green
R: Red
ProCarManuals.com
Page 271 of 347

7-44
E
–+ELECCHARGING SYSTEM
FUSE
Refer to “STARTING SYSTEM”.
BATTERY
Refer to “ELECTRICAL” in Chapter 3.
LIGHTING COIL
Refer to “IGNITION SYSTEM”.
RECTIFIER/REGULATOR
Refer to “IGNITION SYSTEM”.
ProCarManuals.com
Page 283 of 347

7-56
E
–+ELECINDICATION SYSTEM
Overheat warning indicator
1. Check:
Overheat warning indicator
Does not come on → Replace the multi-
function meter.
Checking steps:
Start the engine.
Disconnect the thermoswitch (engine)
connector 1 (blue), engine temperature
sensor connector 2 (black), or ther-
moswitch (exhaust) 3 connector.
Connect the jumper lead to the female
terminal of the disconnected connector.
Check that the multifunction meter over-
heat warning indicator blinks, then comes
on. The buzzer also begins to sound
intermittently, then sounds continuously.
3
12
Check engine warning indicator
1. Check:
Check engine warning indicator
Does not come on → Replace the multi-
function meter.
Checking steps:
Start the engine.
Disconnect the coupler of a sensor (e.g.,
engine temperature sensor) that normally
activates the check engine warning indi-
cator when a malfunction occurs.
Check that the warning light and check
engine warning indicator begin to blink
and the buzzer sounds intermittently.
ProCarManuals.com
Page 286 of 347

7-59
E
–+ELEC
REMOTE CONTROL SYSTEM
(DELUXE MODEL ONLY)
REMOTE CONTROL SYSTEM
Yamaha Security System indicator
1. Check:
Yamaha Security System indicator
Check that the “SECURITY” indicator
light 1 comes on when the Yamaha
Security System is deactivated (i.e., the
engine can be started).
Does not come on → Measure the
remote control unit output voltage.
2. Measure:
Remote control unit output voltage
Within specification → Replace the mul-
tifunction meter.
Out of specification → Replace the
remote control unit.
Remote control unit output
voltage:
Blue/yellow (L/Y) – ground
11–13 V
Measurement steps:
Disconnect the remote control unit 1
coupler from the multifunction meter.
Measure the remote control unit output
voltage while pushing the unlock button
of the remote control transmitter.
1
1
L/Y
1
Low-rpm mode indicator
1. Check:
Low-rpm mode indicator
Does not come on → Replace the multi-
function meter.
Checking steps:
Press the unlock button 1 of the remote
control transmitter for more than 4 sec-
onds to select the low-rpm mode.
Check that the beeper sounds three
times and that the “L-MODE” indicator
light 2 comes on.
1
ProCarManuals.com
Page 287 of 347

7-60
E
–+ELEC
REMOTE CONTROL SYSTEM
(DELUXE MODEL ONLY)
Checking the remote control transmitter
1. Check:
Remote control transmitter
Does not operate → Replace the remote
control transmitter.
Checking steps:
CAUTION:
If the buttons on the remote control
transmitter are pushed but the transmit-
ter does not operate, the battery may be
low.
Press the lock button 1 of the remote
control transmitter. The beeper sounds
once.
Check that the “SECURITY” indicator
light goes off and that the engine cannot
be started.
Press the unlock button 2 of the remote
control transmitter for a short time. The
beeper sounds two or three times.
Check that the “SECURITY” indicator
light comes on and that the engine can
be started.
Press the unlock button for more than 4
seconds to select the low-rpm mode.
Check that the beeper sounds three
times and that the “L-MODE” indicator
light comes on.
Number of
beepsYamaha
Security
System modeEngine
startability
1 beep Lock Unable
2 beepsUnlock
(normal mode)Able
3 beepsUnlock
(low-rpm
mode)Able
12
ProCarManuals.com
Page 288 of 347

7-61
E
–+ELEC
REMOTE CONTROL SYSTEM
(DELUXE MODEL ONLY)
NOTE:
If the start switch or the remote control
transmitter is not operated for more than
25 seconds, the multifunction meter dis-
play and the “L-MODE” indicator light will
go off. To change the modes again, press
the lock button for a short time, and then
start the procedures from the lock mode.
While the engine is running, input is not
received from the remote control transmit-
ter.
ProCarManuals.com
Page 289 of 347

7-62
E
–+ELEC
REMOTE CONTROL SYSTEM
(DELUXE MODEL ONLY)
Transmitter registration
1. Register:
Remote control transmitter 1
ID codes can be added or re-registered
by connecting the entry box 2.
Registration steps:
Connect the entry box.
Transmit the ID code from the remote
control transmitter to be registered.
NOTE:
The remote control transmitters can be reg-
istered in any sequence, regardless of
whether they are original equipment or
additional transmitters.
At this time, the system enters the regis-
tration mode to register the first code. All
existing ID codes will be deleted from the
EEPROM.
The “SECURITY” indicator light flashes
when the registration of the ID code has
been completed. (If the registration could
not be completed, the “SECURITY” indi-
cator light comes on. Re-transmit the ID
code.)
After confirming that the registration of
the ID code has been completed using
the “SECURITY” indicator light, transmit
the next ID code.
Register the ID codes for up to five
remote control transmitters.
After ID code registration has been com-
pleted, disconnect the entry box to exit
the registration mode.
Gy
B
12
ProCarManuals.com