check engine YAMAHA WOLVERINE 2015 User Guide
[x] Cancel search | Manufacturer: YAMAHA, Model Year: 2015, Model line: WOLVERINE, Model: YAMAHA WOLVERINE 2015Pages: 186, PDF Size: 4.22 MB
Page 104 of 186
7-14
7
Become familiar with the way the vehicle feels
in low and high ranges, first in two-wheel
drive “2WD” and then in four-wheel drive
“4WD” and four-wheel drive with the differen-
tial locked “DIFF LOCK”. Steering may take
more effort in four-wheel drive with the differ-
ential locked “DIFF LOCK”. Also practice
driving in reverse.
Take the time to learn basic operation of the
vehicle before attempting more difficult ma-
neuvers. Getting ready to ride
Perform the Pre-Operation Checks on page
5-1. Follow the instructions starting on page
6-2 to start the engine.
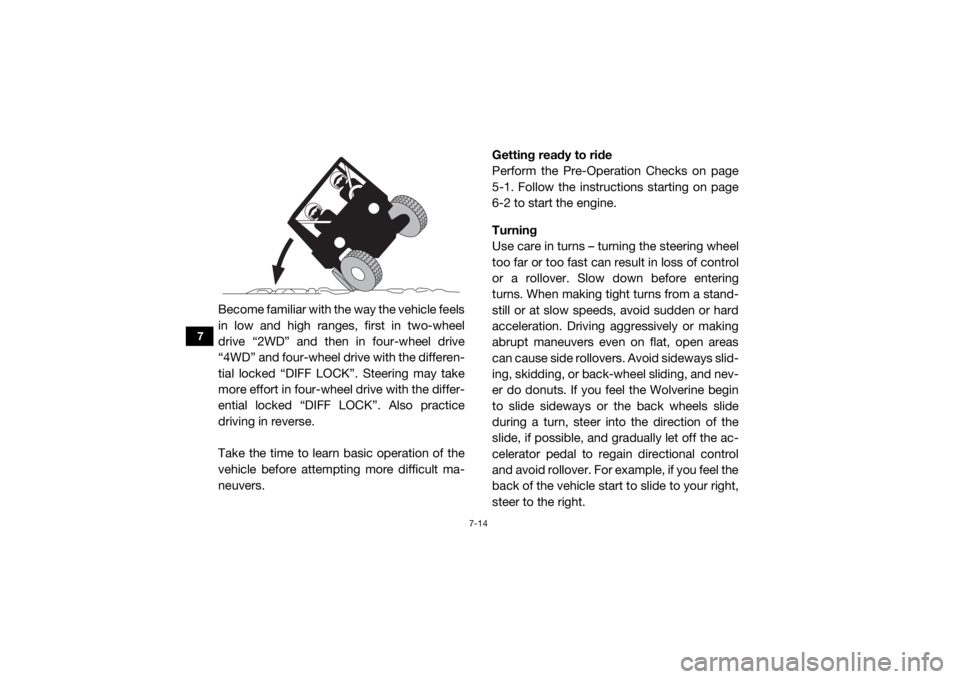
Turning
Use care in turns – turning the steering wheel
too far or too fast can result in loss of control
or a rollover. Slow down before entering
turns. When making tight turns from a stand-
still or at slow speeds, avoid sudden or hard
acceleration. Driving aggressively or making
abrupt maneuvers even on flat, open areas
can cause side rollovers. Avoid sideways slid-
ing, skidding, or back-wheel sliding, and nev-
er do donuts. If you feel the Wolverine begin
to slide sideways or the back wheels slide
during a turn, steer into the direction of the
slide, if possible, and gradually let off the ac-
celerator pedal to regain directional control
and avoid rollover. For example, if you feel the
back of the vehicle start
to slide to your right,
steer to the right.U2MB7AE0.book Page 14 Thursday, January 29, 2015 3:42 PM
Page 108 of 186

7-18
7
to see far enough ahead of you. Use common
sense and remember that some hills are too
steep for you to climb or descend. Use proper
driving techniques to avoid rearward, for-
ward, or sideways rollovers on hills and
slopes.
Drive straight up and down inclines, not
across them. If crossing a hill is unavoidable,
drive slowly. Turn downhill immediately if you
feel the vehicle may tip.
If you think or feel the vehicle may tip or
roll:
Brace yourself by pressing your feet firmly
on the floorboard and keep a firm grip on
the steering wheel or passenger handhold.
Do not put your hands or feet outside of the
vehicle for any reason.
Uphill
Do not attempt to climb hills until you have
mastered basic maneuvers on flat ground.
Drive straight up hills, and avoid crossing the side of a hill, which increases your risk of roll-
over. Practice first on gentle slopes before at-
tempting steeper hills. Always check the
terrain carefully before attempting any hill.
To climb a hill, you need traction, momentum,
and steady throttle. For more traction and
control for climbing steeper and/or rougher
slopes, shift into low gear and select “4WD”
or “DIFF LOCK”. Travel fast enough to main-
tain momentum, but not so fast that you can-
not react to changes in the terrain as you
climb.
Slow down when you reach the crest of the
hill if you cannot see clearly what is on the
other side – there could be another person, an
obstacle, or a sharp drop-off.
If you start to lose traction or momentum
when climbing, and decide you will be unable
to continue, use the brakes to stop. Do not at-
tempt to turn the vehicle around. With your
foot on the brake pedal, look behind you and
plan your descent. Shift the drive select lever
into reverse so you can use engine braking toU2MB7AE0.book Page 18 Thursday, January 29, 2015 3:42 PM
Page 109 of 186

7-19
7
slow your descent. Release the brake and be-
gin to coast down the hill. Use engine braking
as much as possible, gently applying the
brakes when necessary.
Downhill
Check the terrain carefully before going
downhill. When possible, choose a path that
lets you drive your vehicle straight downhill.
Choose your path carefully and drive slowly
enough to be able to react to obstacles that
you encounter.
For more traction and control, before going
down steeper and/or rougher slopes, shift
into low gear and select “4WD” or “DIFF
LOCK”. Engine braking will help you go
downhill slowly. Go as slowly as possible. If
you begin to go too fast, apply the brakes
gently. Avoid hard application of the brakes,
which could cause the vehicle to slide. If you are sliding or skidding, try to steer in the
direction the vehicle is sliding, to regain con-
trol. For example, if you feel the back of the
vehicle start to slide to your right, steer to the
right.
If you must turn on the hill to avoid an obsta-
cle, do so slowly and carefully. If the vehicle
starts to tip, immediately steer in the downhill
direction if there are no obstacles in your
path. As you regain proper balance, gradually
steer again in the direction you want to go.
Rough terrain
Operation over rough terrain should be done
with caution.
Look for and avoid obstacles that could
cause damage to the vehicle or could lead
to a rollover or accident.
Do not drive in a way that will get the vehicle
airborne, as injury, loss of control, and
damage to the vehicle could occur.U2MB7AE0.book Page 19 Thursday, January 29, 2015 3:42 PM
Page 111 of 186

7-21
7
If you feel the vehicle begin to slide sideways
or the back wheels slide during a turn, steer
into the direction of the slide if possible, to re-
gain directional control. For example, if you
feel the back of the vehicle start to slide to
your right, steer to the right.
Brush or wooded areas
When operating in areas with brush or trees,
watch carefully on both sides and above the
vehicle for obstacles such as branches that
the vehicle might hit, causing an accident.
Watch for brush that might enter the vehicle
as you pass and strike you or the passenger.
Never hold onto the cage/frame. The passen-
ger should always hold onto the passenger
handhold with both hands.
The muffler and other engine parts become
extremely hot during operation and remain
hot after the engine has stopped. To reduce
the risk of fire during operation or after leaving
the vehicle, do not let brush, grass and other
materials collect under the vehicle, near themuffler or exhaust pipe, or next to other hot
parts. Check under the vehicle after operating
in areas where combustible materials may
have collected. Do not idle or park the vehicle
in long dry grass or other dry ground cover.
Encountering obstacles
If you cannot go around an obstacle, such as
a fallen tree or a ditch, stop the vehicle where
it is safe to do so. Set the parking brake and
get out to inspect the area thoroughly. Look
from both your approach side and exit side. If
you believe you can continue safely, choose
the path that will allow you to get over the ob-
stacle and at as close to a right angle as pos-
sible to minimize vehicle tipping. Go only fast
enough to maintain your momentum but still
give yourself plenty of time to react to chang-
es in conditions.U2MB7AE0.book Page 21 Thursday, January 29, 2015 3:42 PM
Page 118 of 186

8-6
8
EBU32110General maintenance and lubrication chartNO. ITEMROUTINE INITIAL
EVERY
Whichev- er comes
first month136612
km
(mi) 320
(200) 1200
(750) 2400
(1500) 2400
(1500) 4800
(3000)
hours 20 75 150 150 300
1 *Cooling system • Check coolant leakage.
• Repair if necessary.
√√√√√
• Replace coolant. Every 2 years
2 Air filter element •Clean.
• Replace if necessary. Every 20–40 hours (more often in
wet or dusty areas)
3Engine oil • Replace (warm engine before draining). √ √√√
4 Engine oil filter
cartridge • Replace.
√√√
5 Final gear oil/Dif-
ferential gear oil • Check oil level/oil leakage.
• Replace.
√√
6 *Front brake • Check operation/brake pad wear/fluid leak-
age/see page 8-8.
• Correct if necessary. Replace pads if worn to the limit. √√√√√
7 *Rear brake • Check operation/brake pad wear/fluid leak-
age/see page 8-8.
• Correct if necessary. Replace pads if worn to the limit. √√√√√
U2MB7AE0.book Page 6 Thursday, January 29, 2015 3:42 PM
Page 120 of 186

8-8
8
EBU32330TIPSome maintenance items need more frequent serv ice if you are riding in unusually wet, dusty,
sandy or muddy areas, or at full throttle.
Hydraulic brake service
• Regularly check and, if necessary, correct the brake fluid level.
• Every two years replace the internal components of the brake master cylinder and calipers,
and change the brake fluid.18 *Drive shaft uni-
versal joint • Lubricate with lithium-soap-based grease.
√√√
19 *Engine mount • Check for cracks or damage.
• Check bolt tightness.
√√√
20 *Front and rear
axle boots • Check for cracks or other damage, and re-
place if necessary. √√
21 *Fittings and fas-
teners • Check all chassis fittings and fasteners.
• Correct if necessary.
√√√√√
NO. ITEM ROUTINE
INITIAL EVERY
Whichev- er comes first month136612
km
(mi) 320
(200) 1200
(750) 2400
(1500) 2400
(1500) 4800
(3000)
hours 20 75 150 150 300U2MB7AE0.book Page 8 Thursday, January 29, 2015 3:42 PM
Page 126 of 186
8-14
8
EBU33702Engine oil and oil filter cartridgeCheck engine oil level before each operation.
In addition, change the oil and the oil filter car-
tridge at the intervals specified in the periodic
maintenance and lubrication chart.
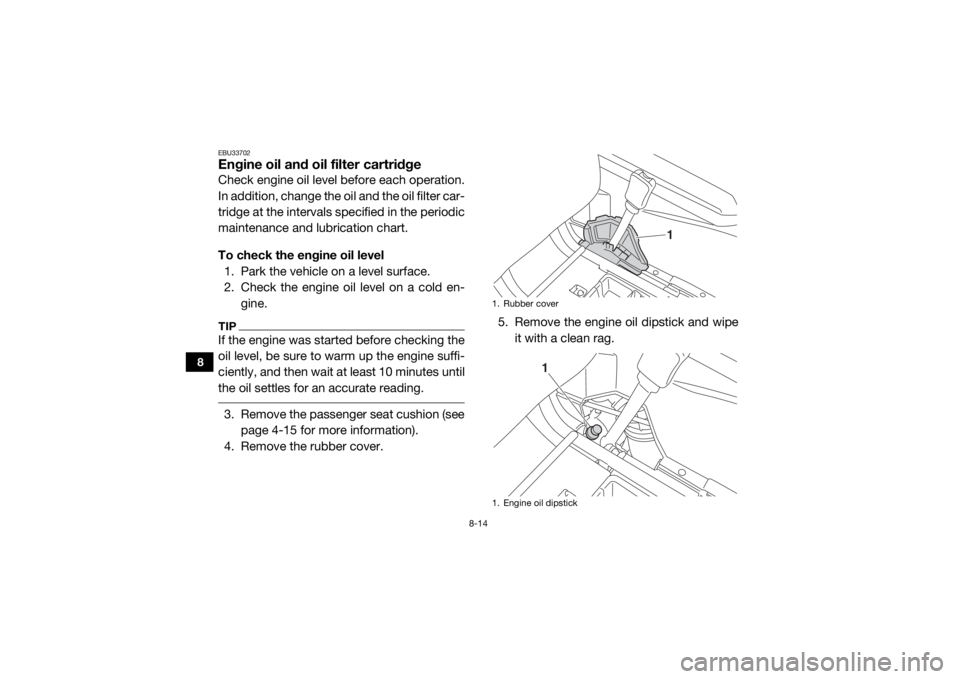
To check the engine oil level
1. Park the vehicle on a level surface.
2. Check the engine oil level on a cold en- gine.TIPIf the engine was started before checking the
oil level, be sure to warm up the engine suffi-
ciently, and then wait at least 10 minutes until
the oil settles for an accurate reading. 3. Remove the passenger seat cushion (seepage 4-15 for more information).
4. Remove the rubber cover. 5. Remove the engine oil dipstick and wipe
it with a clean rag.
1. Rubber cover
1. Engine oil dipstick
1
1
U2MB7AE0.book Page 14 Thursday, January 29, 2015 3:42 PM
Page 127 of 186
8-15
8
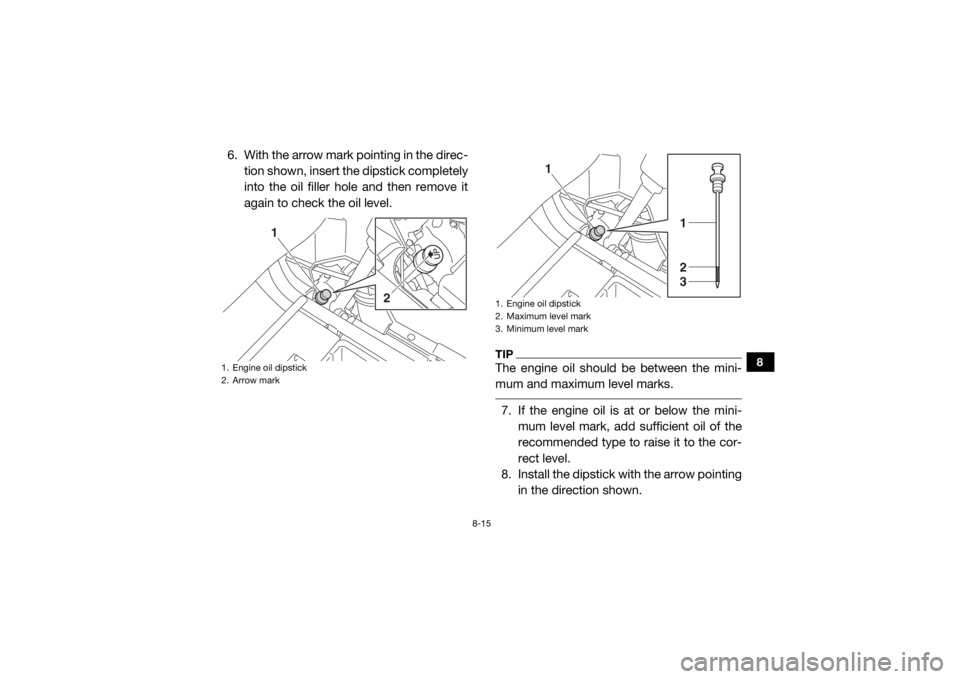
6. With the arrow mark pointing in the direc-tion shown, insert the dipstick completely
into the oil filler hole and then remove it
again to check the oil level.
TIPThe engine oil should be between the mini-
mum and maximum level marks. 7. If the engine oil is at or below the mini-mum level mark, add sufficient oil of the
recommended type to raise it to the cor-
rect level.
8. Install the dipstick with the arrow pointing
in the direction shown.
1. Engine oil dipstick
2. Arrow mark
1
2
1. Engine oil dipstick
2. Maximum level mark
3. Minimum level mark
1
2
3
1
U2MB7AE0.book Page 15 Thursday, January 29, 2015 3:42 PM
Page 131 of 186
8-19
8
TIPBe sure to wipe off spilled oil on any parts af-
ter the engine and exhaust system have
cooled down. NOTICEECB00301In order to prevent clutch slippage (since
the engine oil also lubricates the clutch),
do not mix any chemical additives. Do
not use oils with a diesel specification of
“CD” or oils of a higher quality than
specified. In addition, do not use oils la-
beled “ENERGY CONSERVING II” or
higher.
Make sure that no foreign material en-
ters the crankcase. 14. Start the engine, and then let it idle for
several minutes while checking it for oil
leakage. If oil is leaking, immediately turn
the engine off and check for the cause.
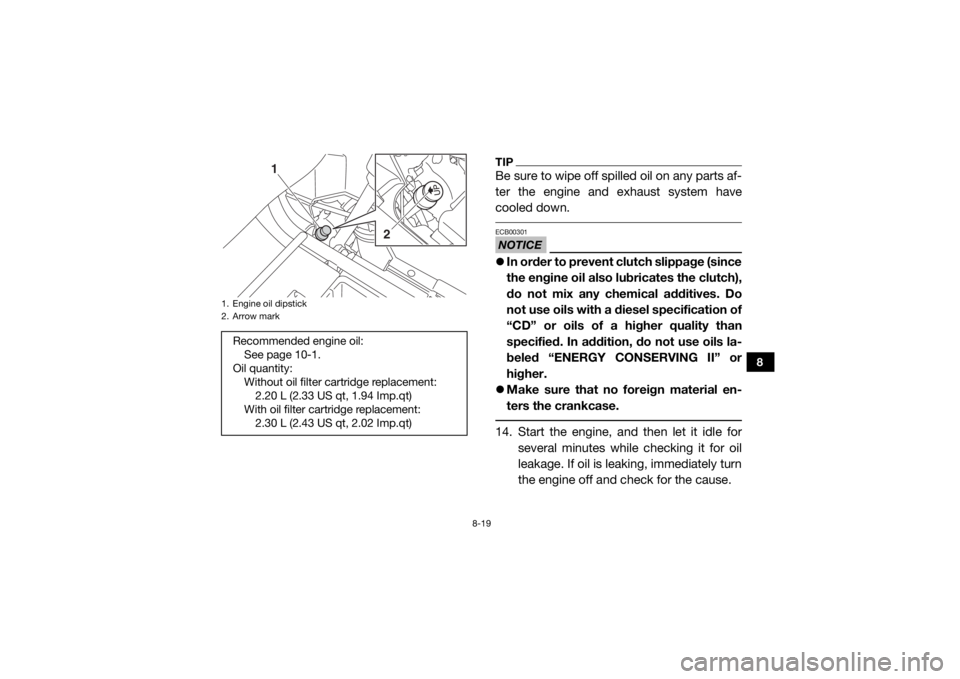
1. Engine oil dipstick
2. Arrow markRecommended engine oil:See page 10-1.
Oil quantity: Without oil filter cartridge replacement:2.20 L (2.33 US qt, 1.94 Imp.qt)
With oil filter cartridge replacement: 2.30 L (2.43 US qt, 2.02 Imp.qt)
1
2
U2MB7AE0.book Page 19 Thursday, January 29, 2015 3:42 PM
Page 132 of 186
8-20
8
15. Turn the engine off, wait at least 10 min-utes, and then check the oil level and cor-
rect it if necessary.
16. Install the rubber cover.
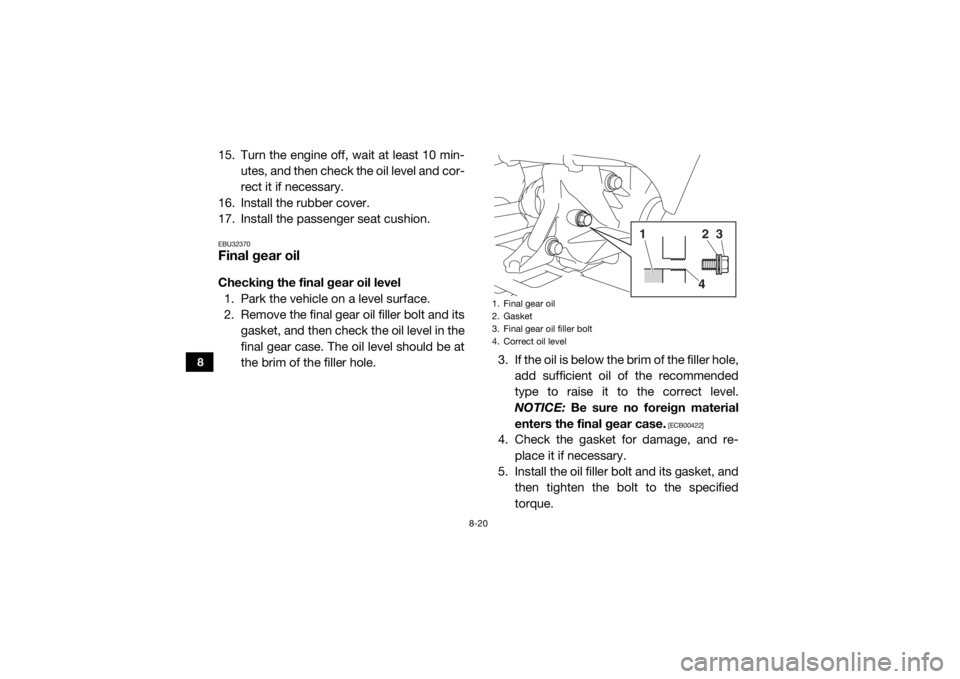
17. Install the passenger seat cushion.EBU32370Final gear oilChecking the final gear oil level 1. Park the vehicle on a level surface.
2. Remove the final gear oil filler bolt and its gasket, and then check the oil level in the
final gear case. The oil level should be at
the brim of the filler hole. 3. If the oil is below the brim of the filler hole,
add sufficient oil of the recommended
type to raise it to the correct level.
NOTICE: Be sure no foreign material
enters the final gear case.
[ECB00422]
4. Check the gasket for damage, and re- place it if necessary.
5. Install the oil filler bolt and its gasket, and then tighten the bolt to the specified
torque.1. Final gear oil
2. Gasket
3. Final gear oil filler bolt
4. Correct oil level
24
3
1
U2MB7AE0.book Page 20 Thursday, January 29, 2015 3:42 PM