Rear shock YAMAHA WR 250F 2005 Owner's Manual
[x] Cancel search | Manufacturer: YAMAHA, Model Year: 2005, Model line: WR 250F, Model: YAMAHA WR 250F 2005Pages: 864, PDF Size: 18.1 MB
Page 732 of 864
5 - 151
CHASREAR SHOCK ABSORBER
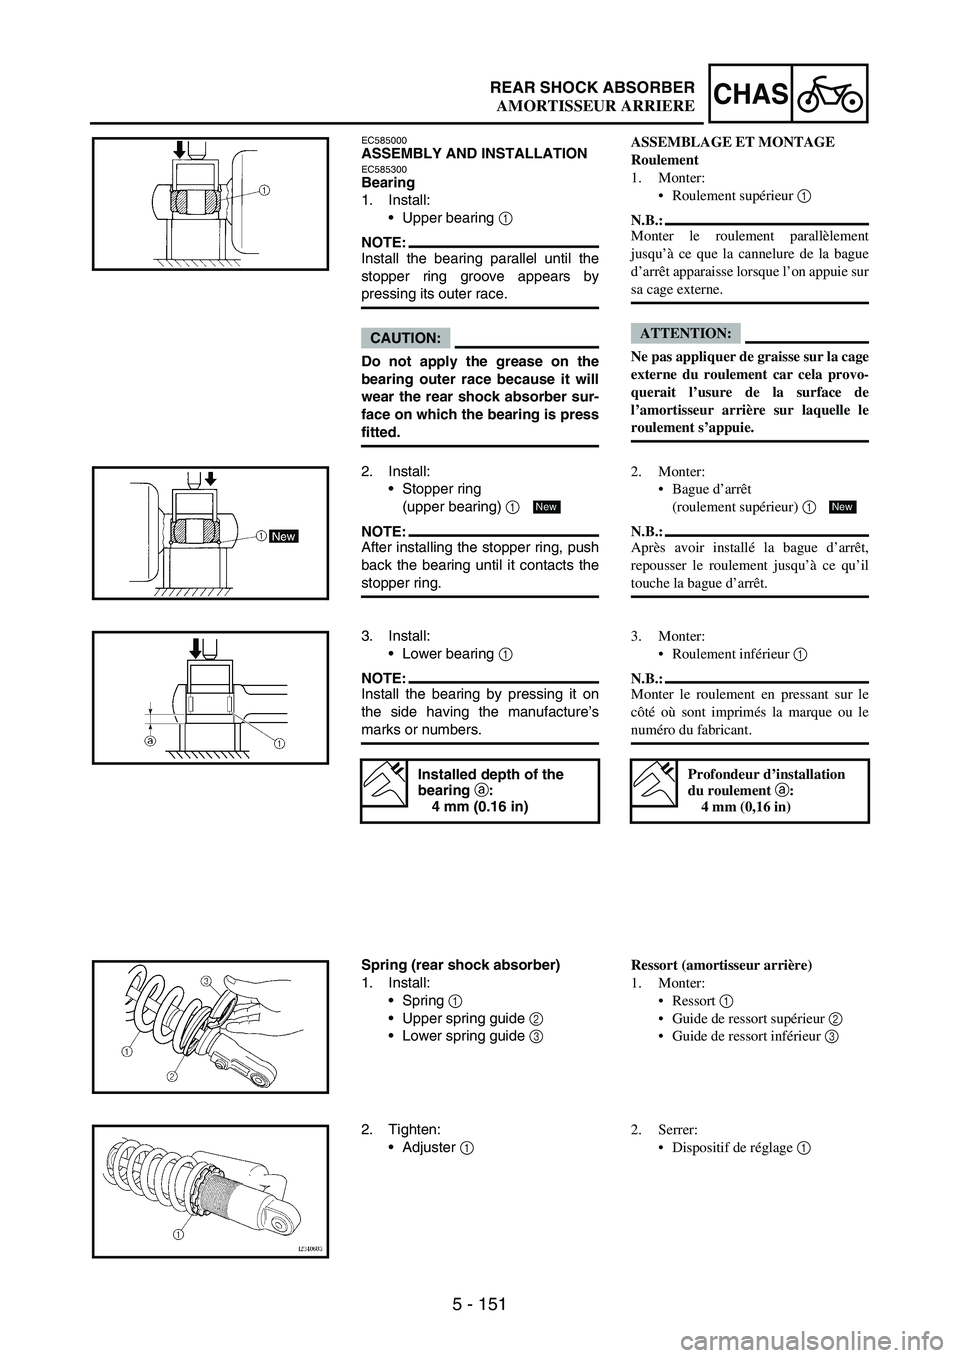
EC585000ASSEMBLY AND INSTALLATIONEC585300Bearing
1. Install:
Upper bearing
1
NOTE:Install the bearing parallel until the
stopper ring groove appears by
pressing its outer race.
CAUTION:
Do not apply the grease on the
bearing outer race because it will
wear the rear shock absorber sur-
face on which the bearing is press
fitted.
2. Install:
Stopper ring
(upper bearing)
1
NOTE:After installing the stopper ring, push
back the bearing until it contacts the
stopper ring.
New
3. Install:
Lower bearing
1
NOTE:Install the bearing by pressing it on
the side having the manufacture’s
marks or numbers.
Installed depth of the
bearing a
:
4 mm (0.16 in)
Spring (rear shock absorber)
1. Install:
Spring
1
Upper spring guide
2
Lower spring guide
3
2. Tighten:
Adjuster
1
ASSEMBLAGE ET MONTAGE
Roulement
1. Monter:
Roulement supérieur 1
N.B.:
Monter le roulement parallèlement
jusqu’à ce que la cannelure de la bague
d’arrêt apparaisse lorsque l’on appuie sur
sa cage externe.
ATTENTION:
Ne pas appliquer de graisse sur la cage
externe du roulement car cela provo-
querait l’usure de la surface de
l’amortisseur arrière sur laquelle le
roulement s’appuie.
2. Monter:
Bague d’arrêt
(roulement supérieur) 1
N.B.:
Après avoir installé la bague d’arrêt,
repousser le roulement jusqu’à ce qu’il
touche la bague d’arrêt.
New
3. Monter:
Roulement inférieur 1
N.B.:
Monter le roulement en pressant sur le
côté où sont imprimés la marque ou le
numéro du fabricant.
Profondeur d’installation
du roulement a:
4 mm (0,16 in)
Ressort (amortisseur arrière)
1. Monter:
Ressort 1
Guide de ressort supérieur 2
Guide de ressort inférieur 3
2. Serrer:
Dispositif de réglage 1
AMORTISSEUR ARRIERE
Page 734 of 864
5 - 153
CHASREAR SHOCK ABSORBER
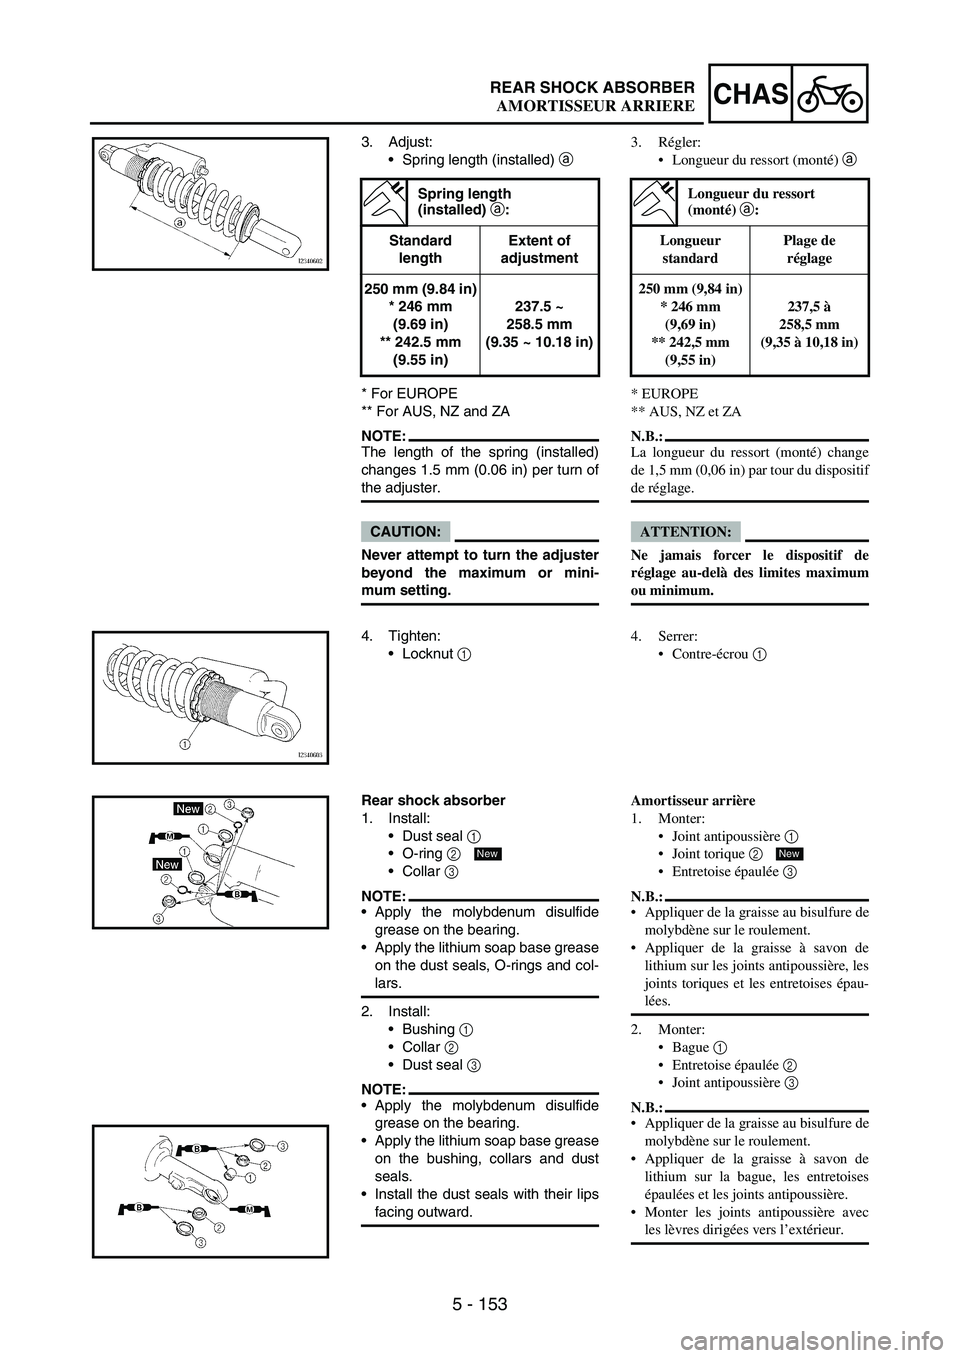
3. Adjust:
Spring length (installed)
a
* For EUROPE
** For AUS, NZ and ZA
NOTE:The length of the spring (installed)
changes 1.5 mm (0.06 in) per turn of
the adjuster.
CAUTION:
Never attempt to turn the adjuster
beyond the maximum or mini-
mum setting.
Spring length
(installed) a
:
Standard
lengthExtent of
adjustment
250 mm (9.84 in)
* 246 mm
(9.69 in)
** 242.5 mm
(9.55 in)237.5 ~
258.5 mm
(9.35 ~ 10.18 in)
4. Tighten:
Locknut
1
Rear shock absorber
1. Install:
Dust seal
1
O-ring
2
Collar
3
NOTE:Apply the molybdenum disulfide
grease on the bearing.
Apply the lithium soap base grease
on the dust seals, O-rings and col-
lars.
2. Install:
Bushing
1
Collar
2
Dust seal
3
NOTE:Apply the molybdenum disulfide
grease on the bearing.
Apply the lithium soap base grease
on the bushing, collars and dust
seals.
Install the dust seals with their lips
facing outward.
New
3. Régler:
Longueur du ressort (monté) a
* EUROPE
** AUS, NZ et ZA
N.B.:
La longueur du ressort (monté) change
de 1,5 mm (0,06 in) par tour du dispositif
de réglage.
ATTENTION:
Ne jamais forcer le dispositif de
réglage au-delà des limites maximum
ou minimum.
Longueur du ressort
(monté) a:
Longueur
standardPlage de
réglage
250 mm (9,84 in)
* 246 mm
(9,69 in)
** 242,5 mm
(9,55 in)237,5 à
258,5 mm
(9,35 à 10,18 in)
4. Serrer:
Contre-écrou 1
Amortisseur arrière
1. Monter:
Joint antipoussière 1
Joint torique 2
Entretoise épaulée 3
N.B.:
Appliquer de la graisse au bisulfure de
molybdène sur le roulement.
Appliquer de la graisse à savon de
lithium sur les joints antipoussière, les
joints toriques et les entretoises épau-
lées.
2. Monter:
Bague 1
Entretoise épaulée 2
Joint antipoussière 3
N.B.:
Appliquer de la graisse au bisulfure de
molybdène sur le roulement.
Appliquer de la graisse à savon de
lithium sur la bague, les entretoises
épaulées et les joints antipoussière.
Monter les joints antipoussière avec
les lèvres dirigées vers l’extérieur.
New
AMORTISSEUR ARRIERE
Page 736 of 864
5 - 155
CHASREAR SHOCK ABSORBER
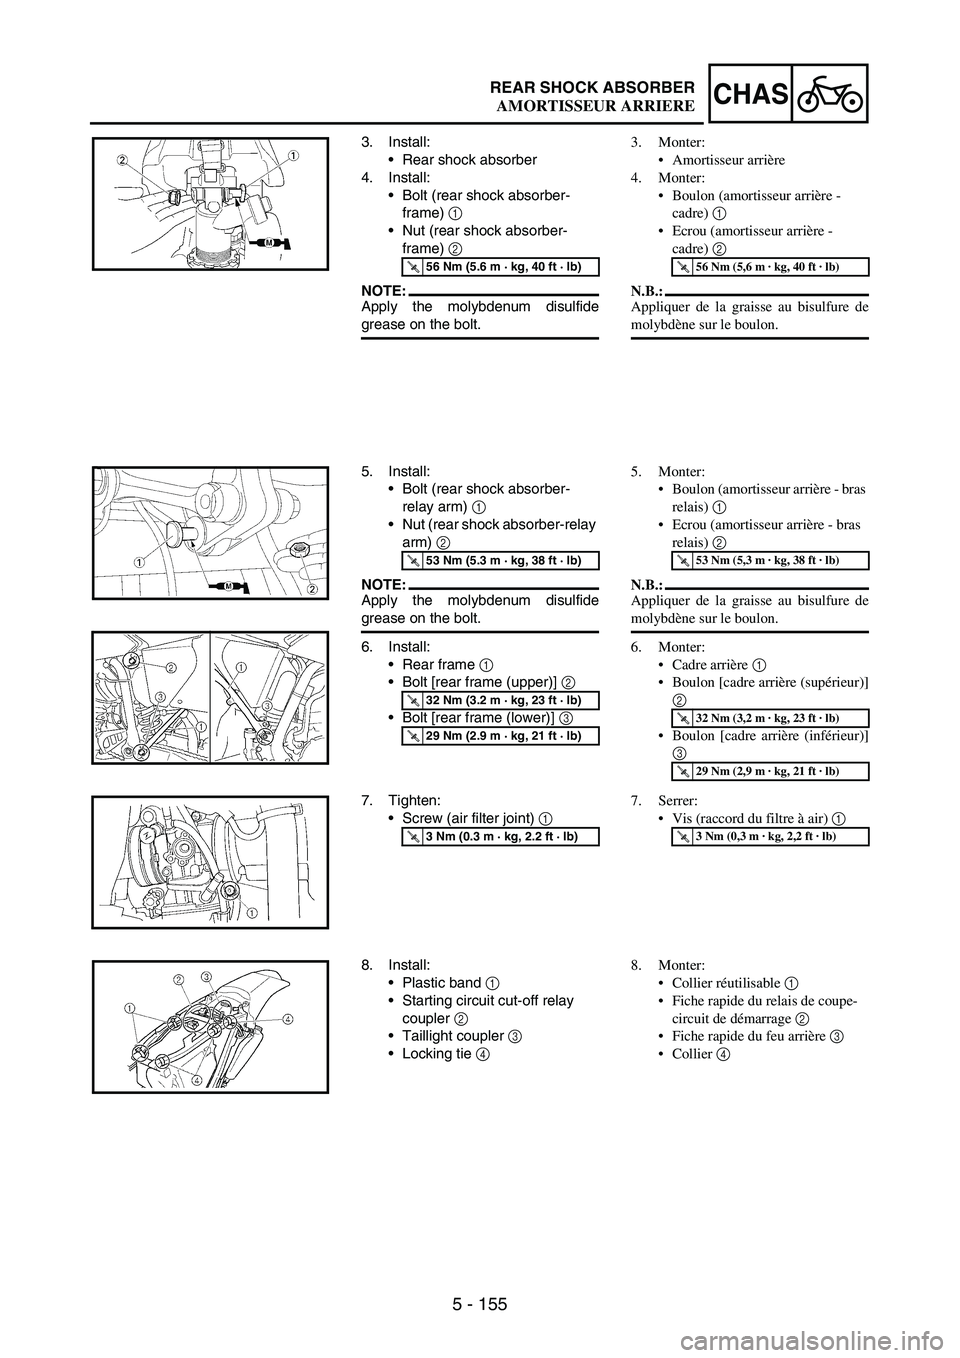
3. Install:
Rear shock absorber
4. Install:
Bolt (rear shock absorber-
frame)
1
Nut (rear shock absorber-
frame)
2
NOTE:Apply the molybdenum disulfide
grease on the bolt.
T R..56 Nm (5.6 m · kg, 40 ft · lb)
5. Install:
Bolt (rear shock absorber-
relay arm)
1
Nut (rear shock absorber-relay
arm)
2
NOTE:Apply the molybdenum disulfide
grease on the bolt.
6. Install:
Rear frame
1
Bolt [rear frame (upper)]
2
Bolt [rear frame (lower)]
3
T R..53 Nm (5.3 m · kg, 38 ft · lb)
T R..32 Nm (3.2 m · kg, 23 ft · lb)
T R..29 Nm (2.9 m · kg, 21 ft · lb)
7. Tighten:
Screw (air filter joint)
1
T R..3 Nm (0.3 m · kg, 2.2 ft · lb)
8. Install:
Plastic band
1
Starting circuit cut-off relay
coupler
2
Taillight coupler
3
Locking tie
4
3. Monter:
Amortisseur arrière
4. Monter:
Boulon (amortisseur arrière -
cadre) 1
Ecrou (amortisseur arrière -
cadre) 2
N.B.:
Appliquer de la graisse au bisulfure de
molybdène sur le boulon.
T R..56 Nm (5,6 m · kg, 40 ft · lb)
5. Monter:
Boulon (amortisseur arrière - bras
relais) 1
Ecrou (amortisseur arrière - bras
relais) 2
N.B.:
Appliquer de la graisse au bisulfure de
molybdène sur le boulon.
6. Monter:
Cadre arrière 1
Boulon [cadre arrière (supérieur)]
2
Boulon [cadre arrière (inférieur)]
3
T R..53 Nm (5,3 m · kg, 38 ft · lb)
T R..32 Nm (3,2 m · kg, 23 ft · lb)
T R..29 Nm (2,9 m · kg, 21 ft · lb)
7. Serrer:
Vis (raccord du filtre à air) 1
T R..3 Nm (0,3 m · kg, 2,2 ft · lb)
8. Monter:
Collier réutilisable 1
Fiche rapide du relais de coupe-
circuit de démarrage 2
Fiche rapide du feu arrière 3
Collier 4
AMORTISSEUR ARRIERE
Page 848 of 864
7 - 37
TUNSETTING
Setting of spring after
replacement
After replacement, be sure to adjust
the spring to the set length [sunken
length 90 ~ 100 mm (3.5 ~ 3.9 in)]
and set it.
1. Use of soft spring
Set the soft spring for less
rebound damping to compen-
sate for its less spring load.
Run with the rebound damping
adjuster one or two clicks on
the softer side and readjust it
to suit your preference.
2. Use of stiff spring
Set the soft spring for more
rebound damping to compen-
sate for its greater spring load.
Run with the rebound damping
adjuster one or two clicks on
the stiffer side and readjust it
to suit your preference.
*Adjusting the rebound damp-
ing will be followed more or
less by a change in the com-
pression damping. For correc-
tion, turn the low compression
damping adjuster on the softer
side.
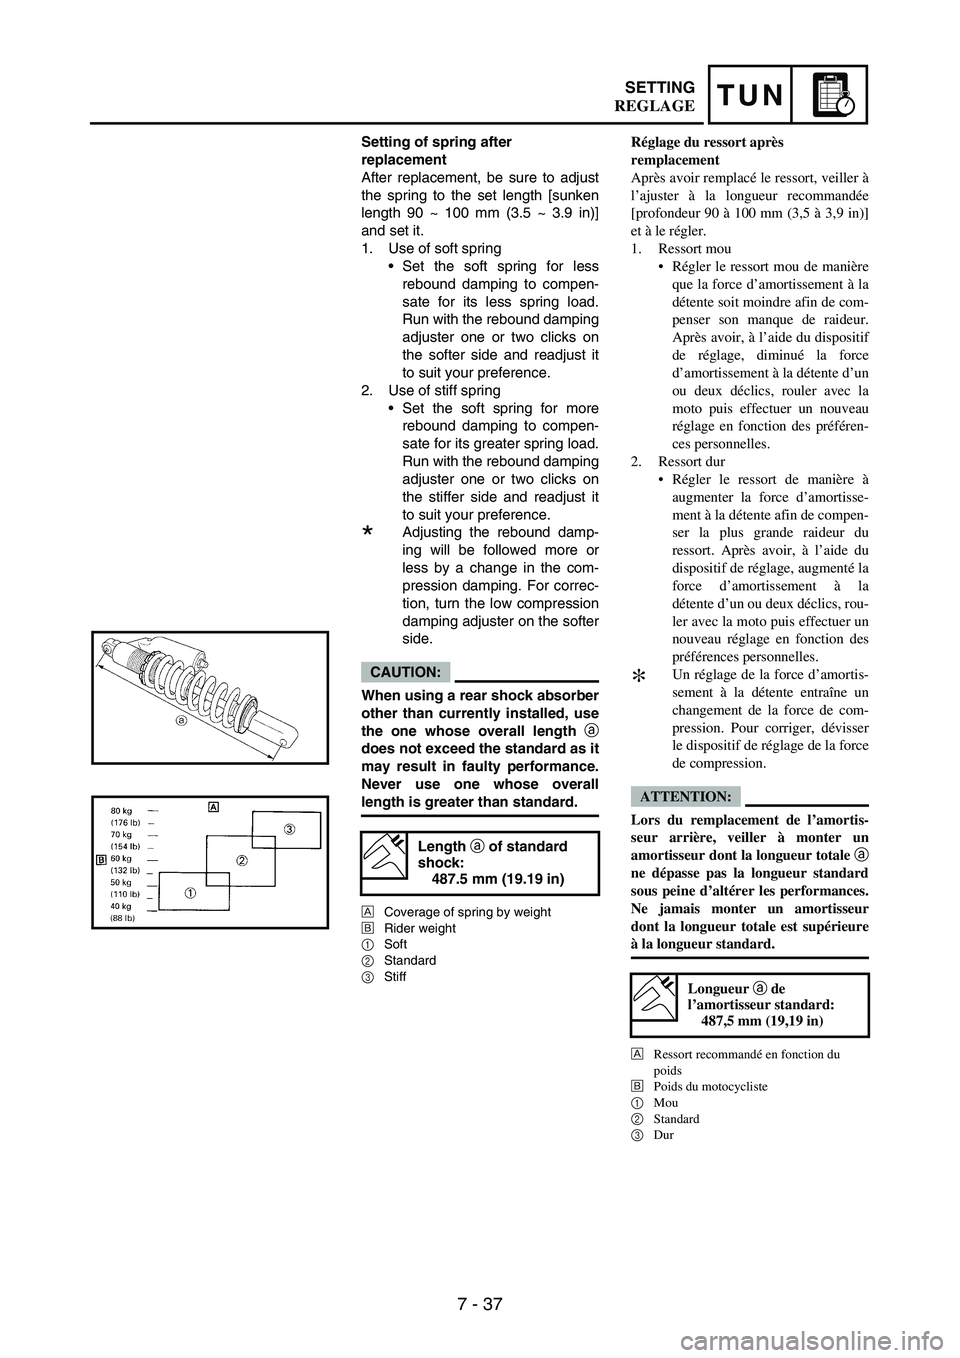
CAUTION:
When using a rear shock absorber
other than currently installed, use
the one whose overall length a
does not exceed the standard as it
may result in faulty performance.
Never use one whose overall
length is greater than standard.
È
Coverage of spring by weight
É
Rider weight
1Soft
2Standard
3Stiff
Length a
of standard
shock:
487.5 mm (19.19 in)
Réglage du ressort après
remplacement
Après avoir remplacé le ressort, veiller à
l’ajuster à la longueur recommandée
[profondeur 90 à 100 mm (3,5 à 3,9 in)]
et à le régler.
1. Ressort mou
Régler le ressort mou de manière
que la force d’amortissement à la
détente soit moindre afin de com-
penser son manque de raideur.
Après avoir, à l’aide du dispositif
de réglage, diminué la force
d’amortissement à la détente d’un
ou deux déclics, rouler avec la
moto puis effectuer un nouveau
réglage en fonction des préféren-
ces personnelles.
2. Ressort dur
Régler le ressort de manière à
augmenter la force d’amortisse-
ment à la détente afin de compen-
ser la plus grande raideur du
ressort. Après avoir, à l’aide du
dispositif de réglage, augmenté la
force d’amortissement à la
détente d’un ou deux déclics, rou-
ler avec la moto puis effectuer un
nouveau réglage en fonction des
préférences personnelles.
*Un réglage de la force d’amortis-
sement à la détente entraîne un
changement de la force de com-
pression. Pour corriger, dévisser
le dispositif de réglage de la force
de compression.
ATTENTION:
Lors du remplacement de l’amortis-
seur arrière, veiller à monter un
amortisseur dont la longueur totale a
ne dépasse pas la longueur standard
sous peine d’altérer les performances.
Ne jamais monter un amortisseur
dont la longueur totale est supérieure
à la longueur standard.
È
Ressort recommandé en fonction du
poids
É
Poids du motocycliste
1
Mou
2
Standard
3
Dur
Longueur a de
l’amortisseur standard:
487,5 mm (19,19 in)
REGLAGE
Page 850 of 864
7 - 39
TUNSETTING
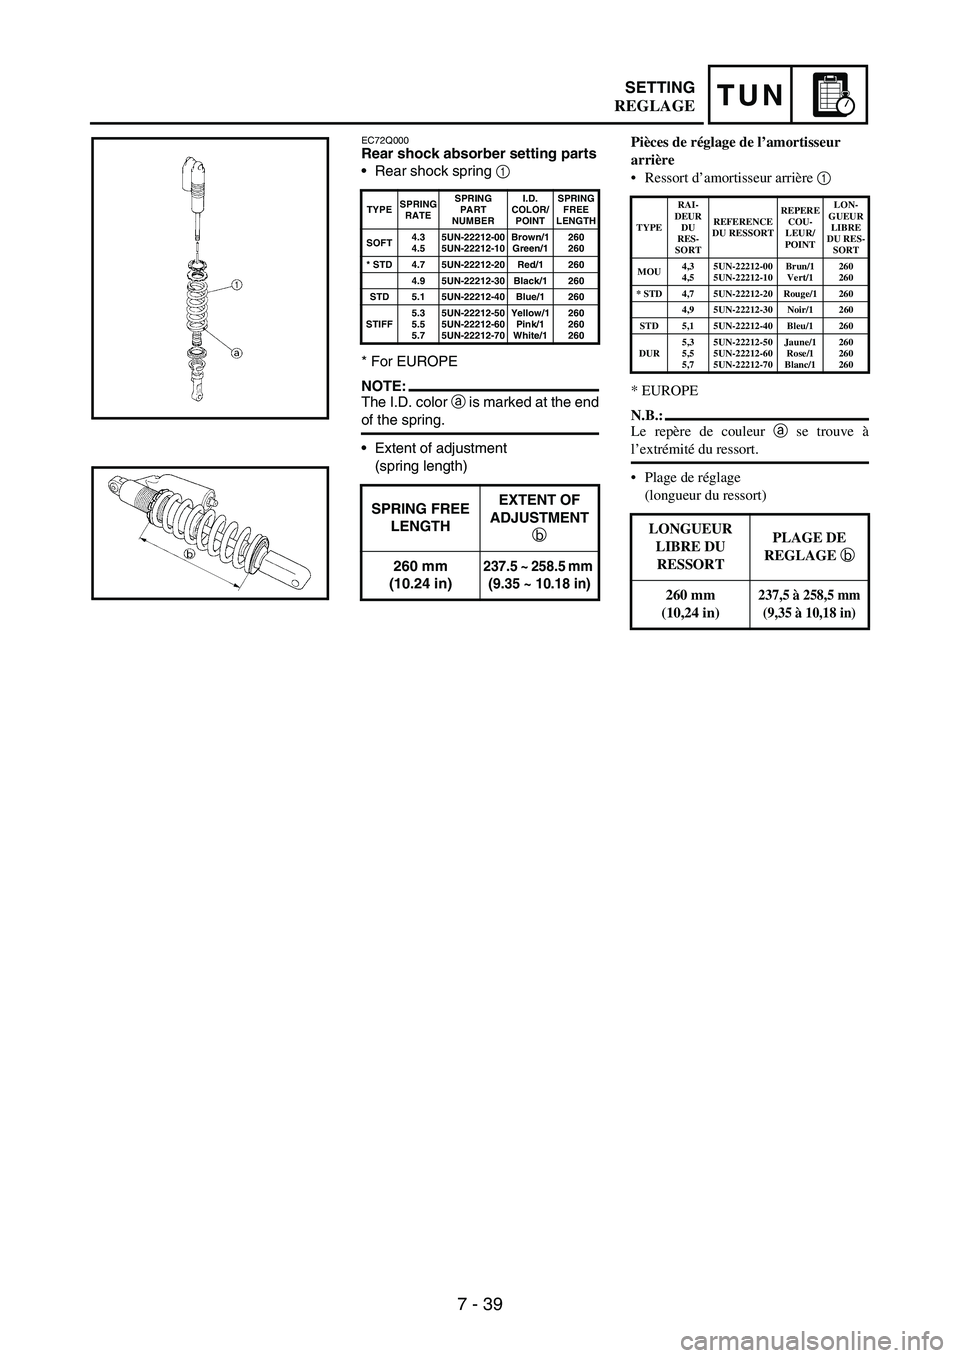
EC72Q000Rear shock absorber setting parts
Rear shock spring
1
* For EUROPE
NOTE:The I.D. color
a is marked at the end
of the spring.
Extent of adjustment
(spring length)
TYPESPRING
RATESPRING
PART
NUMBERI.D.
COLOR/
POINTSPRING
FREE
LENGTH
SOFT4.3
4.55UN-22212-00
5UN-22212-10Brown/1
Green/1260
260
* STD 4.7 5UN-22212-20 Red/1 260
4.9 5UN-22212-30 Black/1 260
STD 5.1 5UN-22212-40 Blue/1 260
STIFF5.3
5.5
5.75UN-22212-50
5UN-22212-60
5UN-22212-70Yellow/1
Pink/1
White/1260
260
260
SPRING FREE
LENGTHEXTENT OF
ADJUSTMENT
b
260 mm
(10.24 in)
237.5 ~ 258.5 mm
(9.35 ~ 10.18 in)
Pièces de réglage de l’amortisseur
arrière
Ressort d’amortisseur arrière 1
* EUROPE
N.B.:
Le repère de couleur a se trouve à
l’extrémité du ressort.
Plage de réglage
(longueur du ressort)
TYPERAI-
DEUR
DU
RES-
SORTREFERENCE
DU RESSORTREPERE
COU-
LEUR/
POINTLON-
GUEUR
LIBRE
DU RES-
SORT
MOU4,3
4,55UN-22212-00
5UN-22212-10Brun/1
Vert/1260
260
* STD 4,7 5UN-22212-20 Rouge/1 260
4,9 5UN-22212-30 Noir/1 260
STD 5,1 5UN-22212-40 Bleu/1 260
DUR5,3
5,5
5,75UN-22212-50
5UN-22212-60
5UN-22212-70Jaune/1
Rose/1
Blanc/1260
260
260
LONGUEUR
LIBRE DU
RESSORT PLAGE DE
REGLAGE b
260 mm
(10,24 in)
237,5 à 258,5 mm
(9,35 à 10,18 in)
REGLAGE
Page 852 of 864
7 - 41
TUNSETTING
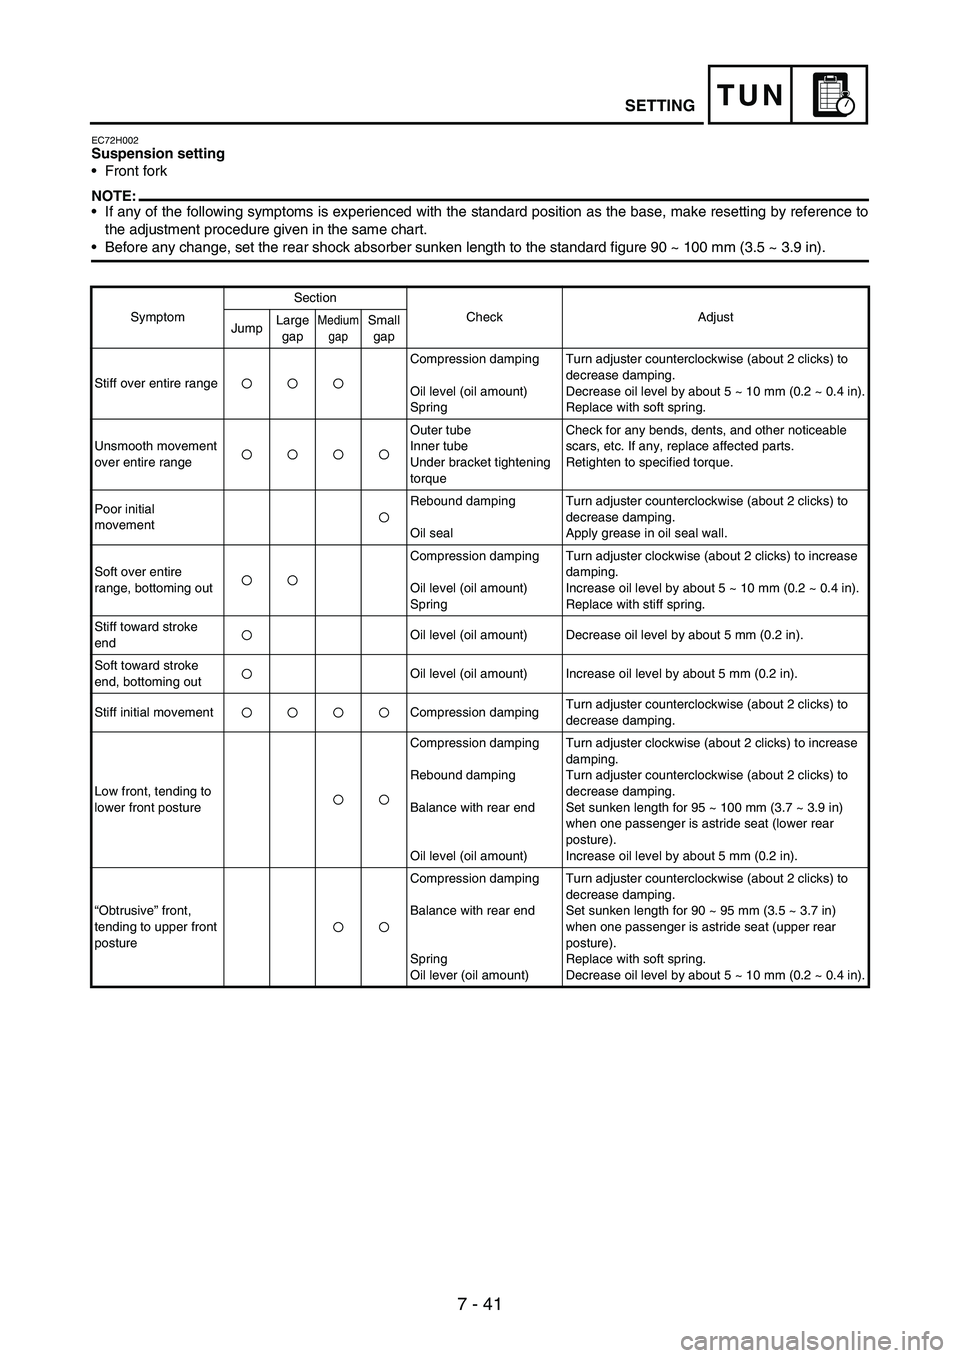
EC72H002Suspension setting
Front fork
NOTE:If any of the following symptoms is experienced with the standard position as the base, make resetting by reference to
the adjustment procedure given in the same chart.
Before any change, set the rear shock absorber sunken length to the standard figure 90 ~ 100 mm (3.5 ~ 3.9 in).
SymptomSection
Check Adjust
JumpLarge
gapMedium
gapSmall
gap
Stiff over entire rangeCompression damping
Oil level (oil amount)
SpringTurn adjuster counterclockwise (about 2 clicks) to
decrease damping.
Decrease oil level by about 5 ~ 10 mm (0.2 ~ 0.4 in).
Replace with soft spring.
Unsmooth movement
over entire rangeOuter tube
Inner tube
Under bracket tightening
torqueCheck for any bends, dents, and other noticeable
scars, etc. If any, replace affected parts.
Retighten to specified torque.
Poor initial
movementRebound damping
Oil sealTurn adjuster counterclockwise (about 2 clicks) to
decrease damping.
Apply grease in oil seal wall.
Soft over entire
range, bottoming outCompression damping
Oil level (oil amount)
SpringTurn adjuster clockwise (about 2 clicks) to increase
damping.
Increase oil level by about 5 ~ 10 mm (0.2 ~ 0.4 in).
Replace with stiff spring.
Stiff toward stroke
endOil level (oil amount) Decrease oil level by about 5 mm (0.2 in).
Soft toward stroke
end, bottoming outOil level (oil amount) Increase oil level by about 5 mm (0.2 in).
Stiff initial movement Compression dampingTurn adjuster counterclockwise (about 2 clicks) to
decrease damping.
Low front, tending to
lower front postureCompression damping
Rebound damping
Balance with rear end
Oil level (oil amount)Turn adjuster clockwise (about 2 clicks) to increase
damping.
Turn adjuster counterclockwise (about 2 clicks) to
decrease damping.
Set sunken length for 95 ~ 100 mm (3.7 ~ 3.9 in)
when one passenger is astride seat (lower rear
posture).
Increase oil level by about 5 mm (0.2 in).
“Obtrusive” front,
tending to upper front
postureCompression damping
Balance with rear end
Spring
Oil lever (oil amount)Turn adjuster counterclockwise (about 2 clicks) to
decrease damping.
Set sunken length for 90 ~ 95 mm (3.5 ~ 3.7 in)
when one passenger is astride seat (upper rear
posture).
Replace with soft spring.
Decrease oil level by about 5 ~ 10 mm (0.2 ~ 0.4 in).
Page 853 of 864
7 - 42
TUNSETTING
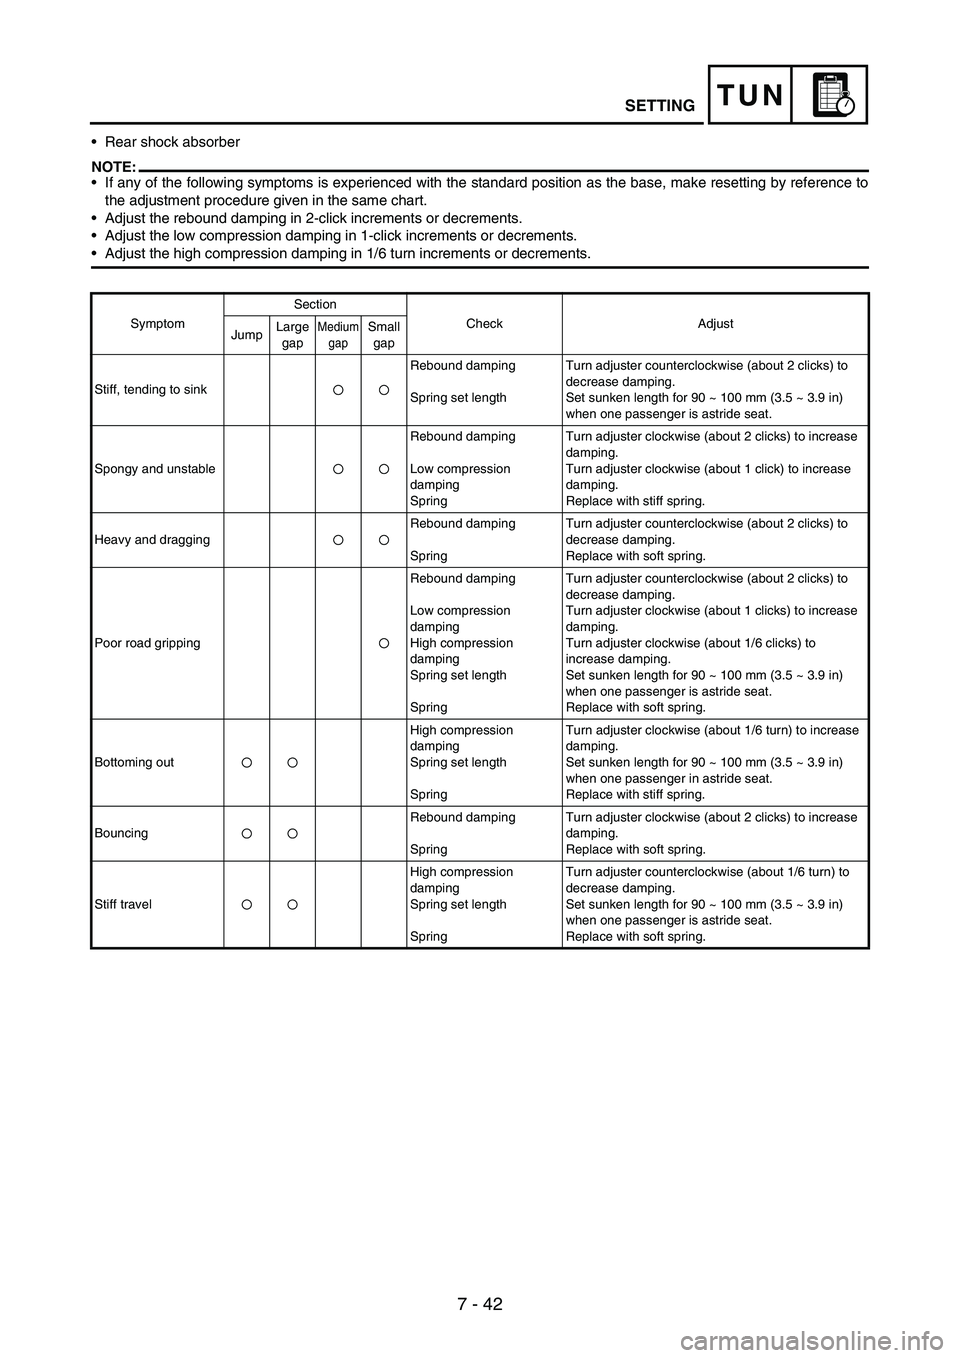
Rear shock absorber
NOTE:If any of the following symptoms is experienced with the standard position as the base, make resetting by reference to
the adjustment procedure given in the same chart.
Adjust the rebound damping in 2-click increments or decrements.
Adjust the low compression damping in 1-click increments or decrements.
Adjust the high compression damping in 1/6 turn increments or decrements.
SymptomSection
Check Adjust
JumpLarge
gapMedium
gapSmall
gap
Stiff, tending to sinkRebound damping
Spring set lengthTurn adjuster counterclockwise (about 2 clicks) to
decrease damping.
Set sunken length for 90 ~ 100 mm (3.5 ~ 3.9 in)
when one passenger is astride seat.
Spongy and unstableRebound damping
Low compression
damping
SpringTurn adjuster clockwise (about 2 clicks) to increase
damping.
Turn adjuster clockwise (about 1 click) to increase
damping.
Replace with stiff spring.
Heavy and draggingRebound damping
SpringTurn adjuster counterclockwise (about 2 clicks) to
decrease damping.
Replace with soft spring.
Poor road grippingRebound damping
Low compression
damping
High compression
damping
Spring set length
SpringTurn adjuster counterclockwise (about 2 clicks) to
decrease damping.
Turn adjuster clockwise (about 1 clicks) to increase
damping.
Turn adjuster clockwise (about 1/6 clicks) to
increase damping.
Set sunken length for 90 ~ 100 mm (3.5 ~ 3.9 in)
when one passenger is astride seat.
Replace with soft spring.
Bottoming outHigh compression
damping
Spring set length
SpringTurn adjuster clockwise (about 1/6 turn) to increase
damping.
Set sunken length for 90 ~ 100 mm (3.5 ~ 3.9 in)
when one passenger in astride seat.
Replace with stiff spring.
BouncingRebound damping
SpringTurn adjuster clockwise (about 2 clicks) to increase
damping.
Replace with soft spring.
Stiff travelHigh compression
damping
Spring set length
SpringTurn adjuster counterclockwise (about 1/6 turn) to
decrease damping.
Set sunken length for 90 ~ 100 mm (3.5 ~ 3.9 in)
when one passenger is astride seat.
Replace with soft spring.