Shock YAMAHA WR 250F 2007 Owners Manual
[x] Cancel search | Manufacturer: YAMAHA, Model Year: 2007, Model line: WR 250F, Model: YAMAHA WR 250F 2007Pages: 912, PDF Size: 23.95 MB
Page 22 of 912
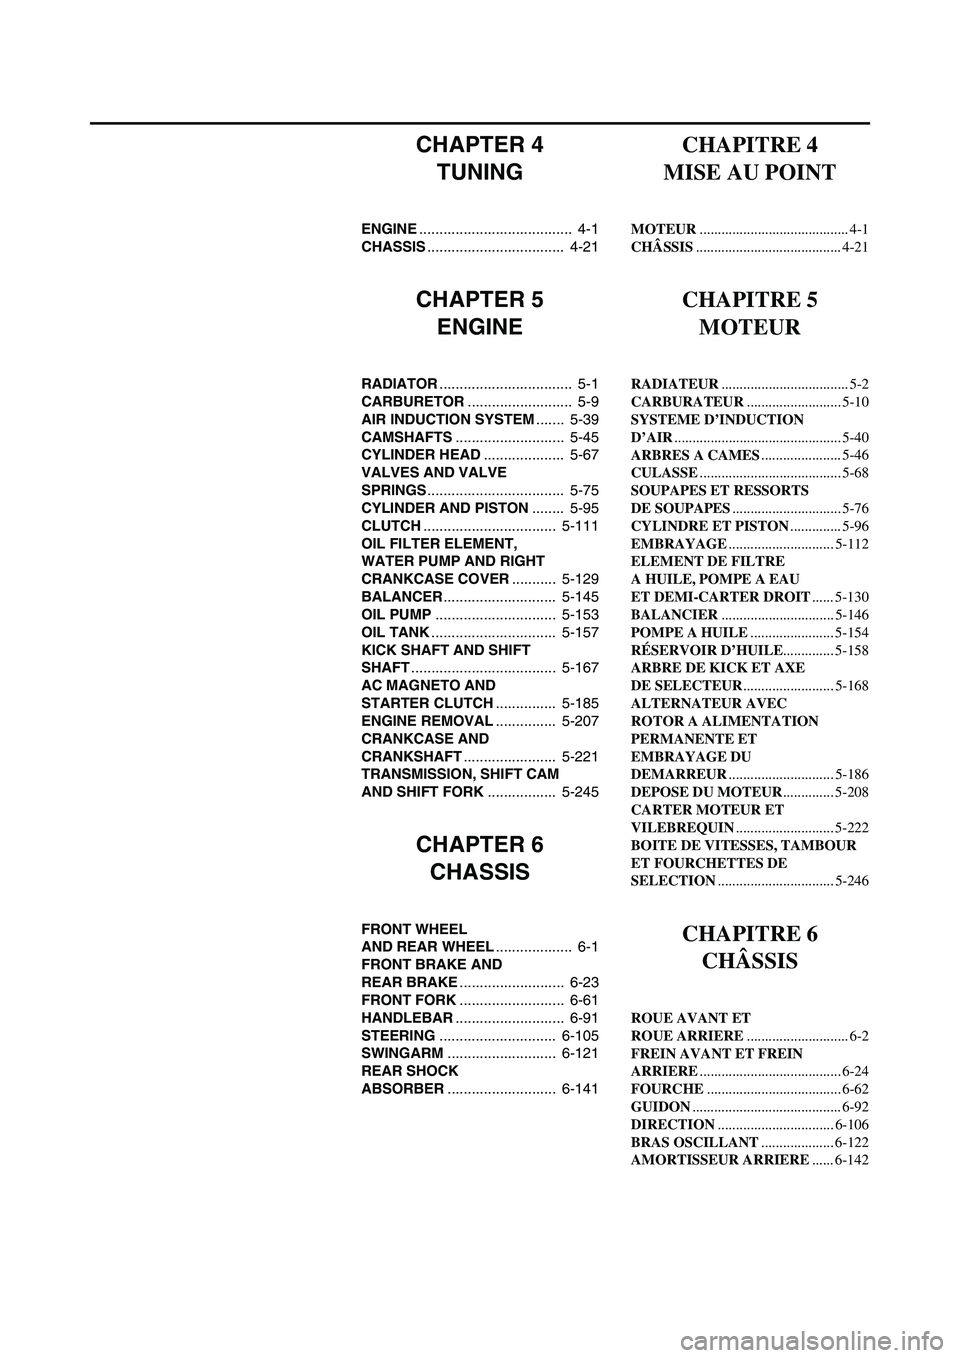
CHAPTER 4
TUNING
ENGINE...................................... 4-1
CHASSIS.................................. 4-21
CHAPTER 5
ENGINE
RADIATOR................................. 5-1
CARBURETOR.......................... 5-9
AIR INDUCTION SYSTEM....... 5-39
CAMSHAFTS........................... 5-45
CYLINDER HEAD.................... 5-67
VALVES AND VALVE
SPRINGS.................................. 5-75
CYLINDER AND PISTON........ 5-95
CLUTCH................................. 5-111
OIL FILTER ELEMENT,
WATER PUMP AND RIGHT
CRANKCASE COVER........... 5-129
BALANCER............................ 5-145
OIL PUMP.............................. 5-153
OIL TANK............................... 5-157
KICK SHAFT AND SHIFT
SHAFT.................................... 5-167
AC MAGNETO AND
STARTER CLUTCH............... 5-185
ENGINE REMOVAL............... 5-207
CRANKCASE AND
CRANKSHAFT....................... 5-221
TRANSMISSION, SHIFT CAM
AND SHIFT FORK................. 5-245
CHAPTER 6
CHASSIS
FRONT WHEEL
AND REAR WHEEL................... 6-1
FRONT BRAKE AND
REAR BRAKE.......................... 6-23
FRONT FORK.......................... 6-61
HANDLEBAR........................... 6-91
STEERING............................. 6-105
SWINGARM........................... 6-121
REAR SHOCK
ABSORBER........................... 6-141
CHAPITRE 4
MISE AU POINT
MOTEUR......................................... 4-1
CHÂSSIS........................................ 4-21
CHAPITRE 5
MOTEUR
RADIATEUR................................... 5-2
CARBURATEUR.......................... 5-10
SYSTEME D’INDUCTION
D’AIR.............................................. 5-40
ARBRES A CAMES...................... 5-46
CULASSE....................................... 5-68
SOUPAPES ET RESSORTS
DE SOUPAPES.............................. 5-76
CYLINDRE ET PISTON.............. 5-96
EMBRAYAGE............................. 5-112
ELEMENT DE FILTRE
A HUILE, POMPE A EAU
ET DEMI-CARTER DROIT...... 5-130
BALANCIER............................... 5-146
POMPE A HUILE....................... 5-154
RÉSERVOIR D’HUILE.............. 5-158
ARBRE DE KICK ET AXE
DE SELECTEUR......................... 5-168
ALTERNATEUR AVEC
ROTOR A ALIMENTATION
PERMANENTE ET
EMBRAYAGE DU
DEMARREUR............................. 5-186
DEPOSE DU MOTEUR.............. 5-208
CARTER MOTEUR ET
VILEBREQUIN........................... 5-222
BOITE DE VITESSES, TAMBOUR
ET FOURCHETTES DE
SELECTION................................ 5-246
CHAPITRE 6
CHÂSSIS
ROUE AVANT ET
ROUE ARRIERE............................ 6-2
FREIN AVANT ET FREIN
ARRIERE....................................... 6-24
FOURCHE..................................... 6-62
GUIDON......................................... 6-92
DIRECTION................................ 6-106
BRAS OSCILLANT.................... 6-122
AMORTISSEUR ARRIERE...... 6-142
Page 84 of 912

1 - 59
GEN
INFO
TORQUE-CHECK POINTS
Frame construction Frame to rear frame
Combined seat and fuel tank Fuel tank to frame
Exhaust system Silencer to rear frame
Engine mounting Frame to engine
Engine bracket to engine
Engine bracket to frame
Steering Steering stem to handlebar Steering stem to frame
Steering stem to upper bracket
Upper bracket to handlebar
Suspension Front Steering stem to front fork Front fork to upper bracket
Front fork to lower bracket
Rear For link type Assembly of links
Link to frame
Link to rear shock absorber
Link to swingarm
Rear Installation of rear
shock absorberRear shock absorber to frame
Rear Installation of swingarm Tightening of pivot shaft
Wheel Installation of wheel Front Tightening of wheel axle
Tightening of axle holder
Rear Tightening of wheel axle
Wheel to rear wheel sprocket
Brake Front Brake caliper to front fork
Brake disc to wheel
Tightening of union bolt
Brake master cylinder to handlebar
Tightening of bleed screw
Tightening of brake hose holder
Rear Brake pedal to frame
Brake disc to wheel
Tightening of union bolt
Brake master cylinder to frame
Tightening of bleed screw
Tightening of brake hose holder
Fuel system Fuel tank to fuel cock
Lubrication system Tightening of oil hose clamp
NOTE:Concerning the tightening torque, refer to
“MAINTENANCE SPECIFICATIONS” sec-
tion in the CHAPTER 2.
TORQUE-CHECK POINTS
Page 96 of 912

GENERAL SPECIFICATIONS
2 - 3
SPEC
Brake:
Front brake type Single disc brake
Operation Right hand operation
Rear brake type Single disc brake
Operation Right foot operation
Suspension:
Front suspension Telescopic fork
Rear suspension Swingarm (link type monocross suspension)
Shock absorber:
Front shock absorber Coil spring/oil damper
Rear shock absorber Coil spring/gas, oil damper
Wheel travel:
Front wheel travel 300 mm (11.8 in)
Rear wheel travel 310 mm (12.2 in)
Electrical:
Ignition system CDI
Generator system AC magneto
Battery type YTX5L-BS
Battery voltage/capacity 12 V/4 AH
Specific gravity 1.320
Headlight type: Quartz bulb (halogen)
Bulb wattage × quantity:
Headlight 12 V 35/36.5 W × 1
Taillight 12 V 1.6/0.3 W × 1
Page 105 of 912
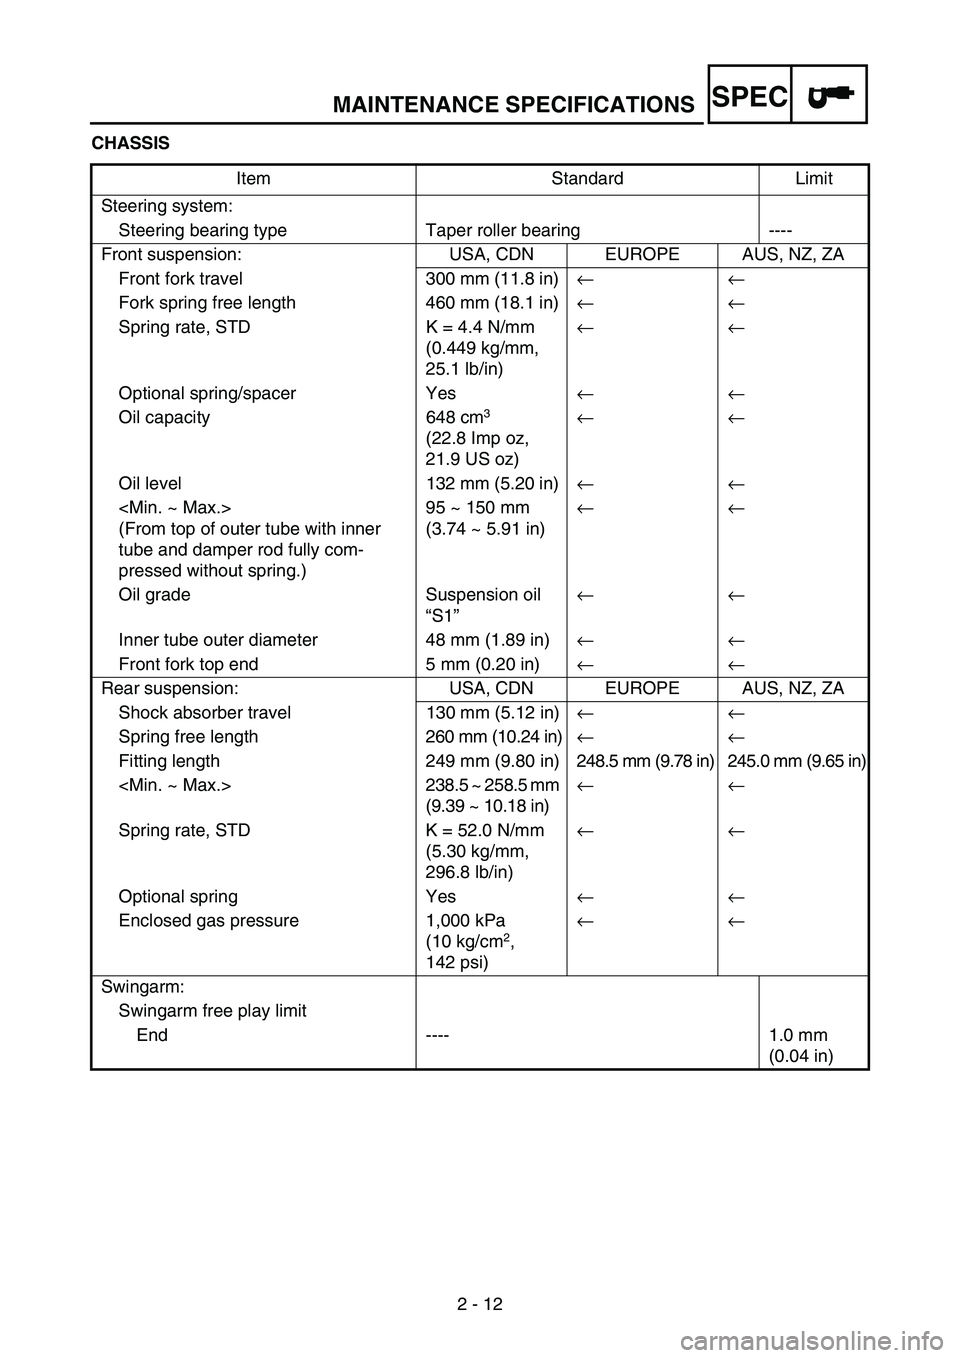
MAINTENANCE SPECIFICATIONS
2 - 12
SPEC
CHASSIS
Item Standard Limit
Steering system:
Steering bearing type Taper roller bearing ----
Front suspension: USA, CDN EUROPE AUS, NZ, ZA
Front fork travel 300 mm (11.8 in)←←
Fork spring free length 460 mm (18.1 in)←←
Spring rate, STD K = 4.4 N/mm
(0.449 kg/mm,
25.1 lb/in)←←
Optional spring/spacer Yes←←
Oil capacity 648 cm
3
(22.8 Imp oz,
21.9 US oz) ←←
Oil level 132 mm (5.20 in)←←
(From top of outer tube with inner
tube and damper rod fully com-
pressed without spring.)95 ~ 150 mm
(3.74 ~ 5.91 in)←←
Oil grade Suspension oil
“S1”←←
Inner tube outer diameter 48 mm (1.89 in)←←
Front fork top end 5 mm (0.20 in)←←
Rear suspension: USA, CDN EUROPE AUS, NZ, ZA
Shock absorber travel 130 mm (5.12 in)← ←
Spring free length260 mm (10.24 in)← ←
Fitting length 249 mm (9.80 in) 248.5 mm (9.78 in) 245.0 mm (9.65 in)
(9.39 ~ 10.18 in)← ←
Spring rate, STD K = 52.0 N/mm
(5.30 kg/mm,
296.8 lb/in)← ←
Optional spring Yes← ←
Enclosed gas pressure 1,000 kPa
(10 kg/cm
2,
142 psi)← ←
Swingarm:
Swingarm free play limit
End ---- 1.0 mm
(0.04 in)
Page 108 of 912

MAINTENANCE SPECIFICATIONS
2 - 15
SPEC
Part to be tightened Thread size Q’tyTightening torque
Nm m·kg ft·lb
Nipple (spoke)—72 3 0.3 2.2
Rear wheel sprocket M8 × 1.25 6 50 5.0 36
Rear brake disc cover M6 × 1.0 2 10 1.0 7.2
Rear brake caliper protector M6 × 1.0 2 7 0.7 5.1
Drive chain puller adjust bolt and locknut M8 × 1.25 2 19 1.9 13
Engine mounting:
Engine and engine bracket (front) M10 × 1.25 1 53 5.3 38
Engine and frame (lower) M10 × 1.25 1 53 5.3 38
Upper engine bracket and frame M8 × 1.25 4 34 3.4 24
Lower engine bracket and frame M8 × 1.25 4 34 3.4 24
Engine and engine bracket (upper) M10 × 1.25 1 55 5.5 40
Engine guard M6 × 1.0 3 7 0.7 5.1
Regulator M6 × 1.0 2 7 0.7 5.1
Pivot shaft and nut M16 × 1.5 1 85 8.5 61
Relay arm and swingarm M14 × 1.5 1 70 7.0 50
Relay arm and connecting rod M14 × 1.5 1 80 8.0 58
Connecting rod and frame M14 × 1.5 1 80 8.0 58
Rear shock absorber and frame M10 × 1.25 1 56 5.6 40
Rear shock absorber and relay arm M10 × 1.25 1 53 5.3 38
Rear frame (upper) M8 × 1.25 1 38 3.8 27
Rear frame (lower) M8 × 1.25 2 32 3.2 23
Swingarm and brake hose holder M5 × 0.8 4 2 0.2 1.4
Swingarm and patch M4 × 0.7 4 2 0.2 1.4
Upper drive chain tensioner M8 × 1.25 1 16 1.6 11
Lower drive chain tensioner M8 × 1.25 1 16 1.6 11
Drive chain support M6 × 1.0 3 7 0.7 5.1
Seal guard and swingarm M5 × 0.8 4 6 0.6 4.3
Fuel tank M6 × 1.0 2 9 0.9 6.5
Fuel cock M6 × 1.0 2 4 0.4 2.9
Seat set bracket and fuel tank M6 × 1.0 1 7 0.7 5.1
Fuel tank bracket and fuel tank M6 × 1.0 4 7 0.7 5.1
Air scoop and fuel tank M6 × 1.0 6 7 0.7 5.1
Air scoop and radiator guard (lower) M6 × 1.0 2 6 0.6 4.3
Front fender M6 × 1.0 4 7 0.7 5.1
Rear fender (front) M6 × 1.0 2 7 0.7 5.1
Rear fender (rear) M6 × 1.0 2 11 1.1 8.0
Side cover M6 × 1.0 2 7 0.7 5.1
Seat M8 × 1.25 2 23 2.3 17
Multi-function display bracket and upper
bracketM6 × 1.0 2 7 0.7 5.1
Multi-function display M5 × 0.8 2 4 0.4 2.9
Plate 1 and front fork protector M5 × 0.8 2 4 0.4 2.9
Plate 2 and front fork protector—2 0.5 0.05 0.36
Page 198 of 912
2 - 105
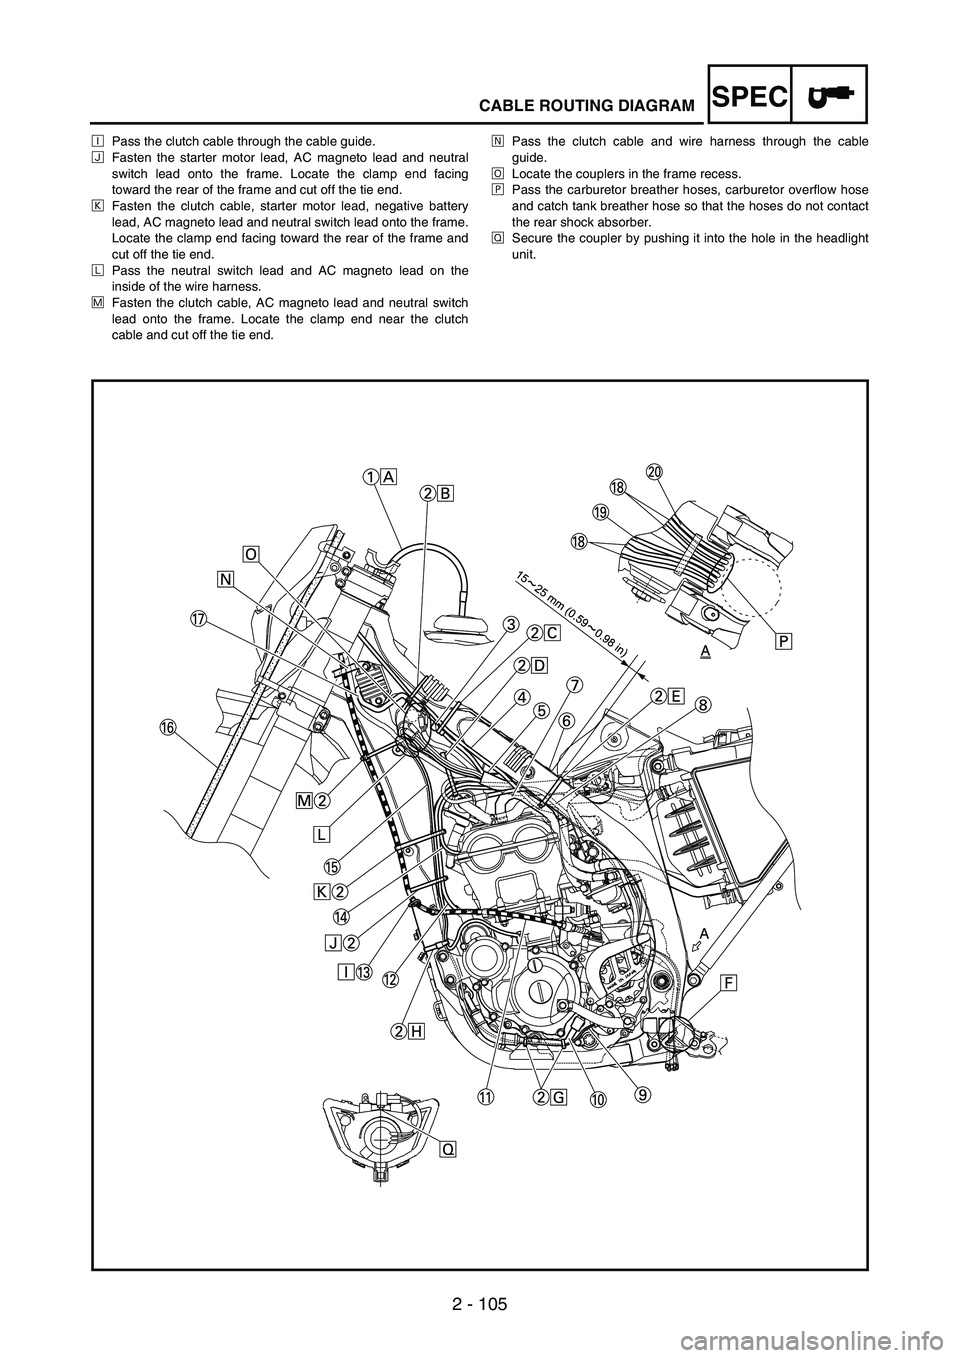
SPECCABLE ROUTING DIAGRAM
ÐPass the clutch cable through the cable guide.
ÑFasten the starter motor lead, AC magneto lead and neutral
switch lead onto the frame. Locate the clamp end facing
toward the rear of the frame and cut off the tie end.
ÒFasten the clutch cable, starter motor lead, negative battery
lead, AC magneto lead and neutral switch lead onto the frame.
Locate the clamp end facing toward the rear of the frame and
cut off the tie end.
ÓPass the neutral switch lead and AC magneto lead on the
inside of the wire harness.
ÔFasten the clutch cable, AC magneto lead and neutral switch
lead onto the frame. Locate the clamp end near the clutch
cable and cut off the tie end.ÕPass the clutch cable and wire harness through the cable
guide.
ÖLocate the couplers in the frame recess.
×Pass the carburetor breather hoses, carburetor overflow hose
and catch tank breather hose so that the hoses do not contact
the rear shock absorber.
ØSecure the coupler by pushing it into the hole in the headlight
unit.
Page 202 of 912
SPEC
2 - 109
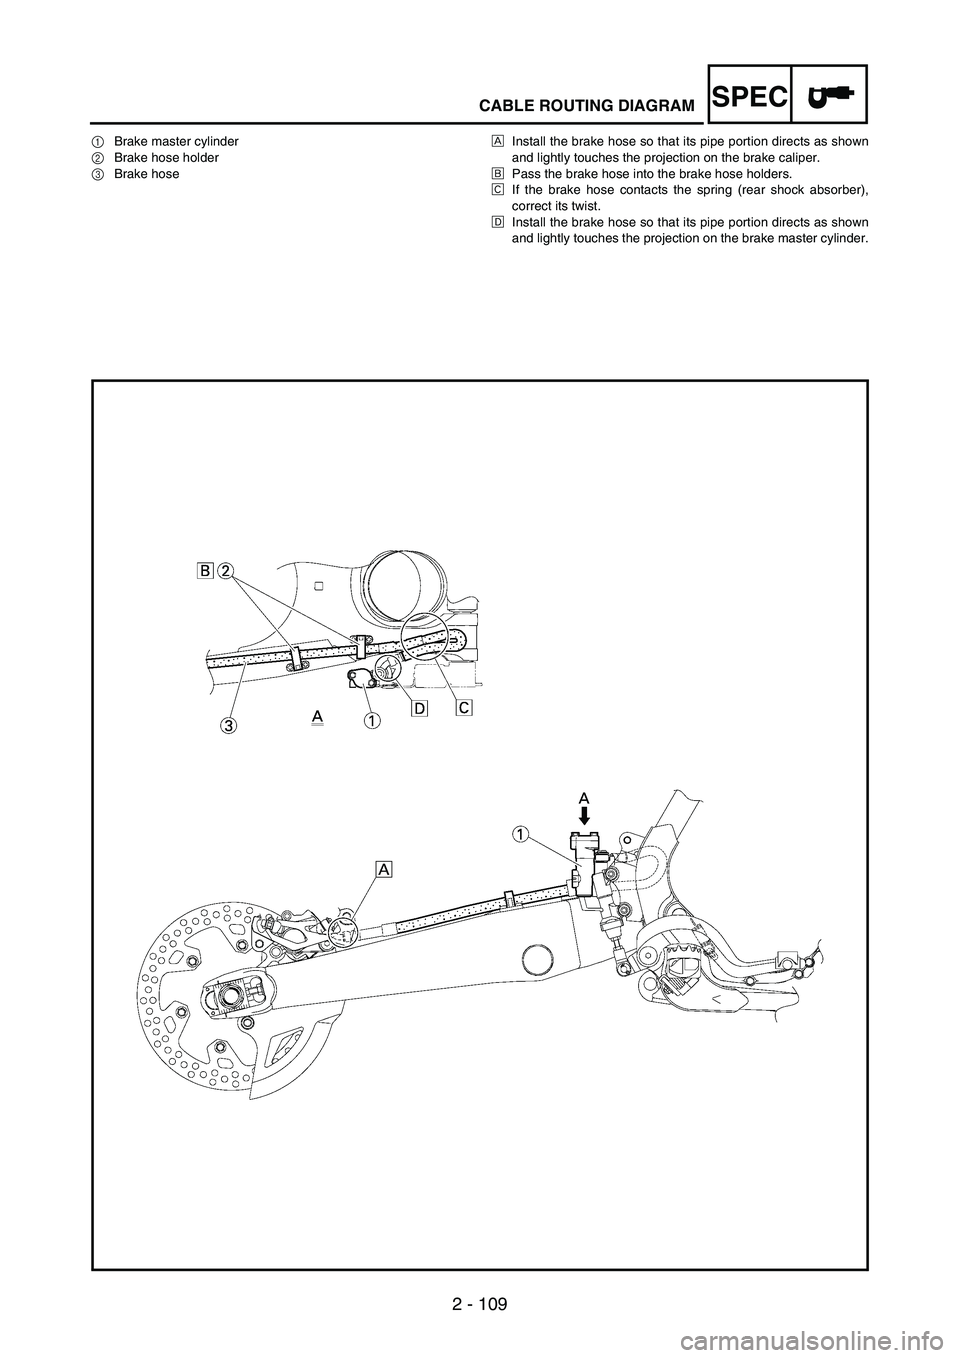
CABLE ROUTING DIAGRAM
1Brake master cylinder
2Brake hose holder
3Brake hoseÈInstall the brake hose so that its pipe portion directs as shown
and lightly touches the projection on the brake caliper.
ÉPass the brake hose into the brake hose holders.
ÊIf the brake hose contacts the spring (rear shock absorber),
correct its twist.
ËInstall the brake hose so that its pipe portion directs as shown
and lightly touches the projection on the brake master cylinder.
Page 214 of 912
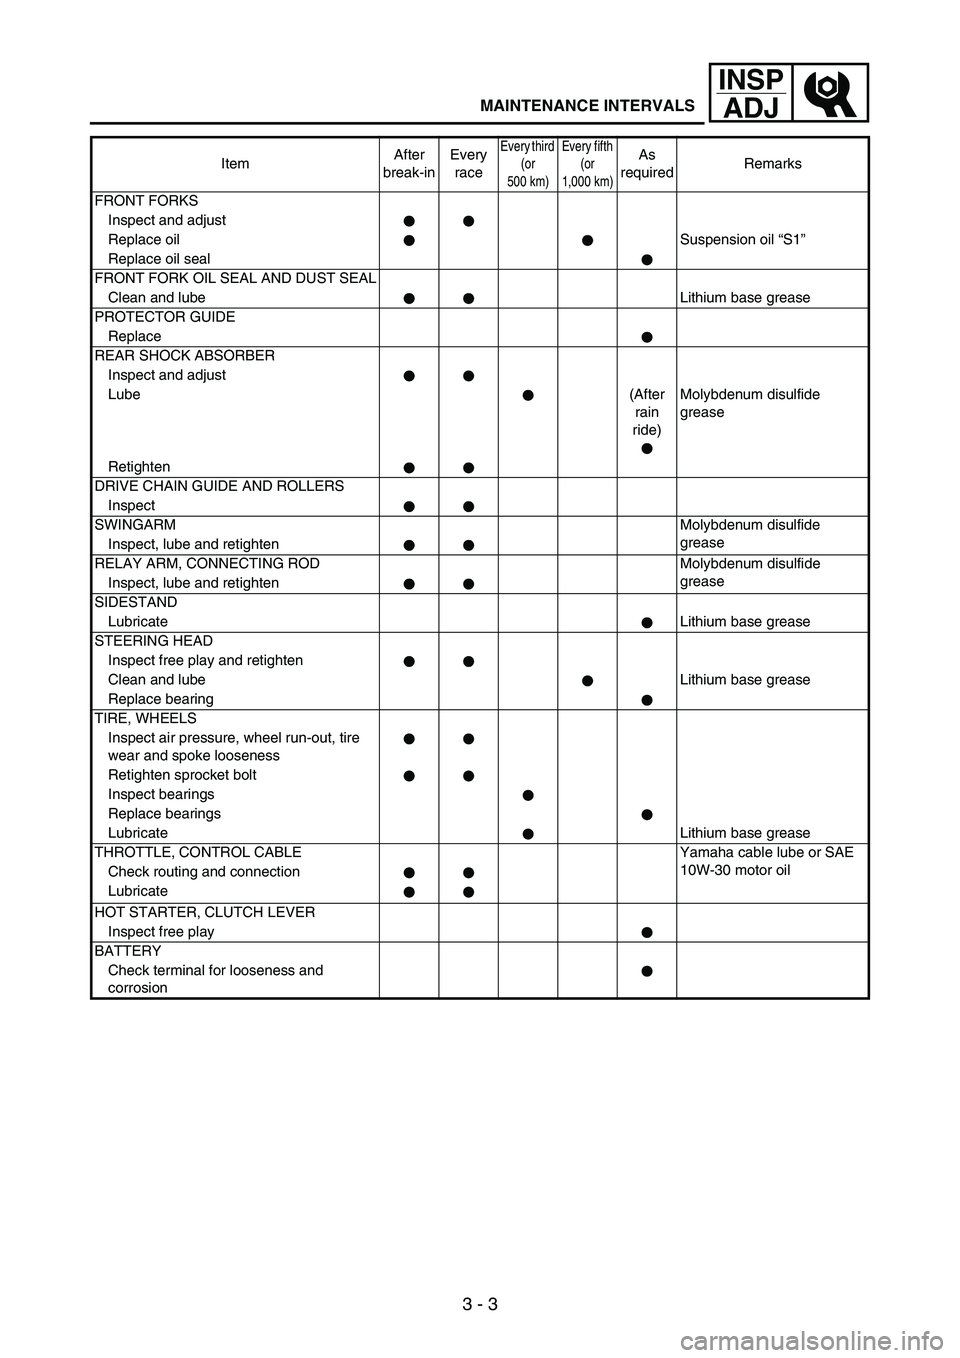
3 - 3
INSP
ADJ
MAINTENANCE INTERVALS
FRONT FORKS
Inspect and adjust
Replace oilSuspension oil “S1”
Replace oil seal
FRONT FORK OIL SEAL AND DUST SEAL
Clean and lubeLithium base grease
PROTECTOR GUIDE
Replace
REAR SHOCK ABSORBER
Inspect and adjust
Lube(After
rain
ride)Molybdenum disulfide
grease
Retighten
DRIVE CHAIN GUIDE AND ROLLERS
Inspect
SWINGARMMolybdenum disulfide
grease
Inspect, lube and retighten
RELAY ARM, CONNECTING ROD Molybdenum disulfide
grease
Inspect, lube and retighten
SIDESTAND
LubricateLithium base grease
STEERING HEAD
Inspect free play and retighten
Clean and lubeLithium base grease
Replace bearing
TIRE, WHEELS
Inspect air pressure, wheel run-out, tire
wear and spoke looseness
Retighten sprocket bolt
Inspect bearings
Replace bearings
LubricateLithium base grease
THROTTLE, CONTROL CABLE Yamaha cable lube or SAE
10W-30 motor oil
Check routing and connection
Lubricate
HOT STARTER, CLUTCH LEVER
Inspect free play
BATTERY
Check terminal for looseness and
corrosionItemAfter
break-inEvery
race
Every third
(or
500 km)Every fifth
(or
1,000 km)As
requiredRemarks
Page 227 of 912
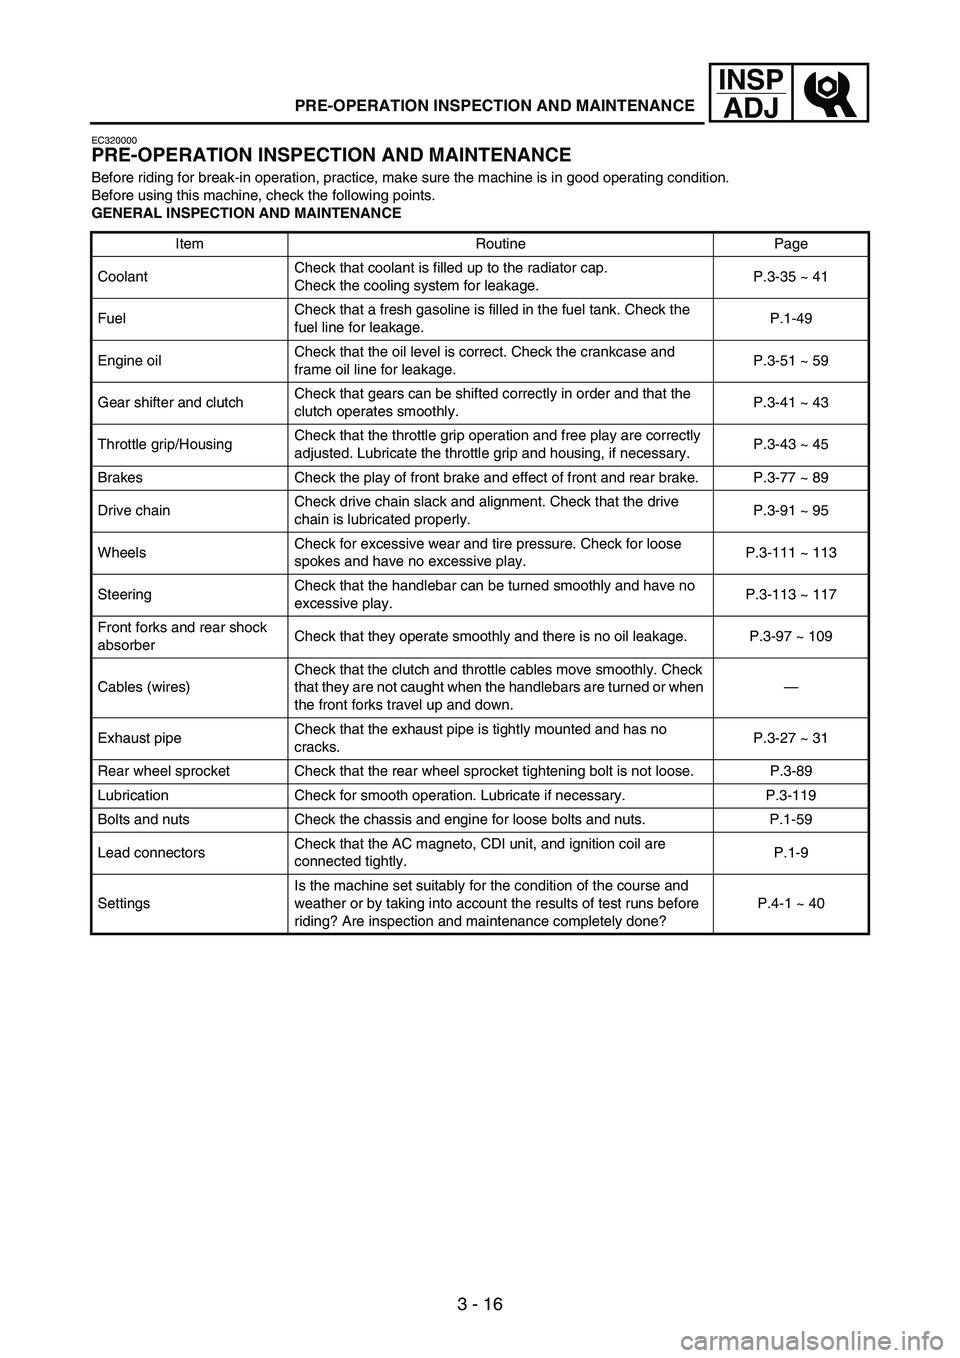
3 - 16
INSP
ADJ
PRE-OPERATION INSPECTION AND MAINTENANCE
EC320000
PRE-OPERATION INSPECTION AND MAINTENANCE
Before riding for break-in operation, practice, make sure the machine is in good operating condition.
Before using this machine, check the following points.
GENERAL INSPECTION AND MAINTENANCE
Item Routine Page
CoolantCheck that coolant is filled up to the radiator cap.
Check the cooling system for leakage.P.3-35 ~ 41
FuelCheck that a fresh gasoline is filled in the fuel tank. Check the
fuel line for leakage.P.1-49
Engine oilCheck that the oil level is correct. Check the crankcase and
frame oil line for leakage.P.3-51 ~ 59
Gear shifter and clutchCheck that gears can be shifted correctly in order and that the
clutch operates smoothly.P.3-41 ~ 43
Throttle grip/HousingCheck that the throttle grip operation and free play are correctly
adjusted. Lubricate the throttle grip and housing, if necessary.P.3-43 ~ 45
Brakes Check the play of front brake and effect of front and rear brake. P.3-77 ~ 89
Drive chainCheck drive chain slack and alignment. Check that the drive
chain is lubricated properly.P.3-91 ~ 95
WheelsCheck for excessive wear and tire pressure. Check for loose
spokes and have no excessive play.P.3-111 ~ 113
SteeringCheck that the handlebar can be turned smoothly and have no
excessive play.P.3-113 ~ 117
Front forks and rear shock
absorberCheck that they operate smoothly and there is no oil leakage. P.3-97 ~ 109
Cables (wires)Check that the clutch and throttle cables move smoothly. Check
that they are not caught when the handlebars are turned or when
the front forks travel up and down.—
Exhaust pipeCheck that the exhaust pipe is tightly mounted and has no
cracks.P.3-27 ~ 31
Rear wheel sprocket Check that the rear wheel sprocket tightening bolt is not loose. P.3-89
Lubrication Check for smooth operation. Lubricate if necessary. P.3-119
Bolts and nuts Check the chassis and engine for loose bolts and nuts. P.1-59
Lead connectorsCheck that the AC magneto, CDI unit, and ignition coil are
connected tightly.P.1-9
SettingsIs the machine set suitably for the condition of the course and
weather or by taking into account the results of test runs before
riding? Are inspection and maintenance completely done?P.4-1 ~ 40
Page 314 of 912
3 - 103
INSP
ADJ
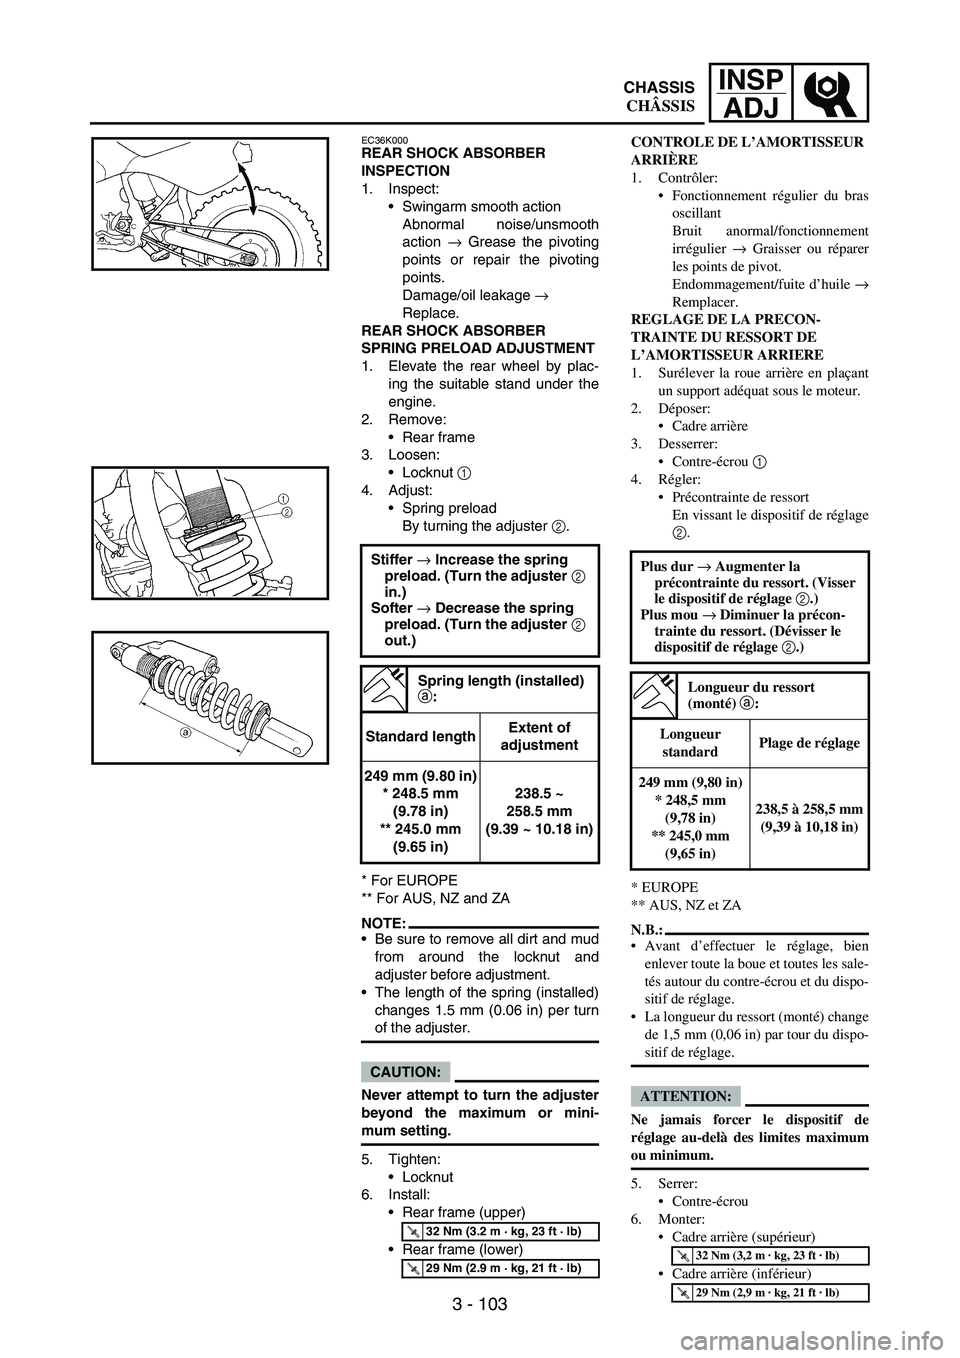
EC36K000REAR SHOCK ABSORBER
INSPECTION
1. Inspect:
Swingarm smooth action
Abnormal noise/unsmooth
action
→ Grease the pivoting
points or repair the pivoting
points.
Damage/oil leakage
→
Replace.
REAR SHOCK ABSORBER
SPRING PRELOAD ADJUSTMENT
1. Elevate the rear wheel by plac-
ing the suitable stand under the
engine.
2. Remove:
Rear frame
3. Loosen:
Locknut
1
4. Adjust:
Spring preload
By turning the adjuster
2.
* For EUROPE
** For AUS, NZ and ZA
NOTE:Be sure to remove all dirt and mud
from around the locknut and
adjuster before adjustment.
The length of the spring (installed)
changes 1.5 mm (0.06 in) per turn
of the adjuster.
CAUTION:
Never attempt to turn the adjuster
beyond the maximum or mini-
mum setting.
5. Tighten:
Locknut
6. Install:
Rear frame (upper)
Rear frame (lower) Stiffer → Increase the spring
preload. (Turn the adjuster 2
in.)
Softer → Decrease the spring
preload. (Turn the adjuster 2
out.)
Spring length (installed)
a:
Standard lengthExtent of
adjustment
249 mm (9.80 in)
* 248.5 mm
(9.78 in)
** 245.0 mm
(9.65 in)238.5 ~
258.5 mm
(9.39 ~ 10.18 in)
T R..32 Nm (3.2 m · kg, 23 ft · lb)
T R..29 Nm (2.9 m · kg, 21 ft · lb)
CONTROLE DE L’AMORTISSEUR
ARRIÈRE
1. Contrôler:
Fonctionnement régulier du bras
oscillant
Bruit anormal/fonctionnement
irrégulier → Graisser ou réparer
les points de pivot.
Endommagement/fuite d’huile →
Remplacer.
REGLAGE DE LA PRECON-
TRAINTE DU RESSORT DE
L’AMORTISSEUR ARRIERE
1. Surélever la roue arrière en plaçant
un support adéquat sous le moteur.
2. Déposer:
Cadre arrière
3. Desserrer:
Contre-écrou 1
4. Régler:
Précontrainte de ressort
En vissant le dispositif de réglage
2.
* EUROPE
** AUS, NZ et ZA
N.B.:
Avant d’effectuer le réglage, bien
enlever toute la boue et toutes les sale-
tés autour du contre-écrou et du dispo-
sitif de réglage.
La longueur du ressort (monté) change
de 1,5 mm (0,06 in) par tour du dispo-
sitif de réglage.
ATTENTION:
Ne jamais forcer le dispositif de
réglage au-delà des limites maximum
ou minimum.
5. Serrer:
Contre-écrou
6. Monter:
Cadre arrière (supérieur)
Cadre arrière (inférieur) Plus dur → Augmenter la
précontrainte du ressort. (Visser
le dispositif de réglage 2.)
Plus mou → Diminuer la précon-
trainte du ressort. (Dévisser le
dispositif de réglage 2.)
Longueur du ressort
(monté) a:
Longueur
standardPlage de réglage
249 mm (9,80 in)
* 248,5 mm
(9,78 in)
** 245,0 mm
(9,65 in)238,5 à 258,5 mm
(9,39 à 10,18 in)
T R..32 Nm (3,2 m · kg, 23 ft · lb)
T R..29 Nm (2,9 m · kg, 21 ft · lb)
CHASSIS
CHÂSSIS