engine oil YAMAHA WR 250F 2010 Owner's Manual
[x] Cancel search | Manufacturer: YAMAHA, Model Year: 2010, Model line: WR 250F, Model: YAMAHA WR 250F 2010Pages: 232, PDF Size: 13.94 MB
Page 82 of 232
3-23
CHASSIS
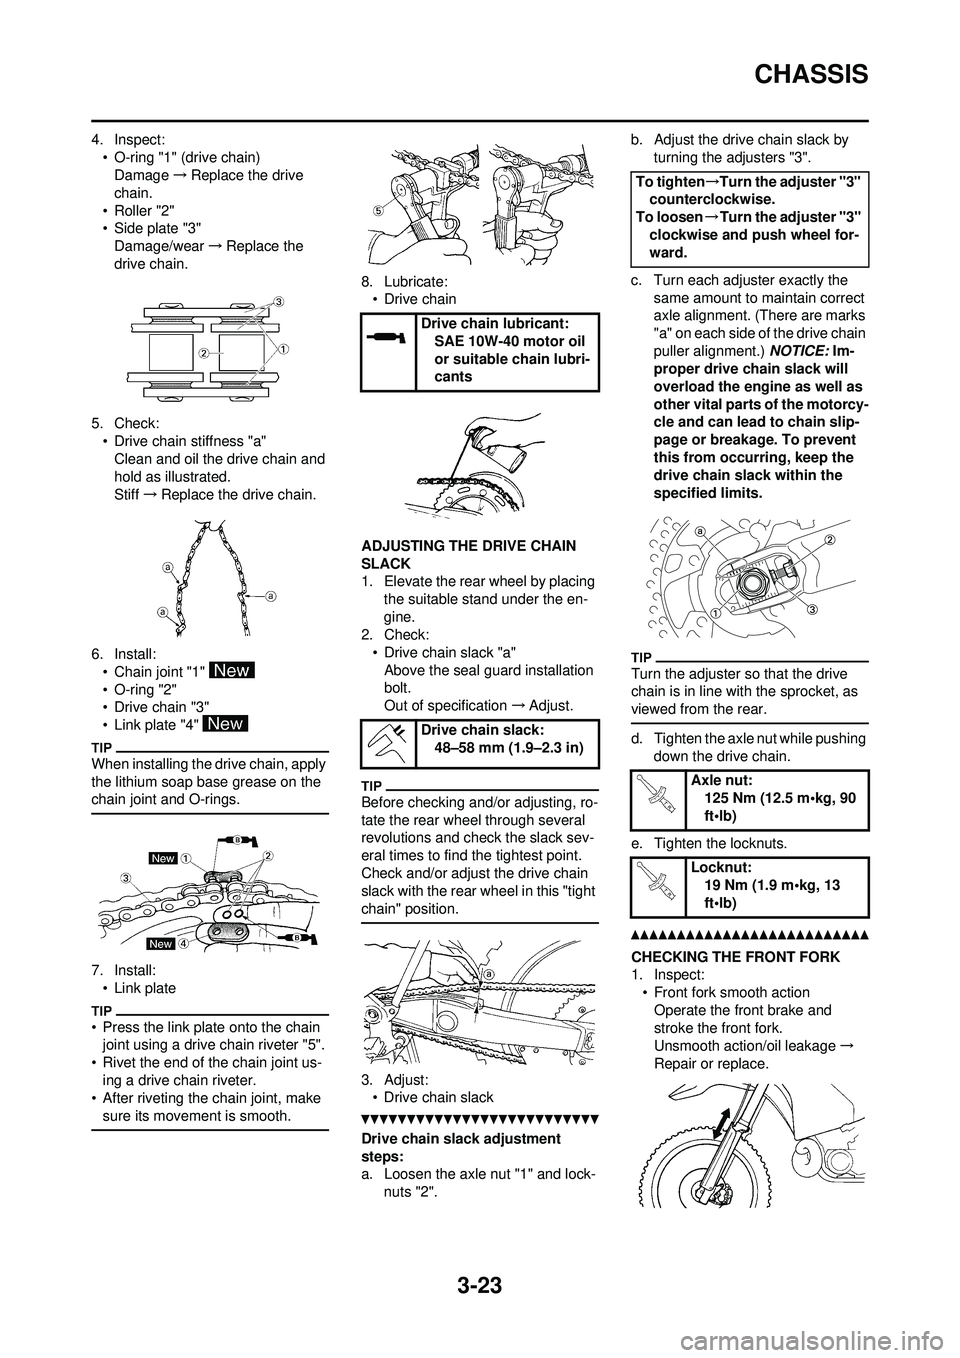
4. Inspect:• O-ring "1" (drive chain)Damage →Replace the drive
chain.
•Roller "2"
• Side plate "3" Damage/wear →Replace the
drive chain.
5. Check: • Drive chain stiffness "a"Clean and oil the drive chain and
hold as illustrated.
Stiff →Replace the drive chain.
6. Install: • Chain joint "1"
• O-ring "2"
• Drive chain "3"
• Link plate "4"
When installing the drive chain, apply
the lithium soap base grease on the
chain joint and O-rings.
7. Install:• Link plate
• Press the link plate onto the chain joint using a drive chain riveter "5".
• Rivet the end of the chain joint us- ing a drive chain riveter.
• After riveting the chain joint, make
sure its movement is smooth.
8. Lubricate:• Drive chain
ADJUSTING THE DRIVE CHAIN
SLACK
1. Elevate the rear wheel by placing the suitable stand under the en-
gine.
2. Check:
• Drive chain slack "a"Above the seal guard installation
bolt.
Out of specification →Adjust.
Before checking and/or adjusting, ro-
tate the rear wheel through several
revolutions and check the slack sev-
eral times to find the tightest point.
Check and/or adjust the drive chain
slack with the rear wheel in this "tight
chain" position.
3. Adjust:
• Drive chain slack
Drive chain slack adjustment
steps:
a. Loosen the axle nut "1" and lock-
nuts "2". b. Adjust the drive chain slack by
turning the adjusters "3".
c. Turn each adjuster exactly the same amount to maintain correct
axle alignment. (There are marks
"a" on each side of the drive chain
puller alignment.) NOTICE: Im-
proper drive chain slack will
overload the engine as well as
other vital parts of the motorcy-
cle and can lead to chain slip-
page or breakage. To prevent
this from occurring, keep the
drive chain slack within the
specified limits.
Turn the adjuster so that the drive
chain is in line with the sprocket, as
viewed from the rear.
d. Tighten the axle nut while pushing down the drive chain.
e. Tighten the locknuts.
CHECKING THE FRONT FORK
1. Inspect: • Front fork smooth action
Operate the front brake and
stroke the front fork.
Unsmooth action/oil leakage →
Repair or replace.
Drive chain lubricant: SAE 10W-40 motor oil
or suitable chain lubri-
cants
Drive chain slack: 48–58 mm (1.9–2.3 in)
To tighten →Turn the adjuster "3"
counterclockwise.
To loosen →Turn the adjuster "3"
clockwise and push wheel for-
ward.
Axle nut:125 Nm (12.5 m•kg, 90
ft•lb)
Locknut: 19 Nm (1.9 m•kg, 13
ft•lb)
Page 83 of 232
3-24
CHASSIS
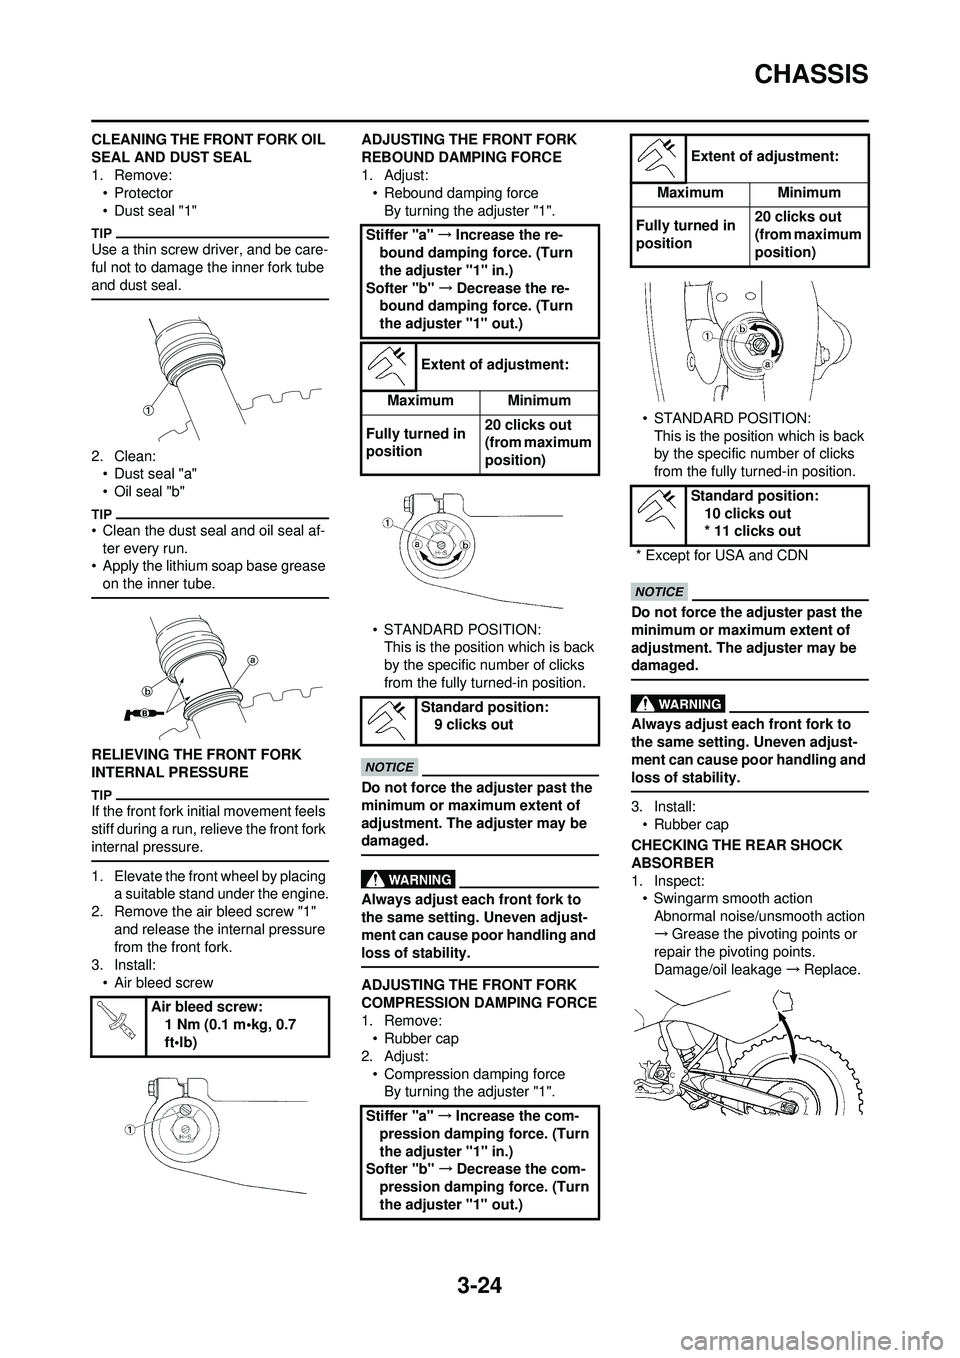
CLEANING THE FRONT FORK OIL
SEAL AND DUST SEAL
1. Remove:•Protector
• Dust seal "1"
Use a thin screw driver, and be care-
ful not to damage the inner fork tube
and dust seal.
2. Clean:• Dust seal "a"
• Oil seal "b"
• Clean the dust seal and oil seal af-
ter every run.
• Apply the lithium soap base grease on the inner tube.
RELIEVING THE FRONT FORK
INTERNAL PRESSURE
If the front fork initial movement feels
stiff during a run, relieve the front fork
internal pressure.
1. Elevate the front wheel by placing a suitable stand under the engine.
2. Remove the air bleed screw "1"
and release the internal pressure
from the front fork.
3. Install:
• Air bleed screw ADJUSTING THE FRONT FORK
REBOUND DAMPING FORCE
1. Adjust:
• Rebound damping force
By turning the adjuster "1".
• STANDARD POSITION: This is the position which is back
by the specific number of clicks
from the fully turned-in position.
Do not force the adjuster past the
minimum or maximum extent of
adjustment. The adjuster may be
damaged.
Always adjust each front fork to
the same setting. Uneven adjust-
ment can cause poor handling and
loss of stability.
ADJUSTING THE FRONT FORK
COMPRESSION DAMPING FORCE
1. Remove:• Rubber cap
2. Adjust:
• Compression damping forceBy turning the adjuster "1". • STANDARD POSITION:
This is the position which is back
by the specific number of clicks
from the fully turned-in position.
Do not force the adjuster past the
minimum or maximum extent of
adjustment. The adjuster may be
damaged.
Always adjust each front fork to
the same setting. Uneven adjust-
ment can cause poor handling and
loss of stability.
3. Install:• Rubber cap
CHECKING THE REAR SHOCK
ABSORBER
1. Inspect: • Swingarm smooth action
Abnormal noise/unsmooth action
→ Grease the pivoting points or
repair the pivoting points.
Damage/oil leakage →Replace.
Air bleed screw: 1 Nm (0.1 m•kg, 0.7
ft•lb)
Stiffer "a" →Increase the re-
bound damping force. (Turn
the adjuster "1" in.)
Softer "b" →Decrease the re-
bound damping force. (Turn
the adjuster "1" out.)
Extent of adjustment:
Maximum Minimum
Fully turned in
position 20 clicks out
(from maximum
position)
Standard position: 9 clicks out
Stiffer "a" →Increase the com-
pression damping force. (Turn
the adjuster "1" in.)
Softer "b" →Decrease the com-
pression damping force. (Turn
the adjuster "1" out.)
Extent of adjustment:
Maximum Minimum
Fully turned in
position 20 clicks out
(from maximum
position)
Standard position: 10 clicks out
* 11 clicks out
* Except for USA and CDN
Page 88 of 232
3-29
ELECTRICAL
ELECTRICAL
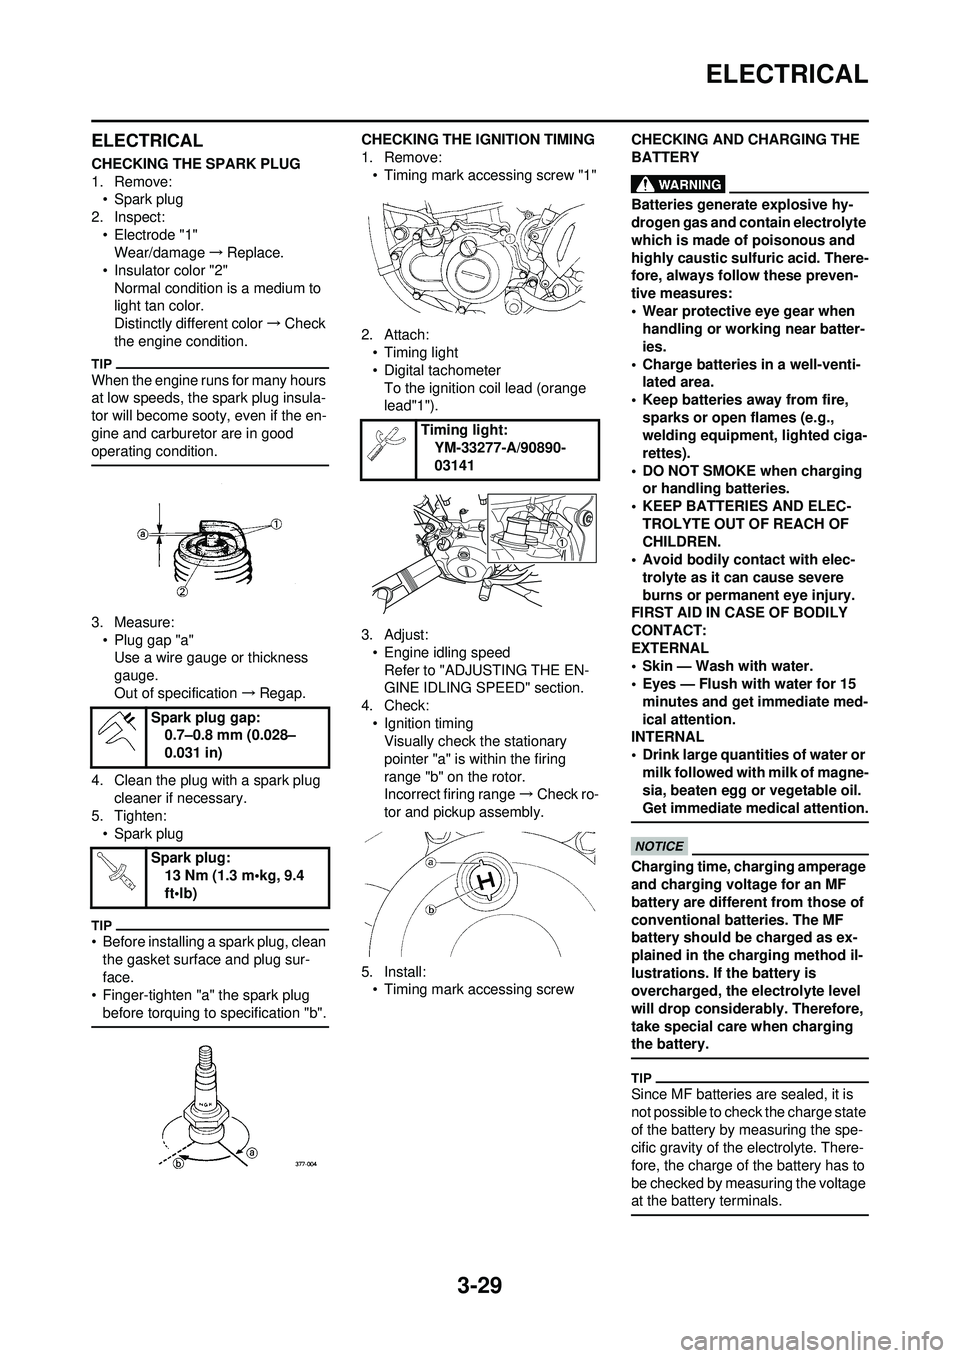
CHECKING THE SPARK PLUG
1. Remove:• Spark plug
2. Inspect:
• Electrode "1"Wear/damage →Replace.
• Insulator color "2"
Normal condition is a medium to
light tan color.
Distinctly different color →Check
the engine condition.
When the engine runs for many hours
at low speeds, the spark plug insula-
tor will become sooty, even if the en-
gine and carburetor are in good
operating condition.
3. Measure: • Plug gap "a"Use a wire gauge or thickness
gauge.
Out of specification →Regap.
4. Clean the plug with a spark plug cleaner if necessary.
5. Tighten: • Spark plug
• Before installing a spark plug, clean the gasket surface and plug sur-
face.
• Finger-tighten "a" the spark plug before torquing to specification "b".
CHECKING THE IGNITION TIMING
1. Remove:• Timing mark accessing screw "1"
2. Attach: • Timing light
• Digital tachometerTo the ignition coil lead (orange
lead"1").
3. Adjust: • Engine idling speedRefer to "ADJUSTING THE EN-
GINE IDLING SPEED" section.
4. Check: • Ignition timingVisually check the stationary
pointer "a" is within the firing
range "b" on the rotor.
Incorrect firing range →Check ro-
tor and pickup assembly.
5. Install: • Timing mark accessing screw CHECKING AND CHARGING THE
BATTERY
Batteries generate explosive hy-
drogen gas and contain electrolyte
which is made of poisonous and
highly caustic sulfuric acid. There-
fore, always follow these preven-
tive measures:
• Wear protective eye gear when
handling or working near batter-
ies.
• Charge batteries in a well-venti-
lated area.
• Keep batteries away from fire,
sparks or open flames (e.g.,
welding equipment, lighted ciga-
rettes).
• DO NOT SMOKE when charging or handling batteries.
• KEEP BATTERIES AND ELEC-
TROLYTE OUT OF REACH OF
CHILDREN.
• Avoid bodily contact with elec-
trolyte as it can cause severe
burns or permanent eye injury.
FIRST AID IN CASE OF BODILY
CONTACT:
EXTERNAL
• Skin — Wash with water.
• Eyes — Flush with water for 15 minutes and get immediate med-
ical attention.
INTERNAL
• Drink large quantities of water or
milk followed with milk of magne-
sia, beaten egg or vegetable oil.
Get immediate medical attention.
Charging time, charging amperage
and charging voltage for an MF
battery are different from those of
conventional batteries. The MF
battery should be charged as ex-
plained in the charging method il-
lustrations. If the battery is
overcharged, the electrolyte level
will drop considerably. Therefore,
take special care when charging
the battery.
Since MF batteries are sealed, it is
not possible to check the charge state
of the battery by measuring the spe-
cific gravity of the electrolyte. There-
fore, the charge of the battery has to
be checked by measuring the voltage
at the battery terminals.
Spark plug gap: 0.7–0.8 mm (0.028–
0.031 in)
Spark plug: 13 Nm (1.3 m•kg, 9.4
ft•lb)
Timing light:
YM-33277-A/90890-
03141
Page 98 of 232
4-5
CHASSIS
CHASSIS
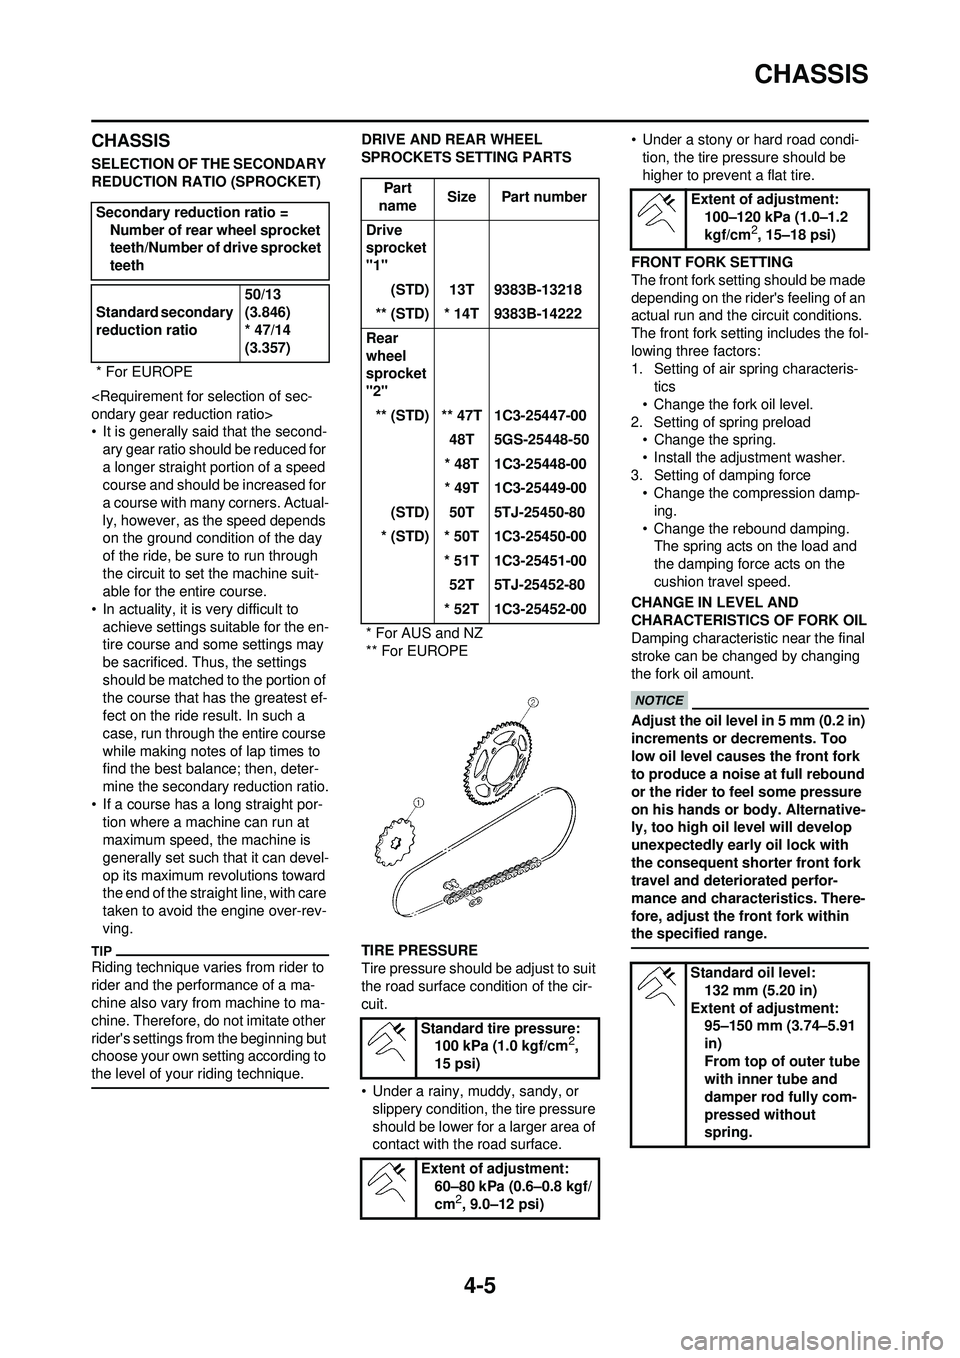
SELECTION OF THE SECONDARY
REDUCTION RATIO (SPROCKET)
• It is generally said that the second-ary gear ratio should be reduced for
a longer straight portion of a speed
course and should be increased for
a course with many corners. Actual-
ly, however, as the speed depends
on the ground condition of the day
of the ride, be su re to run through
the circuit to set the machine suit-
able for the entire course.
• In actuality, it is very difficult to
achieve settings suitable for the en-
tire course and some settings may
be sacrificed. Thus, the settings
should be matched to the portion of
the course that has the greatest ef-
fect on the ride result. In such a
case, run through the entire course
while making notes of lap times to
find the best balance; then, deter-
mine the secondary reduction ratio.
• If a course has a long straight por-
tion where a machine can run at
maximum speed, the machine is
generally set such that it can devel-
op its maximum revolutions toward
the end of the straight line, with care
taken to avoid the engine over-rev-
ving.
Riding technique varies from rider to
rider and the performance of a ma-
chine also vary fr om machine to ma-
chine. Therefore, do not imitate other
rider's settings from the beginning but
choose your own setting according to
the level of your riding technique.
DRIVE AND REAR WHEEL
SPROCKETS SETTING PARTS
TIRE PRESSURE
Tire pressure should be adjust to suit
the road surface condition of the cir-
cuit.
• Under a rainy, muddy, sandy, or slippery condition, the tire pressure
should be lower for a larger area of
contact with the road surface. • Under a stony or hard road condi-
tion, the tire pressure should be
higher to prevent a flat tire.
FRONT FORK SETTING
The front fork setting should be made
depending on the rider's feeling of an
actual run and the circuit conditions.
The front fork setting includes the fol-
lowing three factors:
1. Setting of air spring characteris- tics
• Change the fork oil level.
2. Setting of spring preload • Change the spring.
• Install the adjustment washer.
3. Setting of damping force • Change the compression damp-
ing.
• Change the rebound damping. The spring acts on the load and
the damping force acts on the
cushion travel speed.
CHANGE IN LEVEL AND
CHARACTERISTICS OF FORK OIL
Damping characteristic near the final
stroke can be changed by changing
the fork oil amount.
Adjust the oil level in 5 mm (0.2 in)
increments or decrements. Too
low oil level caus es the front fork
to produce a noise at full rebound
or the rider to feel some pressure
on his hands or body. Alternative-
ly, too high oil level will develop
unexpectedly early oil lock with
the consequent shorter front fork
travel and deteriorated perfor-
mance and characteristics. There-
fore, adjust the front fork within
the specified range.
Secondary reduction ratio =
Number of rear wheel sprocket
teeth/Number of drive sprocket
teeth
Standard secondary
reduction ratio 50/13
(3.846)
* 47/14
(3.357)
* For EUROPE
Part
name Size Part number
Drive
sprocket
"1" (STD) 13T 9383B-13218
** (STD) * 14T 9383B-14222
Rear
wheel
sprocket
"2" ** (STD) ** 47T 1C3-25447-00 48T 5GS-25448-50
* 48T 1C3-25448-00
* 49T 1C3-25449-00
(STD) 50T 5TJ-25450-80
* (STD) * 50T 1C3-25450-00 * 51T 1C3-25451-0052T 5TJ-25452-80
* 52T 1C3-25452-00
* For AUS and NZ
** For EUROPE
Standard tire pressure:100 kPa (1.0 kgf/cm
2,
15 psi)
Extent of adjustment: 60–80 kPa (0.6–0.8 kgf/
cm
2, 9.0–12 psi)
Extent of adjustment: 100–120 kPa (1.0–1.2
kgf/cm
2, 15–18 psi)
Standard oil level: 132 mm (5.20 in)
Extent of adjustment: 95–150 mm (3.74–5.91
in)
From top of outer tube
with inner tube and
damper rod fully com-
pressed without
spring.
Page 120 of 232
5-17
CAMSHAFTS
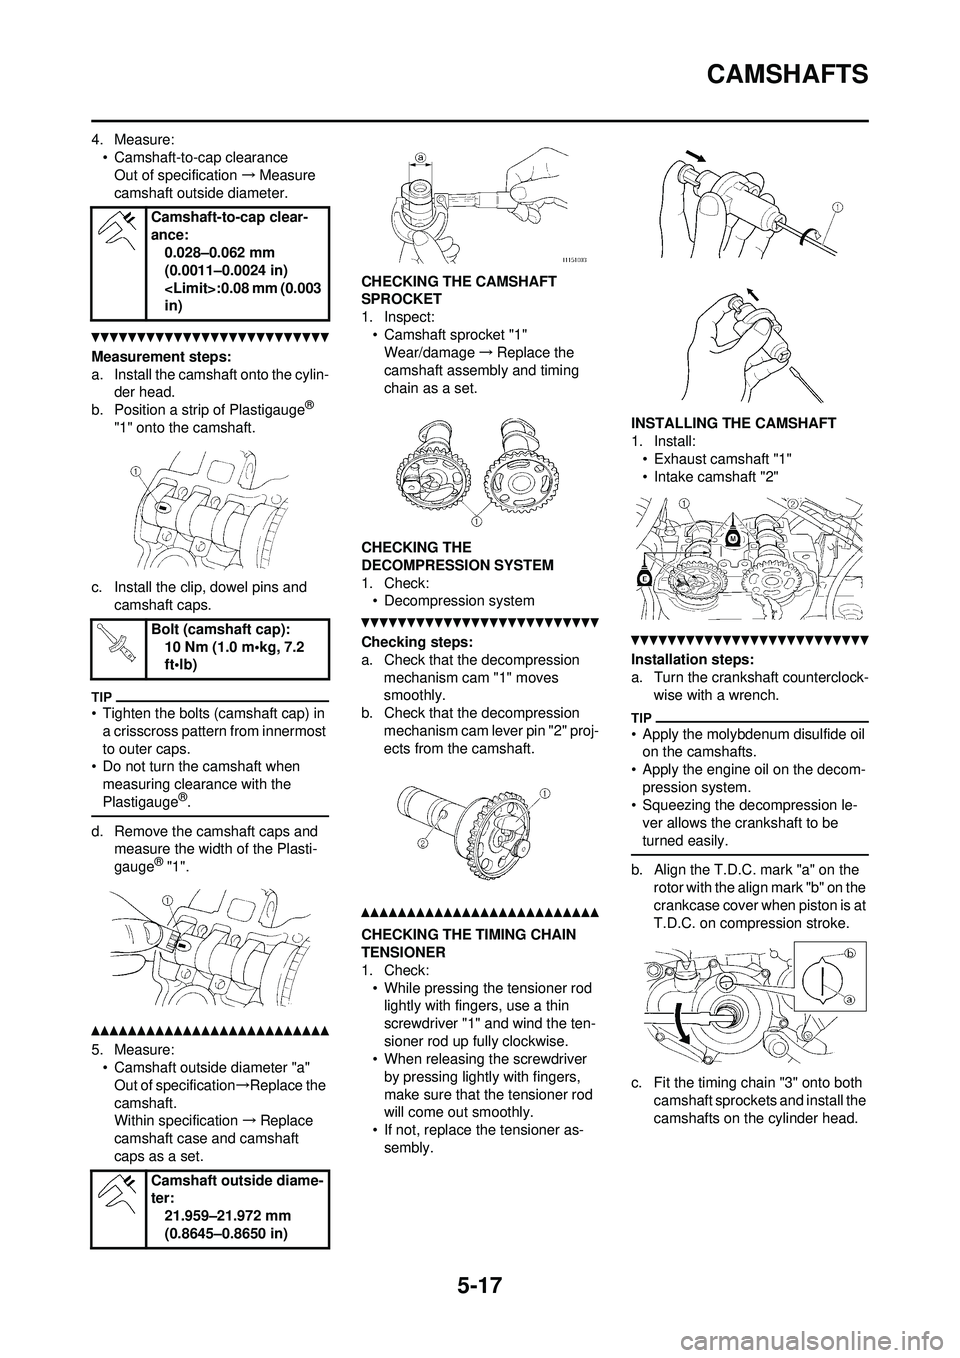
4. Measure:• Camshaft-to-cap clearanceOut of specification →Measure
camshaft outside diameter.
Measurement steps:
a. Install the camshaft onto the cylin- der head.
b. Position a strip of Plastigauge
®
"1" onto the camshaft.
c. Install the clip, dowel pins and camshaft caps.
• Tighten the bolts (camshaft cap) in a crisscross pattern from innermost
to outer caps.
• Do not turn the camshaft when
measuring clearance with the
Plastigauge
®.
d. Remove the camshaft caps and measure the width of the Plasti-
gauge
® "1".
5. Measure:• Camshaft outside diameter "a"
Out of specification →Replace the
camshaft.
Within specification →Replace
camshaft case and camshaft
caps as a set. CHECKING THE CAMSHAFT
SPROCKET
1. Inspect:
• Camshaft sprocket "1"Wear/damage →Replace the
camshaft assemb ly and timing
chain as a set.
CHECKING THE
DECOMPRESSION SYSTEM
1. Check: • Decompression system
Checking steps:
a. Check that the decompression
mechanism cam "1" moves
smoothly.
b. Check that the decompression
mechanism cam lever pin "2" proj-
ects from the camshaft.
CHECKING THE TIMING CHAIN
TENSIONER
1. Check:• While pressing the tensioner rod lightly with fingers, use a thin
screwdriver "1" and wind the ten-
sioner rod up fully clockwise.
• When releasing the screwdriver
by pressing lightly with fingers,
make sure that the tensioner rod
will come out smoothly.
• If not, replace the tensioner as- sembly. INSTALLING THE CAMSHAFT
1. Install:
• Exhaust camshaft "1"
• Intake camshaft "2"
Installation steps:
a. Turn the crankshaft counterclock- wise with a wrench.
• Apply the molybdenum disulfide oil on the camshafts.
• Apply the engine oil on the decom- pression system.
• Squeezing the decompression le-
ver allows the crankshaft to be
turned easily.
b. Align the T.D.C. mark "a" on the rotor with the align mark "b" on the
crankcase cover when piston is at
T.D.C. on compression stroke.
c. Fit the timing chain "3" onto both camshaft sprockets and install the
camshafts on the cylinder head.
Camshaft-to-cap clear-
ance:
0.028–0.062 mm
(0.0011–0.0024 in)
in)
Bolt (camshaft cap): 10 Nm (1.0 m•kg, 7.2
ft•lb)
Camshaft outside diame-
ter: 21.959–21.972 mm
(0.8645–0.8650 in)
Page 122 of 232
5-19
CYLINDER HEAD
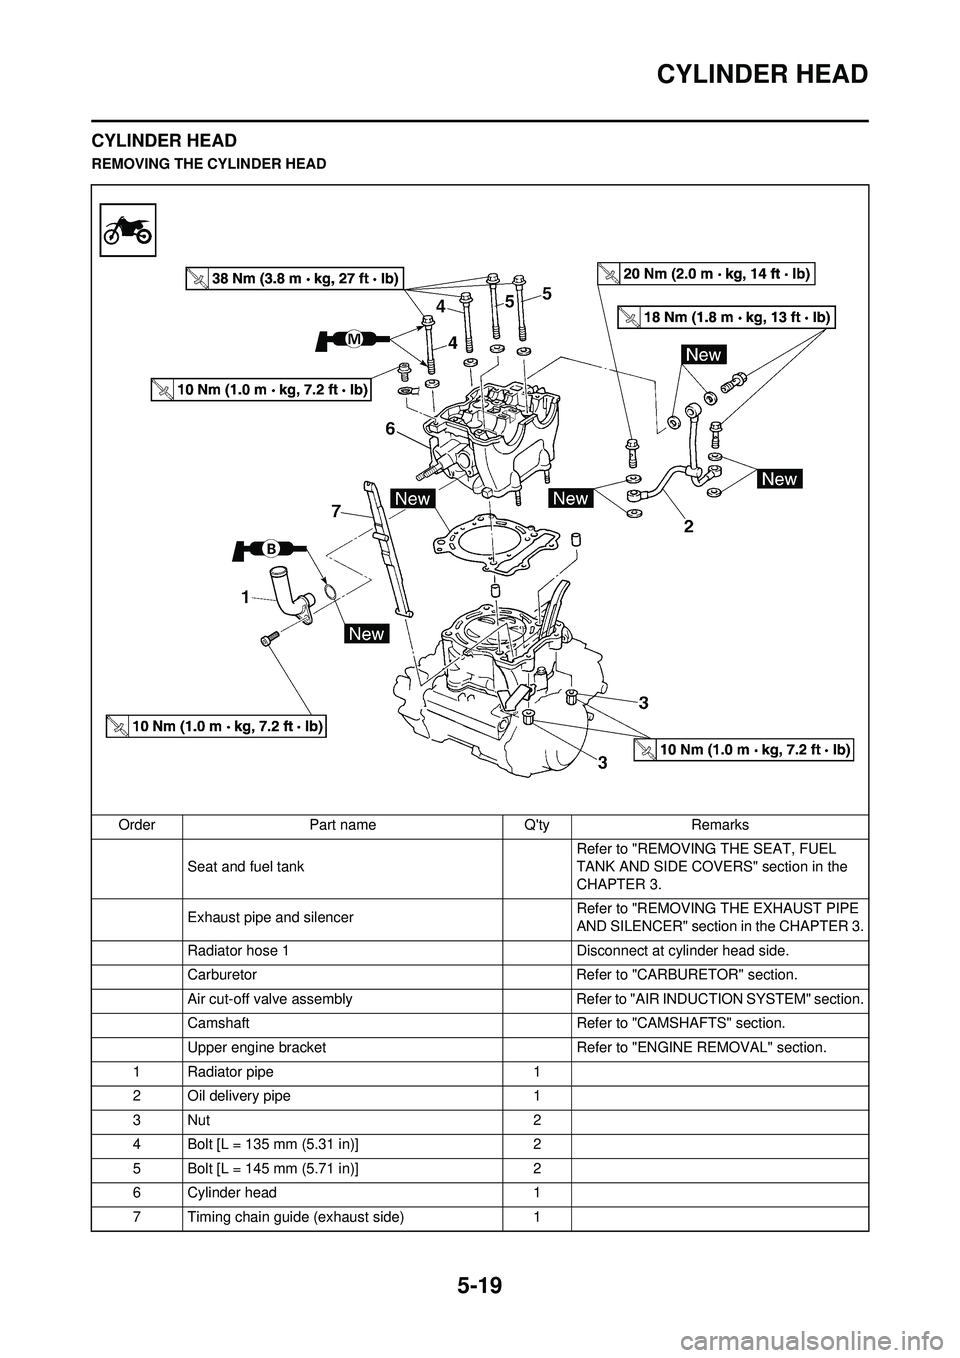
CYLINDER HEAD
REMOVING THE CYLINDER HEADOrder Part name Q'ty Remarks Seat and fuel tank Refer to "REMOVING THE SEAT, FUEL
TANK AND SIDE COVERS" section in the
CHAPTER 3.
Exhaust pipe and silencer Refer to "REMOVING THE EXHAUST PIPE
AND SILENCER" section in the CHAPTER 3.
Radiator hose 1 Disconnect at cylinder head side.
Carburetor Refer to "CARBURETOR" section.
Air cut-off valve assembly Refer to "AIR INDUCTION SYSTEM" section.
Camshaft Refer to "CAMSHAFTS" section.
Upper engine bracket Refer to "ENGINE REMOVAL" section.
1 Radiator pipe 1
2 Oil delivery pipe 1
3Nut 2
4 Bolt [L = 135 mm (5.31 in)] 2
5 Bolt [L = 145 mm (5.71 in)] 2
6 Cylinder head 1
7 Timing chain guide (exhaust side) 1
Page 127 of 232
5-24
VALVES AND VALVE SPRINGS
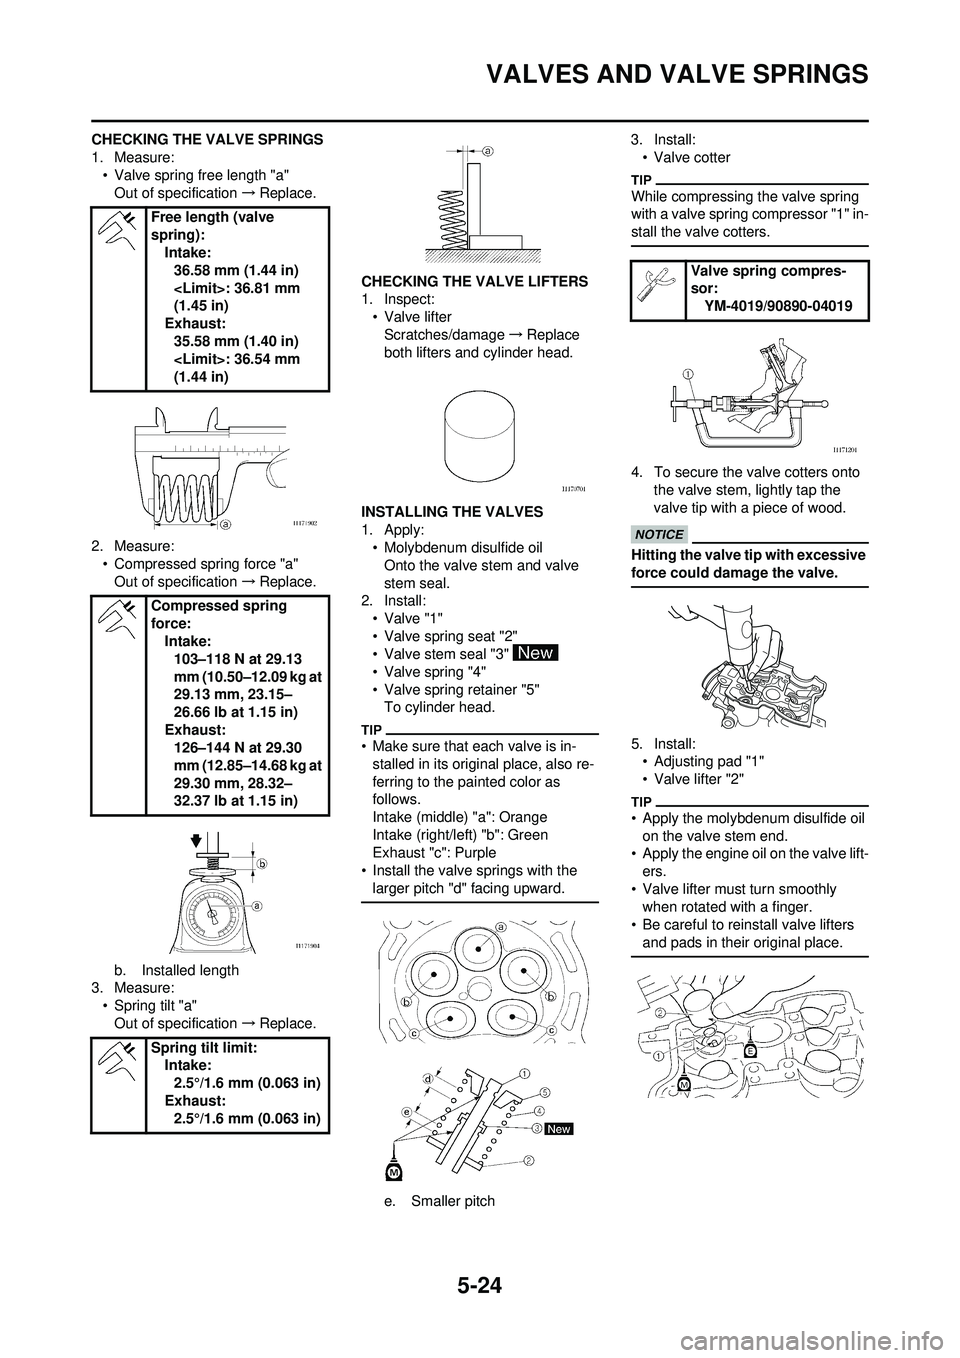
CHECKING THE VALVE SPRINGS
1. Measure:• Valve spring free length "a"Out of specification →Replace.
2. Measure: • Compressed spring force "a"Out of specification →Replace.
b. Installed length
3. Measure:
• Spring tilt "a"Out of specification →Replace. CHECKING THE
VALVE LIFTERS
1. Inspect:
• Valve lifterScratches/damage →Replace
both lifters and cylinder head.
INSTALLING THE VALVES
1. Apply: • Molybdenum disulfide oil
Onto the valve stem and valve
stem seal.
2. Install:
• Valve "1"
• Valve spring seat "2"
• Valve stem seal "3"
• Valve spring "4"
• Valve spring retainer "5"To cylinder head.
• Make sure that each valve is in-
stalled in its original place, also re-
ferring to the painted color as
follows.
Intake (middle) "a": Orange
Intake (right/left) "b": Green
Exhaust "c": Purple
• Install the valve springs with the larger pitch "d" facing upward.
e. Smaller pitch 3. Install:
• Valve cotter
While compressing the valve spring
with a valve spring compressor "1" in-
stall the valve cotters.
4. To secure the valve cotters onto the valve stem, lightly tap the
valve tip with a piece of wood.
Hitting the valve tip with excessive
force could damage the valve.
5. Install:• Adjusting pad "1"
• Valve lifter "2"
• Apply the molybdenum disulfide oil on the valve stem end.
• Apply the engine oil on the valve lift-
ers.
• Valve lifter must turn smoothly when rotated with a finger.
• Be careful to reinstall valve lifters and pads in their original place.
Free length (valve
spring): Intake:36.58 mm (1.44 in)
(1.45 in)
Exhaust:
35.58 mm (1.40 in)
(1.44 in)
Compressed spring
force: Intake:103–118 N at 29.13
mm (10.50–12.09 kg at
29.13 mm, 23.15–
26.66 lb at 1.15 in)
Exhaust: 126–144 N at 29.30
mm (12.85–14.68 kg at
29.30 mm, 28.32–
32.37 lb at 1.15 in)
Spring tilt limit: Intake:
2.5°/1.6 mm (0.063 in)
Exhaust: 2.5°/1.6 mm (0.063 in)
Valve spring compres-
sor:
YM-4019/90890-04019
Page 130 of 232
5-27
CYLINDER AND PISTON
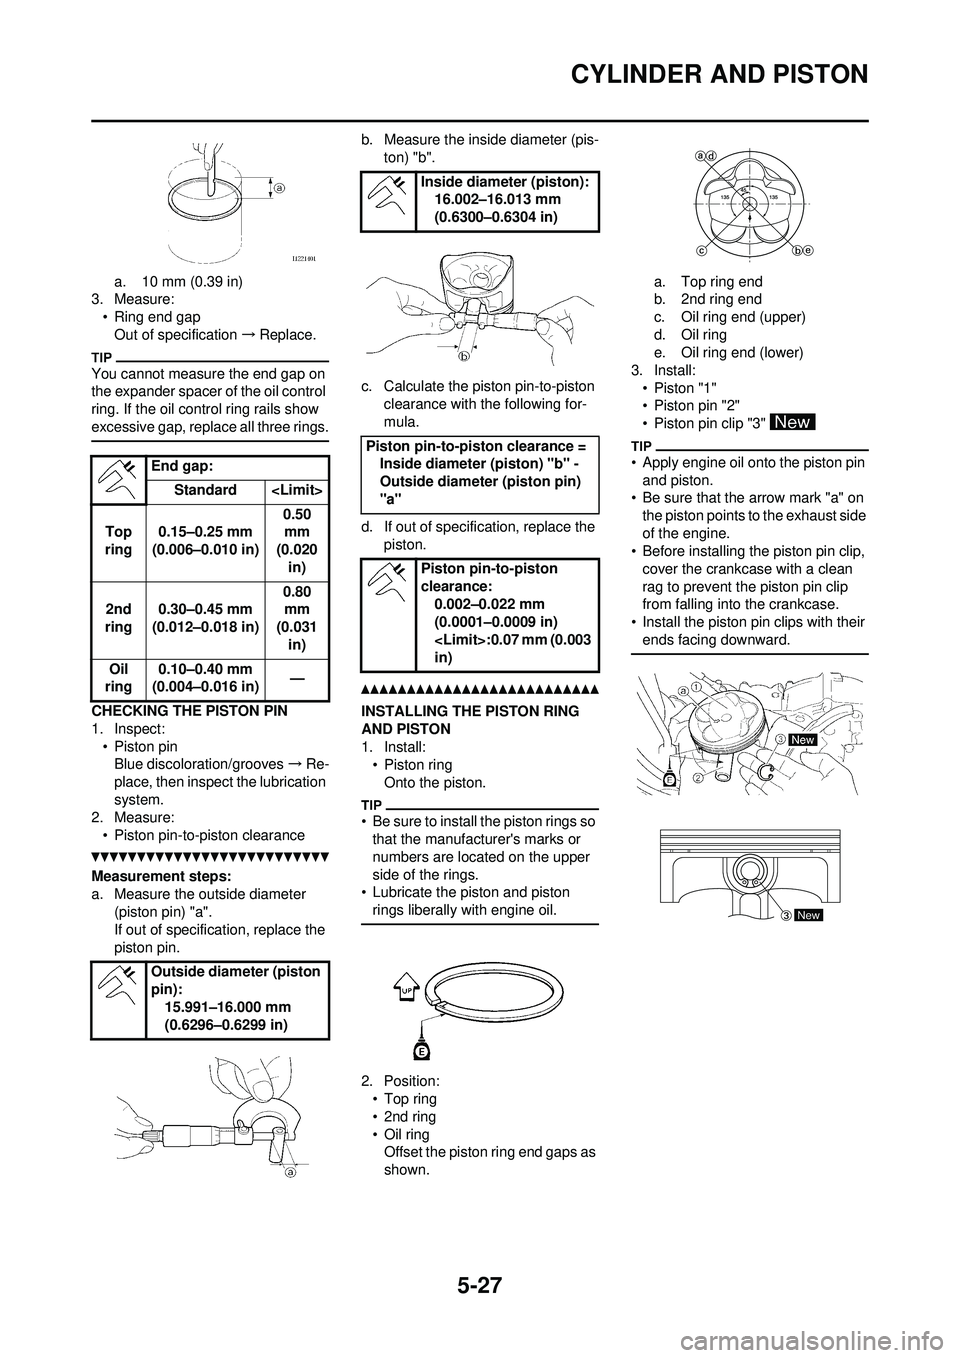
a. 10 mm (0.39 in)
3. Measure:
• Ring end gapOut of specification →Replace.
You cannot measure the end gap on
the expander spacer of the oil control
ring. If the oil control ring rails show
excessive gap, replace all three rings.
CHECKING THE PISTON PIN
1. Inspect:
• Piston pinBlue discoloration/grooves →Re-
place, then inspect the lubrication
system.
2. Measure:
• Piston pin-to-piston clearance
Measurement steps:
a. Measure the outside diameter (piston pin) "a".
If out of specification, replace the
piston pin. b. Measure the inside diameter (pis-
ton) "b".
c. Calculate the piston pin-to-piston clearance with the following for-
mula.
d. If out of specific ation, replace the
piston.
INSTALLING THE PISTON RING
AND PISTON
1. Install: •Piston ringOnto the piston.
• Be sure to install the piston rings so that the manufacturer's marks or
numbers are located on the upper
side of the rings.
• Lubricate the piston and piston
rings liberally with engine oil.
2. Position:•Top ring
• 2nd ring
• Oil ringOffset the piston ring end gaps as
shown. a. Top ring end
b. 2nd ring end
c. Oil ring end (upper)
d. Oil ring
e. Oil ring end (lower)
3. Install: • Piston "1"
• Piston pin "2"
• Piston pin clip "3"
• Apply engine oil onto the piston pin and piston.
• Be sure that the arrow mark "a" on
the piston points to the exhaust side
of the engine.
• Before installing the piston pin clip,
cover the crankcase with a clean
rag to prevent the piston pin clip
from falling into the crankcase.
• Install the piston pin clips with their ends facing downward.End gap:
Standard
Top
ring 0.15–0.25 mm
(0.006–0.010 in) 0.50
mm
(0.020
in)
2nd
ring 0.30–0.45 mm
(0.012–0.018 in) 0.80
mm
(0.031
in)
Oil
ring 0.10–0.40 mm
(0.004–0.016 in) —
Outside diameter (piston
pin): 15.991–16.000 mm
(0.6296–0.6299 in)
Inside diameter (piston):16.002–16.013 mm
(0.6300–0.6304 in)
Piston pin-to-pis ton clearance =
Inside diameter (piston) "b" -
Outside diameter (piston pin)
"a"
Piston pin-to-piston
clearance:0.002–0.022 mm
(0.0001–0.0009 in)
in)
New
Page 131 of 232
5-28
CYLINDER AND PISTON
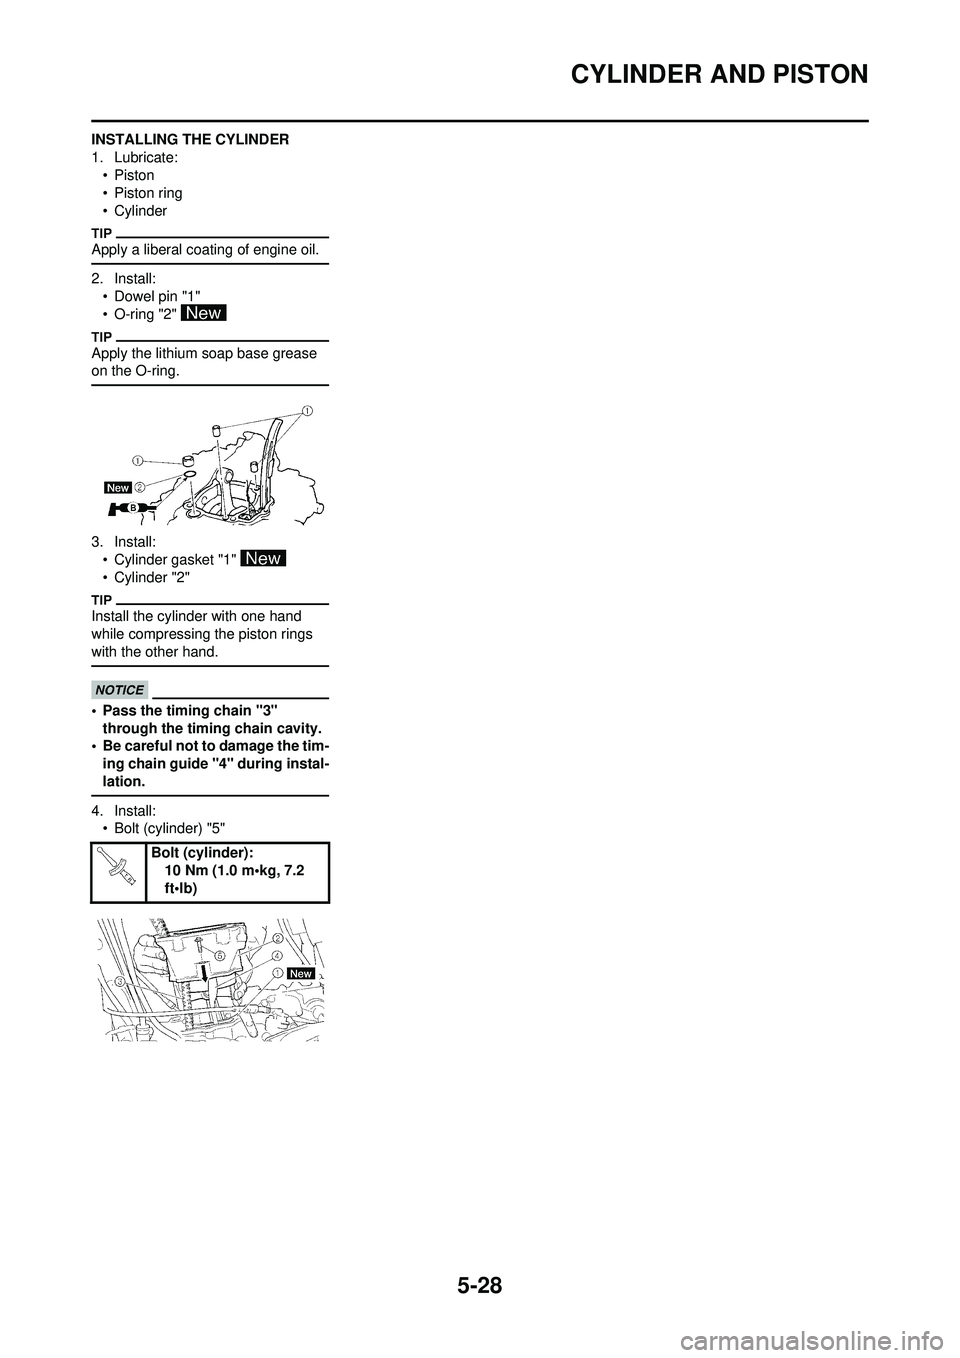
INSTALLING THE CYLINDER
1. Lubricate:•Piston
• Piston ring
• Cylinder
Apply a liberal coating of engine oil.
2. Install:
• Dowel pin "1"
• O-ring "2"
Apply the lithium soap base grease
on the O-ring.
3. Install:• Cylinder gasket "1"
• Cylinder "2"
Install the cylinder with one hand
while compressing the piston rings
with the other hand.
• Pass the timing chain "3" through the timing chain cavity.
• Be careful not to damage the tim-
ing chain guide "4" during instal-
lation.
4. Install:• Bolt (cylinder) "5"
Bolt (cylinder):10 Nm (1.0 m•kg, 7.2
ft•lb)
Page 132 of 232
5-29
CLUTCH
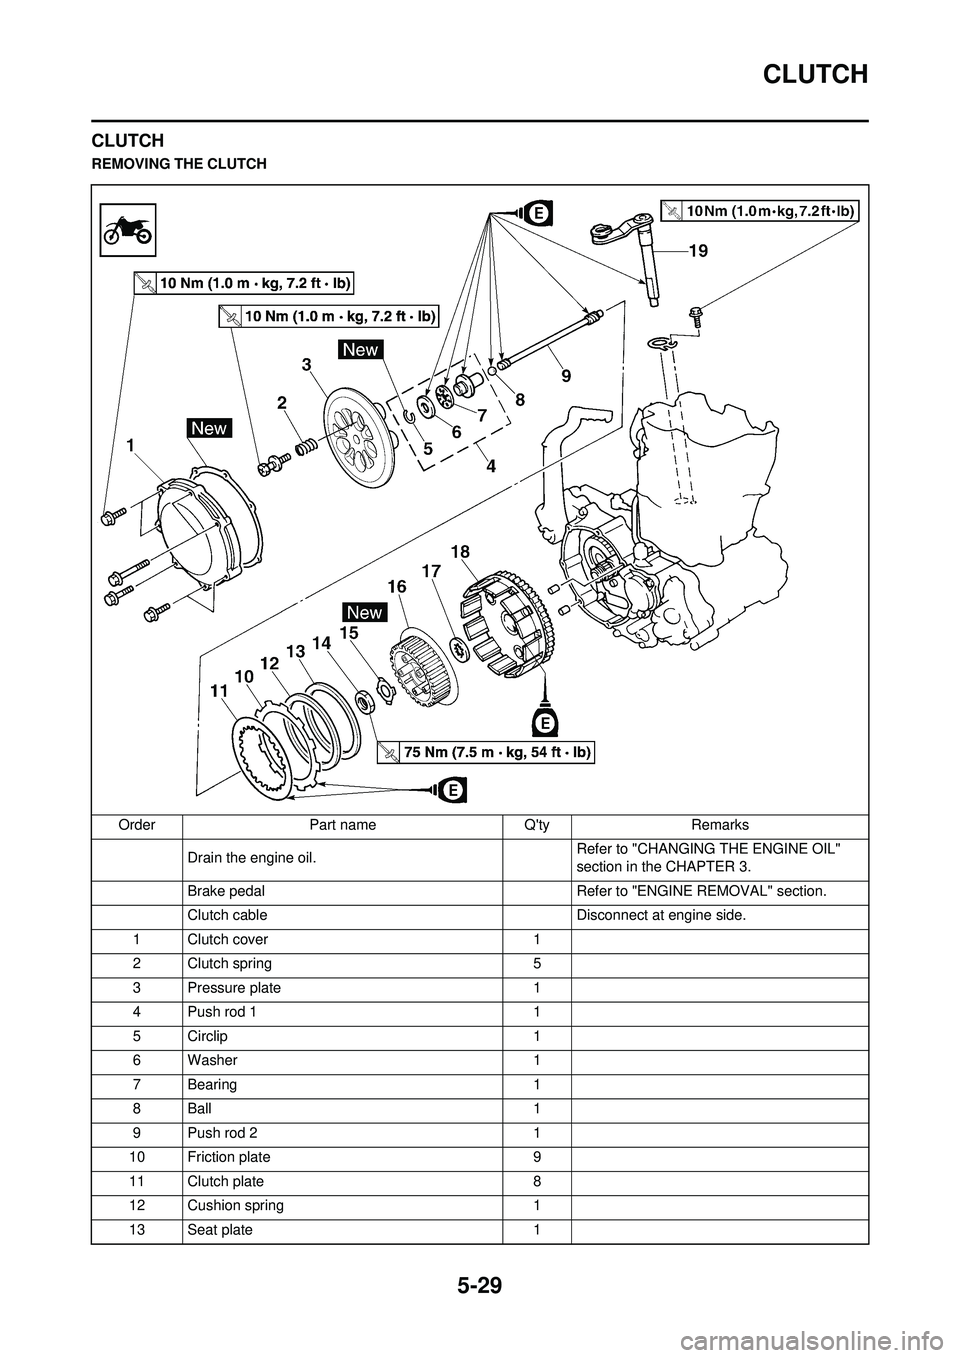
CLUTCH
REMOVING THE CLUTCHOrder Part name Q'ty Remarks Drain the engine oil. Refer to "CHANGING THE ENGINE OIL"
section in the CHAPTER 3.
Brake pedal Refer to "ENGINE REMOVAL" section.
Clutch cable Disconnect at engine side.
1 Clutch cover 1
2 Clutch spring 5
3 Pressure plate 1
4 Push rod 1 1
5 Circlip 1
6 Washer 1
7 Bearing 1
8Ball 1
9 Push rod 2 1
10 Friction plate 9
11 Clutch plate 8
12 Cushion spring 1
13 Seat plate 1