start stop button YAMAHA WR 250F 2010 Owners Manual
[x] Cancel search | Manufacturer: YAMAHA, Model Year: 2010, Model line: WR 250F, Model: YAMAHA WR 250F 2010Pages: 232, PDF Size: 13.94 MB
Page 23 of 232

1-13
MULTI-FUNCTION DISPLAY
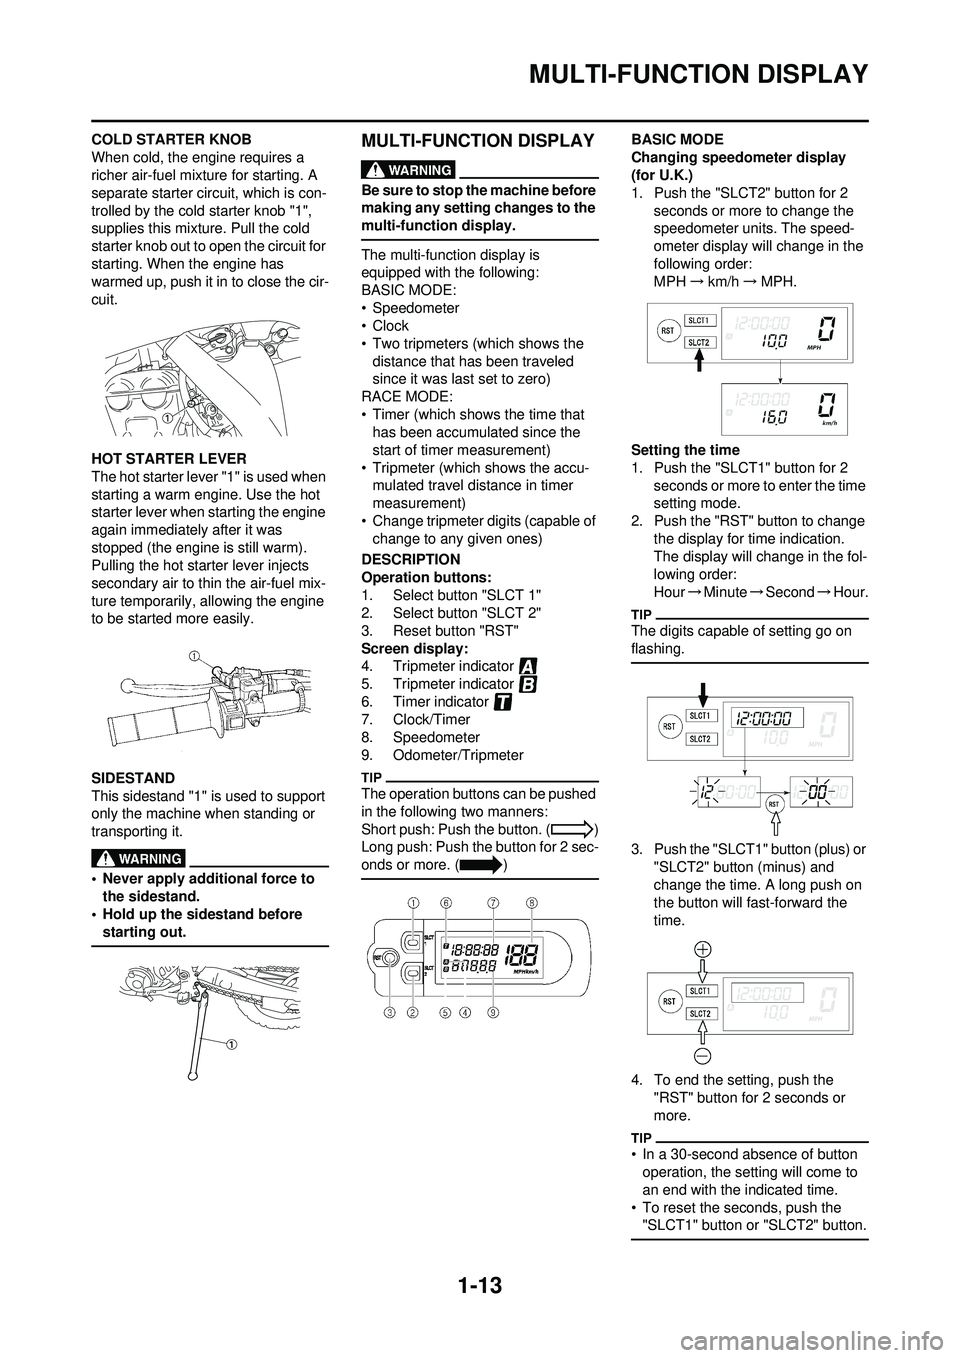
COLD STARTER KNOB
When cold, the engine requires a
richer air-fuel mixture for starting. A
separate starter circuit, which is con-
trolled by the cold starter knob "1",
supplies this mixture. Pull the cold
starter knob out to open the circuit for
starting. When the engine has
warmed up, push it in to close the cir-
cuit.
HOT STARTER LEVER
The hot starter lever "1" is used when
starting a warm engine. Use the hot
starter lever when starting the engine
again immediately after it was
stopped (the engine is still warm).
Pulling the hot starter lever injects
secondary air to thin the air-fuel mix-
ture temporarily, allowing the engine
to be started more easily.
SIDESTAND
This sidestand "1" is used to support
only the machine when standing or
transporting it.
• Never apply additional force to the sidestand.
• Hold up the sidestand before
starting out.
MULTI-FUNCTION DISPLAY
Be sure to stop the machine before
making any setting changes to the
multi-function display.
The multi-function display is
equipped with the following:
BASIC MODE:
• Speedometer
•Clock
• Two tripmeters (which shows the distance that has been traveled
since it was last set to zero)
RACE MODE:
• Timer (which shows the time that has been accumulated since the
start of timer measurement)
• Tripmeter (which shows the accu- mulated travel distance in timer
measurement)
• Change tripmeter digits (capable of change to any given ones)
DESCRIPTION
Operation buttons:
1. Select button "SLCT 1"
2. Select button "SLCT 2"
3. Reset button "RST"
Screen display:
4. Tripmeter indicator
5. Tripmeter indicator
6. Timer indicator
7. Clock/Timer
8. Speedometer
9. Odometer/Tripmeter
The operation buttons can be pushed
in the following two manners:
Short push: Push the button. ( )
Long push: Push the button for 2 sec-
onds or more. ( )
BASIC MODE
Changing speedometer display
(for U.K.)
1. Push the "SLCT2" button for 2 seconds or more to change the
speedometer units. The speed-
ometer display will change in the
following order:
MPH →km/h →MPH.
Setting the time
1. Push the "SLCT1" button for 2 seconds or more to enter the time
setting mode.
2. Push the "RST" button to change the display for time indication.
The display will change in the fol-
lowing order:
Hour →Minute →Second →Hour.
The digits capable of setting go on
flashing.
3. Push the "SLCT1" button (plus) or
"SLCT2" button (minus) and
change the time. A long push on
the button will fast-forward the
time.
4. To end the setting, push the "RST" button for 2 seconds or
more.
• In a 30-second absence of button operation, the setting will come to
an end with the indicated time.
• To reset the seconds, push the "SLCT1" button or "SLCT2" button.
Page 24 of 232

1-14
MULTI-FUNCTION DISPLAY
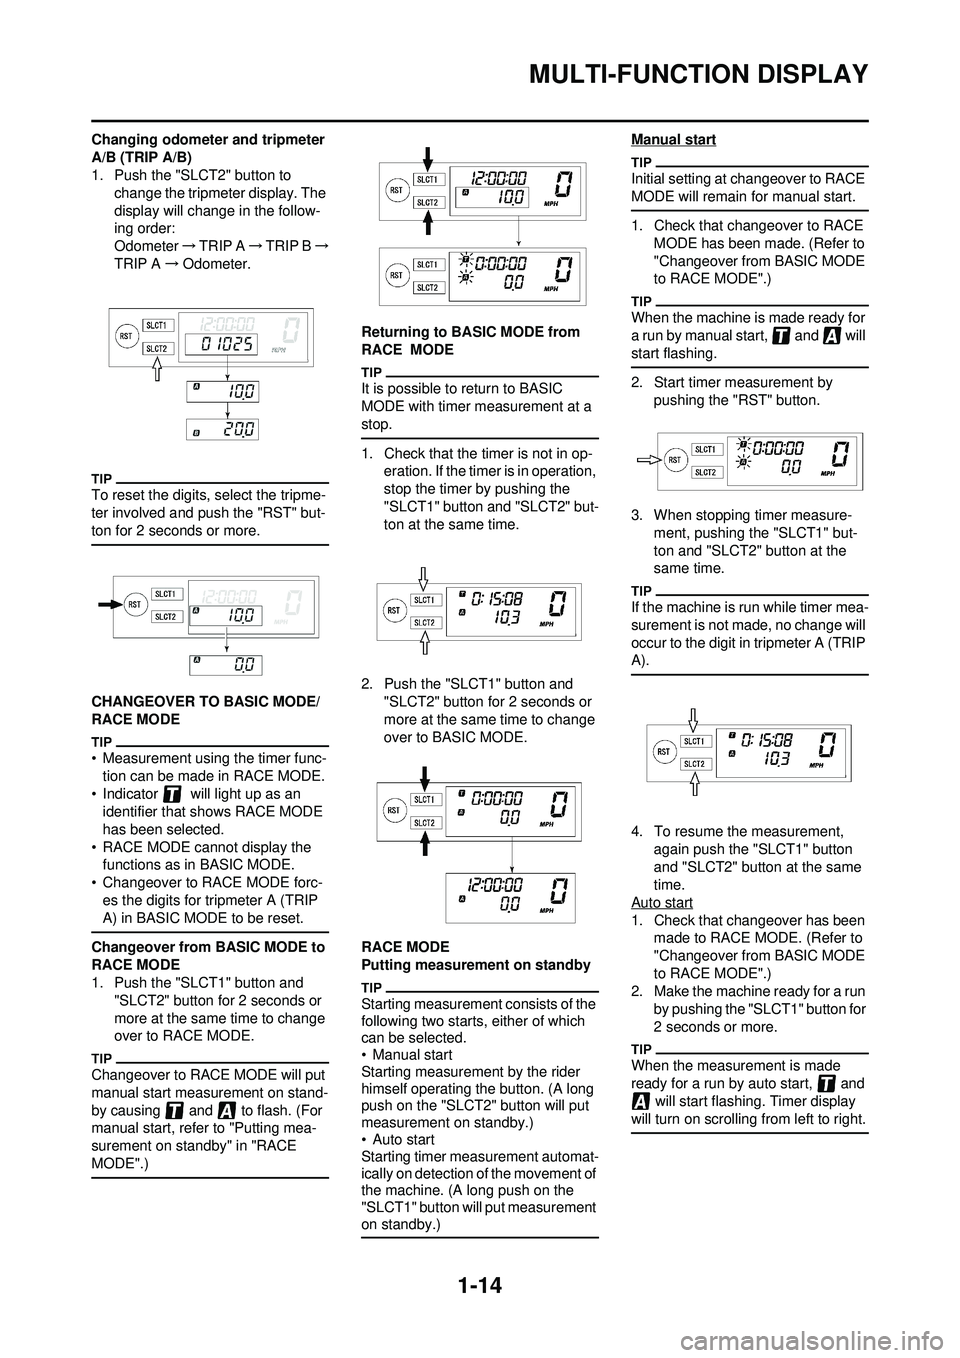
Changing odometer and tripmeter
A/B (TRIP A/B)
1. Push the "SLCT2" button to change the tripmeter display. The
display will change in the follow-
ing order:
Odometer →TRIP A →TRIP B →
TRIP A →Odometer.
To reset the digits, select the tripme-
ter involved and push the "RST" but-
ton for 2 seconds or more.
CHANGEOVER TO BASIC MODE/
RACE MODE
• Measurement using the timer func-
tion can be made in RACE MODE.
• Indicator will light up as an identifier that shows RACE MODE
has been selected.
• RACE MODE cannot display the functions as in BASIC MODE.
• Changeover to RACE MODE forc-
es the digits for tripmeter A (TRIP
A) in BASIC MODE to be reset.
Changeover from BASIC MODE to
RACE MODE
1. Push the "SLCT1" button and "SLCT2" button for 2 seconds or
more at the same time to change
over to RACE MODE.
Changeover to RACE MODE will put
manual start measurement on stand-
by causing and to flash. (For
manual start, refer to "Putting mea-
surement on standby" in "RACE
MODE".)
Returning to BASIC MODE from
RACE MODE
It is possible to return to BASIC
MODE with timer measurement at a
stop.
1. Check that the timer is not in op- eration. If the timer is in operation,
stop the timer by pushing the
"SLCT1" button and "SLCT2" but-
ton at the same time.
2. Push the "SLCT1" button and "SLCT2" button for 2 seconds or
more at the same time to change
over to BASIC MODE.
RACE MODE
Putting measurement on standby
Starting measurement consists of the
following two starts, either of which
can be selected.
• Manual start
Starting measurement by the rider
himself operating the button. (A long
push on the "SLCT2" button will put
measurement on standby.)
• Auto start
Starting timer measurement automat-
ically on detection of the movement of
the machine. (A long push on the
"SLCT1" button will put measurement
on standby.)
Manual start
Initial setting at changeover to RACE
MODE will remain for manual start.
1. Check that changeover to RACE
MODE has been made. (Refer to
"Changeover from BASIC MODE
to RACE MODE".)
When the machine is made ready for
a run by manual start, and will
start flashing.
2. Start timer measurement by pushing the "RST" button.
3. When stopping timer measure- ment, pushing the "SLCT1" but-
ton and "SLCT2" button at the
same time.
If the machine is run while timer mea-
surement is not made, no change will
occur to the digit in tripmeter A (TRIP
A).
4. To resume the measurement, again push the "SLCT1" button
and "SLCT2" button at the same
time.
Auto start
1. Check that changeover has been made to RACE MODE. (Refer to
"Changeover from BASIC MODE
to RACE MODE".)
2. Make the machine ready for a run by pushing the "SLCT1" button for
2 seconds or more.
When the measurement is made
ready for a run by auto start, and will start flashing. Timer display
will turn on scrolling from left to right.
Page 25 of 232

1-15
MULTI-FUNCTION DISPLAY
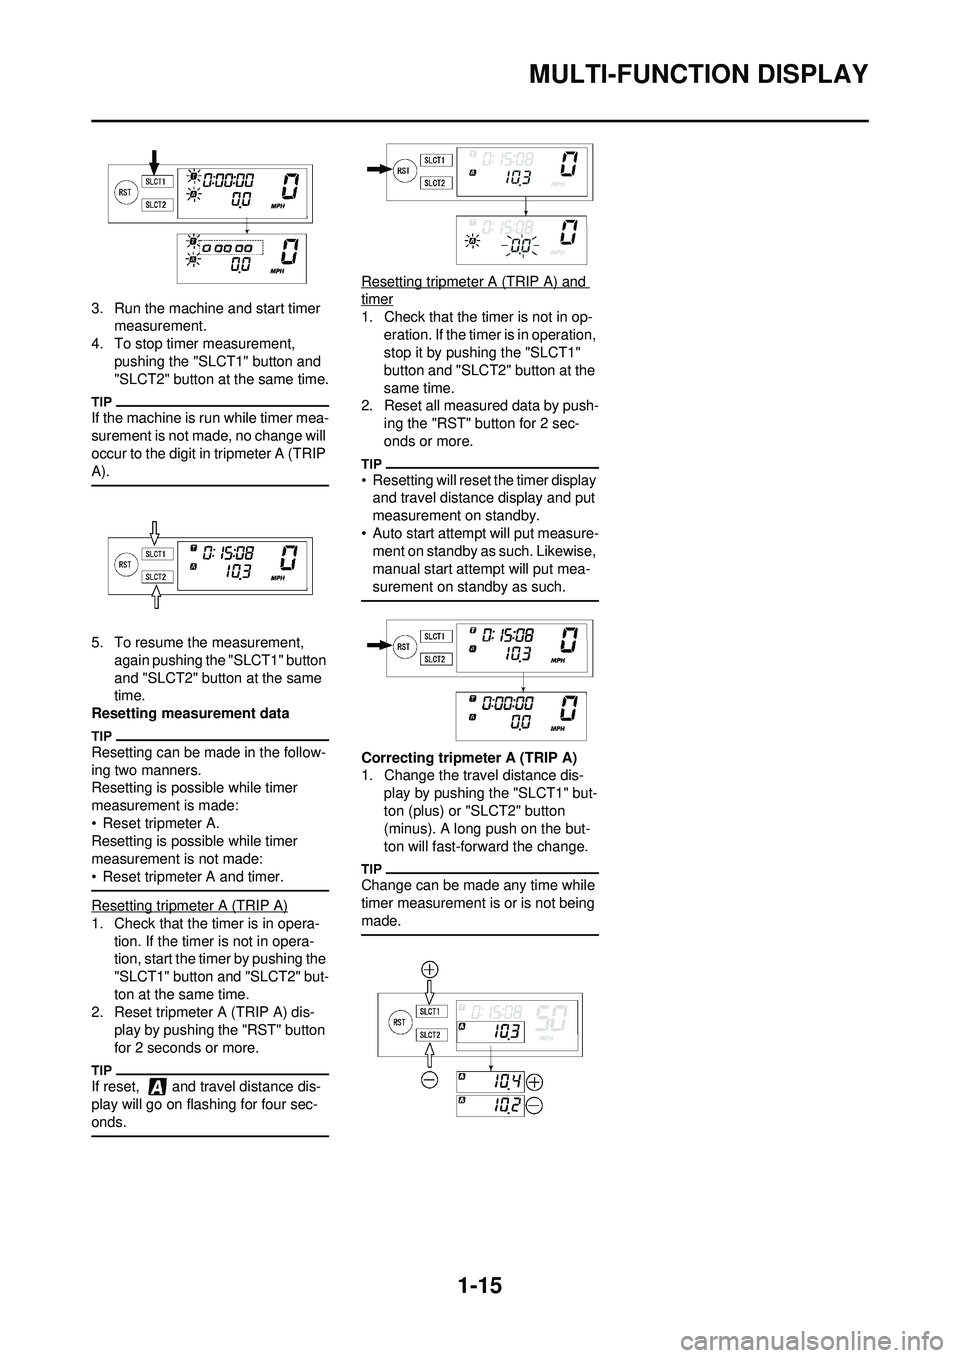
3. Run the machine and start timer measurement.
4. To stop timer measurement, pushing the "SLCT1" button and
"SLCT2" button at the same time.
If the machine is run while timer mea-
surement is not made, no change will
occur to the digit in tripmeter A (TRIP
A).
5. To resume the measurement, again pushing the "SLCT1" button
and "SLCT2" button at the same
time.
Resetting measurement data
Resetting can be made in the follow-
ing two manners.
Resetting is possible while timer
measurement is made:
• Reset tripmeter A.
Resetting is possible while timer
measurement is not made:
• Reset tripmeter A and timer.
Resetting tripmeter A (TRIP A)
1. Check that the timer is in opera- tion. If the timer is not in opera-
tion, start the timer by pushing the
"SLCT1" button and "SLCT2" but-
ton at the same time.
2. Reset tripmeter A (TRIP A) dis-
play by pushing the "RST" button
for 2 seconds or more.
If reset, and travel distance dis-
play will go on flashing for four sec-
onds.
Resetting tripmeter A (TRIP A) and
timer
1. Check that the timer is not in op-eration. If the timer is in operation,
stop it by pushing the "SLCT1"
button and "SLCT2" button at the
same time.
2. Reset all measured data by push-
ing the "RST" button for 2 sec-
onds or more.
• Resetting will reset the timer display and travel distance display and put
measurement on standby.
• Auto start attempt will put measure- ment on standby as such. Likewise,
manual start attempt will put mea-
surement on standby as such.
Correcting tripmeter A (TRIP A)
1. Change the travel distance dis- play by pushing the "SLCT1" but-
ton (plus) or "SLCT2" button
(minus). A long push on the but-
ton will fast-forward the change.
Change can be made any time while
timer measurement is or is not being
made.