light YAMAHA WR 250F 2011 Owner's Guide
[x] Cancel search | Manufacturer: YAMAHA, Model Year: 2011, Model line: WR 250F, Model: YAMAHA WR 250F 2011Pages: 232, PDF Size: 14.29 MB
Page 113 of 232
5-10
CARBURETOR
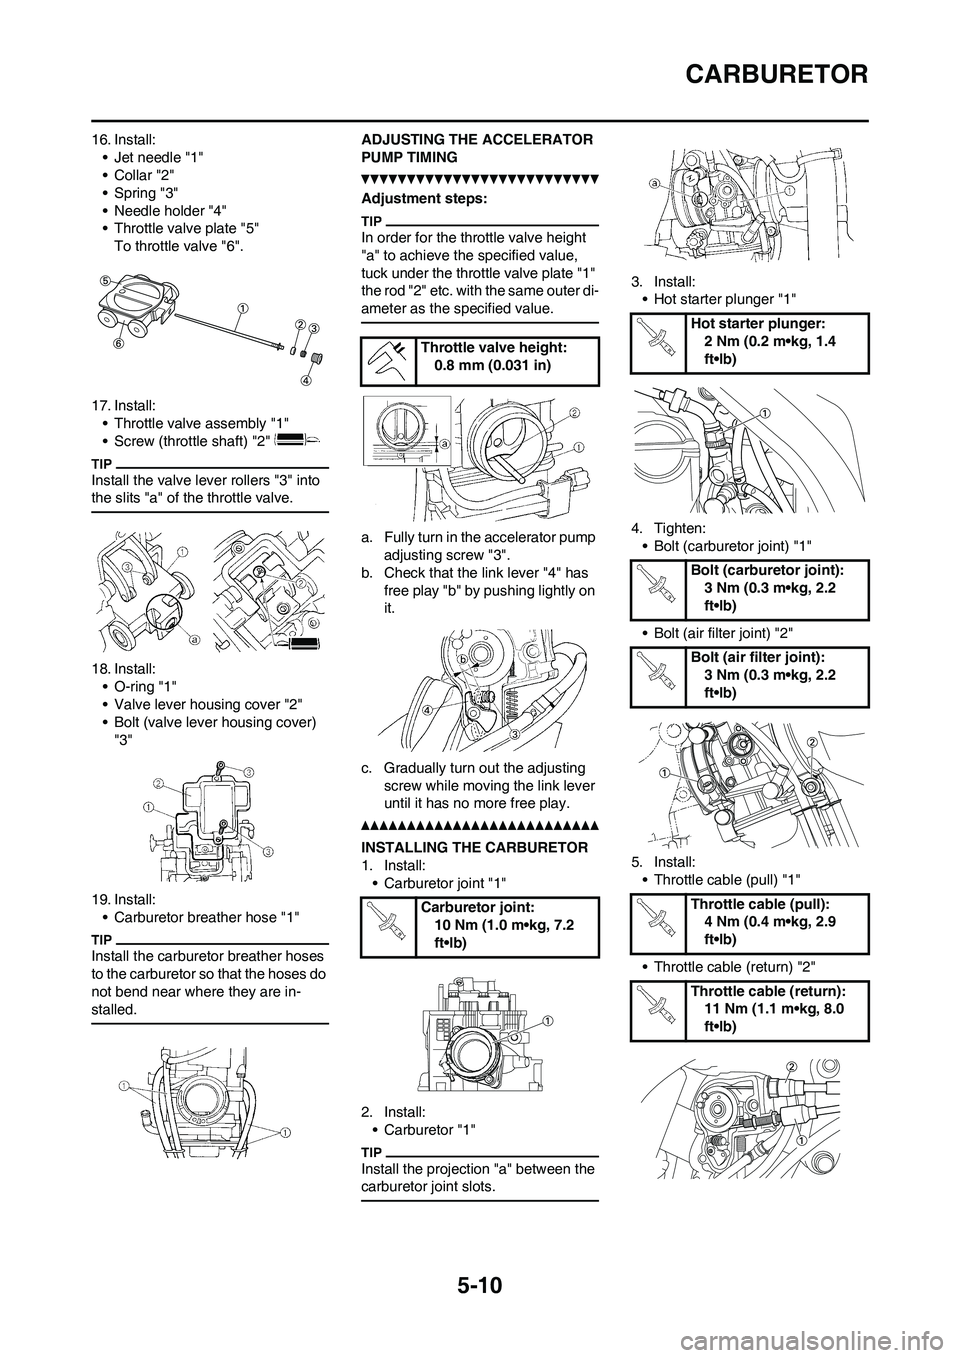
16. Install:
• Jet needle "1"
•Collar "2"
• Spring "3"
• Needle holder "4"
• Throttle valve plate "5"
To throttle valve "6".
17. Install:
• Throttle valve assembly "1"
• Screw (throttle shaft) "2"
Install the valve lever rollers "3" into
the slits "a" of the throttle valve.
18. Install:
• O-ring "1"
• Valve lever housing cover "2"
• Bolt (valve lever housing cover)
"3"
19. Install:
• Carburetor breather hose "1"
Install the carburetor breather hoses
to the carburetor so that the hoses do
not bend near where they are in-
stalled.
ADJUSTING THE ACCELERATOR
PUMP TIMING
Adjustment steps:
In order for the throttle valve height
"a" to achieve the specified value,
tuck under the throttle valve plate "1"
the rod "2" etc. with the same outer di-
ameter as the specified value.
a. Fully turn in the accelerator pump
adjusting screw "3".
b. Check that the link lever "4" has
free play "b" by pushing lightly on
it.
c. Gradually turn out the adjusting
screw while moving the link lever
until it has no more free play.
INSTALLING THE CARBURETOR
1. Install:
• Carburetor joint "1"
2. Install:
• Carburetor "1"
Install the projection "a" between the
carburetor joint slots.
3. Install:
• Hot starter plunger "1"
4. Tighten:
• Bolt (carburetor joint) "1"
• Bolt (air filter joint) "2"
5. Install:
• Throttle cable (pull) "1"
• Throttle cable (return) "2"
Throttle valve height:
0.8 mm (0.031 in)
Carburetor joint:
10 Nm (1.0 m•kg, 7.2
ft•lb)
Hot starter plunger:
2 Nm (0.2 m•kg, 1.4
ft•lb)
Bolt (carburetor joint):
3 Nm (0.3 m•kg, 2.2
ft•lb)
Bolt (air filter joint):
3 Nm (0.3 m•kg, 2.2
ft•lb)
Throttle cable (pull):
4 Nm (0.4 m•kg, 2.9
ft•lb)
Throttle cable (return):
11 Nm (1.1 m•kg, 8.0
ft•lb)
Page 120 of 232
5-17
CAMSHAFTS
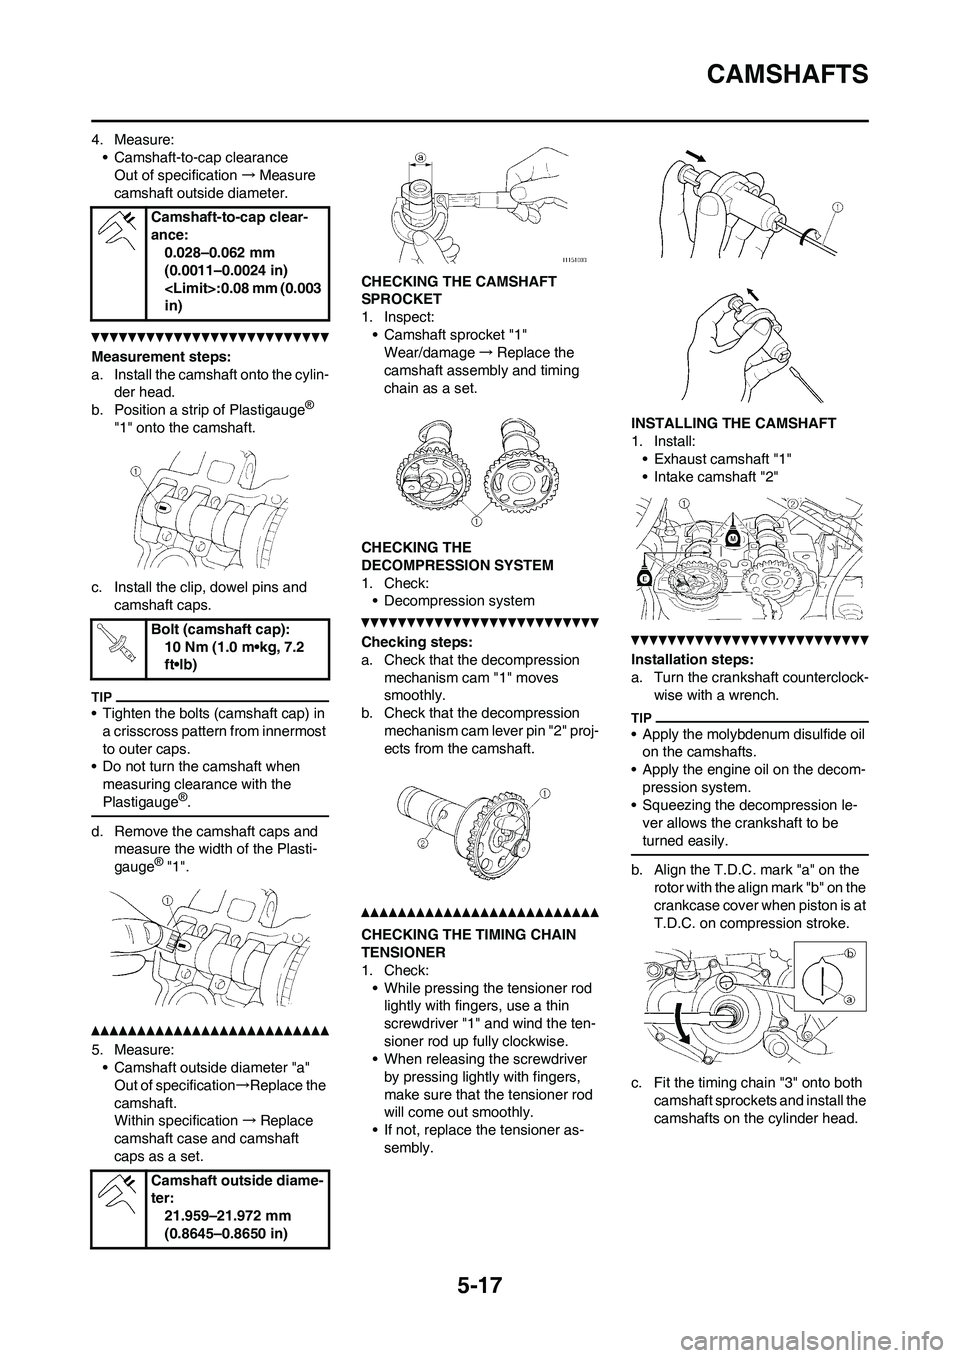
4. Measure:
• Camshaft-to-cap clearance
Out of specification→Measure
camshaft outside diameter.
Measurement steps:
a. Install the camshaft onto the cylin-
der head.
b. Position a strip of Plastigauge
®
"1" onto the camshaft.
c. Install the clip, dowel pins and
camshaft caps.
• Tighten the bolts (camshaft cap) in
a crisscross pattern from innermost
to outer caps.
• Do not turn the camshaft when
measuring clearance with the
Plastigauge
®.
d. Remove the camshaft caps and
measure the width of the Plasti-
gauge
® "1".
5. Measure:
• Camshaft outside diameter "a"
Out of specification→Replace the
camshaft.
Within specification→Replace
camshaft case and camshaft
caps as a set.CHECKING THE CAMSHAFT
SPROCKET
1. Inspect:
• Camshaft sprocket "1"
Wear/damage→Replace the
camshaft assembly and timing
chain as a set.
CHECKING THE
DECOMPRESSION SYSTEM
1. Check:
• Decompression system
Checking steps:
a. Check that the decompression
mechanism cam "1" moves
smoothly.
b. Check that the decompression
mechanism cam lever pin "2" proj-
ects from the camshaft.
CHECKING THE TIMING CHAIN
TENSIONER
1. Check:
• While pressing the tensioner rod
lightly with fingers, use a thin
screwdriver "1" and wind the ten-
sioner rod up fully clockwise.
• When releasing the screwdriver
by pressing lightly with fingers,
make sure that the tensioner rod
will come out smoothly.
• If not, replace the tensioner as-
sembly.INSTALLING THE CAMSHAFT
1. Install:
• Exhaust camshaft "1"
• Intake camshaft "2"
Installation steps:
a. Turn the crankshaft counterclock-
wise with a wrench.
• Apply the molybdenum disulfide oil
on the camshafts.
• Apply the engine oil on the decom-
pression system.
• Squeezing the decompression le-
ver allows the crankshaft to be
turned easily.
b. Align the T.D.C. mark "a" on the
rotor with the align mark "b" on the
crankcase cover when piston is at
T.D.C. on compression stroke.
c. Fit the timing chain "3" onto both
camshaft sprockets and install the
camshafts on the cylinder head. Camshaft-to-cap clear-
ance:
0.028–0.062 mm
(0.0011–0.0024 in)
in)
Bolt (camshaft cap):
10 Nm (1.0 m•kg, 7.2
ft•lb)
Camshaft outside diame-
ter:
21.959–21.972 mm
(0.8645–0.8650 in)
Page 121 of 232
5-18
CAMSHAFTS
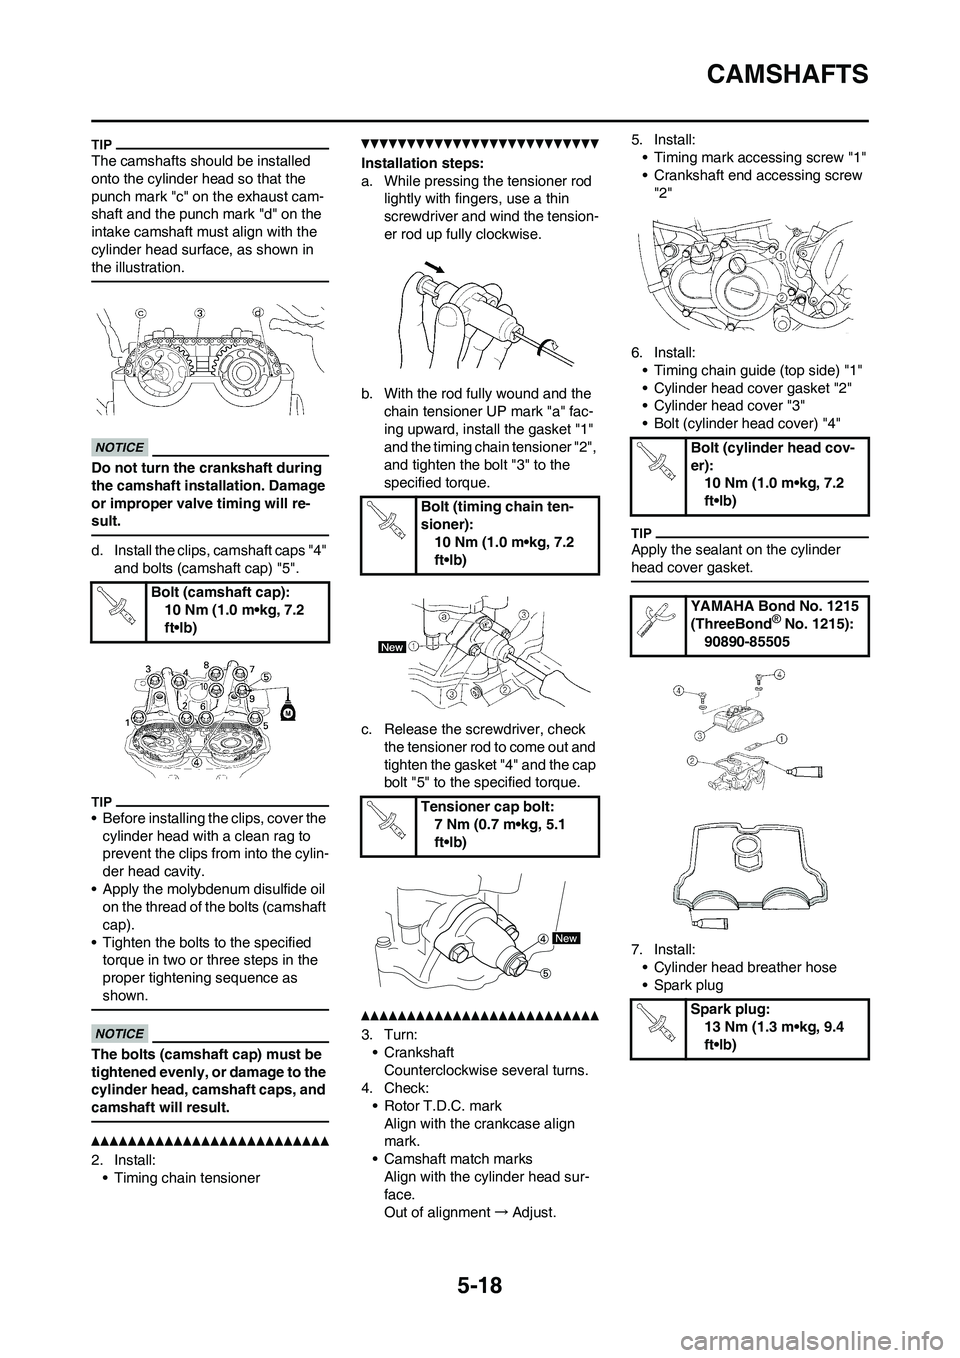
The camshafts should be installed
onto the cylinder head so that the
punch mark "c" on the exhaust cam-
shaft and the punch mark "d" on the
intake camshaft must align with the
cylinder head surface, as shown in
the illustration.
Do not turn the crankshaft during
the camshaft installation. Damage
or improper valve timing will re-
sult.
d. Install the clips, camshaft caps "4"
and bolts (camshaft cap) "5".
• Before installing the clips, cover the
cylinder head with a clean rag to
prevent the clips from into the cylin-
der head cavity.
• Apply the molybdenum disulfide oil
on the thread of the bolts (camshaft
cap).
• Tighten the bolts to the specified
torque in two or three steps in the
proper tightening sequence as
shown.
The bolts (camshaft cap) must be
tightened evenly, or damage to the
cylinder head, camshaft caps, and
camshaft will result.
2. Install:
• Timing chain tensioner
Installation steps:
a. While pressing the tensioner rod
lightly with fingers, use a thin
screwdriver and wind the tension-
er rod up fully clockwise.
b. With the rod fully wound and the
chain tensioner UP mark "a" fac-
ing upward, install the gasket "1"
and the timing chain tensioner "2",
and tighten the bolt "3" to the
specified torque.
c. Release the screwdriver, check
the tensioner rod to come out and
tighten the gasket "4" and the cap
bolt "5" to the specified torque.
3. Turn:
• Crankshaft
Counterclockwise several turns.
4. Check:
• Rotor T.D.C. mark
Align with the crankcase align
mark.
• Camshaft match marks
Align with the cylinder head sur-
face.
Out of alignment→Adjust.5. Install:
• Timing mark accessing screw "1"
• Crankshaft end accessing screw
"2"
6. Install:
• Timing chain guide (top side) "1"
• Cylinder head cover gasket "2"
• Cylinder head cover "3"
• Bolt (cylinder head cover) "4"
Apply the sealant on the cylinder
head cover gasket.
7. Install:
• Cylinder head breather hose
• Spark plug Bolt (camshaft cap):
10 Nm (1.0 m•kg, 7.2
ft•lb)
Bolt (timing chain ten-
sioner):
10 Nm (1.0 m•kg, 7.2
ft•lb)
Tensioner cap bolt:
7 Nm (0.7 m•kg, 5.1
ft•lb)
Bolt (cylinder head cov-
er):
10 Nm (1.0 m•kg, 7.2
ft•lb)
YAMAHA Bond No. 1215
(ThreeBond
® No. 1215):
90890-85505
Spark plug:
13 Nm (1.3 m•kg, 9.4
ft•lb)
Page 126 of 232
5-23
VALVES AND VALVE SPRINGS
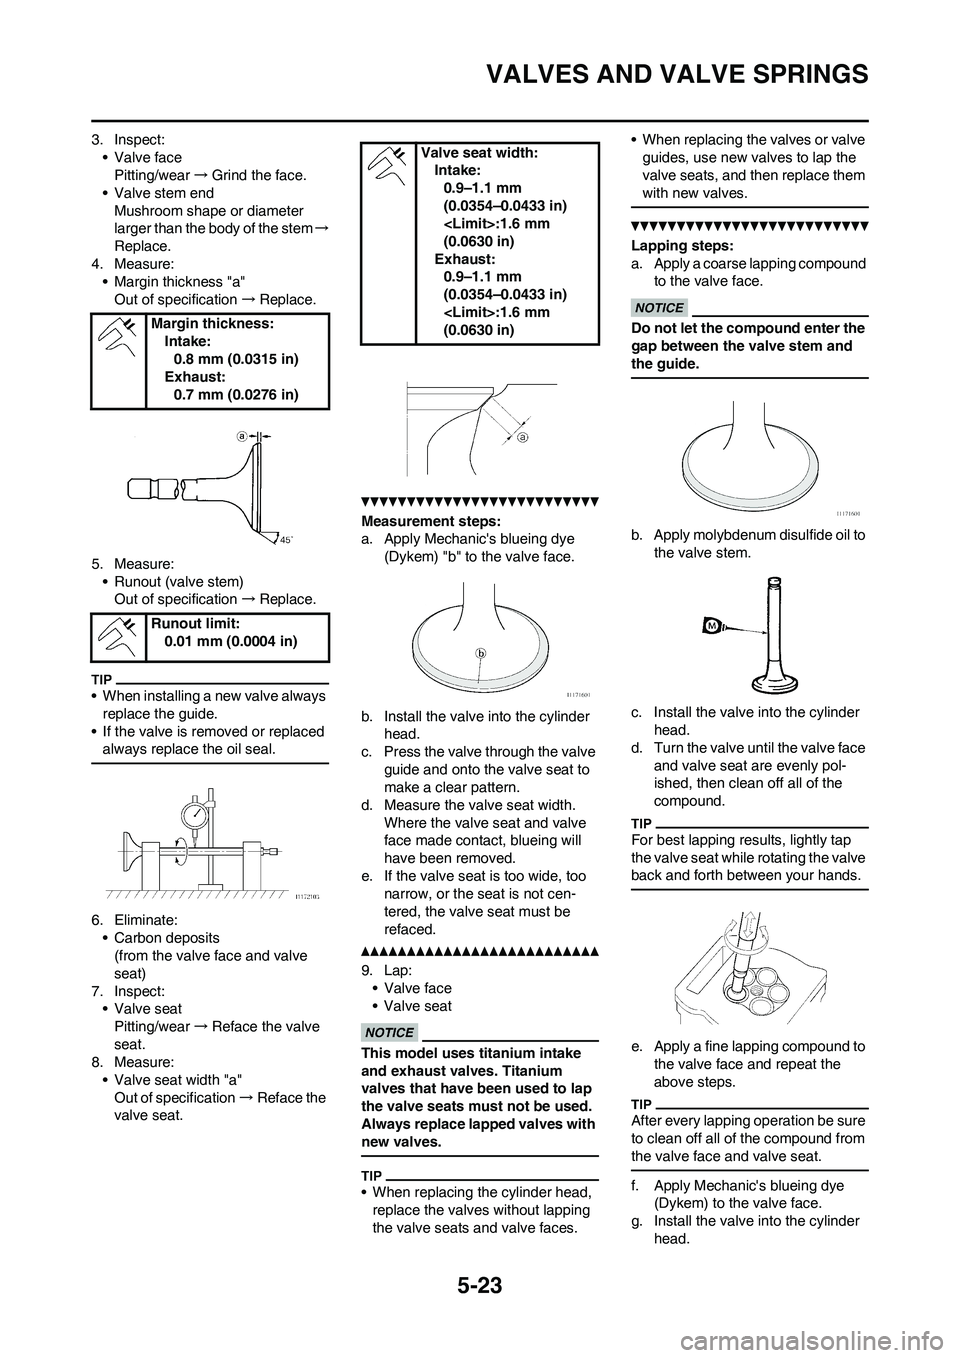
3. Inspect:• Valve facePitting/wear →Grind the face.
• Valve stem end
Mushroom shape or diameter
larger than the body of the stem →
Replace.
4. Measure: • Margin thickness "a"Out of specification →Replace.
5. Measure: • Runout (valve stem)Out of specification →Replace.
• When installing a new valve always
replace the guide.
• If the valve is removed or replaced always replace the oil seal.
6. Eliminate:• Carbon deposits(from the valve face and valve
seat)
7. Inspect: • Valve seat
Pitting/wear →Reface the valve
seat.
8. Measure:
• Valve seat width "a"Out of specification →Reface the
valve seat.
Measurement steps:
a. Apply Mechanic's blueing dye
(Dykem) "b" to the valve face.
b. Install the valve into the cylinder head.
c. Press the valve through the valve
guide and onto the valve seat to
make a clear pattern.
d. Measure the valve seat width.
Where the valve seat and valve
face made contact, blueing will
have been removed.
e. If the valve seat is too wide, too narrow, or the seat is not cen-
tered, the valve seat must be
refaced.
9. Lap: • Valve face
• Valve seat
This model uses titanium intake
and exhaust valves. Titanium
valves that have been used to lap
the valve seats must not be used.
Always replace lapped valves with
new valves.
• When replacing the cylinder head, replace the valves without lapping
the valve seats and valve faces. • When replacing the valves or valve
guides, use new valves to lap the
valve seats, and then replace them
with new valves.
Lapping steps:
a. Apply a coarse lapping compound to the valve face.
Do not let the co mpound enter the
gap between the valve stem and
the guide.
b. Apply molybdenum disulfide oil to
the valve stem.
c. Install the valve into the cylinder head.
d. Turn the valve until the valve face
and valve seat are evenly pol-
ished, then clean off all of the
compound.
For best lapping results, lightly tap
the valve seat while rotating the valve
back and forth between your hands.
e. Apply a fine lapping compound to the valve face and repeat the
above steps.
After every lapping operation be sure
to clean off all of the compound from
the valve face and valve seat.
f. Apply Mechanic's blueing dye (Dykem) to the valve face.
g. Install the valve into the cylinder
head.
Margin thickness:
Intake:0.8 mm (0.0315 in)
Exhaust:
0.7 mm (0.0276 in)
Runout limit: 0.01 mm (0.0004 in)
Valve seat width:Intake:0.9–1.1 mm
(0.0354–0.0433 in)
(0.0630 in)
Exhaust: 0.9–1.1 mm
(0.0354–0.0433 in)
(0.0630 in)
Page 127 of 232
5-24
VALVES AND VALVE SPRINGS
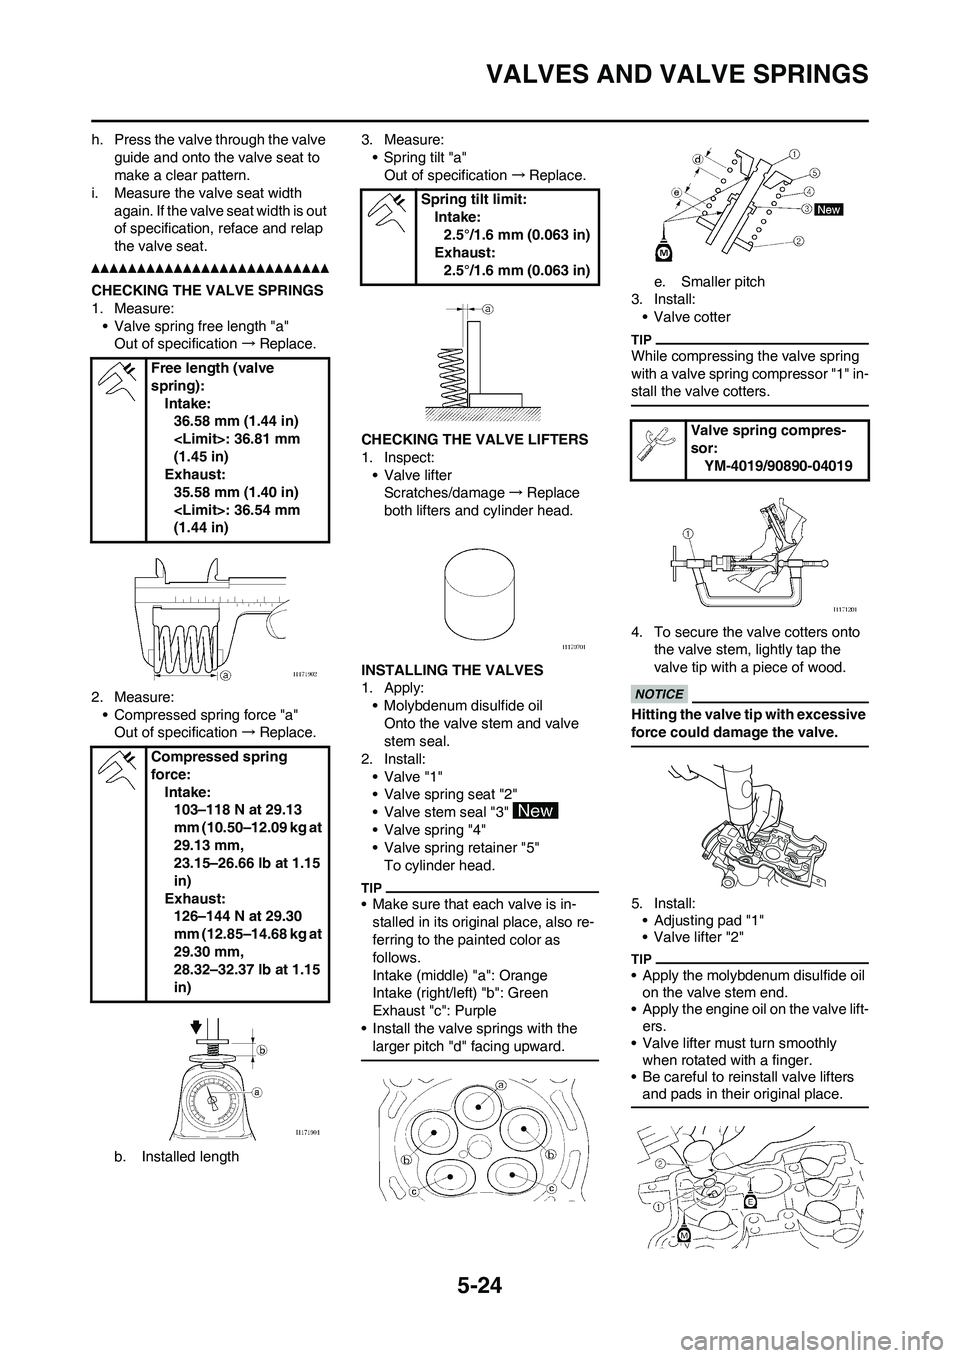
h. Press the valve through the valve guide and onto the valve seat to
make a clear pattern.
i. Measure the valve seat width
again. If the valve seat width is out
of specification, reface and relap
the valve seat.
CHECKING THE VALVE SPRINGS
1. Measure:• Valve spring free length "a"Out of specification →Replace.
2. Measure: • Compressed spring force "a"Out of specification →Replace.
b. Installed length 3. Measure:
• Spring tilt "a"Out of specification →Replace.
CHECKING THE VALVE LIFTERS
1. Inspect: • Valve lifterScratches/damage →Replace
both lifters and cylinder head.
INSTALLING THE VALVES
1. Apply: • Molybdenum disulfide oilOnto the valve stem and valve
stem seal.
2. Install: • Valve "1"
• Valve spring seat "2"
• Valve stem seal "3"
• Valve spring "4"
• Valve spring retainer "5"
To cylinder head.
• Make sure that each valve is in-stalled in its original place, also re-
ferring to the painted color as
follows.
Intake (middle) "a": Orange
Intake (right/left) "b": Green
Exhaust "c": Purple
• Install the valve springs with the larger pitch "d" facing upward.
e. Smaller pitch
3. Install:
• Valve cotter
While compressing the valve spring
with a valve spring compressor "1" in-
stall the valve cotters.
4. To secure the valve cotters onto the valve stem, lightly tap the
valve tip with a piece of wood.
Hitting the valve tip with excessive
force could damage the valve.
5. Install:• Adjusting pad "1"
• Valve lifter "2"
• Apply the molybdenum disulfide oil on the valve stem end.
• Apply the engine oil on the valve lift- ers.
• Valve lifter must turn smoothly when rotated with a finger.
• Be careful to reinstall valve lifters and pads in their original place.
Free length (valve
spring):
Intake:36.58 mm (1.44 in)
(1.45 in)
Exhaust:
35.58 mm (1.40 in)
(1.44 in)
Compressed spring
force: Intake:103–118 N at 29.13
mm (10.50–12.09 kg at
29.13 mm,
23.15–26.66 lb at 1.15
in)
Exhaust: 126–144 N at 29.30
mm (12.85–14.68 kg at
29.30 mm,
28.32–32.37 lb at 1.15
in)
Spring tilt limit: Intake:
2.5°/1.6 mm (0.063 in)
Exhaust: 2.5°/1.6 mm (0.063 in)
Valve spring compres-
sor:
YM-4019/90890-04019
Page 164 of 232
5-61
CRANKCASE AND CRANKSHAFT
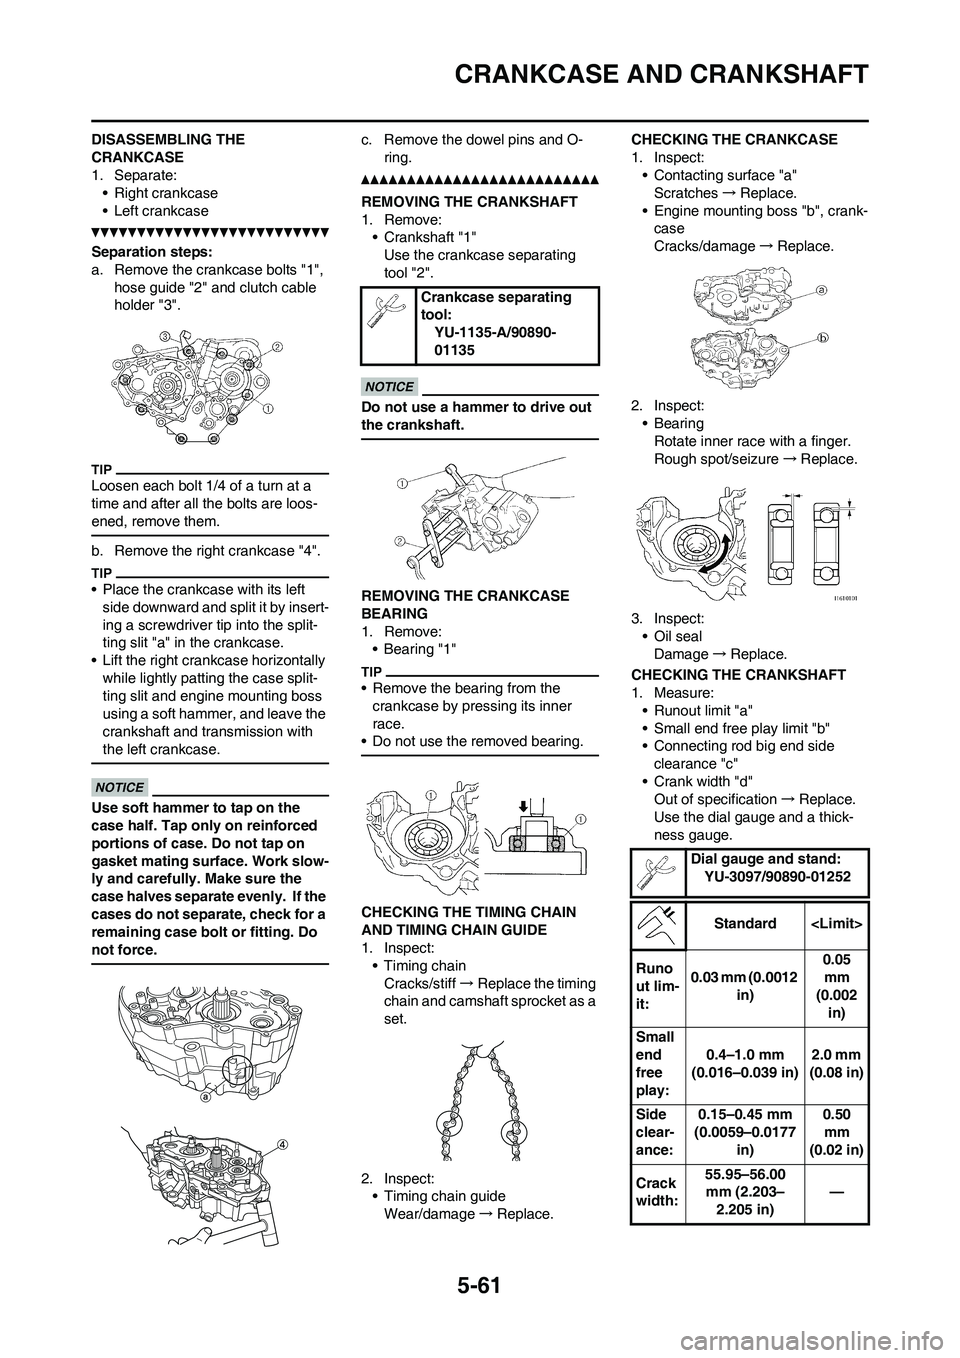
DISASSEMBLING THE
CRANKCASE
1. Separate:
• Right crankcase
• Left crankcase
Separation steps:
a. Remove the crankcase bolts "1",
hose guide "2" and clutch cable
holder "3".
Loosen each bolt 1/4 of a turn at a
time and after all the bolts are loos-
ened, remove them.
b. Remove the right crankcase "4".
• Place the crankcase with its left
side downward and split it by insert-
ing a screwdriver tip into the split-
ting slit "a" in the crankcase.
• Lift the right crankcase horizontally
while lightly patting the case split-
ting slit and engine mounting boss
using a soft hammer, and leave the
crankshaft and transmission with
the left crankcase.
Use soft hammer to tap on the
case half. Tap only on reinforced
portions of case. Do not tap on
gasket mating surface. Work slow-
ly and carefully. Make sure the
case halves separate evenly. If the
cases do not separate, check for a
remaining case bolt or fitting. Do
not force.
c. Remove the dowel pins and O-
ring.
REMOVING THE CRANKSHAFT
1. Remove:
• Crankshaft "1"
Use the crankcase separating
tool "2".
Do not use a hammer to drive out
the crankshaft.
REMOVING THE CRANKCASE
BEARING
1. Remove:
•Bearing "1"
• Remove the bearing from the
crankcase by pressing its inner
race.
• Do not use the removed bearing.
CHECKING THE TIMING CHAIN
AND TIMING CHAIN GUIDE
1. Inspect:
• Timing chain
Cracks/stiff→Replace the timing
chain and camshaft sprocket as a
set.
2. Inspect:
• Timing chain guide
Wear/damage→Replace.CHECKING THE CRANKCASE
1. Inspect:
• Contacting surface "a"
Scratches→Replace.
• Engine mounting boss "b", crank-
case
Cracks/damage→Replace.
2. Inspect:
• Bearing
Rotate inner race with a finger.
Rough spot/seizure→Replace.
3. Inspect:
• Oil seal
Damage→Replace.
CHECKING THE CRANKSHAFT
1. Measure:
• Runout limit "a"
• Small end free play limit "b"
• Connecting rod big end side
clearance "c"
• Crank width "d"
Out of specification→Replace.
Use the dial gauge and a thick-
ness gauge.
Crankcase separating
tool:
YU-1135-A/90890-
01135
Dial gauge and stand:
YU-3097/90890-01252
Standard
Runo
ut lim-
it:0.03 mm (0.0012
in)0.05
mm
(0.002
in)
Small
end
free
play:0.4–1.0 mm
(0.016–0.039 in)2.0 mm
(0.08 in)
Side
clear-
ance:0.15–0.45 mm
(0.0059–0.0177
in)0.50
mm
(0.02 in)
Crack
width:55.95–56.00
mm (2.203–
2.205 in)—
Page 166 of 232
5-63
CRANKCASE AND CRANKSHAFT
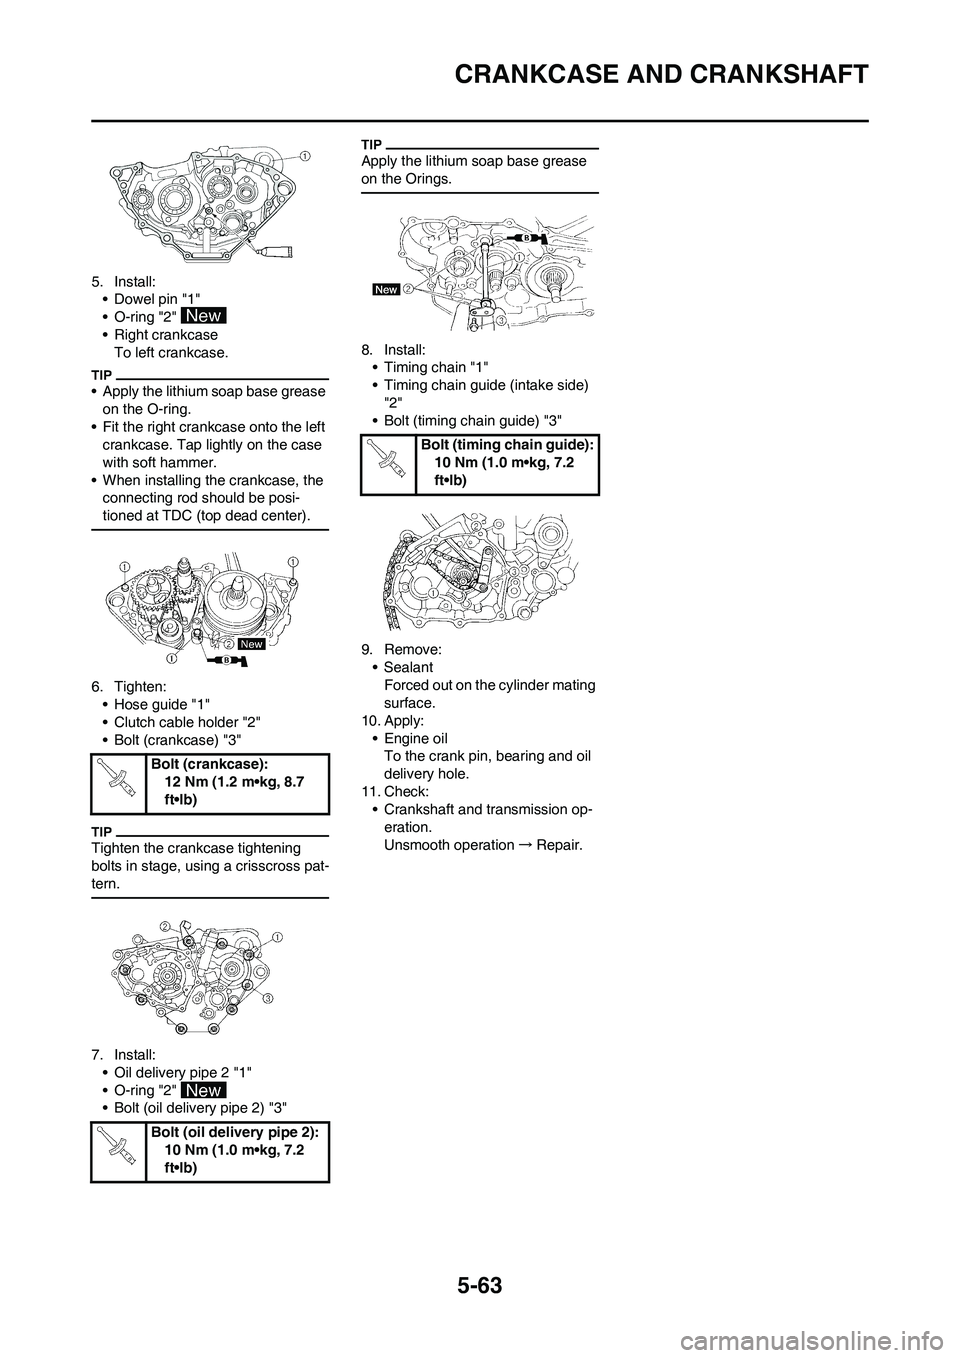
5. Install:
• Dowel pin "1"
• O-ring "2"
• Right crankcase
To left crankcase.
• Apply the lithium soap base grease
on the O-ring.
• Fit the right crankcase onto the left
crankcase. Tap lightly on the case
with soft hammer.
• When installing the crankcase, the
connecting rod should be posi-
tioned at TDC (top dead center).
6. Tighten:
• Hose guide "1"
• Clutch cable holder "2"
• Bolt (crankcase) "3"
Tighten the crankcase tightening
bolts in stage, using a crisscross pat-
tern.
7. Install:
• Oil delivery pipe 2 "1"
• O-ring "2"
• Bolt (oil delivery pipe 2) "3"
Apply the lithium soap base grease
on the Orings.
8. Install:
• Timing chain "1"
• Timing chain guide (intake side)
"2"
• Bolt (timing chain guide) "3"
9. Remove:
• Sealant
Forced out on the cylinder mating
surface.
10. Apply:
• Engine oil
To the crank pin, bearing and oil
delivery hole.
11. Check:
• Crankshaft and transmission op-
eration.
Unsmooth operation→Repair. Bolt (crankcase):
12 Nm (1.2 m•kg, 8.7
ft•lb)
Bolt (oil delivery pipe 2):
10 Nm (1.0 m•kg, 7.2
ft•lb)
Bolt (timing chain guide):
10 Nm (1.0 m•kg, 7.2
ft•lb)
Page 168 of 232
5-65
TRANSMISSION, SHIFT CAM AND SHIFT FORK
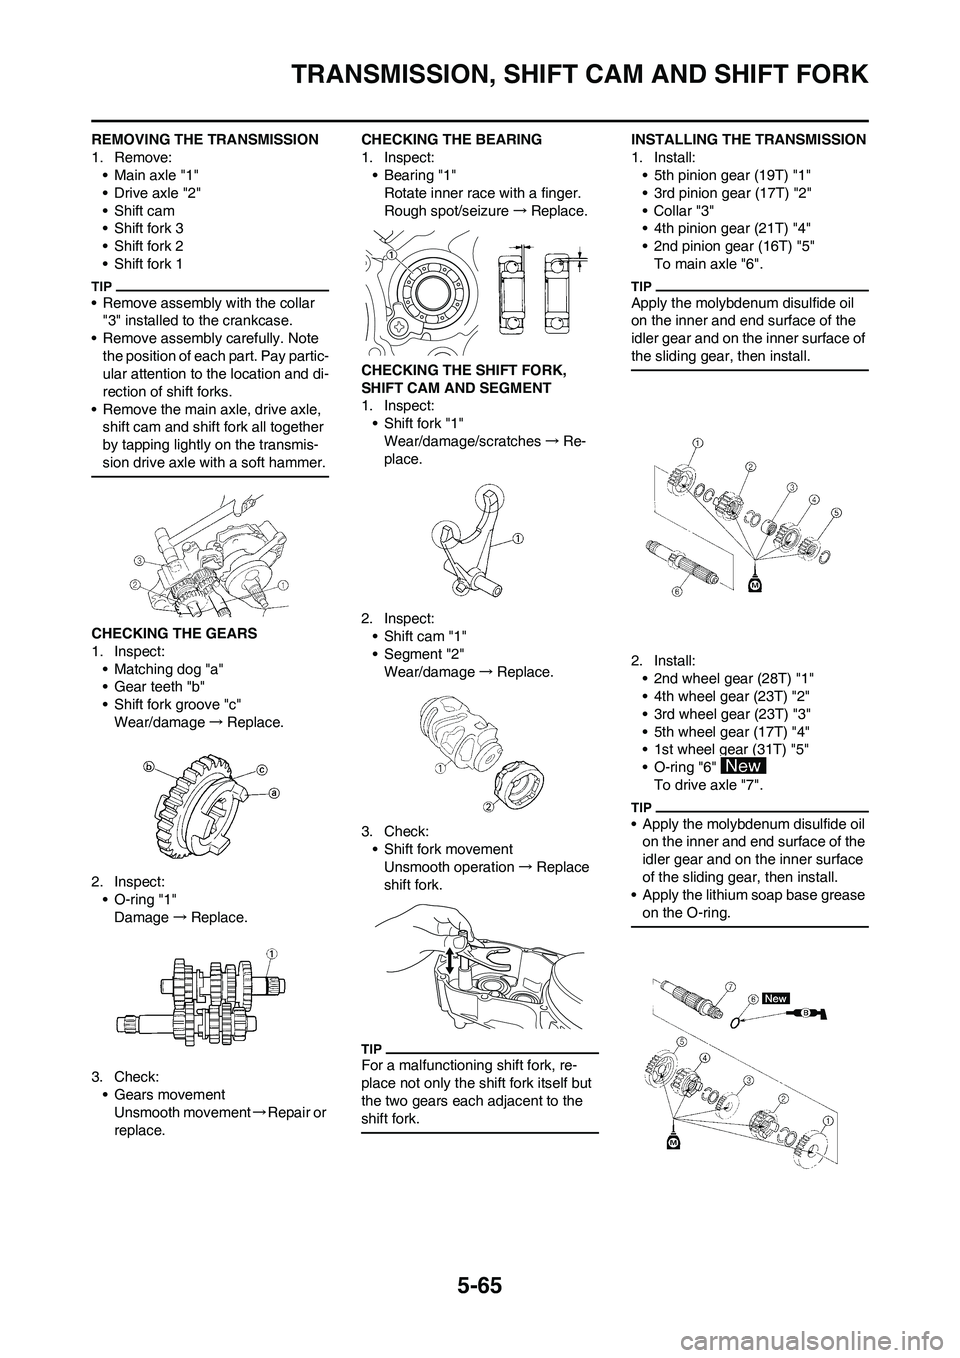
REMOVING THE TRANSMISSION
1. Remove:
• Main axle "1"
• Drive axle "2"
• Shift cam
• Shift fork 3
• Shift fork 2
• Shift fork 1
• Remove assembly with the collar
"3" installed to the crankcase.
• Remove assembly carefully. Note
the position of each part. Pay partic-
ular attention to the location and di-
rection of shift forks.
• Remove the main axle, drive axle,
shift cam and shift fork all together
by tapping lightly on the transmis-
sion drive axle with a soft hammer.
CHECKING THE GEARS
1. Inspect:
• Matching dog "a"
• Gear teeth "b"
• Shift fork groove "c"
Wear/damage→Replace.
2. Inspect:
• O-ring "1"
Damage→Replace.
3. Check:
• Gears movement
Unsmooth movement→Repair or
replace.CHECKING THE BEARING
1. Inspect:
•Bearing "1"
Rotate inner race with a finger.
Rough spot/seizure→Replace.
CHECKING THE SHIFT FORK,
SHIFT CAM AND SEGMENT
1. Inspect:
• Shift fork "1"
Wear/damage/scratches→Re-
place.
2. Inspect:
• Shift cam "1"
• Segment "2"
Wear/damage→Replace.
3. Check:
• Shift fork movement
Unsmooth operation→Replace
shift fork.
For a malfunctioning shift fork, re-
place not only the shift fork itself but
the two gears each adjacent to the
shift fork.
INSTALLING THE TRANSMISSION
1. Install:
• 5th pinion gear (19T) "1"
• 3rd pinion gear (17T) "2"
•Collar "3"
• 4th pinion gear (21T) "4"
• 2nd pinion gear (16T) "5"
To main axle "6".
Apply the molybdenum disulfide oil
on the inner and end surface of the
idler gear and on the inner surface of
the sliding gear, then install.
2. Install:
• 2nd wheel gear (28T) "1"
• 4th wheel gear (23T) "2"
• 3rd wheel gear (23T) "3"
• 5th wheel gear (17T) "4"
• 1st wheel gear (31T) "5"
• O-ring "6"
To drive axle "7".
• Apply the molybdenum disulfide oil
on the inner and end surface of the
idler gear and on the inner surface
of the sliding gear, then install.
• Apply the lithium soap base grease
on the O-ring.
Page 182 of 232
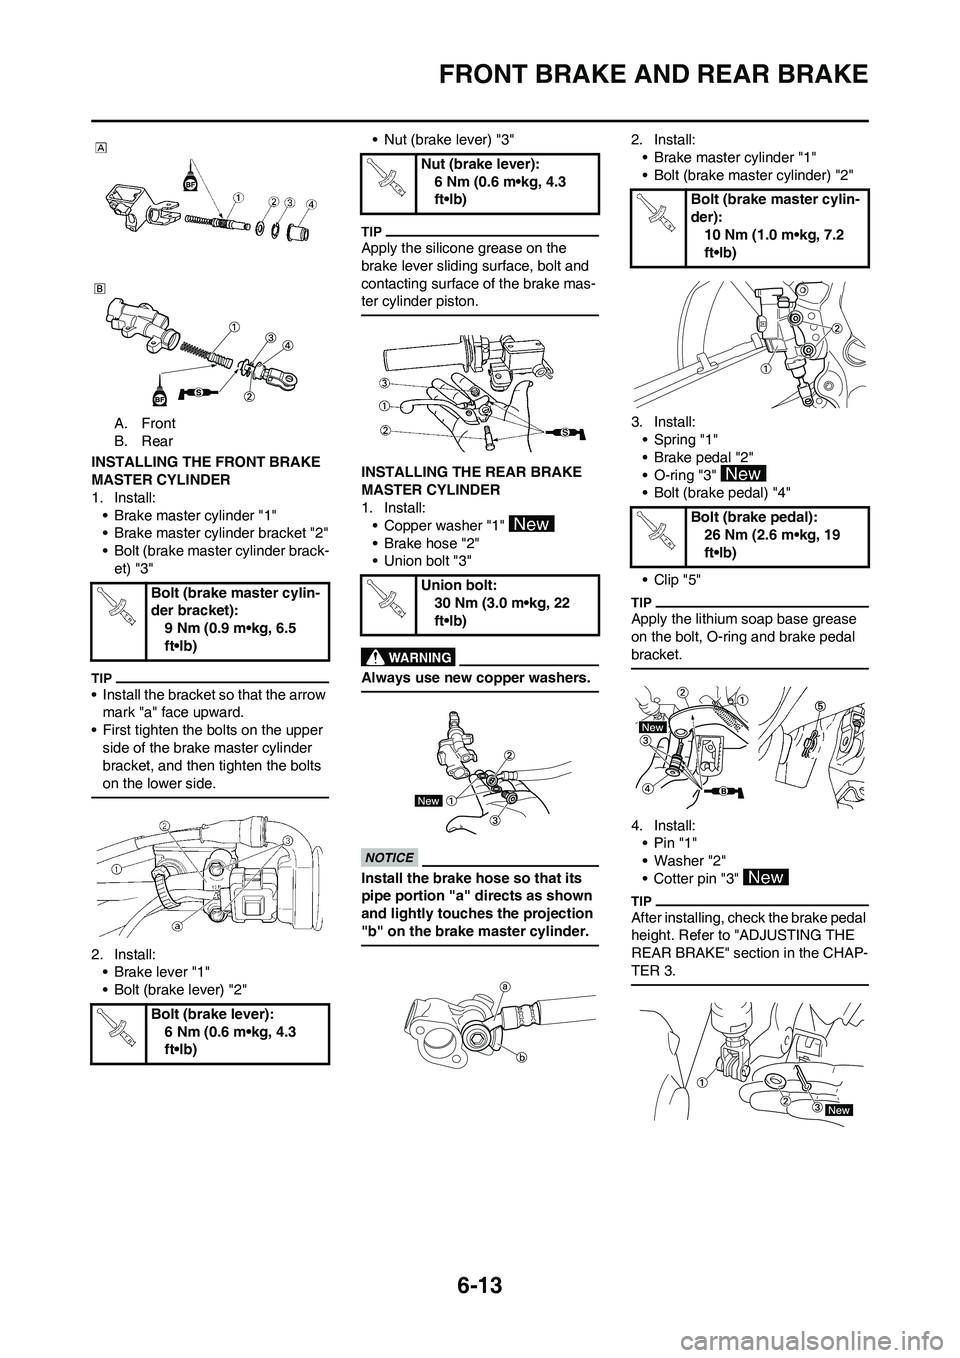
6-13
FRONT BRAKE AND REAR BRAKE
A. Front
B. Rear
INSTALLING THE FRONT BRAKE
MASTER CYLINDER
1. Install:
• Brake master cylinder "1"
• Brake master cylinder bracket "2"
• Bolt (brake master cylinder brack-
et) "3"
• Install the bracket so that the arrow
mark "a" face upward.
• First tighten the bolts on the upper
side of the brake master cylinder
bracket, and then tighten the bolts
on the lower side.
2. Install:
• Brake lever "1"
• Bolt (brake lever) "2"• Nut (brake lever) "3"
Apply the silicone grease on the
brake lever sliding surface, bolt and
contacting surface of the brake mas-
ter cylinder piston.
INSTALLING THE REAR BRAKE
MASTER CYLINDER
1. Install:
• Copper washer "1"
• Brake hose "2"
• Union bolt "3"
Always use new copper washers.
Install the brake hose so that its
pipe portion "a" directs as shown
and lightly touches the projection
"b" on the brake master cylinder.
2. Install:
• Brake master cylinder "1"
• Bolt (brake master cylinder) "2"
3. Install:
• Spring "1"
• Brake pedal "2"
• O-ring "3"
• Bolt (brake pedal) "4"
• Clip "5"
Apply the lithium soap base grease
on the bolt, O-ring and brake pedal
bracket.
4. Install:
•Pin "1"
• Washer "2"
• Cotter pin "3"
After installing, check the brake pedal
height. Refer to "ADJUSTING THE
REAR BRAKE" section in the CHAP-
TER 3.
Bolt (brake master cylin-
der bracket):
9 Nm (0.9 m•kg, 6.5
ft•lb)
Bolt (brake lever):
6 Nm (0.6 m•kg, 4.3
ft•lb)
Nut (brake lever):
6 Nm (0.6 m•kg, 4.3
ft•lb)
Union bolt:
30 Nm (3.0 m•kg, 22
ft•lb)
Bolt (brake master cylin-
der):
10 Nm (1.0 m•kg, 7.2
ft•lb)
Bolt (brake pedal):
26 Nm (2.6 m•kg, 19
ft•lb)
Page 183 of 232
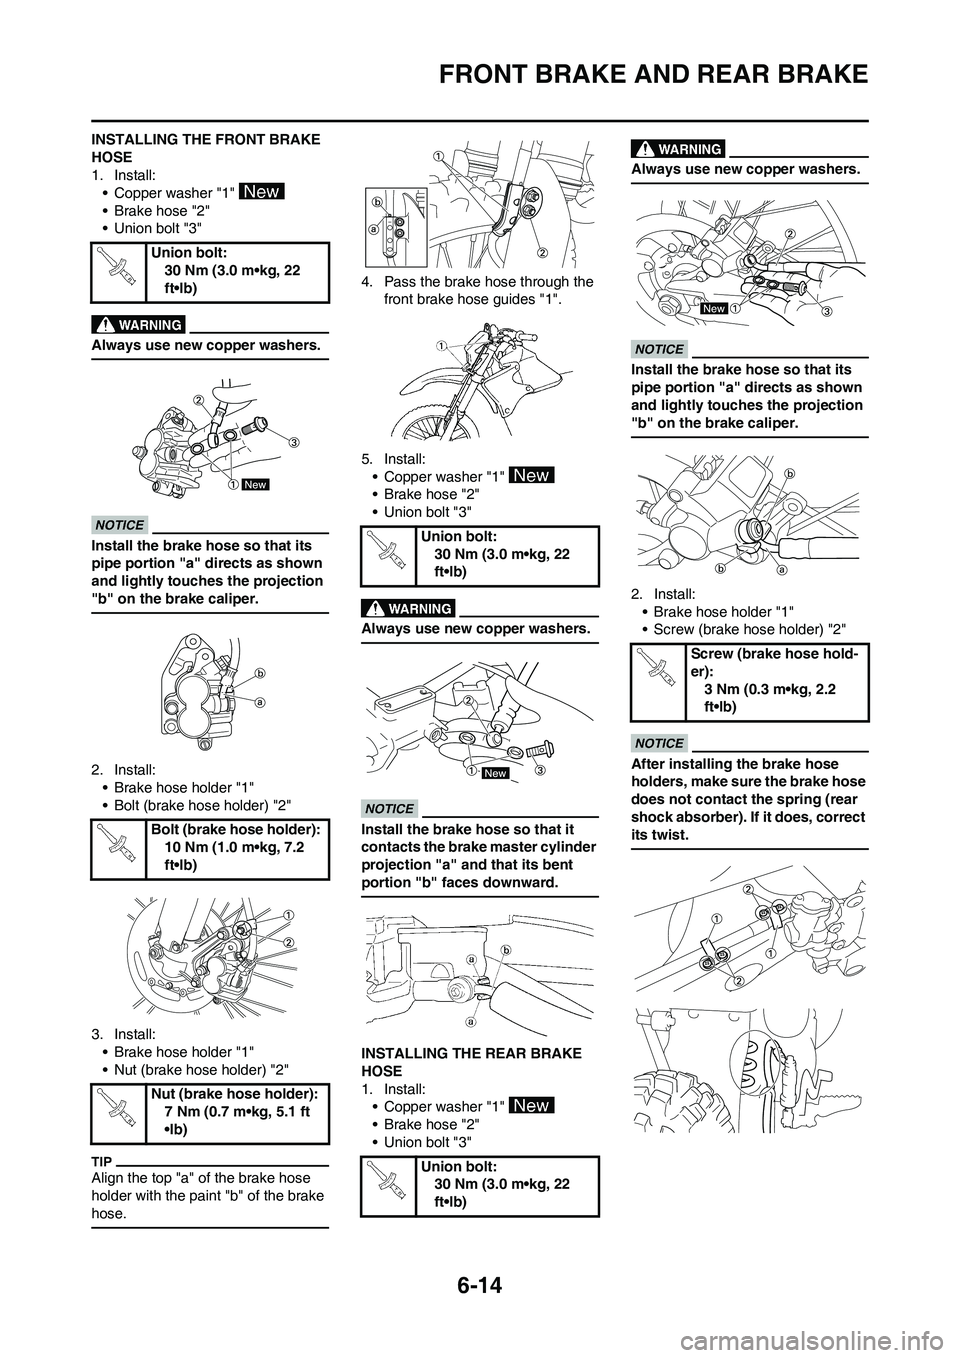
6-14
FRONT BRAKE AND REAR BRAKE
INSTALLING THE FRONT BRAKE
HOSE
1. Install:
• Copper washer "1"
• Brake hose "2"
• Union bolt "3"
Always use new copper washers.
Install the brake hose so that its
pipe portion "a" directs as shown
and lightly touches the projection
"b" on the brake caliper.
2. Install:
• Brake hose holder "1"
• Bolt (brake hose holder) "2"
3. Install:
• Brake hose holder "1"
• Nut (brake hose holder) "2"
Align the top "a" of the brake hose
holder with the paint "b" of the brake
hose.
4. Pass the brake hose through the
front brake hose guides "1".
5. Install:
• Copper washer "1"
• Brake hose "2"
• Union bolt "3"
Always use new copper washers.
Install the brake hose so that it
contacts the brake master cylinder
projection "a" and that its bent
portion "b" faces downward.
INSTALLING THE REAR BRAKE
HOSE
1. Install:
• Copper washer "1"
• Brake hose "2"
• Union bolt "3"
Always use new copper washers.
Install the brake hose so that its
pipe portion "a" directs as shown
and lightly touches the projection
"b" on the brake caliper.
2. Install:
• Brake hose holder "1"
• Screw (brake hose holder) "2"
After installing the brake hose
holders, make sure the brake hose
does not contact the spring (rear
shock absorber). If it does, correct
its twist.
Union bolt:
30 Nm (3.0 m•kg, 22
ft•lb)
Bolt (brake hose holder):
10 Nm (1.0 m•kg, 7.2
ft•lb)
Nut (brake hose holder):
7 Nm (0.7 m•kg, 5.1 ft
•lb)
Union bolt:
30 Nm (3.0 m•kg, 22
ft•lb)
Union bolt:
30 Nm (3.0 m•kg, 22
ft•lb)
Screw (brake hose hold-
er):
3 Nm (0.3 m•kg, 2.2
ft•lb)