wheel YAMAHA WR 250F 2011 Owner's Guide
[x] Cancel search | Manufacturer: YAMAHA, Model Year: 2011, Model line: WR 250F, Model: YAMAHA WR 250F 2011Pages: 232, PDF Size: 14.29 MB
Page 171 of 232
6-2
FRONT WHEEL AND REAR WHEEL
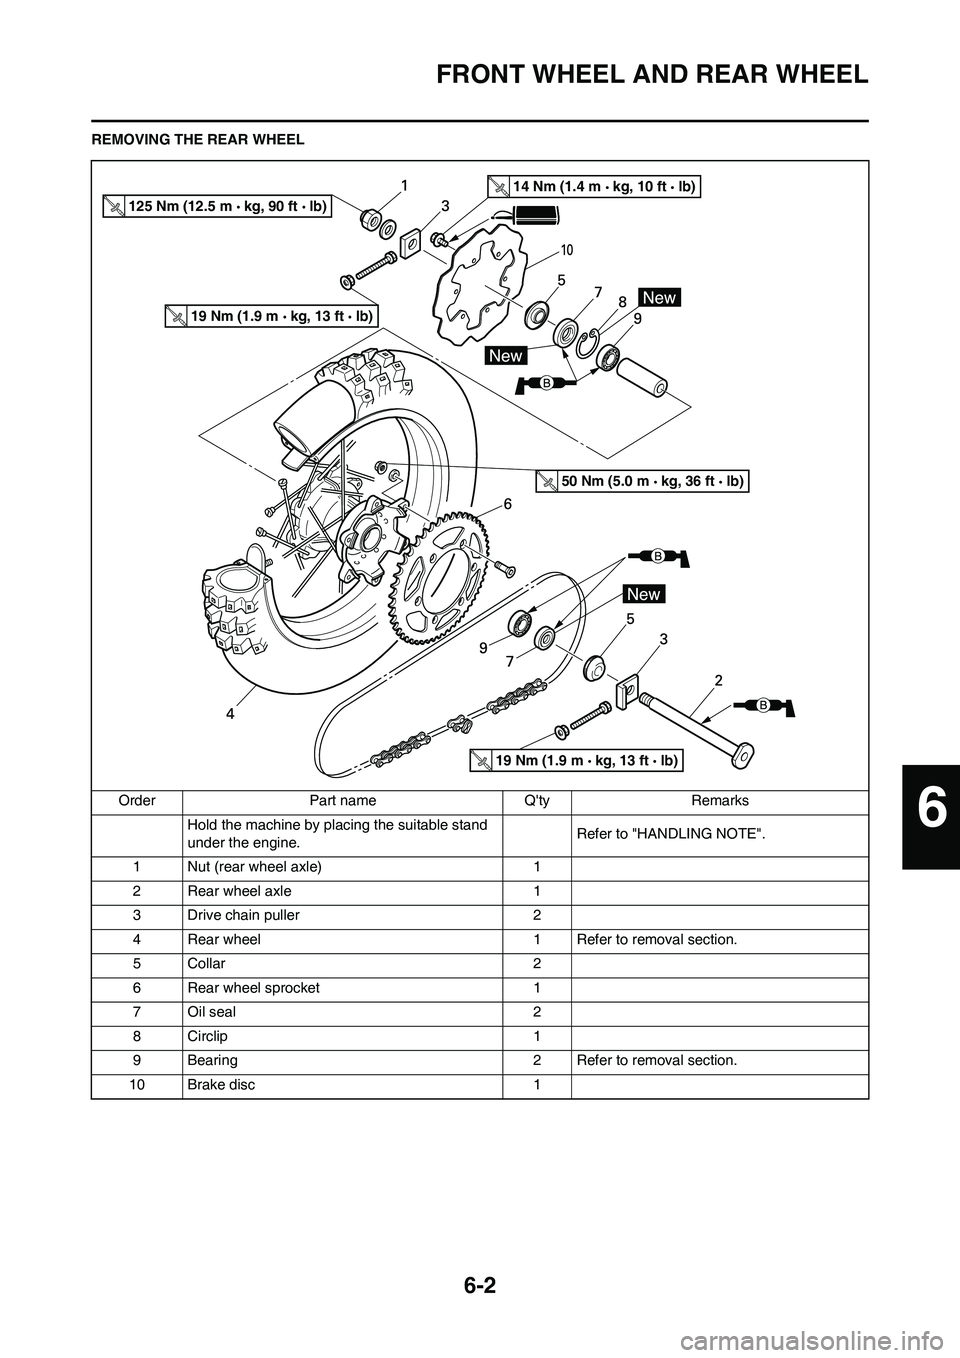
REMOVING THE REAR WHEEL
Order Part name Q'ty Remarks
Hold the machine by placing the suitable stand
under the engine.Refer to "HANDLING NOTE".
1 Nut (rear wheel axle) 1
2 Rear wheel axle 1
3 Drive chain puller 2
4 Rear wheel 1 Refer to removal section.
5 Collar 2
6 Rear wheel sprocket 1
7 Oil seal 2
8 Circlip 1
9 Bearing 2 Refer to removal section.
10 Brake disc 1
125 Nm (12.5 m kg, 90 ft lb)
14 Nm (1.4 m kg, 10 ft lb)
19 Nm (1.9 m kg, 13 ft lb)
19 Nm (1.9 m kg, 13 ft lb)
50 Nm (5.0 m kg, 36 ft lb)
6
Page 172 of 232
6-3
FRONT WHEEL AND REAR WHEEL
HANDLING NOTE
Support the machine securely so
there is no danger of it falling over.
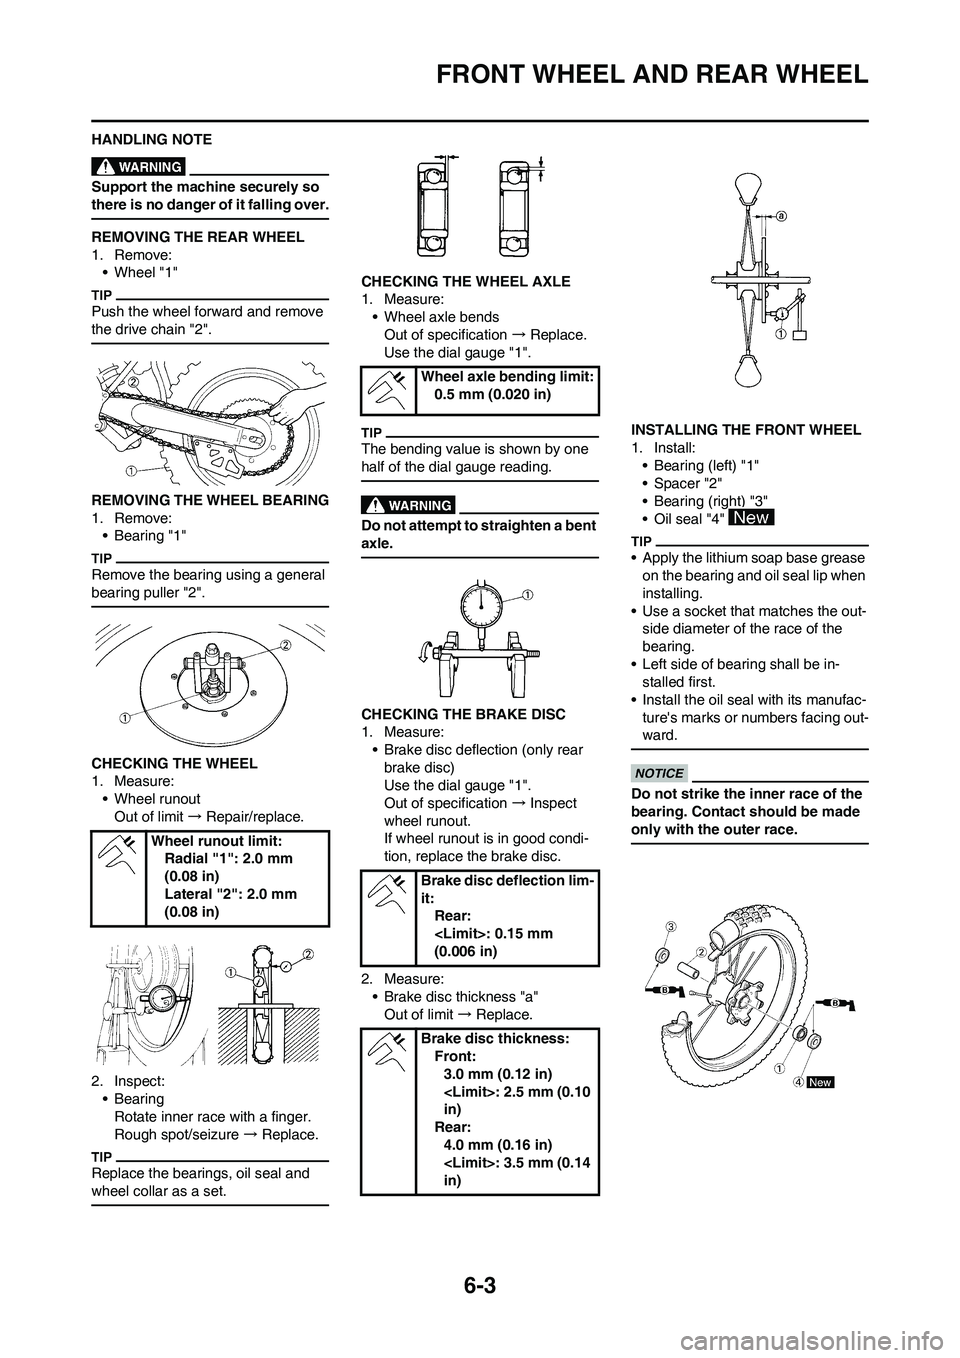
REMOVING THE REAR WHEEL
1. Remove:
• Wheel "1"
Push the wheel forward and remove
the drive chain "2".
REMOVING THE WHEEL BEARING
1. Remove:
• Bearing "1"
Remove the bearing using a general
bearing puller "2".
CHECKING THE WHEEL
1. Measure:
• Wheel runout
Out of limit → Repair/replace.
2. Inspect:
• Bearing
Rotate inner race with a finger.
Rough spot/seizure → Replace.
Replace the bearings, oil seal and
wheel collar as a set.
CHECKING THE WHEEL AXLE
1. Measure:
• Wheel axle bends
Out of specification → Replace.
Use the dial gauge "1".
The bending value is shown by one
half of the dial gauge reading.
Do not attempt to straighten a bent
axle.
CHECKING THE BRAKE DISC
1. Measure:
• Brake disc deflection (only rear
brake disc)
Use the dial gauge "1".
Out of specification → Inspect
wheel runout.
If wheel runout is in good condi-
tion, replace the brake disc.
2. Measure:
• Brake disc thickness "a"
Out of limit → Replace.INSTALLING THE FRONT WHEEL
1. Install:
• Bearing (left) "1"
• Spacer "2"
• Bearing (right) "3"
• Oil seal "4"
• Apply the lithium soap base grease
on the bearing and oil seal lip when
installing.
• Use a socket that matches the out-
side diameter of the race of the
bearing.
• Left side of bearing shall be in-
stalled first.
• Install the oil seal with its manufac-
ture's marks or numbers facing out-
ward.
Do not strike the inner race of the
bearing. Contact should be made
only with the outer race.
Wheel runout limit:
Radial "1": 2.0 mm
(0.08 in)
Lateral "2": 2.0 mm
(0.08 in)
Wheel axle bending limit:
0.5 mm (0.020 in)
Brake disc deflection lim-
it:
Rear:
(0.006 in)
Brake disc thickness:
Front:
3.0 mm (0.12 in)
in)
Rear:
4.0 mm (0.16 in)
in)
Page 173 of 232
6-4
FRONT WHEEL AND REAR WHEEL
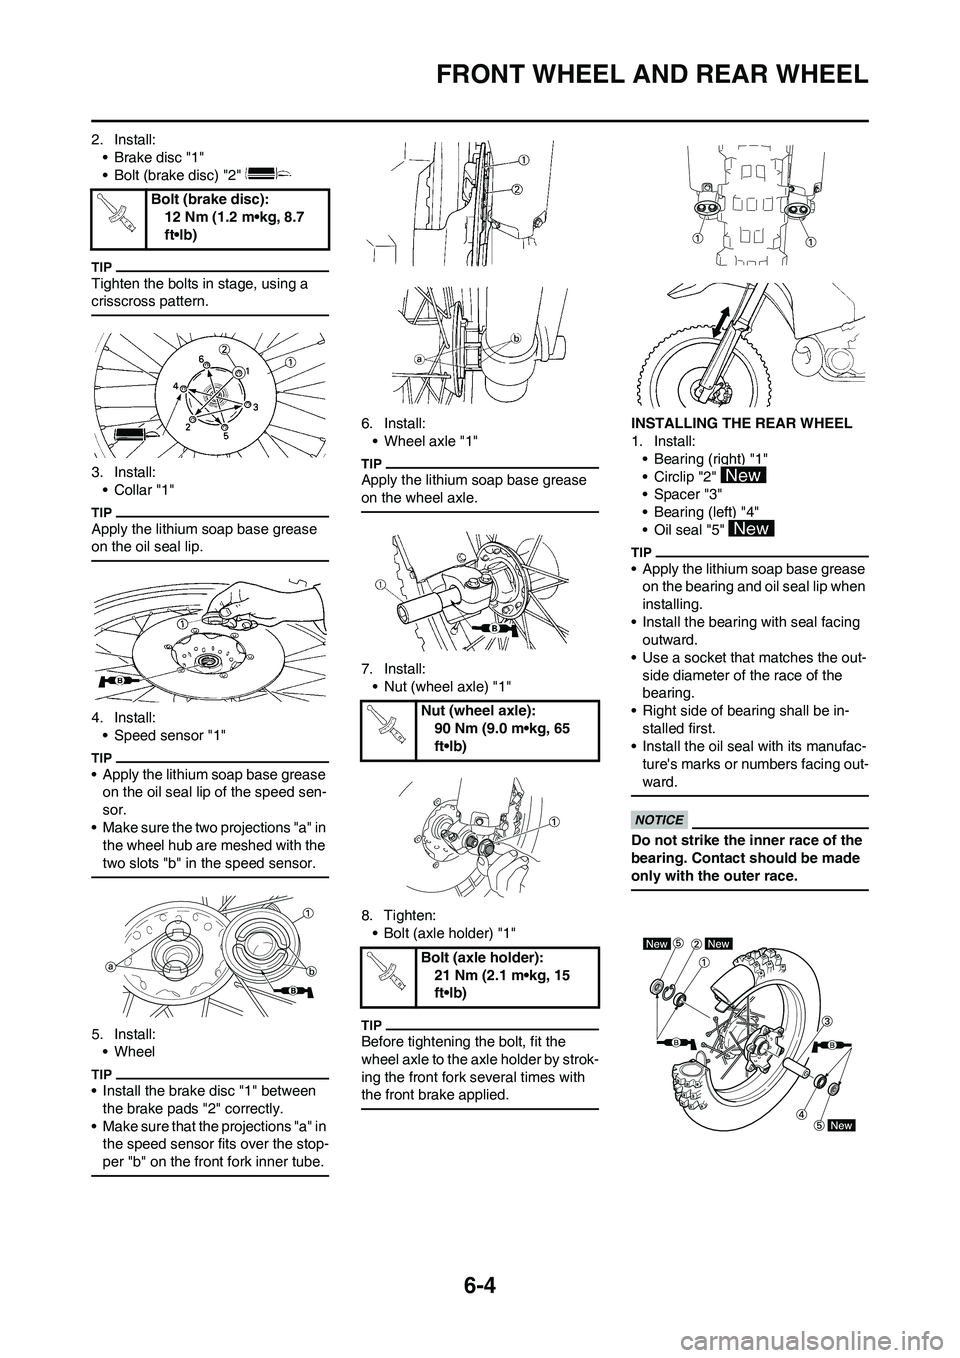
2. Install:
• Brake disc "1"
• Bolt (brake disc) "2"
Tighten the bolts in stage, using a
crisscross pattern.
3. Install:
•Collar "1"
Apply the lithium soap base grease
on the oil seal lip.
4. Install:
• Speed sensor "1"
• Apply the lithium soap base grease
on the oil seal lip of the speed sen-
sor.
• Make sure the two projections "a" in
the wheel hub are meshed with the
two slots "b" in the speed sensor.
5. Install:
• Wheel
• Install the brake disc "1" between
the brake pads "2" correctly.
• Make sure that the projections "a" in
the speed sensor fits over the stop-
per "b" on the front fork inner tube.
6. Install:
• Wheel axle "1"
Apply the lithium soap base grease
on the wheel axle.
7. Install:
• Nut (wheel axle) "1"
8. Tighten:
• Bolt (axle holder) "1"
Before tightening the bolt, fit the
wheel axle to the axle holder by strok-
ing the front fork several times with
the front brake applied.
INSTALLING THE REAR WHEEL
1. Install:
• Bearing (right) "1"
• Circlip "2"
• Spacer "3"
• Bearing (left) "4"
• Oil seal "5"
• Apply the lithium soap base grease
on the bearing and oil seal lip when
installing.
• Install the bearing with seal facing
outward.
• Use a socket that matches the out-
side diameter of the race of the
bearing.
• Right side of bearing shall be in-
stalled first.
• Install the oil seal with its manufac-
ture's marks or numbers facing out-
ward.
Do not strike the inner race of the
bearing. Contact should be made
only with the outer race.
Bolt (brake disc):
12 Nm (1.2 m•kg, 8.7
ft•lb)
Nut (wheel axle):
90 Nm (9.0 m•kg, 65
ft•lb)
Bolt (axle holder):
21 Nm (2.1 m•kg, 15
ft•lb)
Page 174 of 232
6-5
FRONT WHEEL AND REAR WHEEL
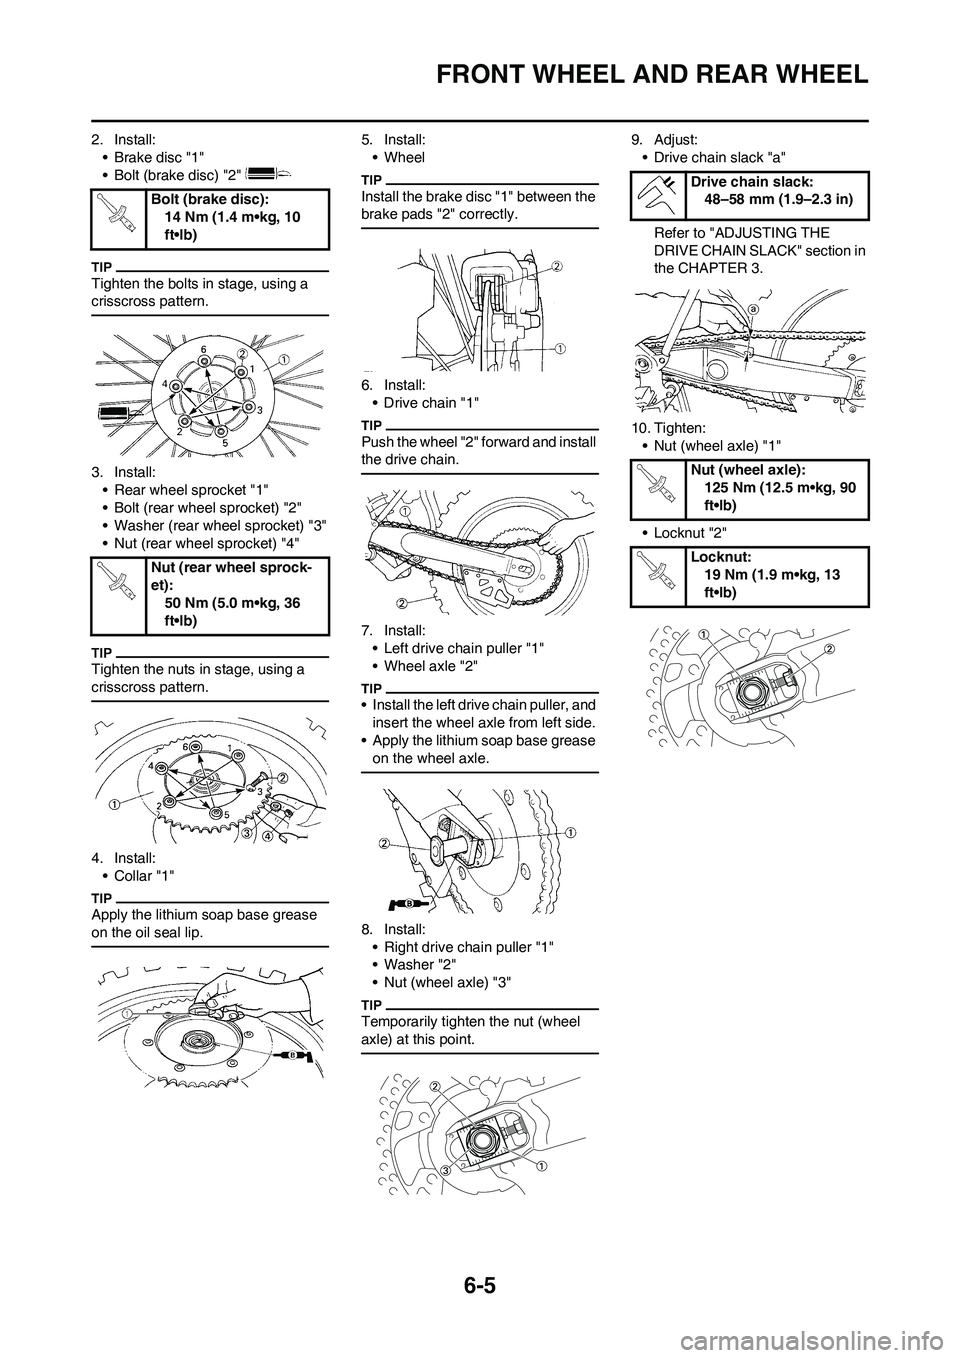
2. Install:
• Brake disc "1"
• Bolt (brake disc) "2"
Tighten the bolts in stage, using a
crisscross pattern.
3. Install:
• Rear wheel sprocket "1"
• Bolt (rear wheel sprocket) "2"
• Washer (rear wheel sprocket) "3"
• Nut (rear wheel sprocket) "4"
Tighten the nuts in stage, using a
crisscross pattern.
4. Install:
•Collar "1"
Apply the lithium soap base grease
on the oil seal lip.
5. Install:
• Wheel
Install the brake disc "1" between the
brake pads "2" correctly.
6. Install:
• Drive chain "1"
Push the wheel "2" forward and install
the drive chain.
7. Install:
• Left drive chain puller "1"
• Wheel axle "2"
• Install the left drive chain puller, and
insert the wheel axle from left side.
• Apply the lithium soap base grease
on the wheel axle.
8. Install:
• Right drive chain puller "1"
• Washer "2"
• Nut (wheel axle) "3"
Temporarily tighten the nut (wheel
axle) at this point.
9. Adjust:
• Drive chain slack "a"
Refer to "ADJUSTING THE
DRIVE CHAIN SLACK" section in
the CHAPTER 3.
10. Tighten:
• Nut (wheel axle) "1"
• Locknut "2" Bolt (brake disc):
14 Nm (1.4 m•kg, 10
ft•lb)
Nut (rear wheel sprock-
et):
50 Nm (5.0 m•kg, 36
ft•lb)
Drive chain slack:
48–58 mm (1.9–2.3 in)
Nut (wheel axle):
125 Nm (12.5 m•kg, 90
ft•lb)
Locknut:
19 Nm (1.9 m•kg, 13
ft•lb)
Page 176 of 232
6-7
FRONT BRAKE AND REAR BRAKE
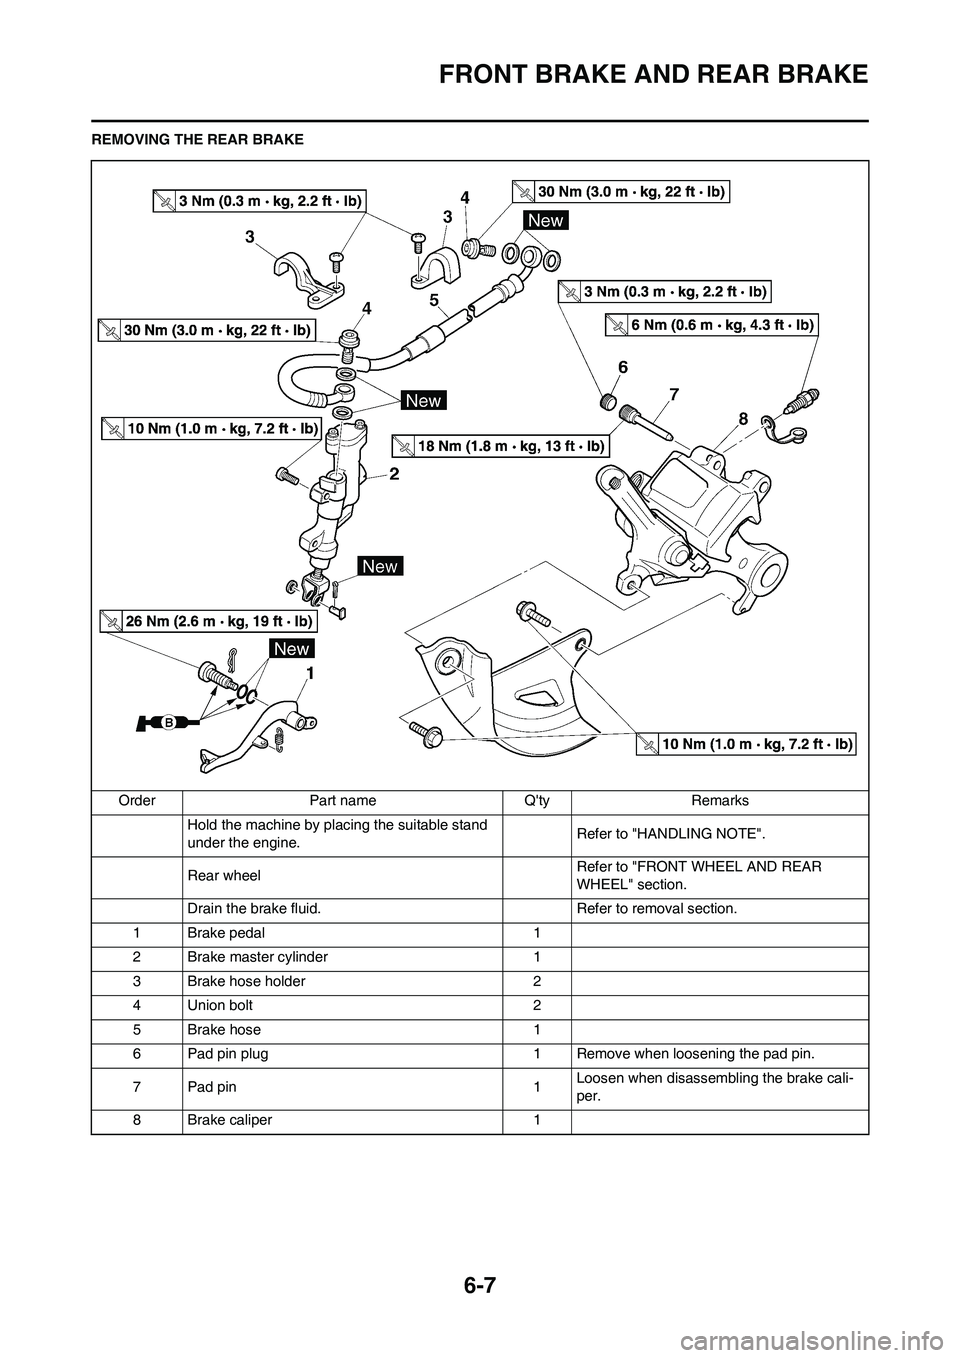
REMOVING THE REAR BRAKE
Order Part name Q'ty Remarks
Hold the machine by placing the suitable stand
under the engine.Refer to "HANDLING NOTE".
Rear wheel Refer to "FRONT WHEEL AND REAR
WHEEL" section.
Drain the brake fluid. Refer to removal section.
1 Brake pedal 1
2 Brake master cylinder 1
3 Brake hose holder 2
4 Union bolt 2
5 Brake hose 1
6 Pad pin plug 1 Remove when loosening the pad pin.
7Pad pin 1Loosen when disassembling the brake cali-
per.
8 Brake caliper 1
Page 181 of 232
6-12
FRONT BRAKE AND REAR BRAKE
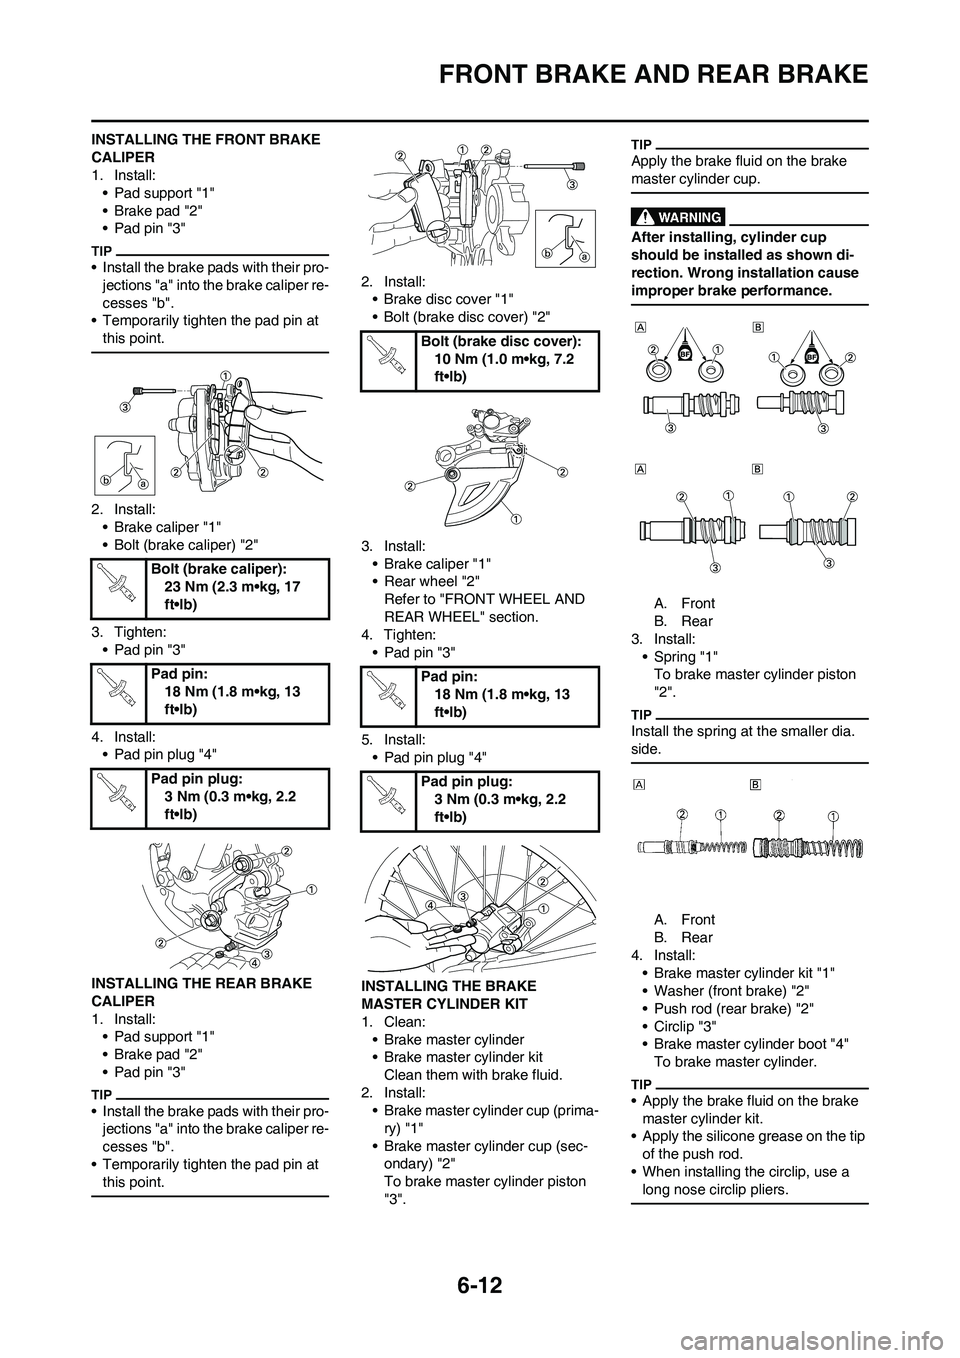
INSTALLING THE FRONT BRAKE
CALIPER
1. Install:
• Pad support "1"
• Brake pad "2"
• Pad pin "3"
• Install the brake pads with their pro-
jections "a" into the brake caliper re-
cesses "b".
• Temporarily tighten the pad pin at
this point.
2. Install:
• Brake caliper "1"
• Bolt (brake caliper) "2"
3. Tighten:
• Pad pin "3"
4. Install:
• Pad pin plug "4"
INSTALLING THE REAR BRAKE
CALIPER
1. Install:
• Pad support "1"
• Brake pad "2"
• Pad pin "3"
• Install the brake pads with their pro-
jections "a" into the brake caliper re-
cesses "b".
• Temporarily tighten the pad pin at
this point.
2. Install:
• Brake disc cover "1"
• Bolt (brake disc cover) "2"
3. Install:
• Brake caliper "1"
• Rear wheel "2"
Refer to "FRONT WHEEL AND
REAR WHEEL" section.
4. Tighten:
• Pad pin "3"
5. Install:
• Pad pin plug "4"
INSTALLING THE BRAKE
MASTER CYLINDER KIT
1. Clean:
• Brake master cylinder
• Brake master cylinder kit
Clean them with brake fluid.
2. Install:
• Brake master cylinder cup (prima-
ry) "1"
• Brake master cylinder cup (sec-
ondary) "2"
To brake master cylinder piston
"3".
Apply the brake fluid on the brake
master cylinder cup.
After installing, cylinder cup
should be installed as shown di-
rection. Wrong installation cause
improper brake performance.
A. Front
B. Rear
3. Install:
• Spring "1"
To brake master cylinder piston
"2".
Install the spring at the smaller dia.
side.
A. Front
B. Rear
4. Install:
• Brake master cylinder kit "1"
• Washer (front brake) "2"
• Push rod (rear brake) "2"
• Circlip "3"
• Brake master cylinder boot "4"
To brake master cylinder.
• Apply the brake fluid on the brake
master cylinder kit.
• Apply the silicone grease on the tip
of the push rod.
• When installing the circlip, use a
long nose circlip pliers.
Bolt (brake caliper):
23 Nm (2.3 m•kg, 17
ft•lb)
Pad pin:
18 Nm (1.8 m•kg, 13
ft•lb)
Pad pin plug:
3 Nm (0.3 m•kg, 2.2
ft•lb)
Bolt (brake disc cover):
10 Nm (1.0 m•kg, 7.2
ft•lb)
Pad pin:
18 Nm (1.8 m•kg, 13
ft•lb)
Pad pin plug:
3 Nm (0.3 m•kg, 2.2
ft•lb)
Page 185 of 232
6-16
FRONT FORK
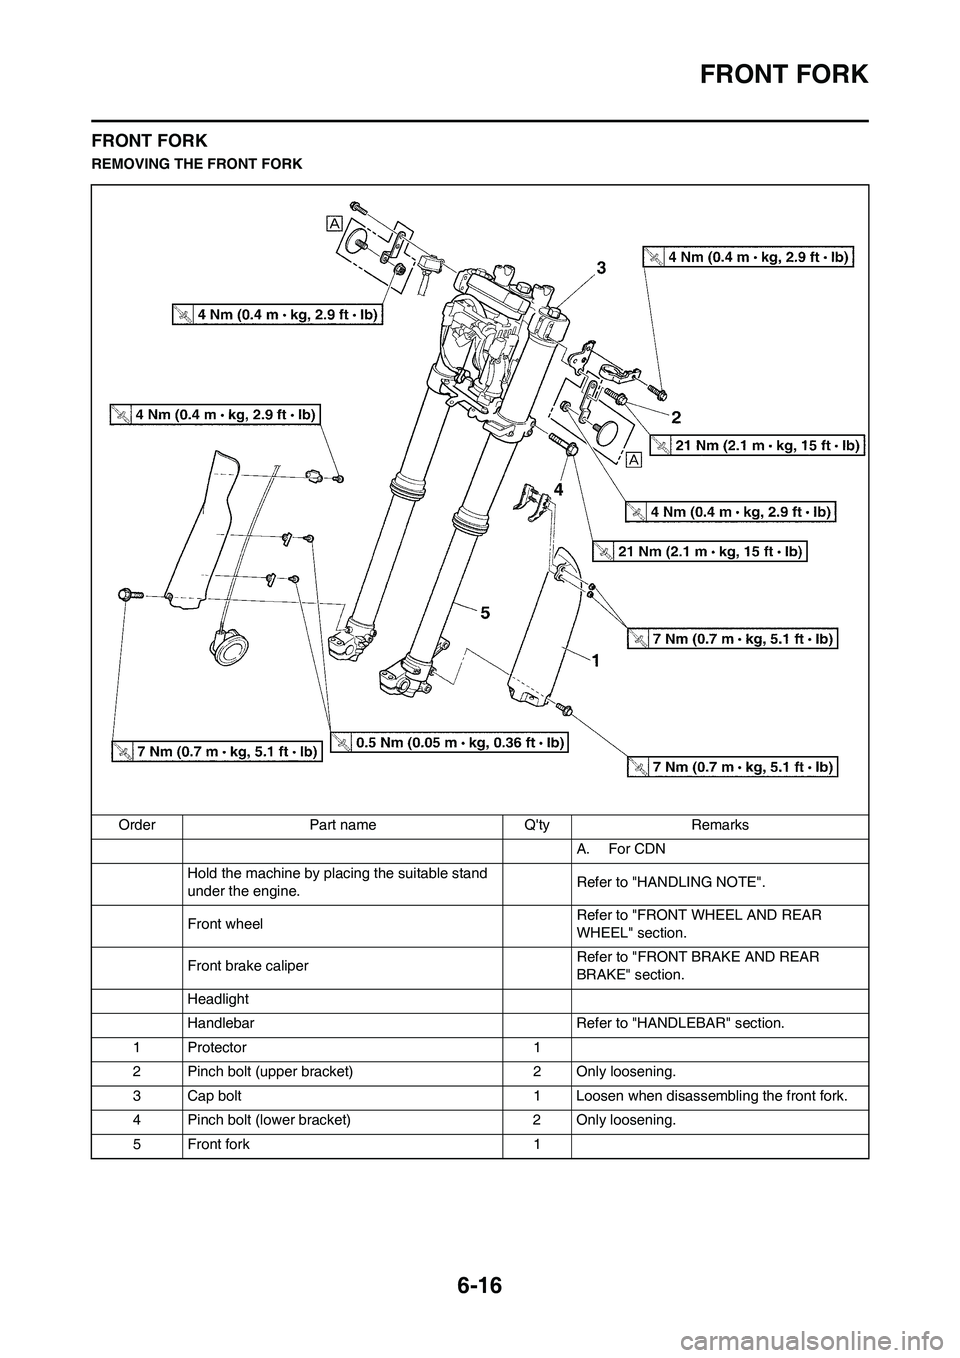
FRONT FORK
REMOVING THE FRONT FORK
Order Part name Q'ty Remarks
A. For CDN
Hold the machine by placing the suitable stand
under the engine.Refer to "HANDLING NOTE".
Front wheel Refer to "FRONT WHEEL AND REAR
WHEEL" section.
Front brake caliper Refer to "FRONT BRAKE AND REAR
BRAKE" section.
Headlight
Handlebar Refer to "HANDLEBAR" section.
1 Protector 1
2 Pinch bolt (upper bracket) 2 Only loosening.
3 Cap bolt 1 Loosen when disassembling the front fork.
4 Pinch bolt (lower bracket) 2 Only loosening.
5 Front fork 1
Page 230 of 232
7-21
SIGNALING SYSTEM
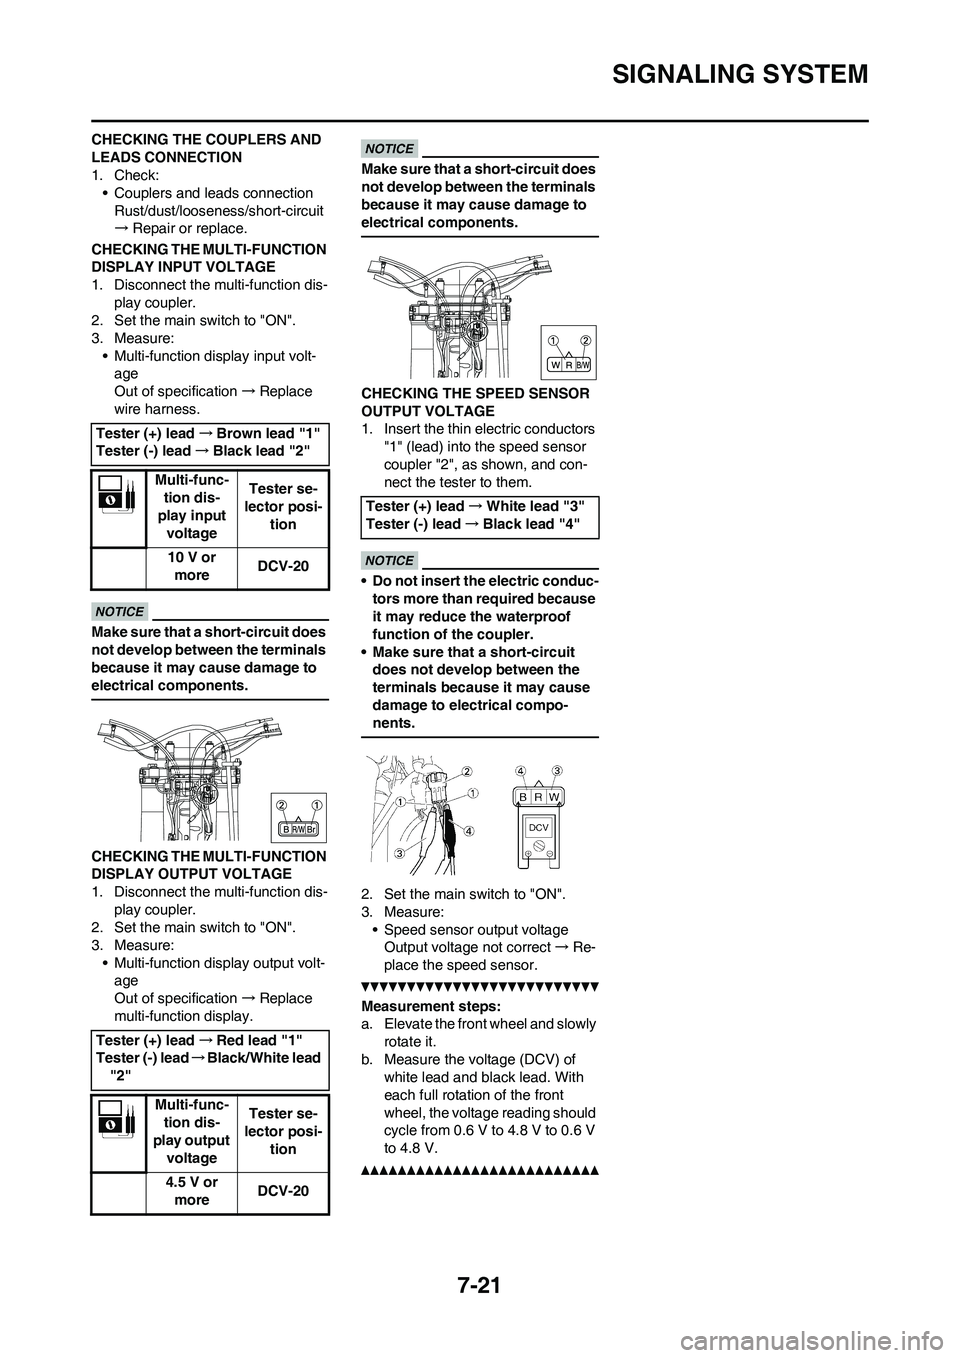
CHECKING THE COUPLERS AND
LEADS CONNECTION
1. Check:
• Couplers and leads connection
Rust/dust/looseness/short-circuit
→Repair or replace.
CHECKING THE MULTI-FUNCTION
DISPLAY INPUT VOLTAGE
1. Disconnect the multi-function dis-
play coupler.
2. Set the main switch to "ON".
3. Measure:
• Multi-function display input volt-
age
Out of specification→Replace
wire harness.
Make sure that a short-circuit does
not develop between the terminals
because it may cause damage to
electrical components.
CHECKING THE MULTI-FUNCTION
DISPLAY OUTPUT VOLTAGE
1. Disconnect the multi-function dis-
play coupler.
2. Set the main switch to "ON".
3. Measure:
• Multi-function display output volt-
age
Out of specification→Replace
multi-function display.
Make sure that a short-circuit does
not develop between the terminals
because it may cause damage to
electrical components.
CHECKING THE SPEED SENSOR
OUTPUT VOLTAGE
1. Insert the thin electric conductors
"1" (lead) into the speed sensor
coupler "2", as shown, and con-
nect the tester to them.
• Do not insert the electric conduc-
tors more than required because
it may reduce the waterproof
function of the coupler.
• Make sure that a short-circuit
does not develop between the
terminals because it may cause
damage to electrical compo-
nents.
2. Set the main switch to "ON".
3. Measure:
• Speed sensor output voltage
Output voltage not correct→Re-
place the speed sensor.
Measurement steps:
a. Elevate the front wheel and slowly
rotate it.
b. Measure the voltage (DCV) of
white lead and black lead. With
each full rotation of the front
wheel, the voltage reading should
cycle from 0.6 V to 4.8 V to 0.6 V
to 4.8 V.
Tester (+) lead→Brown lead "1"
Tester (-) lead→Black lead "2"
Multi-func-
tion dis-
play input
voltageTester se-
lector posi-
tion
10 V or
moreDCV-20
Tester (+) lead→Red lead "1"
Tester (-) lead→Black/White lead
"2"
Multi-func-
tion dis-
play output
voltageTester se-
lector posi-
tion
4.5 V or
moreDCV-20
Tester (+) lead→White lead "3"
Tester (-) lead→Black lead "4"