engine YAMAHA WR 250F 2012 Owners Manual
[x] Cancel search | Manufacturer: YAMAHA, Model Year: 2012, Model line: WR 250F, Model: YAMAHA WR 250F 2012Pages: 232, PDF Size: 13.32 MB
Page 211 of 232
7-2
ELECTRICAL COMPONENTS AND WIRING DIAGRAM
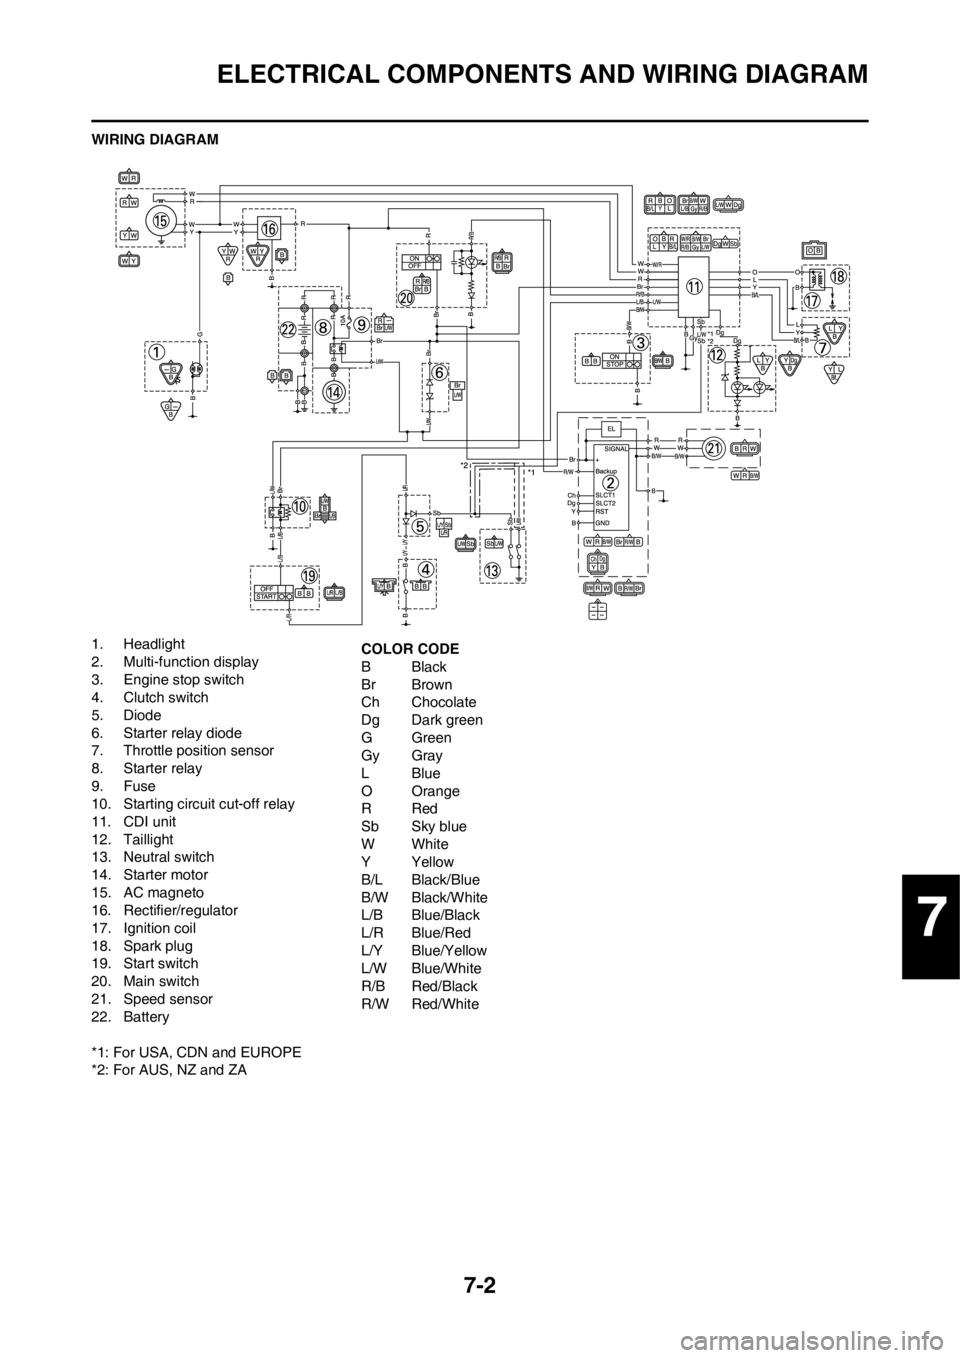
WIRING DIAGRAM
1. Headlight
2. Multi-function display
3. Engine stop switch
4. Clutch switch
5. Diode
6. Starter relay diode
7. Throttle position sensor
8. Starter relay
9. Fuse
10. Starting circuit cut-off relay
11. CDI unit
12. Taillight
13. Neutral switch
14. Starter motor
15. AC magneto
16. Rectifier/regulator
17. Ignition coil
18. Spark plug
19. Start switch
20. Main switch
21. Speed sensor
22. Battery
*1: For USA, CDN and EUROPE
*2: For AUS, NZ and ZACOLOR CODE
BBlack
Br Brown
Ch Chocolate
Dg Dark green
GGreen
Gy Gray
LBlue
O Orange
RRed
Sb Sky blue
WWhite
YYellow
B/L Black/Blue
B/W Black/White
L/B Blue/Black
L/R Blue/Red
L/Y Blue/Yellow
L/W Blue/White
R/B Red/Black
R/W Red/White
7
Page 212 of 232
7-3
IGNITION SYSTEM
IGNITION SYSTEM
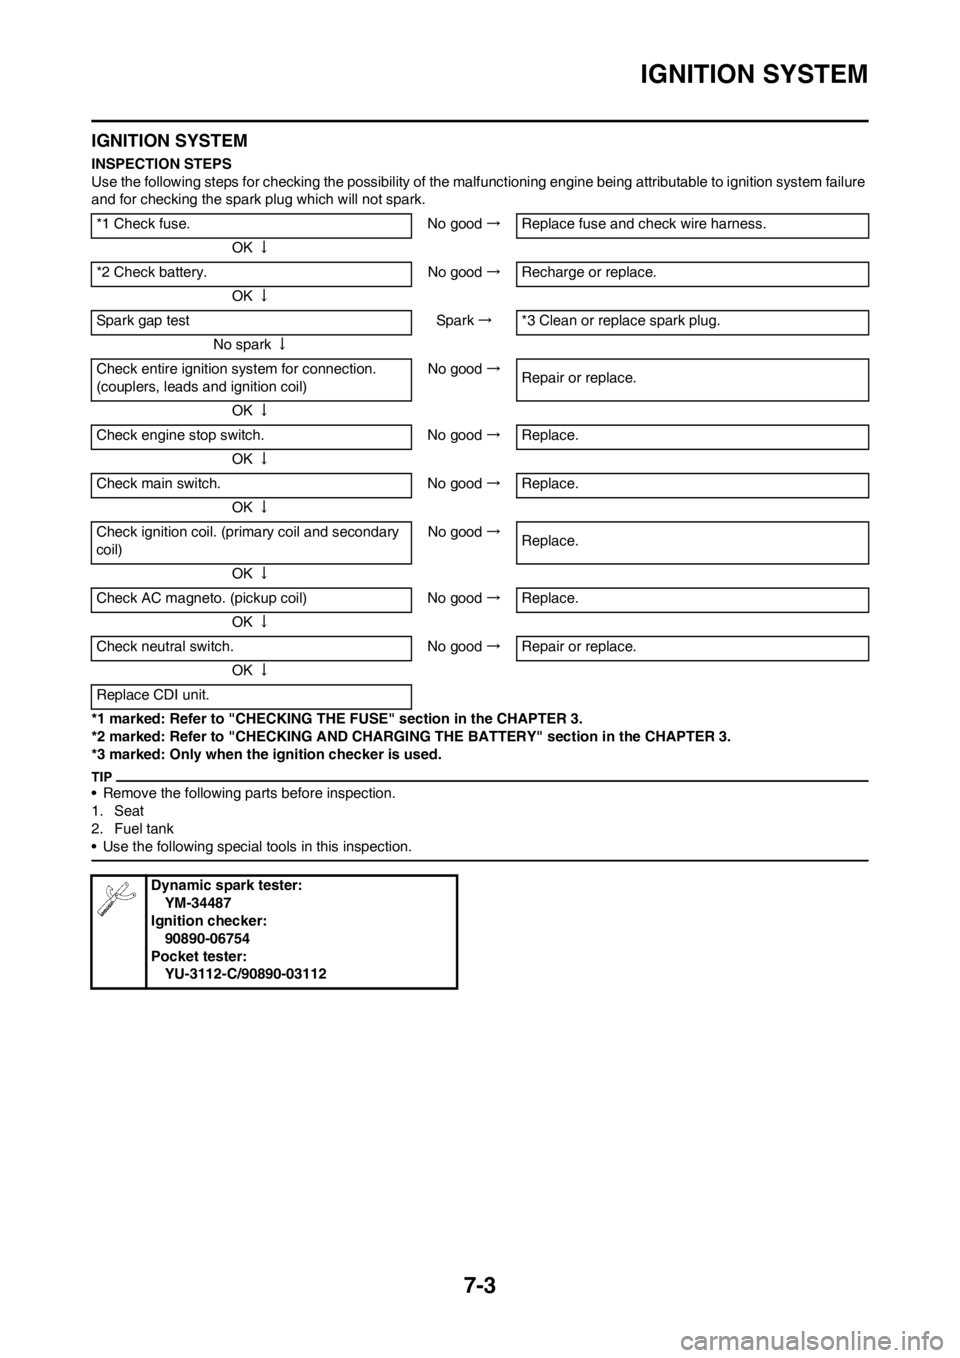
INSPECTION STEPS
Use the following steps for checking the possibility of the malfunctioning engine being attributable to ignition system failure
and for checking the spark plug which will not spark.
*1 marked: Refer to "CHECKING THE FUSE" section in the CHAPTER 3.
*2 marked: Refer to "CHECKING AND CHARGING THE BATTERY" section in the CHAPTER 3.
*3 marked: Only when the ignition checker is used.
• Remove the following parts before inspection.
1. Seat
2. Fuel tank
• Use the following special tools in this inspection.
*1 Check fuse. No good→Replace fuse and check wire harness.
OK↓
*2 Check battery. No good→Recharge or replace.
OK↓
Spark gap test Spark→*3 Clean or replace spark plug.
No spark↓
Check entire ignition system for connection.
(couplers, leads and ignition coil)No good→
Repair or replace.
OK↓
Check engine stop switch. No good→Replace.
OK↓
Check main switch. No good→Replace.
OK↓
Check ignition coil. (primary coil and secondary
coil)No good→
Replace.
OK↓
Check AC magneto. (pickup coil) No good→Replace.
OK↓
Check neutral switch. No good→Repair or replace.
OK↓
Replace CDI unit.
Dynamic spark tester:
YM-34487
Ignition checker:
90890-06754
Pocket tester:
YU-3112-C/90890-03112
Page 213 of 232
7-4
IGNITION SYSTEM
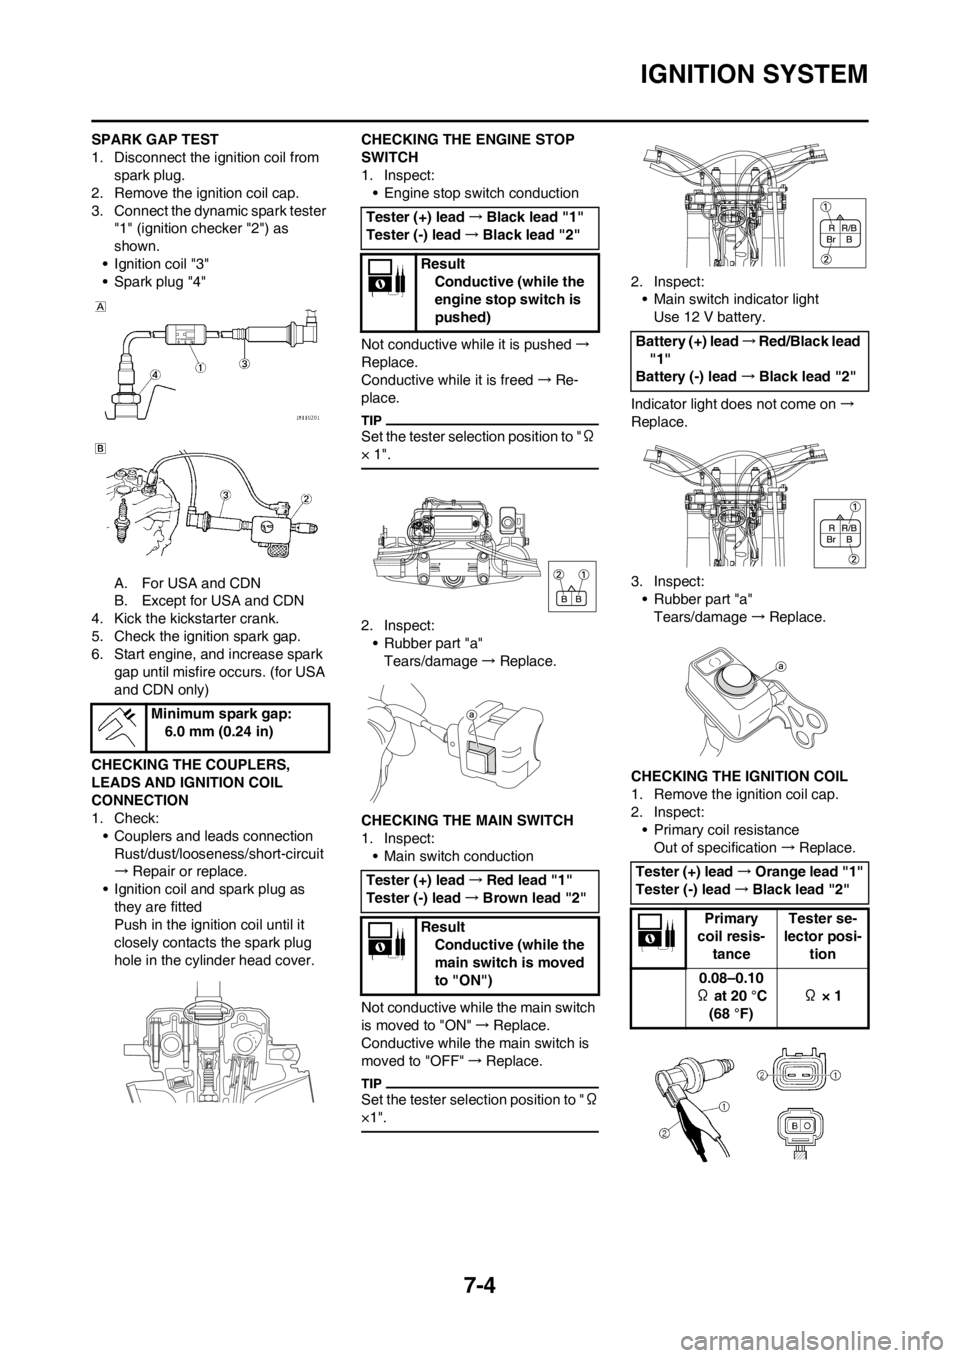
SPARK GAP TEST
1. Disconnect the ignition coil from
spark plug.
2. Remove the ignition coil cap.
3. Connect the dynamic spark tester
"1" (ignition checker "2") as
shown.
• Ignition coil "3"
• Spark plug "4"
A. For USA and CDN
B. Except for USA and CDN
4. Kick the kickstarter crank.
5. Check the ignition spark gap.
6. Start engine, and increase spark
gap until misfire occurs. (for USA
and CDN only)
CHECKING THE COUPLERS,
LEADS AND IGNITION COIL
CONNECTION
1. Check:
• Couplers and leads connection
Rust/dust/looseness/short-circuit
→Repair or replace.
• Ignition coil and spark plug as
they are fitted
Push in the ignition coil until it
closely contacts the spark plug
hole in the cylinder head cover.CHECKING THE ENGINE STOP
SWITCH
1. Inspect:
• Engine stop switch conduction
Not conductive while it is pushed→
Replace.
Conductive while it is freed→Re-
place.
Set the tester selection position to "Ω
× 1".
2. Inspect:
• Rubber part "a"
Tears/damage→ Replace.
CHECKING THE MAIN SWITCH
1. Inspect:
• Main switch conduction
Not conductive while the main switch
is moved to "ON"→Replace.
Conductive while the main switch is
moved to "OFF"→Replace.
Set the tester selection position to "Ω
×1".
2. Inspect:
• Main switch indicator light
Use 12 V battery.
Indicator light does not come on→
Replace.
3. Inspect:
• Rubber part "a"
Tears/damage→Replace.
CHECKING THE IGNITION COIL
1. Remove the ignition coil cap.
2. Inspect:
• Primary coil resistance
Out of specification→Replace. Minimum spark gap:
6.0 mm (0.24 in)
Tester (+) lead→Black lead "1"
Tester (-) lead→Black lead "2"
Result
Conductive (while the
engine stop switch is
pushed)
Tester (+) lead→Red lead "1"
Tester (-) lead→Brown lead "2"
Result
Conductive (while the
main switch is moved
to "ON")
Battery (+) lead→Red/Black lead
"1"
Battery (-) lead→Black lead "2"
Tester (+) lead→Orange lead "1"
Tester (-) lead→Black lead "2"
Primary
coil resis-
tanceTester se-
lector posi-
tion
0.08–0.10
Ω at 20 °C
(68 °F) Ω × 1
Page 214 of 232
7-5
ELECTRIC STARTING SYSTEM
3. Inspect:
• Secondary coil resistance
Out of specification→Replace.
4. Inspect:
• Sealed portion of ignition coil "a"
• Spark plug terminal pin "b"
• Threaded portion of spark plug "c"
Wear →Replace.
CHECKING THE AC MAGNETO
1. Inspect:
• Pickup coil resistance
Out of specification→Replace.CHECKING THE NEUTRAL
SWITCH
1. Inspect:
• Neutral switch conduction
Not conductive while it is in neutral→
Replace.
Conductive while it is engaged→Re-
place.
Set the tester selection position to "Ω
× 1".
CHECKING THE CDI UNIT
Check all electrical components. If no
fault is found, replace the CDI unit.
Then check the electrical compo-
nents again.
ELECTRIC STARTING
SYSTEM
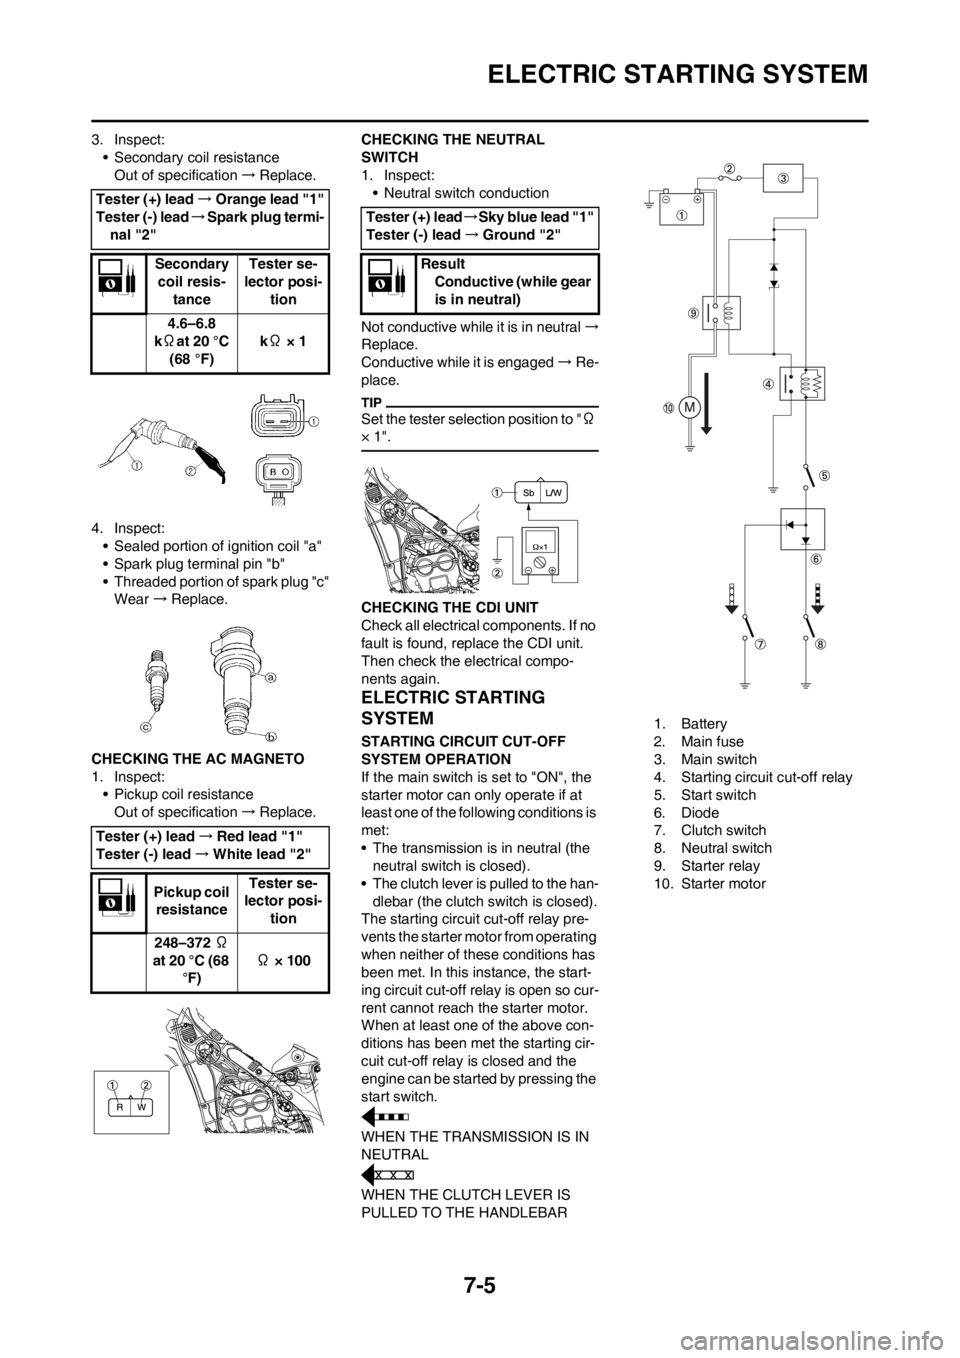
STARTING CIRCUIT CUT-OFF
SYSTEM OPERATION
If the main switch is set to "ON", the
starter motor can only operate if at
least one of the following conditions is
met:
• The transmission is in neutral (the
neutral switch is closed).
• The clutch lever is pulled to the han-
dlebar (the clutch switch is closed).
The starting circuit cut-off relay pre-
vents the starter motor from operating
when neither of these conditions has
been met. In this instance, the start-
ing circuit cut-off relay is open so cur-
rent cannot reach the starter motor.
When at least one of the above con-
ditions has been met the starting cir-
cuit cut-off relay is closed and the
engine can be started by pressing the
start switch.
WHEN THE TRANSMISSION IS IN
NEUTRAL
WHEN THE CLUTCH LEVER IS
PULLED TO THE HANDLEBAR1. Battery
2. Main fuse
3. Main switch
4. Starting circuit cut-off relay
5. Start switch
6. Diode
7. Clutch switch
8. Neutral switch
9. Starter relay
10. Starter motor Tester (+) lead→Orange lead "1"
Tester (-) lead→Spark plug termi-
nal "2"
Secondary
coil resis-
tanceTester se-
lector posi-
tion
4.6–6.8
kΩat 20 °C
(68 °F) kΩ × 1
Tester (+) lead→Red lead "1"
Tester (-) lead→White lead "2"
Pickup coil
resistanceTester se-
lector posi-
tion
248–372 Ω
at 20 °C (68
°F) Ω × 100
Tester (+) lead→Sky blue lead "1"
Tester (-) lead→Ground "2"
Result
Conductive (while gear
is in neutral)
Page 223 of 232

7-14
CHARGING SYSTEM
CHECKING THE COUPLERS AND
LEADS CONNECTION
1. Check:
• Couplers and leads connection
Rust/dust/looseness/short-circuit
→Repair or replace.
CHECKING THE CHARGING
VOLTAGE
1. Start the engine.
2. Inspect:
• Charging voltage
Out of specification→If no failure
is found in checking the source
coil resistance, replace the rectifi-
er/regulator.
3. Inspect:
• Charging coil resistance
Out of specification→Replace. Tester (+) lead→Red lead "1"
Tester (-) lead→Black lead "2"
Charging
voltageTester se-
lector posi-
tion
14.0–15.0 V
at 5,000 r/
minDCV-20
Tester (+) lead→White lead "1"
Tester (-) lead→Ground "2"
Charging
coil resis-
tanceTester se-
lector posi-
tion
0.288–0.432
Ω at 20 °C
(68 °F)Ω × 1
Page 225 of 232
7-16
THROTTLE POSITION SENSOR SYSTEM
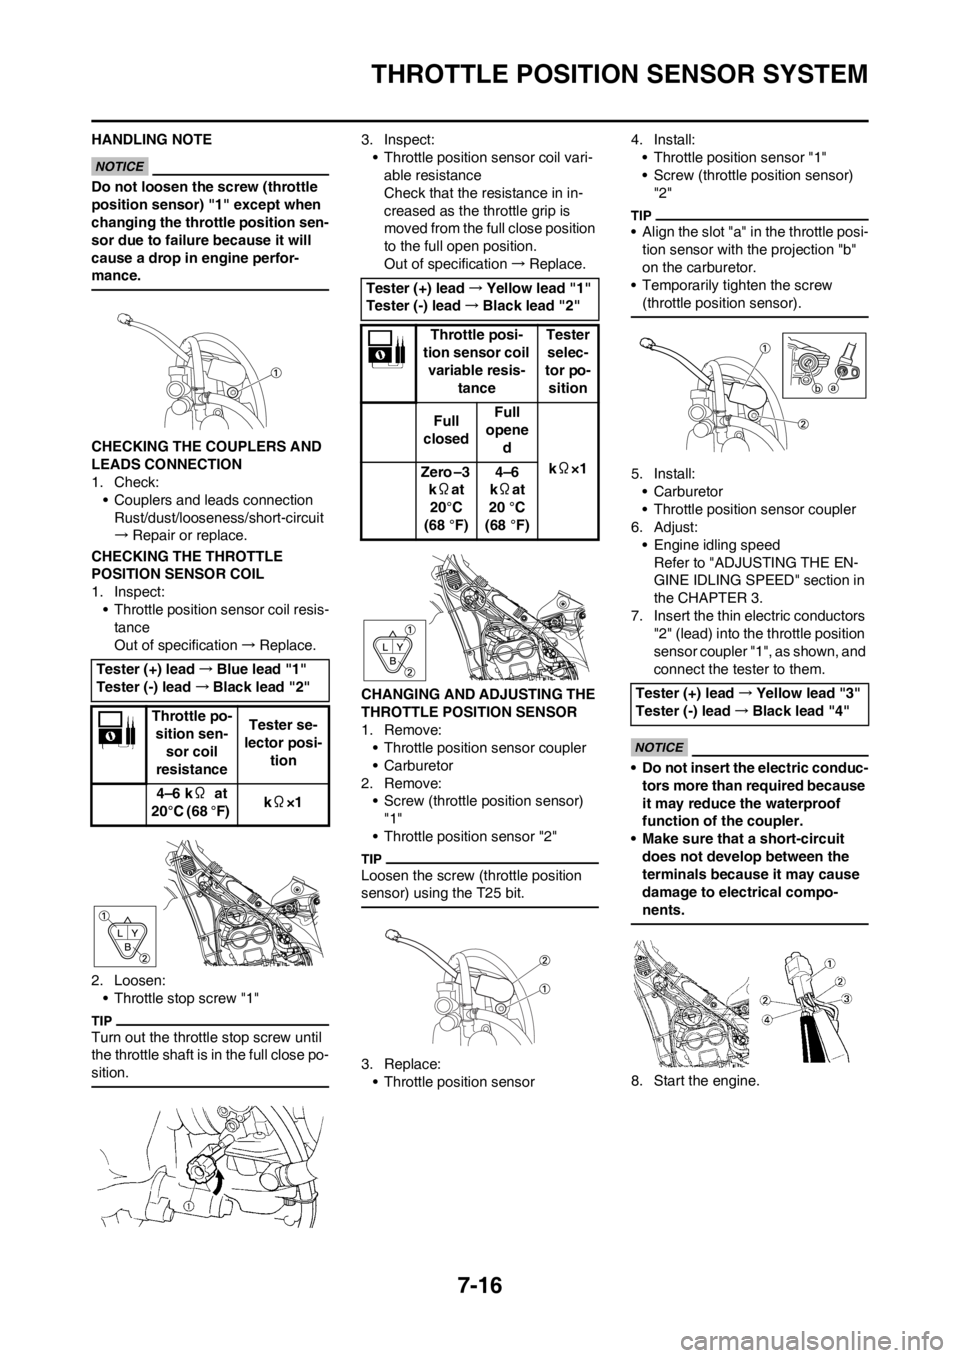
HANDLING NOTE
Do not loosen the screw (throttle
position sensor) "1" except when
changing the throttle position sen-
sor due to failure because it will
cause a drop in engine perfor-
mance.
CHECKING THE COUPLERS AND
LEADS CONNECTION
1. Check:
• Couplers and leads connection
Rust/dust/looseness/short-circuit
→Repair or replace.
CHECKING THE THROTTLE
POSITION SENSOR COIL
1. Inspect:
• Throttle position sensor coil resis-
tance
Out of specification→Replace.
2. Loosen:
• Throttle stop screw "1"
Turn out the throttle stop screw until
the throttle shaft is in the full close po-
sition.
3. Inspect:
• Throttle position sensor coil vari-
able resistance
Check that the resistance in in-
creased as the throttle grip is
moved from the full close position
to the full open position.
Out of specification→Replace.
CHANGING AND ADJUSTING THE
THROTTLE POSITION SENSOR
1. Remove:
• Throttle position sensor coupler
• Carburetor
2. Remove:
• Screw (throttle position sensor)
"1"
• Throttle position sensor "2"
Loosen the screw (throttle position
sensor) using the T25 bit.
3. Replace:
• Throttle position sensor4. Install:
• Throttle position sensor "1"
• Screw (throttle position sensor)
"2"
• Align the slot "a" in the throttle posi-
tion sensor with the projection "b"
on the carburetor.
• Temporarily tighten the screw
(throttle position sensor).
5. Install:
•Carburetor
• Throttle position sensor coupler
6. Adjust:
• Engine idling speed
Refer to "ADJUSTING THE EN-
GINE IDLING SPEED" section in
the CHAPTER 3.
7. Insert the thin electric conductors
"2" (lead) into the throttle position
sensor coupler "1", as shown, and
connect the tester to them.
• Do not insert the electric conduc-
tors more than required because
it may reduce the waterproof
function of the coupler.
• Make sure that a short-circuit
does not develop between the
terminals because it may cause
damage to electrical compo-
nents.
8. Start the engine. Tester (+) lead→Blue lead "1"
Tester (-) lead→Black lead "2"
Throttle po-
sition sen-
sor coil
resistanceTester se-
lector posi-
tion
4–6 kΩ at
20°C (68 °F) kΩ×1
Tester (+) lead→Yellow lead "1"
Tester (-) lead→Black lead "2"
Throttle posi-
tion sensor coil
variable resis-
tanceTester
selec-
tor po-
sition
Full
closedFull
opene
d
kΩ×1
Zero –3
kΩat
20°C
(68 °F)4–6
kΩat
20 °C
(68 °F)
Tester (+) lead→Yellow lead "3"
Tester (-) lead→Black lead "4"
Page 226 of 232
7-17
THROTTLE POSITION SENSOR SYSTEM
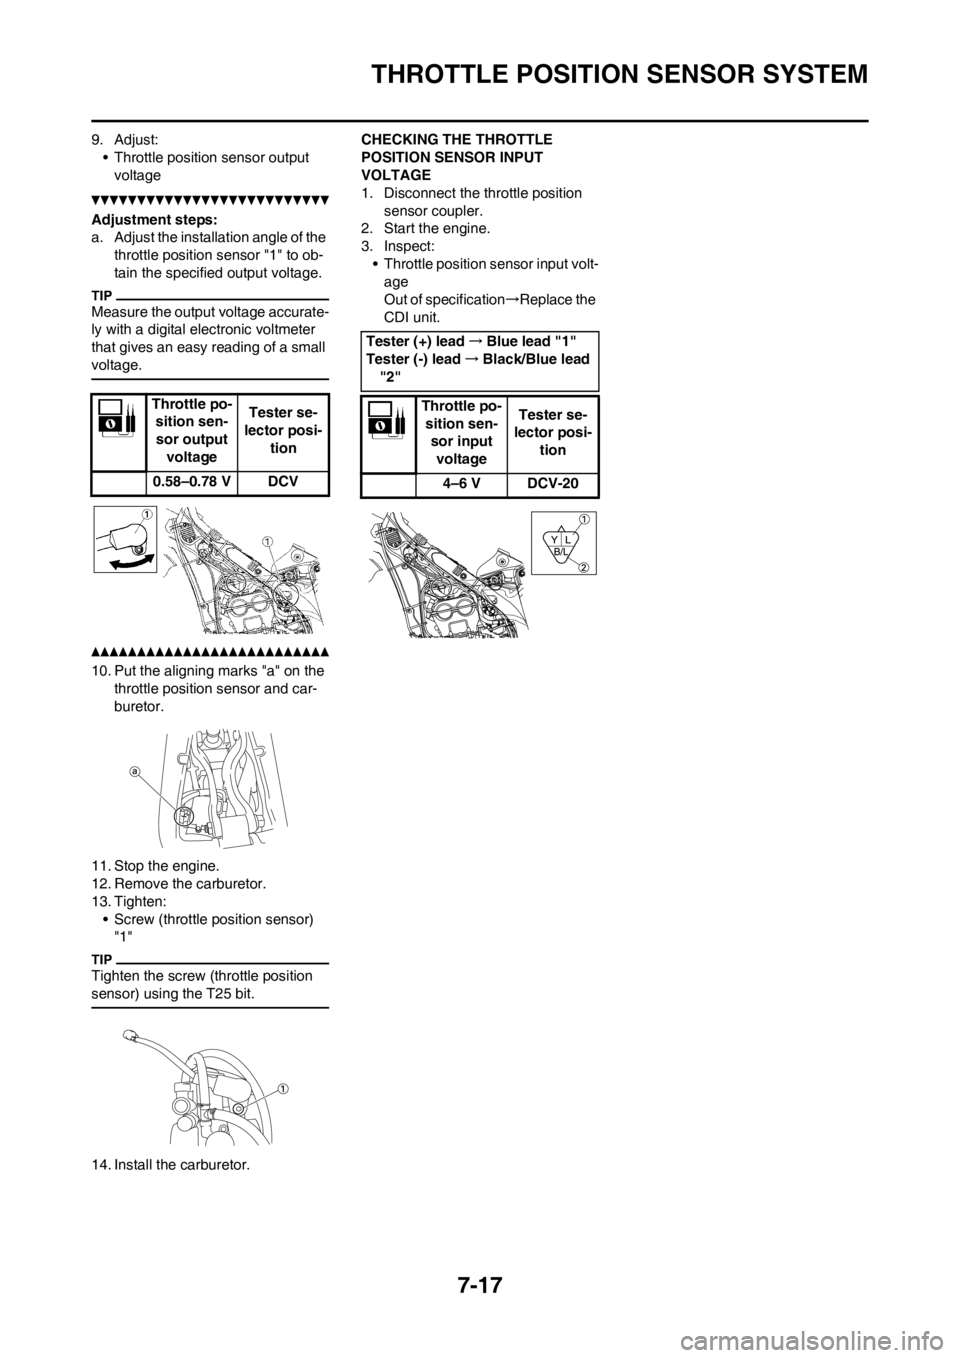
9. Adjust:
• Throttle position sensor output
voltage
Adjustment steps:
a. Adjust the installation angle of the
throttle position sensor "1" to ob-
tain the specified output voltage.
Measure the output voltage accurate-
ly with a digital electronic voltmeter
that gives an easy reading of a small
voltage.
10. Put the aligning marks "a" on the
throttle position sensor and car-
buretor.
11. Stop the engine.
12. Remove the carburetor.
13. Tighten:
• Screw (throttle position sensor)
"1"
Tighten the screw (throttle position
sensor) using the T25 bit.
14. Install the carburetor.CHECKING THE THROTTLE
POSITION SENSOR INPUT
VOLTAGE
1. Disconnect the throttle position
sensor coupler.
2. Start the engine.
3. Inspect:
• Throttle position sensor input volt-
age
Out of specification→Replace the
CDI unit.
Throttle po-
sition sen-
sor output
voltageTester se-
lector posi-
tion
0.58–0.78 V DCV
Tester (+) lead→Blue lead "1"
Tester (-) lead→Black/Blue lead
"2"
Throttle po-
sition sen-
sor input
voltage Tester se-
lector posi-
tion
4–6 V DCV-20
Page 228 of 232
7-19
LIGHTING SYSTEM
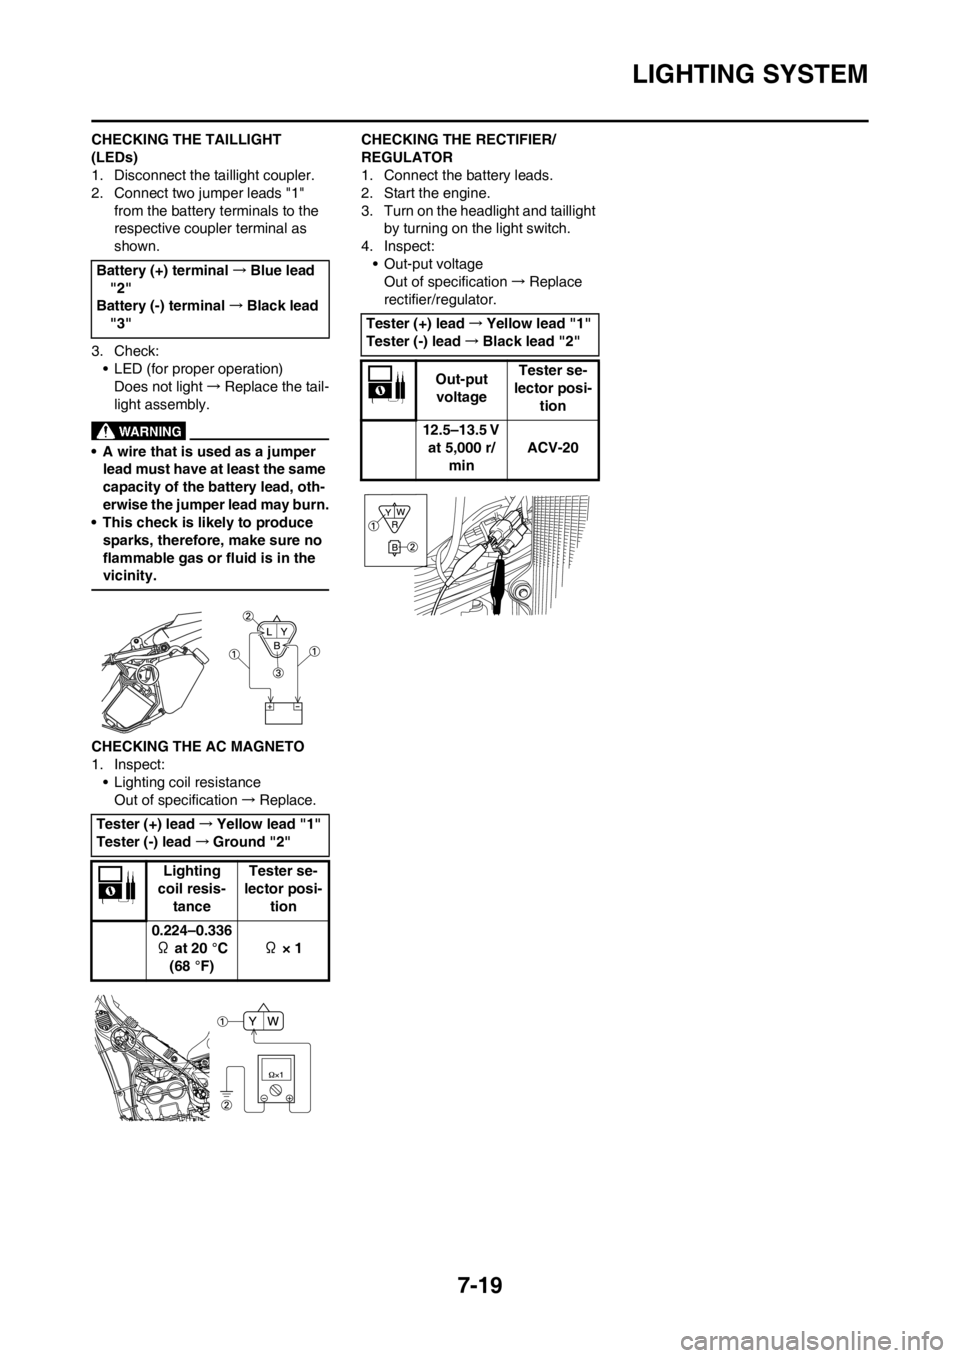
CHECKING THE TAILLIGHT
(LEDs)
1. Disconnect the taillight coupler.
2. Connect two jumper leads "1"
from the battery terminals to the
respective coupler terminal as
shown.
3. Check:
• LED (for proper operation)
Does not light→Replace the tail-
light assembly.
• A wire that is used as a jumper
lead must have at least the same
capacity of the battery lead, oth-
erwise the jumper lead may burn.
• This check is likely to produce
sparks, therefore, make sure no
flammable gas or fluid is in the
vicinity.
CHECKING THE AC MAGNETO
1. Inspect:
• Lighting coil resistance
Out of specification→Replace.CHECKING THE RECTIFIER/
REGULATOR
1. Connect the battery leads.
2. Start the engine.
3. Turn on the headlight and taillight
by turning on the light switch.
4. Inspect:
• Out-put voltage
Out of specification→Replace
rectifier/regulator. Battery (+) terminal→Blue lead
"2"
Battery (-) terminal→Black lead
"3"
Tester (+) lead→Yellow lead "1"
Tester (-) lead→Ground "2"
Lighting
coil resis-
tanceTester se-
lector posi-
tion
0.224–0.336
Ω at 20 °C
(68 °F) Ω × 1
Tester (+) lead→Yellow lead "1"
Tester (-) lead→Black lead "2"
Out-put
voltageTester se-
lector posi-
tion
12.5–13.5 V
at 5,000 r/
minACV-20